low beam Hyundai Getz 2003 Owner's Manual
[x] Cancel search | Manufacturer: HYUNDAI, Model Year: 2003, Model line: Getz, Model: Hyundai Getz 2003Pages: 444, PDF Size: 13.82 MB
Page 15 of 444
YOUR VEHICLE AT A GLANCE
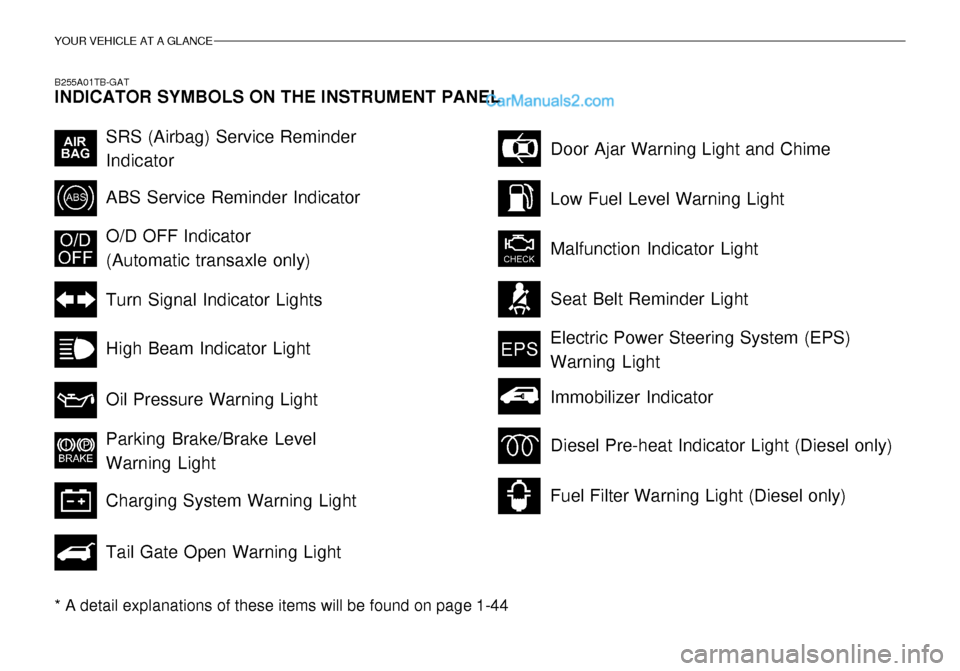
B255A01TB-GAT INDICATOR SYMBOLS ON THE INSTRUMENT PANEL * A detail explanations of these items will be found on page 1-44
SRS (Airbag) Service Reminder Indicator ABS Service Reminder Indicator Turn Signal Indicator Lights High Beam Indicator Light Oil Pressure Warning Light Parking Brake/Brake Level Warning Light Charging System Warning Light Tail Gate Open Warning LightDoor Ajar Warning Light and Chime
Low Fuel Level Warning Light Malfunction Indicator Light Seat Belt Reminder Light
O/D OFF Indicator (Automatic transaxle only)
Electric Power Steering System (EPS)Warning Light
Diesel Pre-heat Indicator Light (Diesel only)
Fuel Filter Warning Light (Diesel only)
Immobilizer Indicator
Page 56 of 444
FEATURES OF YOUR HYUNDAI 1- 41
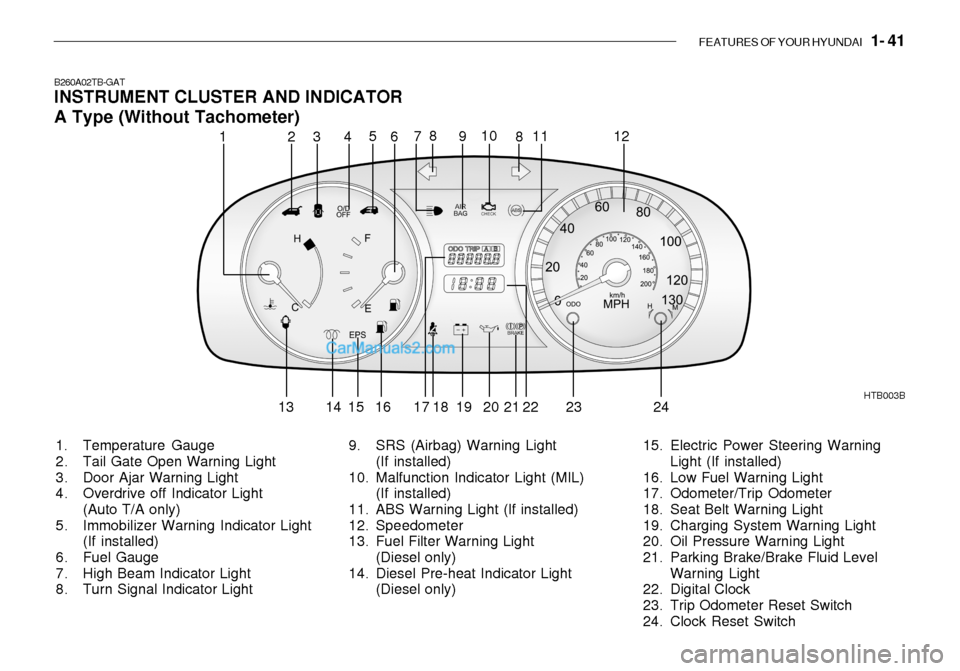
B260A02TB-GAT INSTRUMENT CLUSTER AND INDICATOR A Type (Without Tachometer)
1. Temperature Gauge
2. Tail Gate Open Warning Light
3. Door Ajar Warning Light
4. Overdrive off Indicator Light (Auto T/A only)
5. Immobilizer Warning Indicator Light (If installed)
6. Fuel Gauge
7. High Beam Indicator Light
8. Turn Signal Indicator Light HTB003B
9. SRS (Airbag) Warning Light (If installed)
10. Malfunction Indicator Light (MIL)
(If installed)
11. ABS Warning Light (If installed)
12. Speedometer
13. Fuel Filter Warning Light (Diesel only)
14. Diesel Pre-heat Indicator Light
(Diesel only) 15. Electric Power Steering Warning
Light (If installed)
16. Low Fuel Warning Light
17. Odometer/Trip Odometer
18. Seat Belt Warning Light
19. Charging System Warning Light
20. Oil Pressure Warning Light
21. Parking Brake/Brake Fluid Level Warning Light
22. Digital Clock
23. Trip Odometer Reset Switch
24. Clock Reset Switch
12 3
45
6 78
910
11
8 12
13 14 15 16 17 18 19 20 21 22 23 24
Page 57 of 444
1- 42 FEATURES OF YOUR HYUNDAI
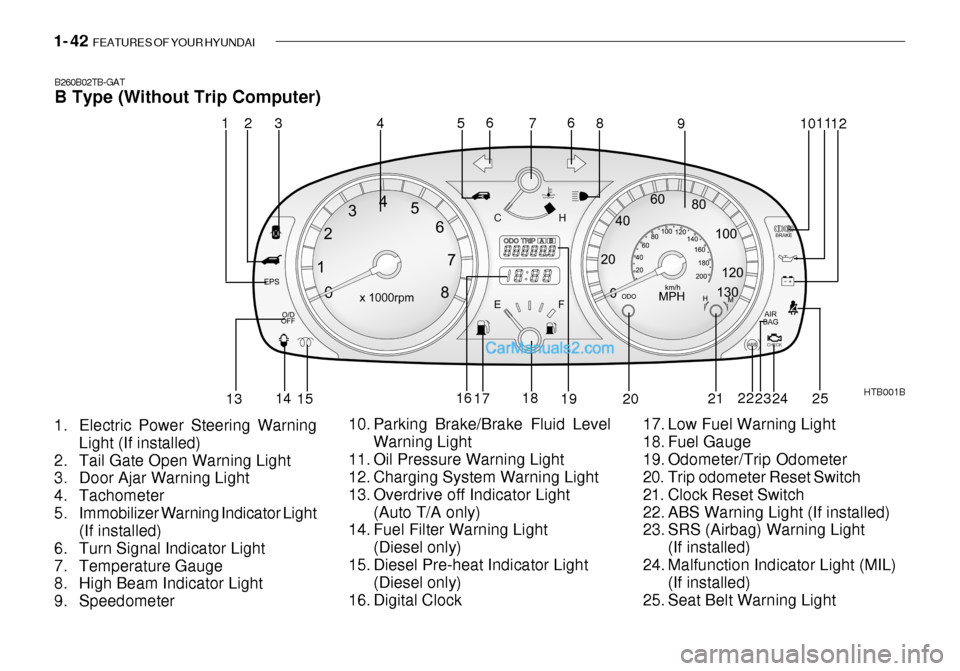
B260B02TB-GAT B Type (Without Trip Computer)
1. Electric Power Steering Warning Light (If installed)
2. Tail Gate Open Warning Light
3. Door Ajar Warning Light
4. Tachometer
5. Immobilizer Warning Indicator Light (If installed)
6. Turn Signal Indicator Light
7. Temperature Gauge
8. High Beam Indicator Light
9. Speedometer HTB001B
10. Parking Brake/Brake Fluid Level Warning Light
11. Oil Pressure Warning Light
12. Charging System Warning Light
13. Overdrive off Indicator Light (Auto T/A only)
14. Fuel Filter Warning Light
(Diesel only)
15. Diesel Pre-heat Indicator Light (Diesel only)
16. Digital Clock 17. Low Fuel Warning Light
18. Fuel Gauge
19. Odometer/Trip Odometer
20. Trip odometer Reset Switch
21. Clock Reset Switch
22. ABS Warning Light (If installed)
23. SRS (Airbag) Warning Light
(If installed)
24. Malfunction Indicator Light (MIL) (If installed)
25. Seat Belt Warning Light
1
2
453 6
7 8
9 1011
12
13 14
15 16
17 18
19 20 2122
23 24
6
25
Page 58 of 444
FEATURES OF YOUR HYUNDAI 1- 43
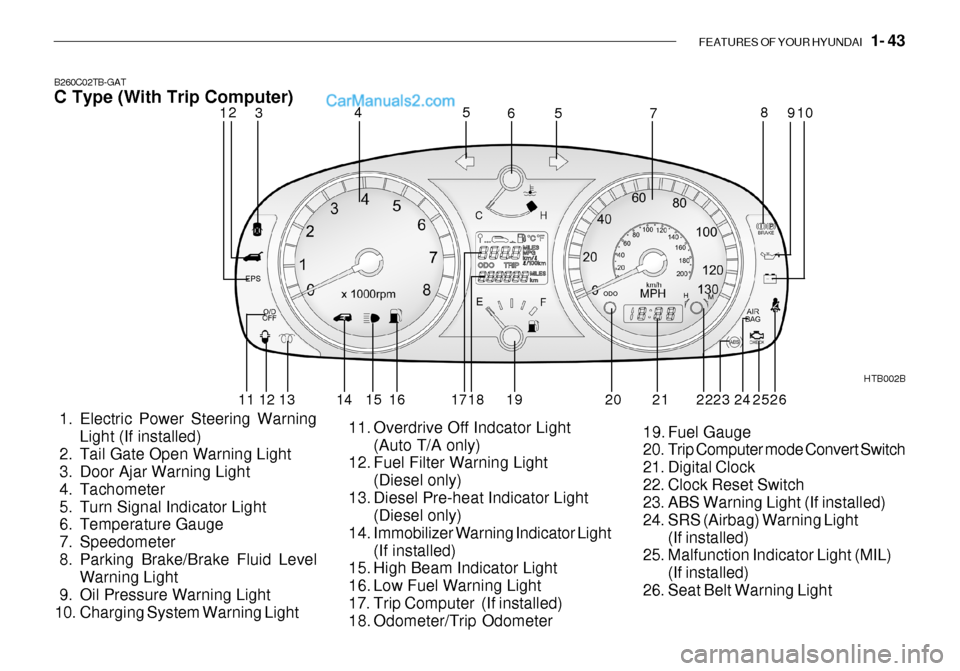
B260C02TB-GAT C Type (With Trip Computer)
1. Electric Power Steering Warning Light (If installed)
2. Tail Gate Open Warning Light
3. Door Ajar Warning Light
4. Tachometer
5. Turn Signal Indicator Light
6. Temperature Gauge
7. Speedometer
8. Parking Brake/Brake Fluid Level Warning Light
9. Oil Pressure Warning Light
10. Charging System Warning Light HTB002B
11. Overdrive Off Indcator Light (Auto T/A only)
12. Fuel Filter Warning Light
(Diesel only)
13. Diesel Pre-heat Indicator Light (Diesel only)
14. Immobilizer Warning Indicator Light (If installed)
15. High Beam Indicator Light
16. Low Fuel Warning Light
17. Trip Computer (If installed)
18. Odometer/Trip Odometer 19. Fuel Gauge
20. Trip Computer mode Convert Switch
21. Digital Clock
22. Clock Reset Switch
23. ABS Warning Light (If installed)
24. SRS (Airbag) Warning Light
(If installed)
25. Malfunction Indicator Light (MIL)
(If installed)
26. Seat Belt Warning Light
12 3 4
5
5
67 8
9
10
11 12 13 14 15 16 17 18 19 20 23 24
252221 26
Page 60 of 444
FEATURES OF YOUR HYUNDAI 1- 45
B260F01A-AAT
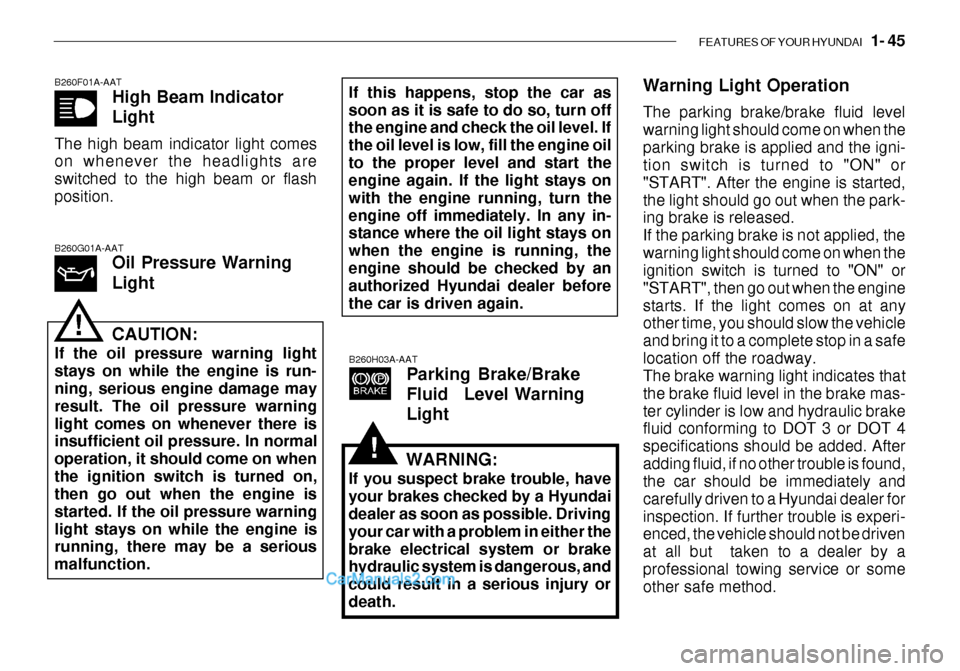
High Beam Indicator Light
The high beam indicator light comes on whenever the headlights are switched to the high beam or flashposition.
B260H03A-AATParking Brake/Brake
Fluid Level WarningLight
B260G01A-AATOil Pressure Warning Light
!CAUTION:
If the oil pressure warning light stays on while the engine is run- ning, serious engine damage may result. The oil pressure warninglight comes on whenever there is insufficient oil pressure. In normal operation, it should come on whenthe ignition switch is turned on, then go out when the engine is started. If the oil pressure warninglight stays on while the engine is running, there may be a serious malfunction. If this happens, stop the car assoon as it is safe to do so, turn off the engine and check the oil level. If the oil level is low, fill the engine oilto the proper level and start the engine again. If the light stays on with the engine running, turn theengine off immediately. In any in- stance where the oil light stays on when the engine is running, theengine should be checked by an authorized Hyundai dealer before the car is driven again.
Warning Light Operation The parking brake/brake fluid level warning light should come on when theparking brake is applied and the igni- tion switch is turned to "ON" or "START". After the engine is started,the light should go out when the park- ing brake is released. If the parking brake is not applied, thewarning light should come on when the ignition switch is turned to "ON" or "START", then go out when the enginestarts. If the light comes on at any other time, you should slow the vehicle and bring it to a complete stop in a safelocation off the roadway. The brake warning light indicates that the brake fluid level in the brake mas-ter cylinder is low and hydraulic brake fluid conforming to DOT 3 or DOT 4 specifications should be added. Afteradding fluid, if no other trouble is found, the car should be immediately and carefully driven to a Hyundai dealer forinspection. If further trouble is experi- enced, the vehicle should not be driven at all but taken to a dealer by aprofessional towing service or some other safe method.
WARNING:
If you suspect brake trouble, have your brakes checked by a Hyundai dealer as soon as possible. Driving your car with a problem in either thebrake electrical system or brake hydraulic system is dangerous, and could result in a serious injury ordeath.
!
Page 69 of 444

1- 54 FEATURES OF YOUR HYUNDAI
HTB017 B350A01A-AAT WINDSHIELD WIPER AND WASHER SWITCH
B340E01A-AAT Headlight Flasher To flash the headlights, pull the switch lever toward you, then release it. The headlights can be flashed even thoughthe headlight switch is in the "OFF" position. The windshield wiper switch has threepositions:
1. Intermittent wiper operation
2. Low-speed operation
3. High-speed operation NOTE: To prevent damage to the wiper system, do not attempt to wipe away heavy accumulations of snow orice. Accumulated snow and ice should be removed manually. If there is only a light layer of snow orHTB019
B340D01A-AAT High-beam Switch To turn on the headlight high beams, push the lever forward (away fromyou). The high beam indicator light will come on at the same time. For low beams, pull the lever back toward you.
B340F01A-GAT Daytime Running Lights (If Installed) Your Hyundai is equipped with day- time running lights. The daytime run- ning lights are used to improve visibil-ity for oncoming traffic. Your vehicle daytime running lights are designed to remain on continuously when the en-gine is operating even though the head- light switch is in the "OFF" position. However, the daytime running lightswill be off while the parking brake is applied.
Page 74 of 444
FEATURES OF YOUR HYUNDAI 1- 59
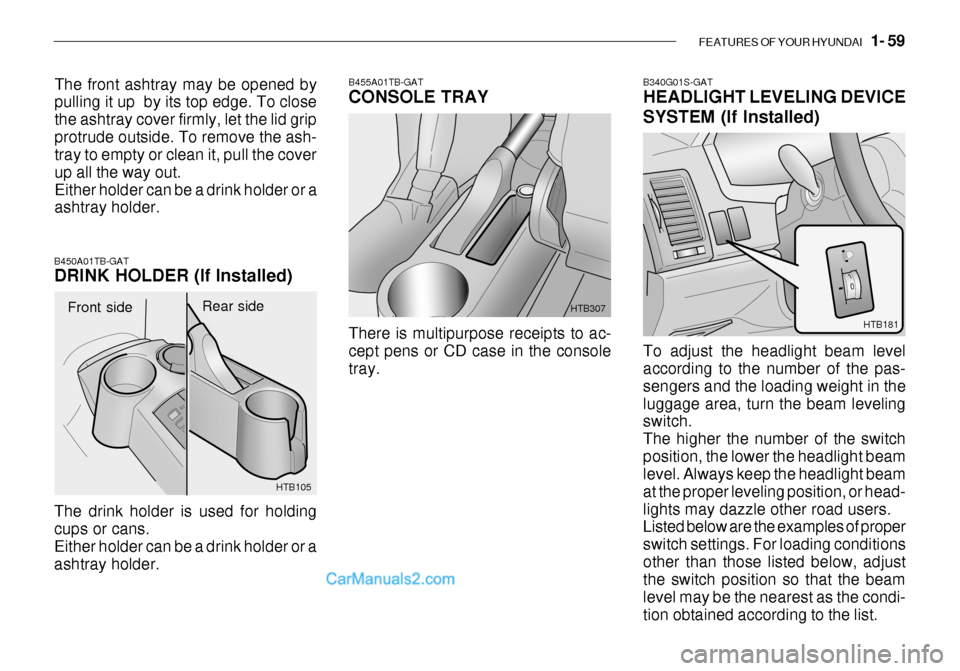
B340G01S-GAT HEADLIGHT LEVELING DEVICE SYSTEM (If Installed) To adjust the headlight beam level according to the number of the pas- sengers and the loading weight in theluggage area, turn the beam leveling switch. The higher the number of the switchposition, the lower the headlight beam level. Always keep the headlight beam at the proper leveling position, or head-lights may dazzle other road users. Listed below are the examples of proper switch settings. For loading conditionsother than those listed below, adjust the switch position so that the beam level may be the nearest as the condi-tion obtained according to the list. HTB181
Front side
B450A01TB-GAT DRINK HOLDER (If Installed) The drink holder is used for holding cups or cans. Either holder can be a drink holder or a ashtray holder. HTB105Rear side
The front ashtray may be opened by pulling it up by its top edge. To close the ashtray cover firmly, let the lid gripprotrude outside. To remove the ash- tray to empty or clean it, pull the cover up all the way out.Either holder can be a drink holder or a ashtray holder.
B455A01TB-GAT CONSOLE TRAY There is multipurpose receipts to ac- cept pens or CD case in the console tray.
HTB307
Page 154 of 444
2- 18 DRIVING YOUR HYUNDAI
C190C03S-GAT Trailer Brakes If your trailer is equipped with a braking system, make sure it conforms to fed-eral and/or local regulations and that it is properly installed and operating cor- rectly. NOTE: If you tow a trailer or vehicle, your car will require more frequent main- tenance due to the additional load.See "Maintenance Under Severe Usage Conditions" on page 5-5.
CAUTION:
o Never connect a trailer brake sys- tem directly to the vehicle brake system.
o When towing a trailer on steep
grades (in excess of 12%) payclose attention to the engine cool- ant temperature gauge to ensure the engine does not overheat. Ifthe needle of the coolant tem- perature gauge moves across the dial towards "H" (HOT), pull overand stop as soon as it is safe to do so, and allow the engine to
!
C180A01A-AAT USE OF LIGHTS Check your lights regularly for correct operation and always keep them clean.When driving during the day in condi- tions of poor visibility, it is helpful to drive with headlights on low beam.This enables you to be seen as well as to see. C190A02A-GAT TRAILER OR VEHICLE TOWING If you are considering towing with your car, you should first check with your Province Department of Motor Vehicles to determine their legal requirements.Since laws vary from province to prov- ince, the requirements for towing trail- ers, cars, other types of vehicles, orapparatus may differ. Ask your Hyundai dealer for further details before towing. C190B01S-AAT Trailer Hitches Select the proper hitch and ball combi- nation, making sure that it's location iscompatible with that of the trailer or vehicle being towed. Use a quality non-equalizing hitch whichdistributes the tongue load uniformly throughout the chassis. The hitch should be bolted securely to the car and installed by a qualified technician. DO NOT USE A HITCHDESIGNED FOR TEMPORARY IN- STALLATION AND NEVER USE ONE THAT ATTACHES ONLY TO THEBUMPER.
!
CAUTION
Do not do any towing with your car during its first 2,000 km (1,200 miles) in order to allow the engine to prop- erly break in. Failure to heed thiscaution may result in serious en- gine or transaxle damage.
Page 219 of 444

DO-IT-YOURSELF MAINTENANCE 6- 31
1. Remove the engine cover.
2. Disconnect the air intake hose from
air cleaner cover.
3. Loosen the drain plug at the bottom of the fuel filter.
4. Tighten the drain plug when water
no longer comes out.
5. Check to be sure that the warning
lamp illuminates when the ignition key is turned to "ON", and that it goes off when the engine is started. If in doubt, consult your nearestauthorized HYUNDAI dealer.
NOTE: It is recommended that water accu- mulated in the fuel filter should beremoved by an authorized Hyundai dealer. G300B01FC
WARNING:
Be sure to carefully wipe away anywater drained out in this manner, because the fuel mixed in the watermight be ignited and result in a fire.
!
5. Open the hood.
6. Draw the vertical line (through the center of each headlight beam pat-tern) and the horizontal line (throughthe center of each headlight beam pattern) on the aiming screen. And then, draw the horizontal paral- lel line at 30 mm (1.18 in.) under the horizontal line.
7. Adjust each cut-off line of the low beam to the parallel line with a phillipsscrewdriver - VERTICAL AIMING.
8. Adjust each cut-off line of the low
beam to each vertical line with aphillips screwdriver - HORIZONTAL AIMING. HTB269
Horizontal Aiming
Vertical Aiming
G290A01FC-GAT HEADLIGHT AIMING ADJUST- MENT Before performing aiming adjustment, make sure of the following.
1. Keep all tires inflated to the correct pressure.
2. Place the vehicle on level ground
and press the front bumper and rear bumper down several times. Place the vehicle at a distance of 3,000 mm (118 in.) from the test wall.
3. See that the vehicle is unloaded (except for full levels of coolant,engine oil and fuel, and spare tire,jack, and tools).
4. Clean the head lights lens and turn
on the headlight (low beam).
Page 220 of 444

6- 32 DO-IT-YOURSELF MAINTENANCE
If the vehicle has had front body repair and the headlight assembly has been replaced, the headlight aiming should be checked using the aiming screen asshown in the illustration. Turn on the headlight switch. (Low Beam Position)
1. Adjust headlights so that main axis
of light is parallel to center line of the body and is aligned with point "P"shown in the illustration.
2. Dotted lines in the illustration show
the center of headlights.
G290B01TB-GAT Adjustment After Headlight As- sembly Replacement
SPECIFICATIONS: "H" Horizontal center line of headlightsfrom ground. : 656 mm (26.8 in.) "W" Distance between each headlight center.: 1,100 mm (43.3 in.) "L" Distance between the headlights and the wall that the lights are tested against.: 3,000 mm (118 in.).
G290B01L
LW
H
H Cut-off line
Ground line
"P"
Horizontal line15mm (0.59in.)
30mm (1.18 in.) Vertical line G270A01TB-GAT REPLACEMENT OF BULBS Headlight Bulb Before attempting to replace a head- light bulb, be sure the switch is turned to the "OFF" position.The next paragraph shows how to reach headlight bulbs so they may be changed. Be sure to replace theburned-out bulb with one of the same number and wattage rating.
CAUTION:
Keep the lamps out of contact with petroleum product, such as oil,gasoline, etc.
!