oil temperature Hyundai Getz 2003 Owner's Manual
[x] Cancel search | Manufacturer: HYUNDAI, Model Year: 2003, Model line: Getz, Model: Hyundai Getz 2003Pages: 444, PDF Size: 13.82 MB
Page 17 of 444
1- 2 FEATURES OF YOUR HYUNDAI
B010B01A-AAT What About Gasohol? Gasohol (a mixture of 90% unleaded gasoline and 10% ethanol or grain alcohol) may be used in your Hyundai. However, if your engine developsdriveability problems, the use of 100% unleaded gasoline is recommended. Fuels with unspecified quantities ofalcohol, or alcohols other than ethanol, should not be used.
B010A01O-GAT FUEL RECOMMENDATIONS Use Unleaded Gasoline
NOTE:
o For some countries, Hyundai
vehicles are designed to use leaded gasoline. When you aregoing to use leaded gasoline, ask to Hyundai dealer whether leaded gasoline in your vehicleis available or not.
o Octane Rating of leaded gaso-
line is same with unleaded one.
Use Diesel Diesel fuel of 52 to 54 cetane is used in Hyundai vehicle. If two types of dieselfuel are available, use summer or win- ter fuel properly according to the fol- lowing temperature conditions.
o Above -5 C (23 F) ... Summer type diesel fuel.
o Below -5 C (23 F) ... Winter type
diesel fuel.
Watch the fuel level in the tank very carefully : If the engine stops through fuel failure, the circuits must be com- pletely purged to permit restarting.
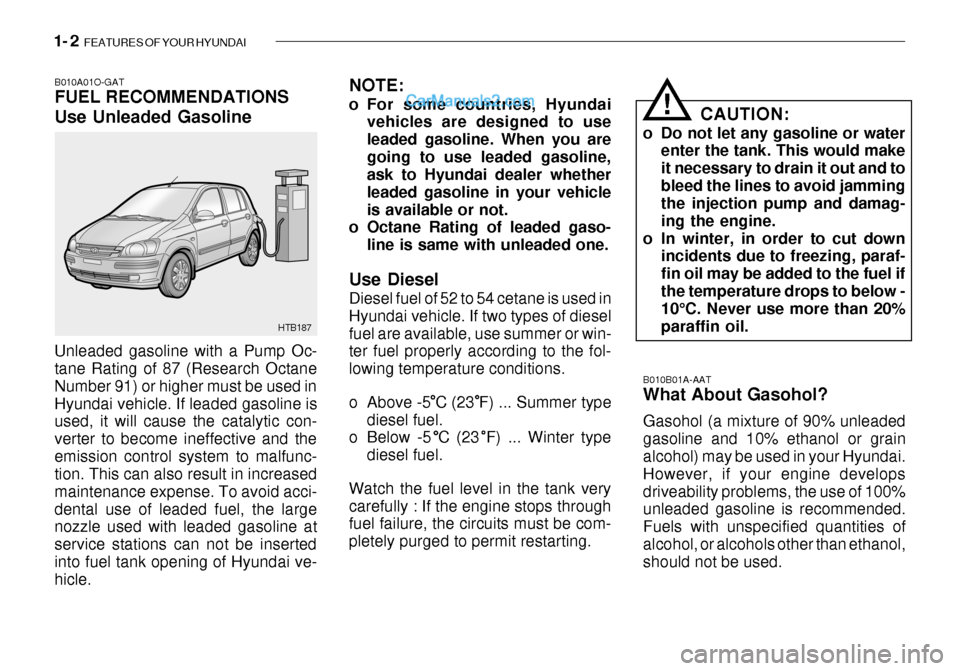
Unleaded gasoline with a Pump Oc- tane Rating of 87 (Research Octane Number 91) or higher must be used inHyundai vehicle. If leaded gasoline is used, it will cause the catalytic con- verter to become ineffective and theemission control system to malfunc- tion. This can also result in increased maintenance expense. To avoid acci-dental use of leaded fuel, the large nozzle used with leaded gasoline at service stations can not be insertedinto fuel tank opening of Hyundai ve- hicle. HTB187
CAUTION:
o Do not let any gasoline or water enter the tank. This would make it necessary to drain it out and tobleed the lines to avoid jamming the injection pump and damag- ing the engine.
o In winter, in order to cut down incidents due to freezing, paraf-fin oil may be added to the fuel ifthe temperature drops to below - 10°C. Never use more than 20% paraffin oil.
!
Page 56 of 444
FEATURES OF YOUR HYUNDAI 1- 41
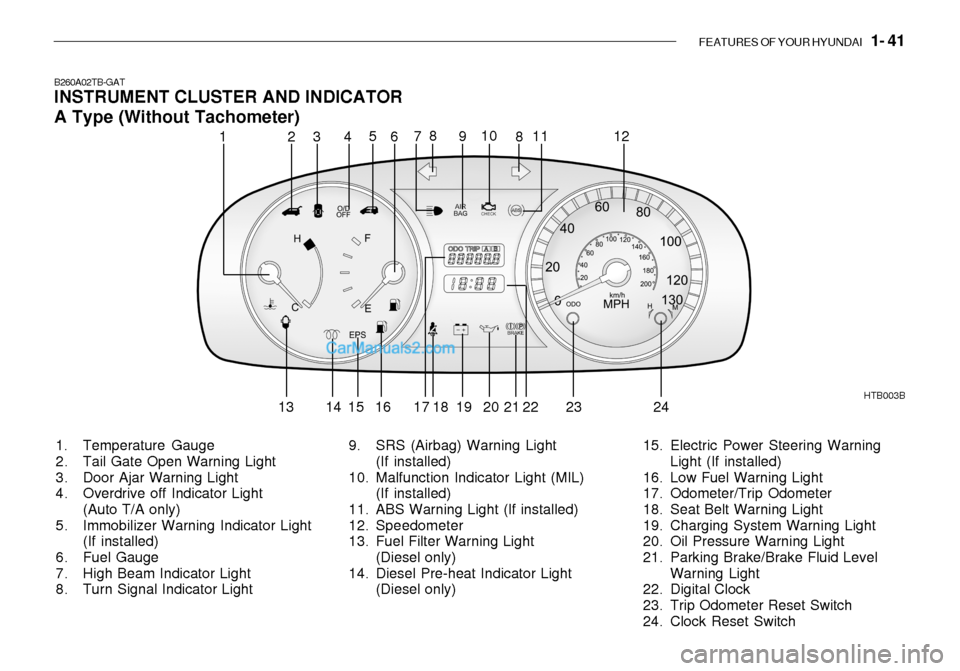
B260A02TB-GAT INSTRUMENT CLUSTER AND INDICATOR A Type (Without Tachometer)
1. Temperature Gauge
2. Tail Gate Open Warning Light
3. Door Ajar Warning Light
4. Overdrive off Indicator Light (Auto T/A only)
5. Immobilizer Warning Indicator Light (If installed)
6. Fuel Gauge
7. High Beam Indicator Light
8. Turn Signal Indicator Light HTB003B
9. SRS (Airbag) Warning Light (If installed)
10. Malfunction Indicator Light (MIL)
(If installed)
11. ABS Warning Light (If installed)
12. Speedometer
13. Fuel Filter Warning Light (Diesel only)
14. Diesel Pre-heat Indicator Light
(Diesel only) 15. Electric Power Steering Warning
Light (If installed)
16. Low Fuel Warning Light
17. Odometer/Trip Odometer
18. Seat Belt Warning Light
19. Charging System Warning Light
20. Oil Pressure Warning Light
21. Parking Brake/Brake Fluid Level Warning Light
22. Digital Clock
23. Trip Odometer Reset Switch
24. Clock Reset Switch
12 3
45
6 78
910
11
8 12
13 14 15 16 17 18 19 20 21 22 23 24
Page 57 of 444
1- 42 FEATURES OF YOUR HYUNDAI
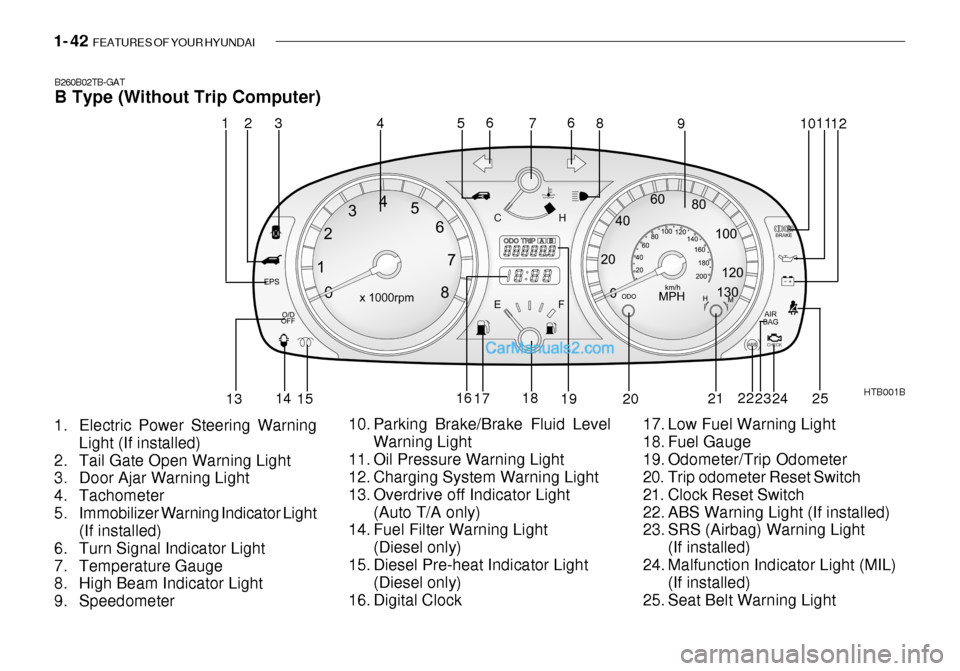
B260B02TB-GAT B Type (Without Trip Computer)
1. Electric Power Steering Warning Light (If installed)
2. Tail Gate Open Warning Light
3. Door Ajar Warning Light
4. Tachometer
5. Immobilizer Warning Indicator Light (If installed)
6. Turn Signal Indicator Light
7. Temperature Gauge
8. High Beam Indicator Light
9. Speedometer HTB001B
10. Parking Brake/Brake Fluid Level Warning Light
11. Oil Pressure Warning Light
12. Charging System Warning Light
13. Overdrive off Indicator Light (Auto T/A only)
14. Fuel Filter Warning Light
(Diesel only)
15. Diesel Pre-heat Indicator Light (Diesel only)
16. Digital Clock 17. Low Fuel Warning Light
18. Fuel Gauge
19. Odometer/Trip Odometer
20. Trip odometer Reset Switch
21. Clock Reset Switch
22. ABS Warning Light (If installed)
23. SRS (Airbag) Warning Light
(If installed)
24. Malfunction Indicator Light (MIL) (If installed)
25. Seat Belt Warning Light
1
2
453 6
7 8
9 1011
12
13 14
15 16
17 18
19 20 2122
23 24
6
25
Page 58 of 444
FEATURES OF YOUR HYUNDAI 1- 43
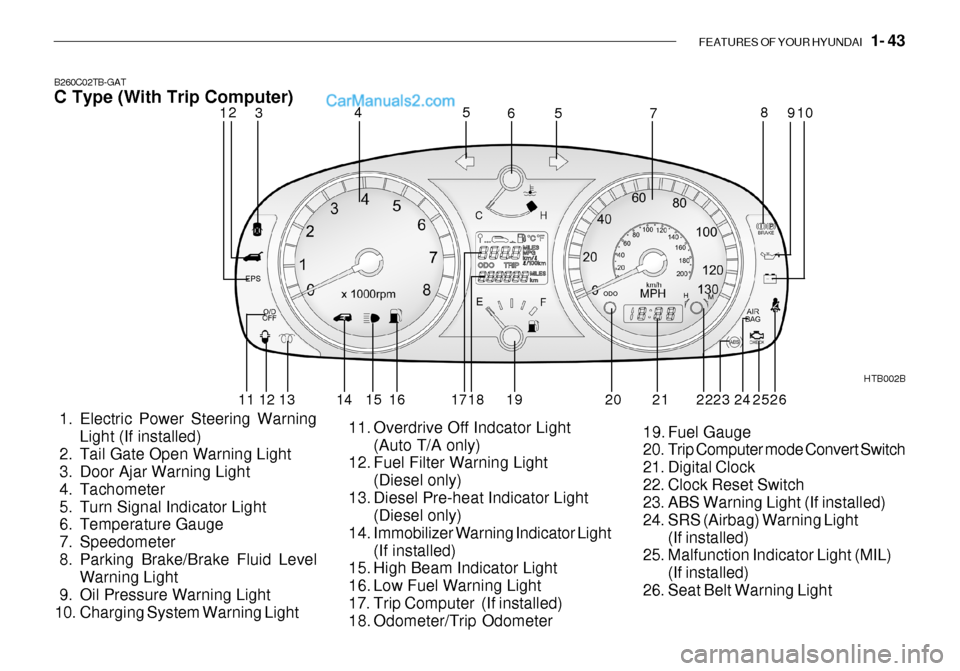
B260C02TB-GAT C Type (With Trip Computer)
1. Electric Power Steering Warning Light (If installed)
2. Tail Gate Open Warning Light
3. Door Ajar Warning Light
4. Tachometer
5. Turn Signal Indicator Light
6. Temperature Gauge
7. Speedometer
8. Parking Brake/Brake Fluid Level Warning Light
9. Oil Pressure Warning Light
10. Charging System Warning Light HTB002B
11. Overdrive Off Indcator Light (Auto T/A only)
12. Fuel Filter Warning Light
(Diesel only)
13. Diesel Pre-heat Indicator Light (Diesel only)
14. Immobilizer Warning Indicator Light (If installed)
15. High Beam Indicator Light
16. Low Fuel Warning Light
17. Trip Computer (If installed)
18. Odometer/Trip Odometer 19. Fuel Gauge
20. Trip Computer mode Convert Switch
21. Digital Clock
22. Clock Reset Switch
23. ABS Warning Light (If installed)
24. SRS (Airbag) Warning Light
(If installed)
25. Malfunction Indicator Light (MIL)
(If installed)
26. Seat Belt Warning Light
12 3 4
5
5
67 8
9
10
11 12 13 14 15 16 17 18 19 20 23 24
252221 26
Page 117 of 444
1- 102 FEATURES OF YOUR HYUNDAI
H290F01O-GAT
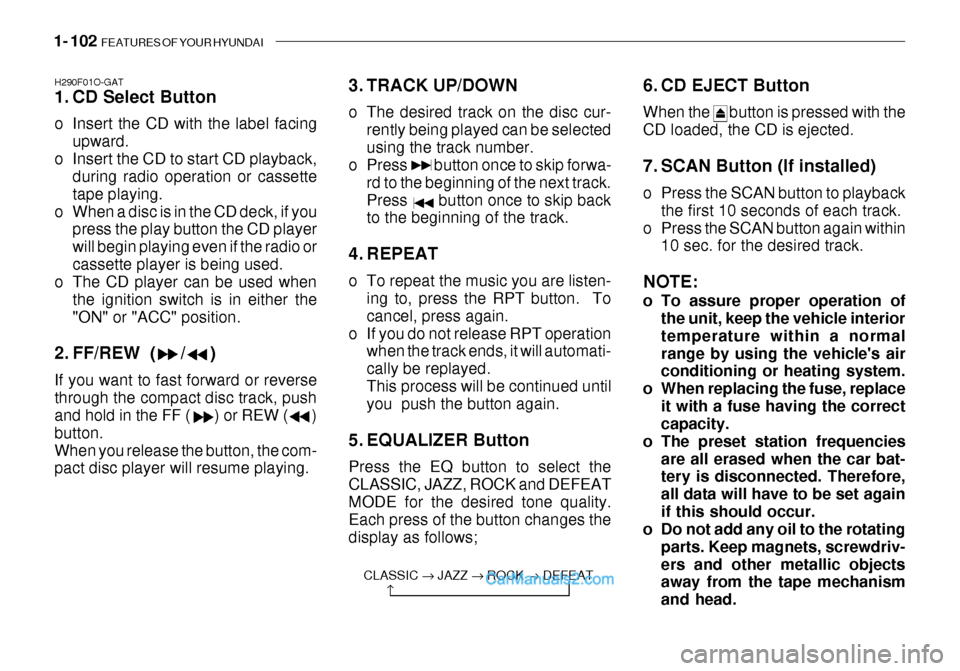
1. CD Select Button
o Insert the CD with the label facing
upward.
o Insert the CD to start CD playback, during radio operation or cassette tape playing.
o When a disc is in the CD deck, if you press the play button the CD playerwill begin playing even if the radio orcassette player is being used.
o The CD player can be used when
the ignition switch is in either the"ON" or "ACC" position.
2. FF/REW ( / ) If you want to fast forward or reverse through the compact disc track, push and hold in the FF ( ) or REW ( ) button.When you release the button, the com- pact disc player will resume playing. 3. TRACK UP/DOWN
o The desired track on the disc cur-
rently being played can be selected using the track number.
o Press button once to skip forwa-
rd to the beginning of the next track.Press button once to skip back to the beginning of the track.
4. REPEAT
o To repeat the music you are listen- ing to, press the RPT button. To cancel, press again.
o If you do not release RPT operation when the track ends, it will automati-cally be replayed.This process will be continued until you push the button again.
5. EQUALIZER Button Press the EQ button to select the CLASSIC, JAZZ, ROCK and DEFEATMODE for the desired tone quality. Each press of the button changes the display as follows; 6. CD EJECT Button When the button is pressed with the CD loaded, the CD is ejected.
7. SCAN Button (If installed)
o Press the SCAN button to playback
the first 10 seconds of each track.
o Press the SCAN button again within 10 sec. for the desired track.
NOTE:
o To assure proper operation of the unit, keep the vehicle interior temperature within a normalrange by using the vehicle's air conditioning or heating system.
o When replacing the fuse, replace
it with a fuse having the correctcapacity.
o The preset station frequencies
are all erased when the car bat-tery is disconnected. Therefore, all data will have to be set againif this should occur.
o Do not add any oil to the rotating
parts. Keep magnets, screwdriv-ers and other metallic objects away from the tape mechanism and head.
CLASSIC � JAZZ � ROCK � DEFEAT
�
Page 134 of 444
FEATURES OF YOUR HYUNDAI 1- 119
Head
Cotton applicator
HTB216
B860A02L
o Be sure that the cassette label is not
loose or peeling off or tape ejection may be difficult.
o Never touch or soil the actual audio
tape surfaces.
o Keep all magnetized objects, such as electric motors, speakers or trans-formers away from your cassettetapes and tape player unit.
o Store cassettes in a cool, dry place
with the open side facing down toprevent dust from setting in the cas- sette body.
o We strongly recommend against the
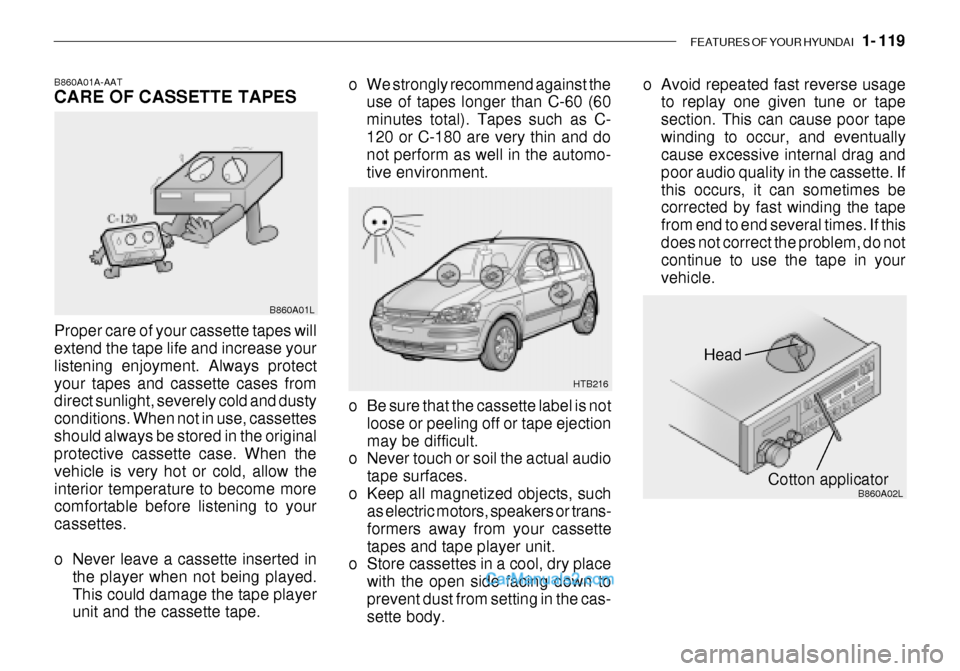
use of tapes longer than C-60 (60 minutes total). Tapes such as C-120 or C-180 are very thin and do not perform as well in the automo- tive environment. o Avoid repeated fast reverse usage
to replay one given tune or tapesection. This can cause poor tapewinding to occur, and eventually cause excessive internal drag and poor audio quality in the cassette. Ifthis occurs, it can sometimes be corrected by fast winding the tape from end to end several times. If thisdoes not correct the problem, do not continue to use the tape in your vehicle.
B860A01A-AAT CARE OF CASSETTE TAPES Proper care of your cassette tapes will extend the tape life and increase your listening enjoyment. Always protectyour tapes and cassette cases from direct sunlight, severely cold and dusty conditions. When not in use, cassettesshould always be stored in the original protective cassette case. When the vehicle is very hot or cold, allow theinterior temperature to become more comfortable before listening to your cassettes.
o Never leave a cassette inserted in
the player when not being played. This could damage the tape player unit and the cassette tape. B860A01L
Page 152 of 444
2- 16 DRIVING YOUR HYUNDAI
C160G01A-GAT To Keep Locks from Freezing To keep the locks from freezing, squirt an approved de-icer fluid or glycerineinto the key opening. If a lock is cov- ered with ice, squirt it with an approved de-icing fluid to remove the ice. If thelock is frozen internally, you may be able to thaw it out by using a heated key. Handle the heated key with careto avoid burning your fingers. NOTE: The proper temperature for using the immobilizer key is from -40°C to 80°C. If you heat the immobilizer key over 80°C to open the frozenlock, it may cause damage to the transponder in its head.
C160F01A-AAT Check Spark Plugs and Ignition System Inspect your spark plugs as described in Section 6 and replace them if neces- sary. Also check all ignition wiring andcomponents to be sure they are not cracked, worn or damaged in any way.
chains on the tire will provide a greaterdriving force, but will not prevent side skids. NOTE: Tire chains are not legal in all prov- inces. Check province laws beforefitting tire chains. C160C01A-AAT Use High Quality Ethylene Glycol Coolant Your Hyundai is delivered with high quality ethylene glycol coolant in the cooling system. It is the only type ofcoolant that should be used because it helps prevent corrosion in the cooling system, lubricates the water pump andprevents freezing. Be sure to replace or replenish your coolant in accor- dance with the maintenance schedulein Section 5. Before winter, have your coolant tested to assure that its freez- ing point is sufficient for the tempera-tures anticipated during the winter. C160D01A-AAT Check Battery and Cables Winter puts additional burdens on the battery system. Visually inspect thebattery and cables as described in Section 6. The level of charge in your battery can be checked by your Hyun-dai dealer or a service station. C160E01A-AAT Change to "Winter Weight" Oil if Necessary In some climates it is recommended that a lower viscosity "winter weight" oil be used during cold weather. See Section 9 for recommendations. If youaren't sure what weight oil you should use, consult your Hyundai dealer.
Page 186 of 444
VEHICLE MAINTENANCE REQUIREMENTS 5- 9
F060H01A-AAT
o Air Cleaner Filter
A Genuine Hyundai air cleaner filter is
recommended when filter is replaced.
F060J01A-AAT
o Spark Plugs
Make sure to install new spark plugs
of the correct heat range.
F070C01A-AAT
o Engine Coolant
The coolant should be changed at
the intervals specified in the mainte- nance schedule. F070D01A-AAT
o Manual Transaxle Oil Inspect the manual transaxle oil ac- cording to the maintenance schedule. NOTE: If the oil level is low, check for possible leaks before adding oil. Do not overfill. F070E03A-AAT
o Automatic Transaxle Fluid and
Filter
The fluid level should be in the "HOT" range of the dipstick, after the engineand transaxle are at normal operating temperature. Check the automatic transaxle fluid level with the enginerunning and the transaxle in neutral, with the parking brake properly ap- plied. Use DIAMOND ATF SP-III orSK ATF SP-III when adding or chang- ing fluid.
F060F01A-AAT
o Vacuum, Crankcase Ventila-
tion Hoses
Inspect the surface of hoses for evi- dence of heat and/or mechanical dam-age. Hard and brittle rubber, cracking, tears, cuts, abrasions, and excessive swelling indicate deterioration. Partic-ular attention should be paid to exam- ine those hose surfaces nearest to high heat sources, such as the ex-haust manifold.Inspect the hose routing to assurethat the hoses do not come in contact with any heat source, sharp edges or moving component which might causeheat damage or mechanical wear. Inspect all hose connections, such as clamps and couplings, to make surethey are secure, and that no leaks are present. Hoses should be replaced immediately if there is any evidenceof deterioration or damage. F070B01A-GAT
o Cooling System
Check the cooling system part, such
as radiator, coolant reservoir, hosesand connections for leakage and dam-age. Replace any damaged parts.
Page 198 of 444
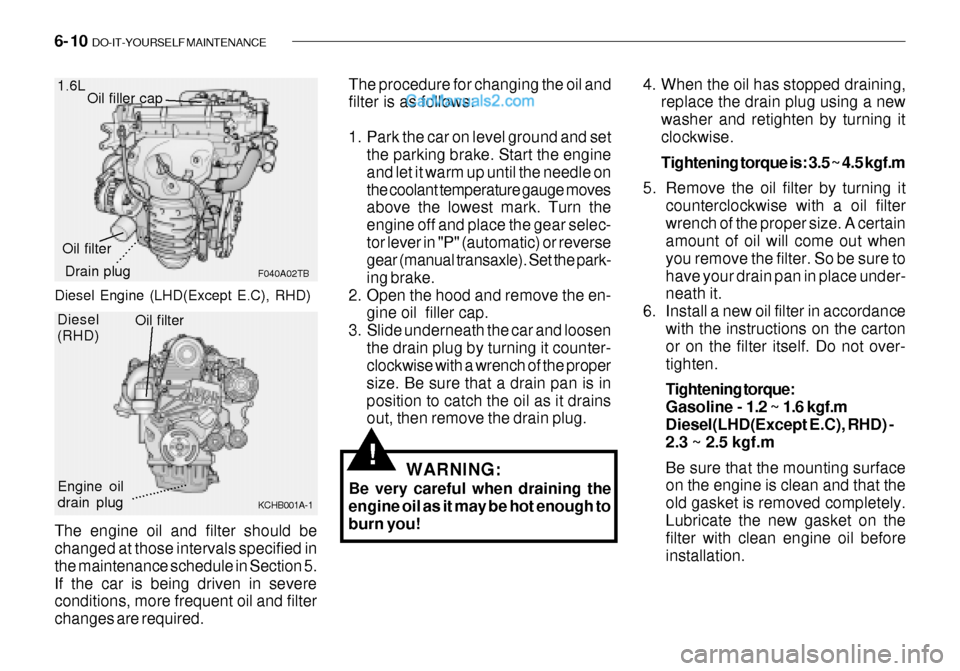
6- 10 DO-IT-YOURSELF MAINTENANCE
The engine oil and filter should be changed at those intervals specified in the maintenance schedule in Section 5.If the car is being driven in severe conditions, more frequent oil and filter changes are required.1.6L
F040A02TB
Oil filler cap
Drain plug
Oil filter The procedure for changing the oil and filter is as follows:
1. Park the car on level ground and set
the parking brake. Start the engine and let it warm up until the needle onthe coolant temperature gauge moves above the lowest mark. Turn the engine off and place the gear selec-tor lever in "P" (automatic) or reverse gear (manual transaxle). Set the park- ing brake.
2. Open the hood and remove the en- gine oil filler cap.
3. Slide underneath the car and loosen the drain plug by turning it counter- clockwise with a wrench of the proper size. Be sure that a drain pan is inposition to catch the oil as it drains out, then remove the drain plug.
WARNING:
Be very careful when draining theengine oil as it may be hot enough to burn you!
!
4. When the oil has stopped draining, replace the drain plug using a new washer and retighten by turning itclockwise. Tightening torque is: 3.5 ~ 4.5 kgf.m
5. Remove the oil filter by turning it counterclockwise with a oil filter wrench of the proper size. A certain amount of oil will come out when you remove the filter. So be sure tohave your drain pan in place under- neath it.
6. Install a new oil filter in accordance with the instructions on the cartonor on the filter itself. Do not over- tighten. Tightening torque: Gasoline - 1.2 ~ 1.6 kgf.m
Diesel(LHD(Except E.C), RHD) - 2.3 ~ 2.5 kgf.m Be sure that the mounting surface on the engine is clean and that the old gasket is removed completely.Lubricate the new gasket on the filter with clean engine oil before installation.
.........
Diesel (RHD)
KCHB001A-1
Engine oil drain plugOil filter................
Diesel Engine (LHD(Except E.C), RHD)
Page 199 of 444

DO-IT-YOURSELF MAINTENANCE 6- 11
G040B03FC-GAT CHANGING THE OIL AND FILTER
(Diesel Engine: Left hand drivetype (E.C only)) The engine oil and filter should be changed at those intervals specified in the maintenance schedule in Section 5. If the car is being driven in severeconditions, more frequent oil and filter changes are required. The procedure for changing the oil and filter is as follows: 1. Park the car on level ground and set
the parking brake. Start the engine and let it warm up until the needle onthe coolant temperature gauge moves above the lowest mark. Turn the engine off and place the gearselector lever in "P" (automatic) or reverse gear (manual transaxle).
2. Open the hood and remove the en- gine oil filler cap.
3. Slide underneath the car and loosen
the oil pan drain plug by turning it counterclockwise oil pan with a wrench of the proper size. Be sure that a drain pan is in position tocatch the oil as it drains out, then remove the drain plug.
7. Refill the crankcase with the recom-
mended engine oil. Refer to the specification in chapter 9 for engineoil capacity.
8. Start the engine and check to be
sure no oil is leaking from the drainplug or oil filter.
9. Shut off the engine and recheck the
oil level.
NOTE: Always dispose of used engine oil in an environmentally acceptablemanner. It is suggested that it be placed in a sealed container and taken to a service station for recla-mation. Do not pour the oil on the ground or put it into the household trash.
WARNING:
Used motor oil may cause irritationor cancer of the skin if left in con-tact with the skin for prolonged periods of time. Wash your hands thoroughly with soap and warmwater as soon as possible after han- dling used oil.
!
Engine oil drain plug Oil filter
KCHB01A
WARNING:
Be very careful when draining the engine oil as it may be hot enough to burn you!!
4. When the oil has stopped draining, replace the drain plug using a new washer and retighten by turning it clockwise. Oil pan drain plug tightening torque: 3.5 ~ 4.5 kgf.m
............