low oil pressure Hyundai Getz 2005 Owner's Manual
[x] Cancel search | Manufacturer: HYUNDAI, Model Year: 2005, Model line: Getz, Model: Hyundai Getz 2005Pages: 437, PDF Size: 11.19 MB
Page 11 of 437

YOUR VEHICLE AT A GLANCE
B255A01TB-GAT INDICATOR SYMBOLS ON THE INSTRUMENT PANEL * A detail explanations of these items will be found on page 1-37
SRS (Airbag) Service Reminder Indicator ABS Service Reminder Indicator Turn Signal Indicator Lights High Beam Indicator Light Oil Pressure Warning Light Parking Brake/Brake Level Warning Light Charging System Warning Light Tail Gate Open Warning LightDoor Ajar Warning Light and Chime
Low Fuel Level Warning Light Malfunction Indicator Light Seat Belt Reminder Light
O/D OFF Indicator (Automatic transaxle only)
Electric Power Steering System (EPS)Warning Light
Diesel Pre-heat Indicator Light (Diesel only)
Fuel Filter Warning Light (Diesel only)
Immobilizer Indicator
Page 48 of 437

FEATURES OF YOUR HYUNDAI 1- 37
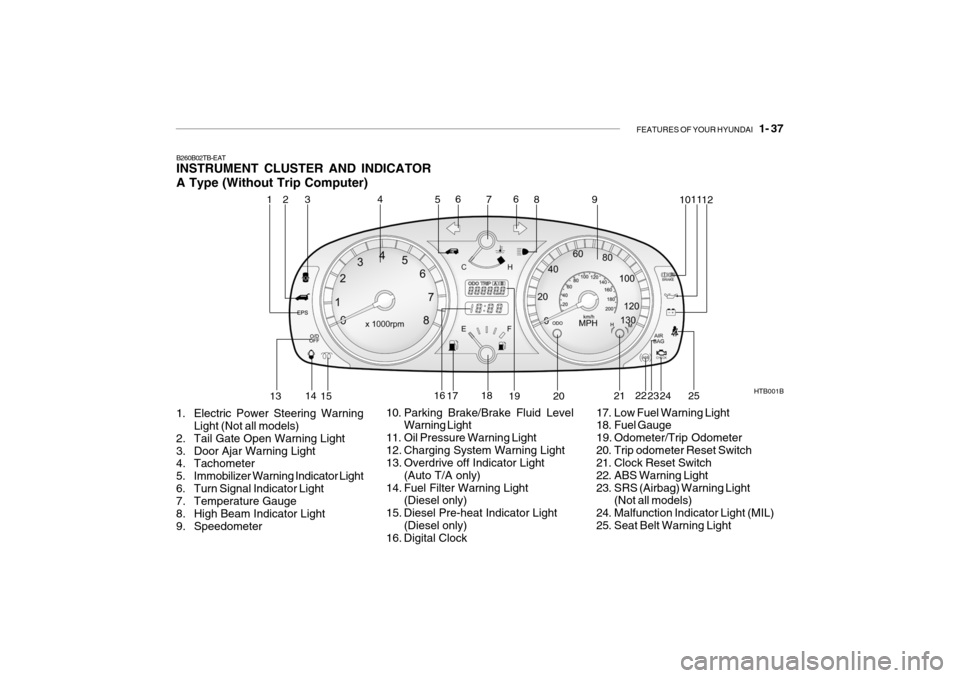
B260B02TB-EAT INSTRUMENT CLUSTER AND INDICATOR A Type (Without Trip Computer)
1. Electric Power Steering Warning Light (Not all models)
2. Tail Gate Open Warning Light
3. Door Ajar Warning Light
4. Tachometer
5. Immobilizer Warning Indicator Light
6. Turn Signal Indicator Light
7. Temperature Gauge
8. High Beam Indicator Light
9. Speedometer HTB001B
10. Parking Brake/Brake Fluid Level Warning Light
11. Oil Pressure Warning Light
12. Charging System Warning Light
13. Overdrive off Indicator Light (Auto T/A only)
14. Fuel Filter Warning Light (Diesel only)
15. Diesel Pre-heat Indicator Light (Diesel only)
16. Digital Clock 17. Low Fuel Warning Light
18. Fuel Gauge
19. Odometer/Trip Odometer
20. Trip odometer Reset Switch
21. Clock Reset Switch
22. ABS Warning Light
23. SRS (Airbag) Warning Light
(Not all models)
24. Malfunction Indicator Light (MIL)
25. Seat Belt Warning Light
1
2
4
53 6
7 8
9 1011
12
13 14
15 16
17 18
19 20 21
22
23 24
6
25
Page 49 of 437

1- 38 FEATURES OF YOUR HYUNDAI
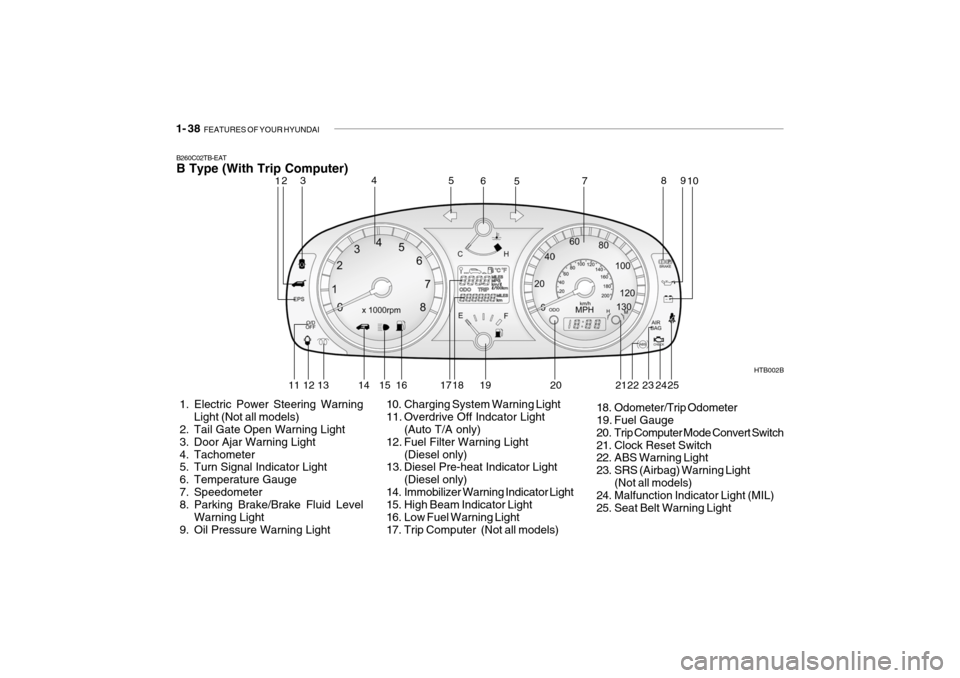
B260C02TB-EAT B Type (With Trip Computer)
1. Electric Power Steering Warning
Light (Not all models)
2. Tail Gate Open Warning Light
3. Door Ajar Warning Light
4. Tachometer
5. Turn Signal Indicator Light
6. Temperature Gauge
7. Speedometer
8. Parking Brake/Brake Fluid Level
Warning Light
9. Oil Pressure Warning Light HTB002B
10. Charging System Warning Light
11. Overdrive Off Indcator Light (Auto T/A only)
12. Fuel Filter Warning Light (Diesel only)
13. Diesel Pre-heat Indicator Light
(Diesel only)
14. Immobilizer Warning Indicator Light
15. High Beam Indicator Light
16. Low Fuel Warning Light
17. Trip Computer (Not all models) 18. Odometer/Trip Odometer
19. Fuel Gauge
20. Trip Computer Mode Convert Switch
21. Clock Reset Switch
22. ABS Warning Light
23. SRS (Airbag) Warning Light
(Not all models)
24. Malfunction Indicator Light (MIL)
25. Seat Belt Warning Light
12 3 4
5
5
6
78
910
11 12 13 14 15 16 17 18 19 20 22 23
242521
Page 121 of 437

WHAT TO DO IN AN EMERGENCY 3- 5
!
D040A01TB-EAT TEMPORARY SPARE TYRE (Not all models) The following instructions for the tem- porary spare tyre should be observed:
1. Check inflation pressure as soon as
practical after installing the spare tyre, and adjust to the specifiedpressure. The tyre pressure should be periodically checked and main- tained at the specified pressurewhile the tyre is stored.
6. If the cause of the overheating can- not be found, wait until the enginetemperature has returned to nor- mal. Then, if coolant has been lost, carefully remove the radiator capand add water to bring the fluid level in the reservoir up to the base of the radiator fill opening. Fill the coolantexpansion tank to the halfway mark.
7. Proceed with caution until it is es-
tablished that the engine is operat-ing normally. If the engine over- heats repeatedly, the advice of a Hyundai authorised repairer shouldbe sought. WARNING:
Do not remove the radiator cap when the engine is hot since steam and boiling water may be ejected fromthe radiator resulting in burns or scalding.
Inflation Pressure
Tyre Size
T105/70D14 420 kPa (60 psi)
2. The spare tyre should only be used temporarily and should be returned to the luggage compartment as soonas the original tyre can be repairered or replaced.
3. Continuous use at speeds of over 50 mph(80 km/h) is not recom-mended.
4. As the temporary spare tyre is spe- cifically designed for your car, itshould not be used on any other vehicle.
Spare Tyre Pressure
YD050A1-E SPARE TYRE For Full Size (Not all models) The following instructions for the FULL SIZE spare tyre should be observed: Check inflation pressure as soon aspossible after installing the spare tyre, and adjust to the specified pressure. The tyre pressure should be periodi-cally checked and maintained at the specified pressure while the tyre is stored. Spare Tyre Pressure
Tyre Size Inflation Pressure
FULL SIZE 30 psi (210 kPa)
5. If the water pump drive belt is bro-
ken or coolant is leaking out, stop the engine immediately and call thenearest Hyundai authorised repairer for assistance.
! CAUTION:
Serious loss of coolant indicates there is a leak in the cooling systemand this should be checked as soon as possible by a Hyundai authorised repairer.
Page 140 of 437

VEHICLE MAINTENANCE REQUIREMENTS 5- 5
F030C02TB-EAT R : Replace I : Inspect and, after inspection, clean, adjust, repairer or replace if necessary
GENERAL MAINTENANCE COOLING SYSTEMCOOLANTCOOLANT SPECIFIC GRAVITYMANUAL TRANSAXLE OILAUTOMATIC TRANSAXLE FLUIDBRAKE PIPES, HOSES, AND CONNECTIONSBRAKE FLUIDCLUTCH FLUIDREAR BRAKE LININGS AND CYLINDERSBRAKE PADSSUSPENSION AND STEERING SYSTEMFRONT SUSPENSION BALL JOINTSPOLLEN FILTER (FOR EVAPORATOR AND BLOWER UNIT)REAR WHEEL BEARINGSTYRE CONDITION AND PRESSURE (incl. Spare)LUBRICATE LOCKS AND HINGESCHECK ALL ELECTRICAL SYSTEMSROAD TESTCHECK ALL SYSTEMS WITH HI-SCAN
60 72
5060
4048
I I I
R
I
RR II I I
R III I II
I I I IIIII I II
R II I III
I I I II
RR I I II
R II I III
30 36
2024
I I I IIIII I II
R II I III
I I I II
RR I I II
R II I III
10 12
I I I IIIII I II
R II I III
MILES X 1000MONTHS
NO. DESCRIPTION
1 23456789
10111213141516171819
See NOTE (1)
Note :(1) FOR THE FIRST TIME, REPLACE THE COOLANT 60,000 MILES OR 60 MONTHS. AFTER THAT, REPLACE IT EVERY 30,000 MILES OR 24 MONTHS.
Page 151 of 437

6- 6 DO-IT-YOURSELF MAINTENANCE
SG020B1-E DAILY OPERATING CHECKS The following items should be checked on a daily basis or whenever the vehicleis refuelled, whichever occurs sooner.
o Engine oil level.
o Engine coolant level.
o Power steering fluid level.
o Brake fluid level.
o Windscreen washer fluid level.
o Battery condition.
o Tyre condition and pressures.
o Operation and cleanliness of all light-
ing equipment.
o Windscreen wiper and washer opera- tion.
o Horn operation.
o Warning light operation.
o Adjustment and cleanliness of mir- rors.
o Seat and seat belt adjustment and operation.
o Fluid leakage. The vehicle must not be driven if the daily operating checks indicate that any item of equipment related to thesafety or roadworthiness of the vehicle is not functioning correctly. G030B03A-EAT Recommended Oil
1. Petrol engine The engine oil quality should meet the following classification. API SJ, SL or ABOVE, ILSAC GF-3 or ABOVE The oil viscosity should be selected according to the operating environment of the engine by means of the table shown above. The engine oil recom-mendations are complete in themselves and the use of additives is neither required nor recommended. The use ofengine oil additives may result in invali- dation of the vehicle warranty.
G030A01FC-EAT ENGINE OIL The correct engine oil level is of para- mount importance. An excessively highor low oil level may result in irreparable damage being sustained by the engine. The engine oil level must be checkedon a daily basis, whenever the vehicle is refuelled or before starting a long trip, whichever occurs sooner.In addition, it is imperative that only an approved grade and specification of oil is used to avoid the possibility of seri-ous engine damage and premature wear. The use of "budget price" oil is a false economy that must be avoided if themaximum reliability and useful life is to be obtained from the vehicle.
G030B01L
Page 153 of 437

6- 8 DO-IT-YOURSELF MAINTENANCE
Petrol engine
HTB169
HTB169A
Diesel engine
G030D01TB-EAT ENGINE OIL REPLENISHMENT
If the indicated oil level is at or below the lower mark of the dipstick, oil should be added until the level is at or below the upper mark.To add oil to the engine, remove the filler cap by rotating in an counterclock- wise direction and pour engine oil intothe engine. Before checking the level again, allow several minutes for the oil to drain into the sump. Replace the oilfiller cap rotating it in a clockwise direc- tion until tight. The quantity of oil required to raise thelevel from the minimum to maximum level is approximately 1.2 litre.ZG030E1-E ENGINE OIL CONSUMPTION Function of engine oil Engine oil has the primary function of lubricating and cooling the inside of the engine. Engine oil consumption It is normal that an engine should con- sume some engine oil while normal driving. The cause of oil consumption in a normal engine are as follows;
o Engine oil is used to lubricate pis-
tons, piston rings and cylinders. A thin film of oil is left on the cylinder wall when a piston moves down- wards in the cylinder. High negativepressure generated during engine operation sucks some of the oil into the combustion chamber.This oil with some oil of the cylinder wall is burned by the high tempera- ture combustion gases during thecombustion process.
o The engine oil consumption is strongly
effected by the viscosity and qualityof oil, engine rpm and driving condi- tion etc.
Page 172 of 437

DO-IT-YOURSELF MAINTENANCE 6- 27
!
5. Open the bonnet.
6. Draw the vertical line (through the
center of each headlight beam pat-tern) and the horizontal line (throughthe center of each headlight beam pattern) on the aiming screen. And then, draw the horizontal paral- lel line at 1.18 in. (30 mm ) under the horizontal line.
7. Adjust each cut-off line of the low beam to the parallel line with a phillipsscrewdriver - VERTICAL AIMING.
8. Adjust each cut-off line of the low
beam to each vertical line with aphillips screwdriver - HORIZONTAL AIMING. HTB269
Horizontal Aiming
Vertical Aiming
G290A01FC-EAT HEADLIGHT AIMING ADJUST- MENT Before performing aiming adjustment, make sure of the following.
1. Keep all tyres inflated to the correct pressure.
2. Place the vehicle on level ground
and press the front bumper and rear bumper down several times. Place the vehicle at a distance of 118 in. (3,000 mm) from the test wall.
3. See that the vehicle is unloaded (except for full levels of coolant,engine oil and fuel, and spare tyre,jack, and tools).
4. Clean the head lights lens and turn
on the headlight (low beam). WARNING:
Be sure to carefully wipe away anywater drained out in this manner, because the fuel mixed in the water might be ignited and result in a fire.
1. Remove the engine cover.
2. Disconnect the air intake hose from air cleaner cover.
3. Loosen the drain plug at the bottom
of the fuel filter.
4. Tighten the drain plug when water no longer comes out.
5. Check to be sure that the warning lamp illuminates when the ignition key is turned to "ON", and that it goes off when the engine is started.If in doubt, consult your nearest Hyundai authorised repairer.
G300B01FC
Page 212 of 437

YOUR VEHICLE AT A GLANCE
B255A01TB-GAT INDICATOR SYMBOLS ON THE INSTRUMENT PANEL * A detail explanations of these items will be found on page 1-43
SRS (Airbag) Service Reminder Indicator ABS Service Reminder Indicator Turn Signal Indicator Lights High Beam Indicator Light Oil Pressure Warning Light Parking Brake/Brake Level Warning Light Charging System Warning Light Tail Gate Open Warning LightDoor Ajar Warning Light and Chime
Low Fuel Level Warning Light Malfunction Indicator Light Seat Belt Reminder Light
O/D OFF Indicator (Automatic transaxle only)
Electric Power Steering System (EPS)Warning Light
Diesel Pre-heat Indicator Light (Diesel only)
Fuel Filter Warning Light (Diesel only)
Immobilizer Indicator
TBENG_0.P65
3/9/2005, 4:55 PM
14
Page 253 of 437

FEATURES OF YOUR HYUNDAI 1- 41
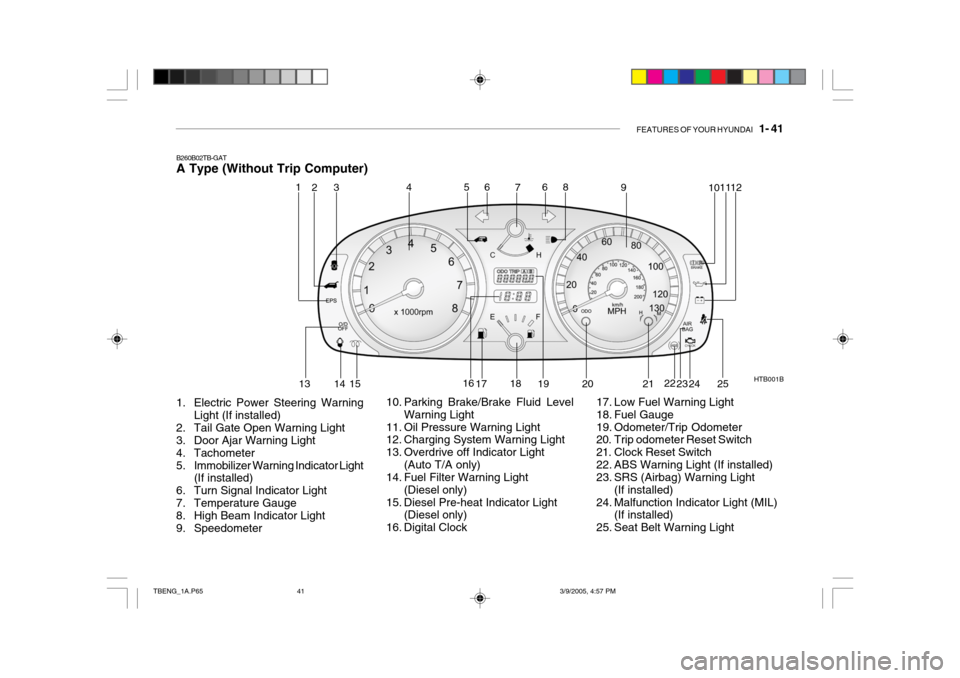
B260B02TB-GAT A Type (Without Trip Computer)
1. Electric Power Steering Warning Light (If installed)
2. Tail Gate Open Warning Light
3. Door Ajar Warning Light
4. Tachometer
5. Immobilizer Warning Indicator Light (If installed)
6. Turn Signal Indicator Light
7. Temperature Gauge
8. High Beam Indicator Light
9. Speedometer HTB001B
10. Parking Brake/Brake Fluid Level Warning Light
11. Oil Pressure Warning Light
12. Charging System Warning Light
13. Overdrive off Indicator Light (Auto T/A only)
14. Fuel Filter Warning Light
(Diesel only)
15. Diesel Pre-heat Indicator Light (Diesel only)
16. Digital Clock 17. Low Fuel Warning Light
18. Fuel Gauge
19. Odometer/Trip Odometer
20. Trip odometer Reset Switch
21. Clock Reset Switch
22. ABS Warning Light (If installed)
23. SRS (Airbag) Warning Light
(If installed)
24. Malfunction Indicator Light (MIL) (If installed)
25. Seat Belt Warning Light
1
2
453 6
7 8
9 1011
12
13 14
15 16
17 18
19 20 2122
23 24
6
25
TBENG_1A.P65 3/9/2005, 4:57 PM
41