Hyundai Getz 2010 Owner's Manual
Manufacturer: HYUNDAI, Model Year: 2010, Model line: Getz, Model: Hyundai Getz 2010Pages: 256, PDF Size: 7.84 MB
Page 131 of 256

FEATURES OF YOUR HYUNDAI 1- 119
INDICATION
Er2 Er3
Er6 Er7Er8
HHH
B890A01TB-GAT AUDIO FAULT CODE (M280 only) If you see any error indication in the display while using the CD or Tape mode, find the cause in the chart below. If you canno t
clear the error indication, take the car to your Hyundai dealer.
SOLUTION
After resetting the audio, push the eject button. If disc is not ejected, consult your hyundai dealer.Make sure the disc is not scratched or damaged. Press the eject button and pull out the disc. Then insert a normal cd disc. Check if the disc is inserted correctly in the cd player. Check if the disc is inserted correctly in the cd player. After resetting the audio, push the eject button. If tape is not ejected, consult your hyundai dealer.Fault code will reset automatically when the temperature returns to normal.
CAUSE
CDP DECK MECHANICAL ERROR (EJECT ERROR, LOADING ERROR) FOCUS ERROR DATA READ ERROR DISC ERROR LOADING ERROR TAPE DECK ERROR TAPE EJECT ERROR TEMPERATURE IS TOO HIGH
Page 132 of 256

1- 120 FEATURES OF YOUR HYUNDAI
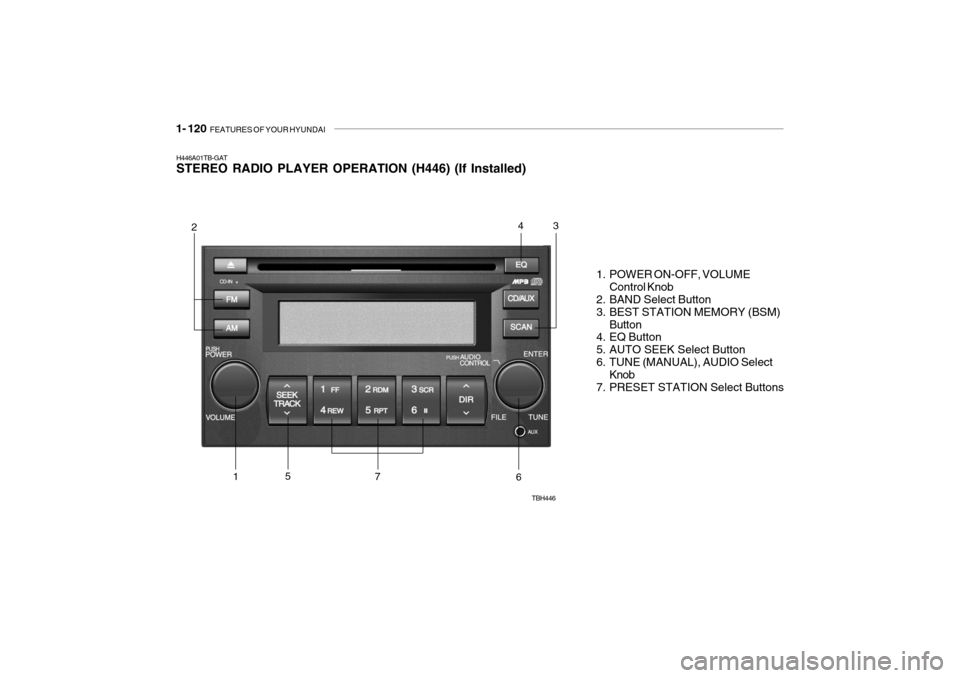
H446A01TB-GAT STEREO RADIO PLAYER OPERATION (H446) (If Installed)
1. POWER ON-OFF, VOLUMEControl Knob
2. BAND Select Button
3. BEST STATION MEMORY (BSM)
Button
4. EQ Button
5. AUTO SEEK Select Button
6. TUNE (MANUAL), AUDIO Select Knob
7. PRESET STATION Select Buttons
TBH446
243
6751
Page 133 of 256

FEATURES OF YOUR HYUNDAI 1- 121
H446B01MC-GAT 1. POWER ON-OFF Control Knob
o The radio unit may be operated when
the ignition key is in the "ACC" or "ON" position. Press the button to switch the power on. The LCD shows the radio frequency in the radio mode,CD/MP3 track in the CD/MP3 mode. To switch the power off, press the button again.
o Push the FM, AM or CD/MP3 to turn on that function without pushingpower ON-OFF control knob.
VOLUME Control Rotate the knob clockwise to increase the volume and turn the knob counter-clockwise to reduce the volume. 2. BAND Select Button Pressing the FM, AM button changes the AM, FM1 and FM2 bands. The mode selected is shown on the display. 3. Best Station Memory (BSM)
Button
When the BSM button is pressed, the six channels from the highest field in- tensity are selected next and stored inmemory. The stations selected are stored in the sequence frequency from the first preset key. 4. EQ Button Press the EQ button to select the CLAS- SIC, POPS, ROCK, JAZZ and OFF MODE for the desired tone quality.Each press of the button changes the display as follows;
5. AUTO SEEK Select Button (Automatic Channel Selection)
Press the AUTO SEEK select button. When the side is pressed, the unit will automatically tune to the next higherfrequency and when the side is pressed, it will automatically tune to the next lower frequency. 6. TUNE (Manual) Select Knob Rotate the knob clockwise to increase the frequency and turn the knob coun-terclockwise to reduce the frequency. AUDIO Select Button Pressing the AUDIO button changes the BASS, TREBLE, FADER and BAL- ANCE mode. The mode selected is shown on thedisplay. After selecting the each mode, rotate the Volume control knob clockwise orcounterclockwise. o BASS Control To increase the BASS, rotate the knob clockwise, while to decrease the bass, rotate the knob counterclockwise. o TREBLE Control Turn to the left or right for the desired treble tone.
CLASSIC
� POPS � ROCK � JAZZ � OFF
Page 134 of 256

1- 122 FEATURES OF YOUR HYUNDAI
o FADER Control Turn the control knob clockwise to emphasize rear speaker sound (frontspeaker sound will be attenuated). When the control knob is turned counterclock- wise, front speaker sound will be em-phasized (rear speaker sound will be attenuated). o BALANCE Control Rotate the knob clockwise to empha- size right speaker sound (Left speakersound will be attenuated). When the control knob is turned counterclock- wise, left speaker sound will be empha-sized (Right speaker sound will be at- tenuated).
!
CAUTION:
o Do not place beverages close to the audio system. The playback mechanism may be damaged ifyou spill them.
o Do not strike or allow anything to
impact the audio system, damageto the system mechanisms could occur.
7. PRESET STATION Select But-
tons
Six stations for AM, FM1 and FM2respectively can be preset in the elec- tronic memory circuit. HOW TO PRESET STATIONS Six AM and twelve FM stations may be programmed into the memory of the radio. Then, by simply pressing the band select button and/or one of the sixstation select buttons, you may recall any of these stations instantly. To pro- gram the stations, follow these steps:
o Press AM, FM selector to set the band for AM, FM1 and FM2.
o Select the desired station to be stored by seek or manual tuning.
o Determine the preset station select button you wish to use to access that station.
o Press the station select button for
more than two seconds. Beep soundwill be heard while depressing the button. You should then release thebutton, and proceed to program the next desired station. A total of 18 stations can be pro-grammed by selecting one AM and two FM station per button.
o When completed, any preset station may be recalled by selecting AM,FM1 or FM2 band and the appropri-ate station button.
Page 135 of 256

FEATURES OF YOUR HYUNDAI 1- 123
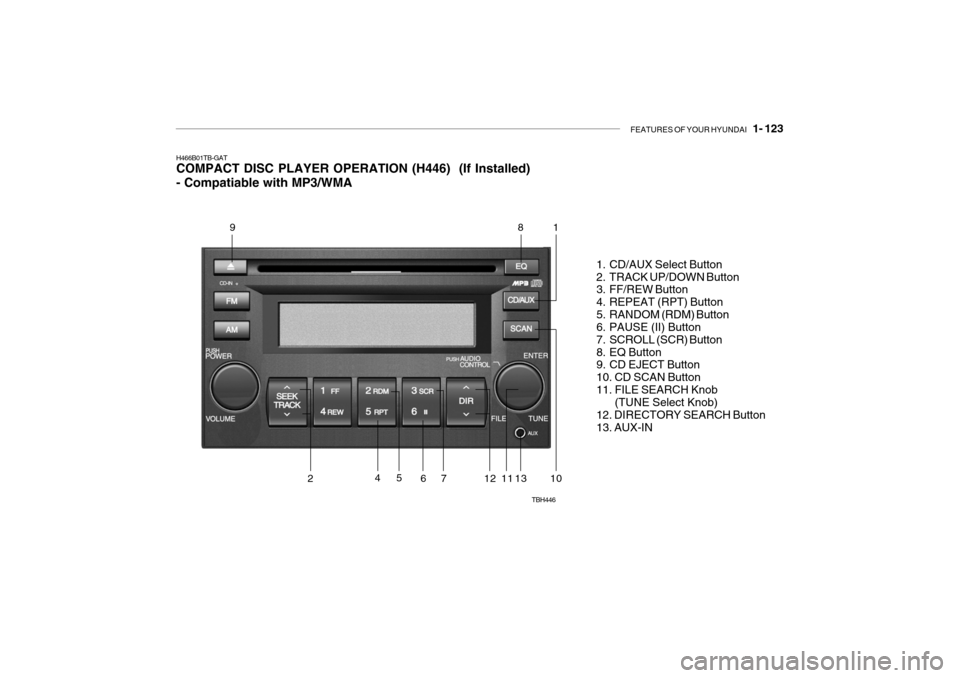
H466B01TB-GAT COMPACT DISC PLAYER OPERATION (H446) (If Installed) - Compatiable with MP3/WMA
1. CD/AUX Select Button
2. TRACK UP/DOWN Button
3. FF/REW Button
4. REPEAT (RPT) Button
5. RANDOM (RDM) Button
6. PAUSE (II) Button
7. SCROLL (SCR) Button
8. EQ Button
9. CD EJECT Button 10. CD SCAN Button11. FILE SEARCH Knob (TUNE Select Knob) 12. DIRECTORY SEARCH Button13. AUX-IN
TBH446
981
1141013127
652
Page 136 of 256

1- 124 FEATURES OF YOUR HYUNDAI
H446D01MC-GAT 1. CD Select Button
o Insert the CD with the label facing
upward.
o Insert the CD to start CD playback, during radio operation.
o If you press the CD button while a
disc is in the CD deck, the CD player will begin playing even if the radio player is being used.
o The CD player can be used when the ignition switch is in either the “ON” or“ACC” position.
o Push the CD button to start CD playback without pushing power ON-OFF control knob. (Only when a CDis in the deck.)
NOTE :
o Do not stick paper or tape etc., on the label side or the recording side of any discs, as it may cause a malfunction.
o The unit can play a multi-session CD-R (recordable CD) and CD-RW(rewritable CD) that consists of more than two sessions.Please refer to the manual of CD- R/CD-RW recorder or CD-R/CD-RW software for more information onfinalization process. o Depending on the recording sta-
tus, some CD-Rs/CD-RWs may notbe played on this unit.
o Playback of MP3 and WMA file formats are supported. Load toplay time for these formats may belonger due to the compressed nature of these discs.
AUX Select Button Listening to the external player con- nected to AUX-IN
o Connect the external player to AUX- IN.
o Press CD/AUX button to turn to AUX- IN.
o You can enjoy the music played in
the external player through the auto mobile speaker. NOTE :
o If the AUX device is not connected,
you cannot switch to AUX-IN mode.
o When the AUX device is discon-
nected while in AUX-IN mode, the unit automatically switches its mode to last selected mode (CDmode or RADIO mode).
o The quality of sound may be de-
fected or distorted when the unit'sEQ control and AUX device's EQ control are both enabled (not flat). When you want to use the unit'sEQ control feature, disable the AUX device's EQ control feature, and vice versa.
o When using a portable audio de- vice connected to the power out-let, noise may occur during play-back. If this happens, use the power source of the portable audio de- vice.
Page 137 of 256

FEATURES OF YOUR HYUNDAI 1- 125
2. TRACK UP/DOWN Button
o The desired track on the disc cur-
rently being played can be selected using the track number.
o Press button once to skip forward
to the beginning of the next track.Press within a second after play- back begins to quickly move back- ward through a CD.If you press after more than a second, it will take you to the begin- ning of the file you are now listeningto.
3. FF/REW Button If you want to fast forward or reverse through the compact disc track, push and hold the FF or REW button. When you release the button, the com-pact disc player will resume playing. 4. REPEAT (RPT) Button
o To repeat the track you are currently listening to, press the RPT button. To cancel, press it again.
o To repeat the music within selected folder, press the RPT button for morethan 1 second. Beep sound will beheard depressing the button. To cancel, press it again (MP3 CD only).
o If you do not release RPT operation
when the track ends, it will automati-cally be replayed. This process will be continued untilyou push the button again or turn the power OFF then ON.
5. RANDOM (RDM) Button
o Press the RDM button to listen to recorded tracks in random sequence. Press RDM again to cancel or turn the audio unit OFF then ON. The unit defaults to playing tracks in sequen-tial order.
o To listen the music within the se-
lected folder in random order, pressthe RDM button within a second. Press the button more than a second to play all tracks randomly on thedisc. To cancel, press it again or or turn the power OFF then ON (MP3 CD only).
6. PAUSE (II) Button Press the PAUSE (ll) button to pause the disc. 7. SCROLL (SCR) Button When the CD is playing, you can scroll through long file names by pressing theSCR button for approximately one sec- ond. The file name will appear on the LCD for about three seconds. 8. EQ Button Press the EQ button to select the CLAS- SIC, POPS, ROCK, JAZZ and OFFMODE for the desired tone quality. Each press of the button changes the display as follows; 9. CD EJECT Button When the
button is pressed with a CD
loaded, the CD will eject. Forcing to eject : To force to eject a CD, press this button for more than 2 sec-onds. (Do this only when a CD is jammed and you can not eject it in the normal way.) CLASSIC
� POPS � ROCK � JAZZ � OFF
Page 138 of 256

1- 126 FEATURES OF YOUR HYUNDAI
!
CAUTION:
o Do not insert warped or poor qual- ity discs into the CD player as damage to the unit may occur.
o Do not insert anything like coins
into the player slot as damage tothe unit may occur.
o Do not place beverages close to
the audio system. The playbackmechanism may be damaged if you spill them.
10. CD SCAN Button
o To playback the first 10 seconds of
each track, press the CD SCAN button more than 1 second.
o To playback the first 10 seconds of
each track in the selected folder,press the CD SCAN button within 1 second (MP3 CD only).
o Press the CD SCAN button again within 10 sec. when you have reachedthe desired track.
11. FILE SEARCH Knob (TUNE Select Knob)
o You can skip the track by turning the FILE SEARCH knob clockwise or counterclockwise.After selecting the desired track, press the FILE SEARCH knob to playback the track.If you do not press the FILE SEARCH knob within five seconds, the search will stop. 12. DIRECTORY SEARCH
Button
o You can move through the folder by pushing the DIR button to up ( ) anddown ( ).After moving the desired folder, press the FILE SEARCH knob to playback the selected folder.If you do not press the FILE SEARCH knob within five seconds, the search will stop.
NOTE :
o To assure proper operation of the unit, keep the vehicle interior tem- perature within a normal range by using the vehicle's air condition- ing or heating system.
o When replacing the fuse, replace it with a fuse having the correctcapacity.
o All stored bookmarks are all erased when the car battery is discon-nected or power to the vehicle islost. If this occurs, the bookmarks will have to be reset.
o This equipment is designed to be
used only in a 12 volt DC batterysystem with negative ground.
o This unit is made of precisionparts. Do not attempt to disas- semble or adjust any parts.
o When driving your vehicle, be sure to keep the volume of the unit setlow enough to allow you to hearsounds coming from the outside.
o Do not expose this equipment (in-
cluding the speakers and tape) towater or excessive moisture.
Page 139 of 256

FEATURES OF YOUR HYUNDAI 1- 127
o Do not strike or allow anything to
impact the audio system, damage to the system mechanisms could occur.
o Off-road or rough surface driving may cause the compact disc toskip. Do not use the compact disc when driving in such conditionsas damage to the compact disc face could occur.
o Do not attempt to grab or pull the
compact disc out while the disc isbeing pulled into the audio unit by the self-loading mechanism. Dam-age to the audio unit and compact disc could occur.
o Avoid using recorded compact
discs in your audio unit. Originalcompact discs are recommended.
Page 140 of 256

1- 128 FEATURES OF YOUR HYUNDAI
Storage When not in use, place your discs in their individual cases and store them ina cool place away from the sun, heat, and dust. Do not grip or pull out the disc with yourhand while the disc is being pulled into the unit by the self loading mechanism. Keep Your Discs Clean
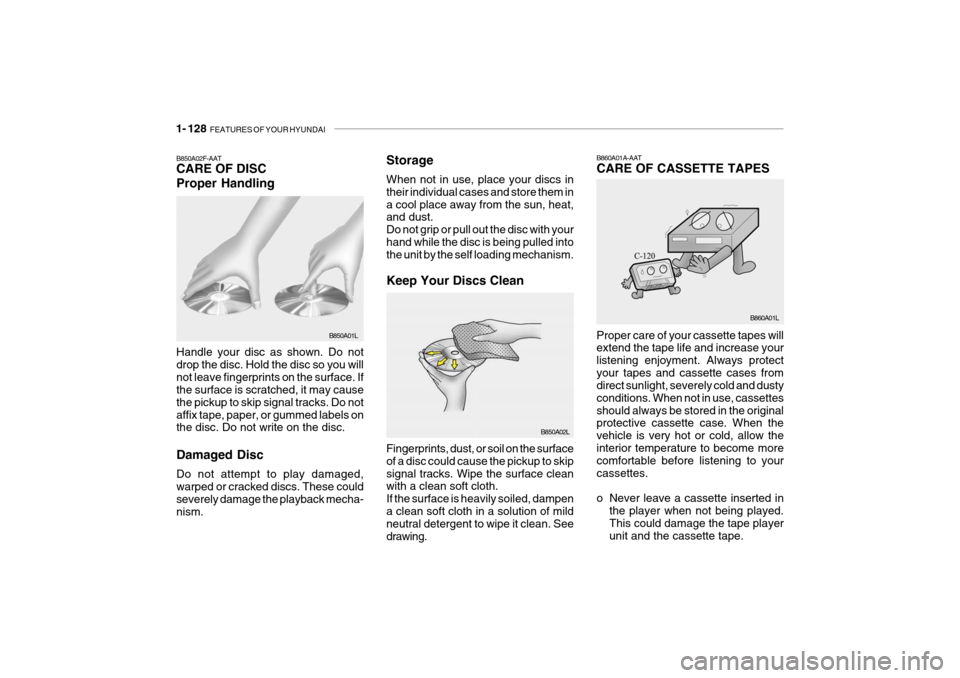
B850A02F-AAT CARE OF DISC Proper Handling Handle your disc as shown. Do not drop the disc. Hold the disc so you willnot leave fingerprints on the surface. If the surface is scratched, it may cause the pickup to skip signal tracks. Do notaffix tape, paper, or gummed labels on the disc. Do not write on the disc. Damaged Disc Do not attempt to play damaged, warped or cracked discs. These could severely damage the playback mecha- nism. B850A01L
B850A02L
Fingerprints, dust, or soil on the surfaceof a disc could cause the pickup to skipsignal tracks. Wipe the surface clean with a clean soft cloth. If the surface is heavily soiled, dampena clean soft cloth in a solution of mild neutral detergent to wipe it clean. See drawing.B860A01A-AAT CARE OF CASSETTE TAPES Proper care of your cassette tapes will extend the tape life and increase your listening enjoyment. Always protectyour tapes and cassette cases from direct sunlight, severely cold and dusty conditions. When not in use, cassettesshould always be stored in the original protective cassette case. When the vehicle is very hot or cold, allow theinterior temperature to become more comfortable before listening to your cassettes.
o Never leave a cassette inserted in the player when not being played. This could damage the tape player unit and the cassette tape. B860A01L