lock Hyundai Grand Santa Fe 2014 User Guide
[x] Cancel search | Manufacturer: HYUNDAI, Model Year: 2014, Model line: Grand Santa Fe, Model: Hyundai Grand Santa Fe 2014Pages: 718, PDF Size: 13.5 MB
Page 41 of 718
Safety features of your vehicle
22 3
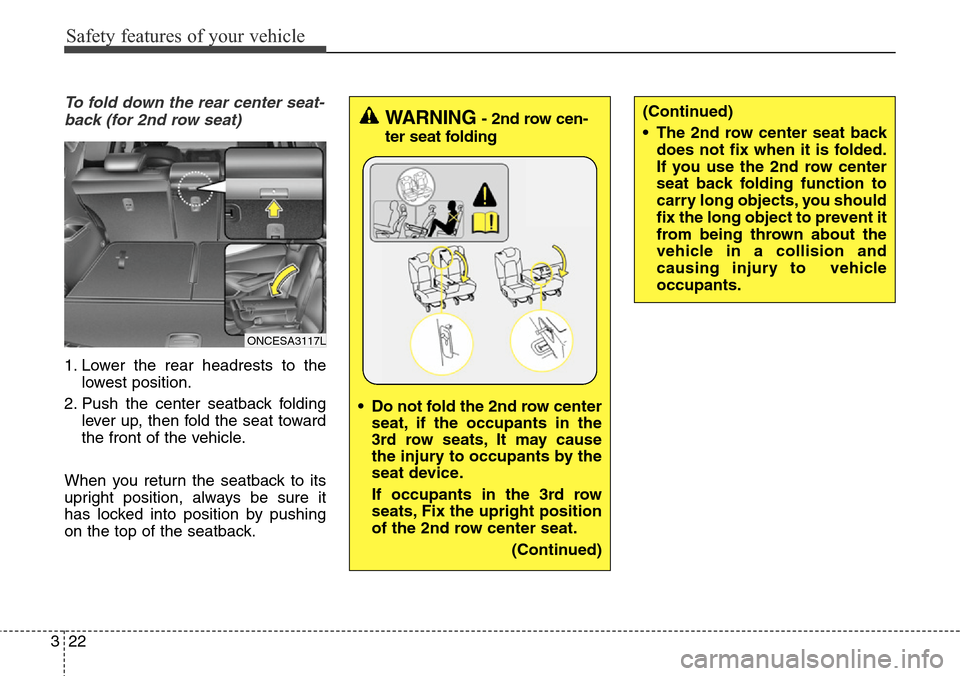
To fold down the rear center seat-
back (for 2nd row seat)
1. Lower the rear headrests to the
lowest position.
2. Push the center seatback folding
lever up, then fold the seat toward
the front of the vehicle.
When you return the seatback to its
upright position, always be sure it
has locked into position by pushing
on the top of the seatback.
WARNING - 2nd row cen-
ter seat folding
• Do not fold the 2nd row center
seat, if the occupants in the
3rd row seats, It may cause
the injury to occupants by the
seat device.
If occupants in the 3rd row
seats, Fix the upright position
of the 2nd row center seat.
(Continued)(Continued)
• The 2nd row center seat back
does not fix when it is folded.
If you use the 2nd row center
seat back folding function to
carry long objects, you should
fix the long object to prevent it
from being thrown about the
vehicle in a collision and
causing injury to vehicle
occupants.
ONCESA3117L
Page 44 of 718
325
Safety features of your vehicle
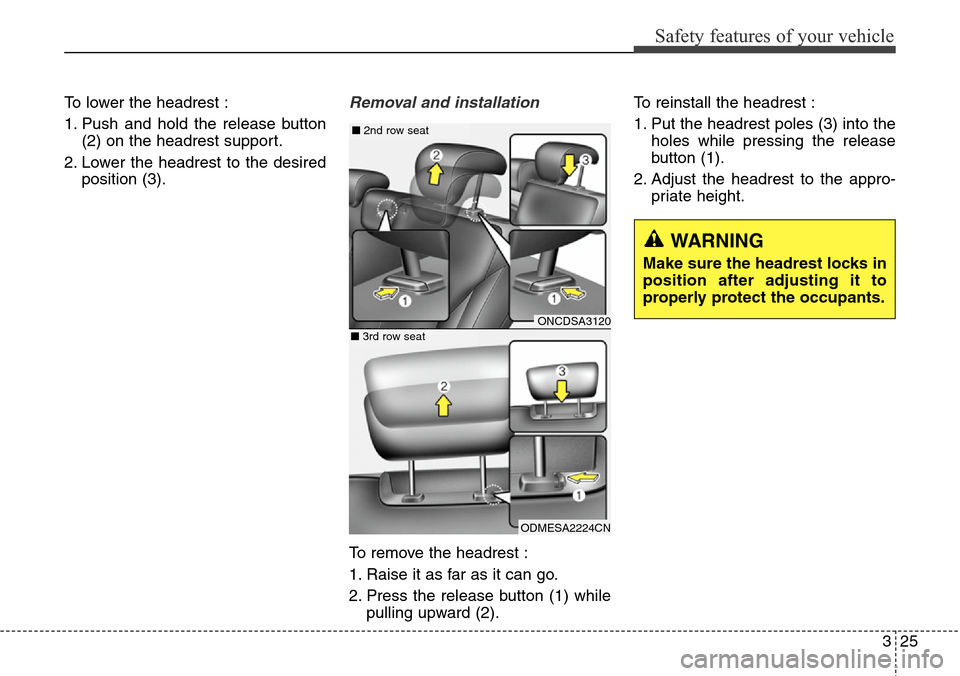
To lower the headrest :
1. Push and hold the release button
(2) on the headrest support.
2. Lower the headrest to the desired
position (3).Removal and installation
To remove the headrest :
1. Raise it as far as it can go.
2. Press the release button (1) while
pulling upward (2).To reinstall the headrest :
1. Put the headrest poles (3) into the
holes while pressing the release
button (1).
2. Adjust the headrest to the appro-
priate height.
ONCDSA3120
ODMESA2224CN
■2nd row seat
■3rd row seat
WARNING
Make sure the headrest locks in
position after adjusting it to
properly protect the occupants.
Page 49 of 718
Safety features of your vehicle
30 3
If the driver's seat belt is not fastened
when the ignition switch is turned ON
or if it is unfastened after the ignition
switch is ON, the seat belt warning
chime will sound for approximately 6
seconds. At this time, if the seat belt
is fastened, the chime will stop at
once. (if equipped)Ty p e B
As a reminder to the driver, the dri-
ver’s seat belt warning lights will illu-
minate for approximately 6 seconds
each time you turn the ignition switch
ON regardless of belt fastening.
If the driver’s seat belt is not fastened
when the ignition switch is turned ON
or if it is disconnected after the igni-
tion switch is turned ON, the seat
belt warning light will illuminate until
the belt is fastened.
If you continue not to fasten the seat
belt and you drive over 9 km/h, the
illuminated warning light will start to
blink until you drive under 6 km/h.
If you continue not to fasten the seat
belt and you drive over 20 km/h (12
mph) the seat belt warning chime will
sound for approximately 100 sec-
onds and the corresponding warning
light will blink.Lap/shoulder belt
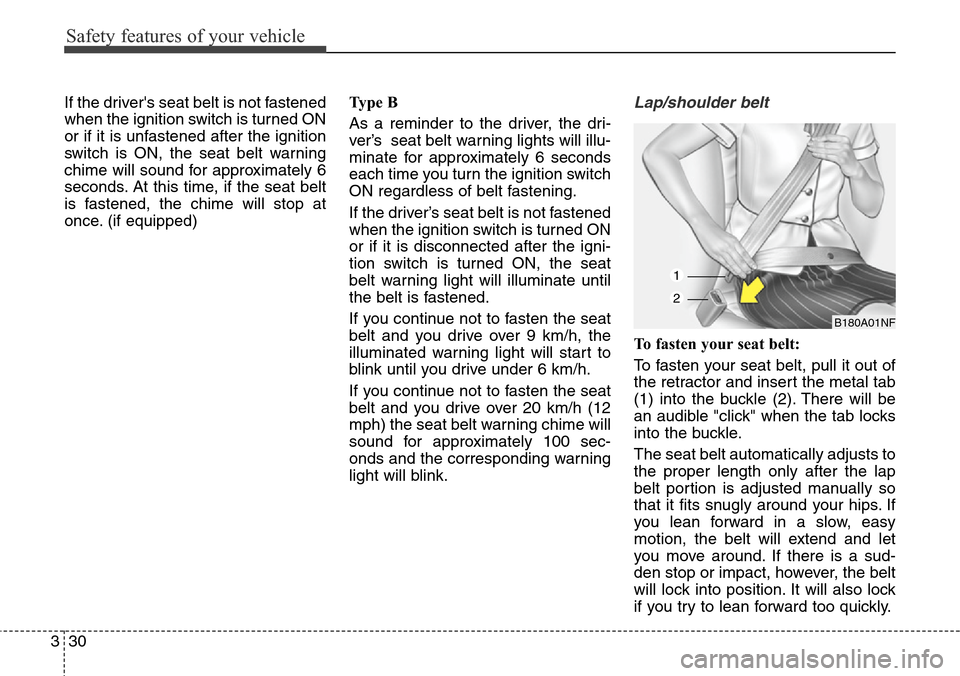
To fasten your seat belt:
To fasten your seat belt, pull it out of
the retractor and insert the metal tab
(1) into the buckle (2). There will be
an audible "click" when the tab locks
into the buckle.
The seat belt automatically adjusts to
the proper length only after the lap
belt portion is adjusted manually so
that it fits snugly around your hips. If
you lean forward in a slow, easy
motion, the belt will extend and let
you move around. If there is a sud-
den stop or impact, however, the belt
will lock into position. It will also lock
if you try to lean forward too quickly.
B180A01NF
1
2
Page 50 of 718
331
Safety features of your vehicle
✽NOTICE
If you are not able to pull out the
seat belt from the retractor, firmly
pull the belt out and release it. Then
you will be able to pull the belt out
smoothly.
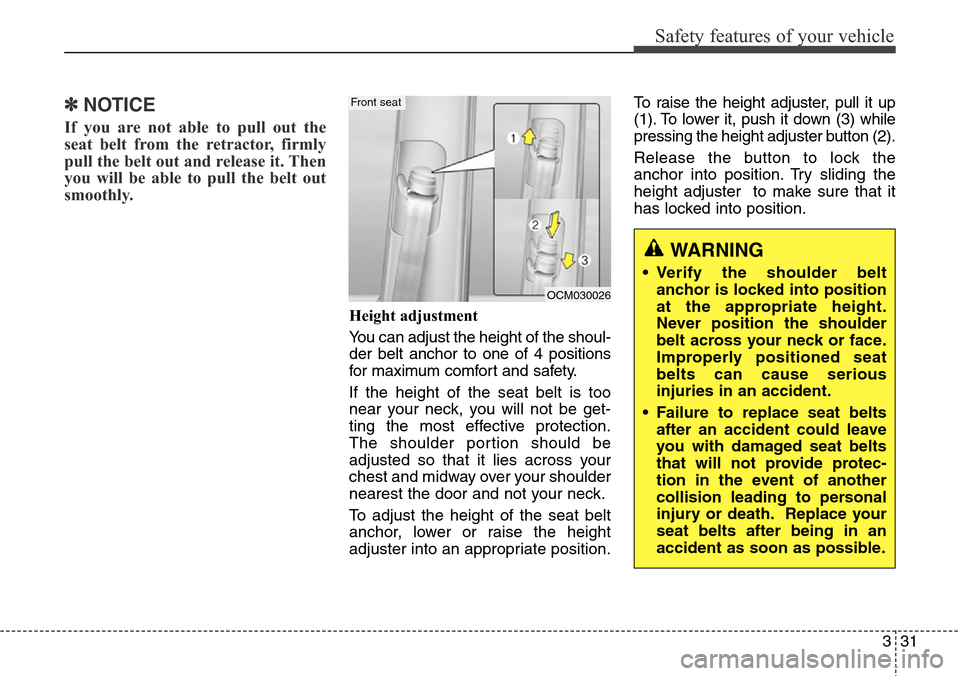
Height adjustment
You can adjust the height of the shoul-
der belt anchor to one of 4 positions
for maximum comfort and safety.
If the height of the seat belt is too
near your neck, you will not be get-
ting the most effective protection.
The shoulder portion should be
adjusted so that it lies across your
chest and midway over your shoulder
nearest the door and not your neck.
To adjust the height of the seat belt
anchor, lower or raise the height
adjuster into an appropriate position.To raise the height adjuster, pull it up
(1). To lower it, push it down (3) while
pressing the height adjuster button (2).
Release the button to lock the
anchor into position. Try sliding the
height adjuster to make sure that it
has locked into position.
OCM030026
Front seat
WARNING
• Verify the shoulder belt
anchor is locked into position
at the appropriate height.
Never position the shoulder
belt across your neck or face.
Improperly positioned seat
belts can cause serious
injuries in an accident.
• Failure to replace seat belts
after an accident could leave
you with damaged seat belts
that will not provide protec-
tion in the event of another
collision leading to personal
injury or death. Replace your
seat belts after being in an
accident as soon as possible.
Page 51 of 718

Safety features of your vehicle
32 3
When using the rear center seat belt,
the buckle with the “CENTER” mark
must be used.To release the seat belt:
The seat belt is released by pressing
the release button (1) in the locking
buckle. When it is released, the belt
should automatically draw back into
the retractor.
If this does not happen, check the
belt to be sure it is not twisted, then
try again.
B200A01NF
WARNING
You should place the lap belt
portion as low as possible and
snugly across your hips, not on
your waist. If the lap belt is locat-
ed too high on your waist, it may
increase the chance of injury in
the event of a collision. Both
arms should not be under or
over the belt. Rather, one should
be over and the other under, as
shown in the illustration.
Never wear the seat belt under
the arm nearest the door.
ODM032051B210A01NF1
Page 53 of 718
Safety features of your vehicle
34 3
Pre-tensioner seat belt
(if equipped)
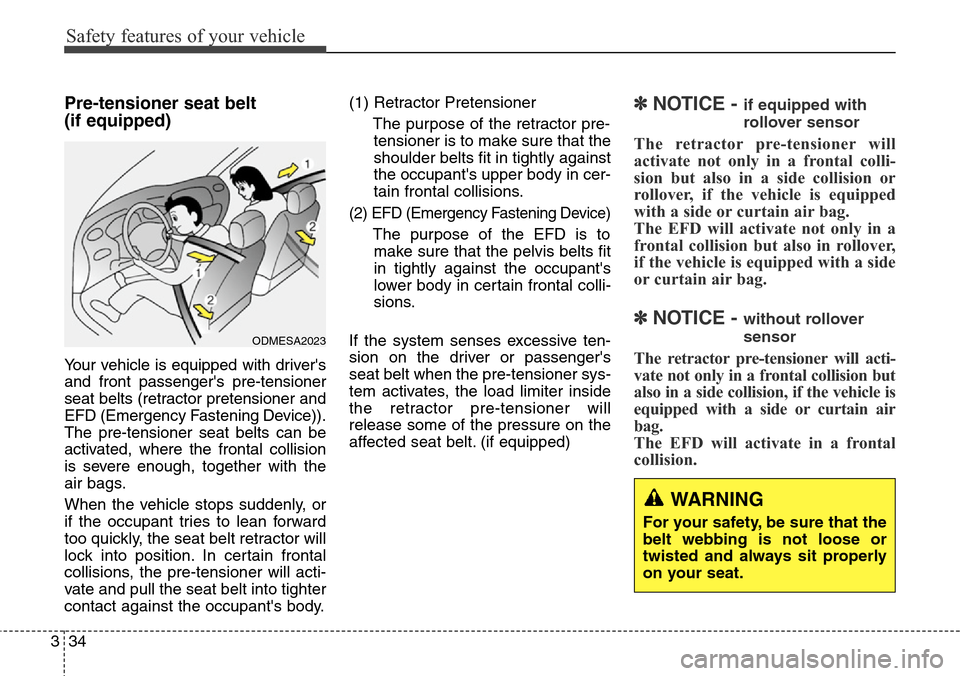
Your vehicle is equipped with driver's
and front passenger's pre-tensioner
seat belts (retractor pretensioner and
EFD (Emergency Fastening Device)).
The pre-tensioner seat belts can be
activated, where the frontal collision
is severe enough, together with the
air bags.
When the vehicle stops suddenly, or
if the occupant tries to lean forward
too quickly, the seat belt retractor will
lock into position. In certain frontal
collisions, the pre-tensioner will acti-
vate and pull the seat belt into tighter
contact against the occupant's body.(1) Retractor Pretensioner
The purpose of the retractor pre-
tensioner is to make sure that the
shoulder belts fit in tightly against
the occupant's upper body in cer-
tain frontal collisions.
(2) EFD (Emergency Fastening Device)
The purpose of the EFD is to
make sure that the pelvis belts fit
in tightly against the occupant's
lower body in certain frontal colli-
sions.
If the system senses excessive ten-
sion on the driver or passenger's
seat belt when the pre-tensioner sys-
tem activates, the load limiter inside
the retractor pre-tensioner will
release some of the pressure on the
affected seat belt. (if equipped)
✽NOTICE - if equipped with
rollover sensor
The retractor pre-tensioner will
activate not only in a frontal colli-
sion but also in a side collision or
rollover, if the vehicle is equipped
with a side or curtain air bag.
The EFD will activate not only in a
frontal collision but also in rollover,
if the vehicle is equipped with a side
or curtain air bag.
✽NOTICE - without rollover
sensor
The retractor pre-tensioner will acti-
vate not only in a frontal collision but
also in a side collision, if the vehicle is
equipped with a side or curtain air
bag.
The EFD will activate in a frontal
collision.
ODMESA2023
WARNING
For your safety, be sure that the
belt webbing is not loose or
twisted and always sit properly
on your seat.
Page 61 of 718
Safety features of your vehicle
42 3
WARNING
To reduce a risk of serious or
fatal injuries:
• Children of all ages are safer
when restrained in the rear
seat. A child riding in the
front passenger seat can be
forcefully struck by an inflat-
ing air bag resulting in seri-
ous or fatal injuries.
• Always follow the instructions
for installation and use of the
child restraint maker.
• Always make sure the child
seat is secured properly in the
car and your child is securely
restrained in the child seat.
• Never hold a child in your
arms or lap when riding in a
vehicle. The violent forces cre-
ated during a crash will tear
the child from your arms and
throw the child against the
car’s interior.
(Continued)
(Continued)
• Never put a seat belt over
yourself and a child. During a
crash, the belt could press
deep into the child causing
serious internal injuries.
• Never leave children unat-
tended in a vehicle – not even
for a short time. The car can
heat up very quickly, resulting
in serious injuries to children
inside. Even very young chil-
dren may inadvertently cause
the vehicle to move, entangle
themselves in the windows, or
lock themselves or others
inside the vehicle.
• Never allow two children, or
any two persons, to use the
same seat belt.
• Children often squirm and
reposition themselves improp-
erly. Never let a child ride with
the shoulder belt under their
arm or behind their back.
Always properly position and
secure children in the rear
seat.
(Continued)(Continued)
• Never allow a child to stand-
up or kneel on the seat or
floorboard of a moving vehi-
cle. During a collision or sud-
den stop, the child can be vio-
lently thrown against the vehi-
cles interior, resulting in seri-
ous injury.
• Never use an infant carrier or
a child safety seat that
"hooks" over a seatback, it
may not provide adequate
security in an accident.
• Seat belts can become very
hot, especially when the car is
parked in direct sunlight.
Always check seat belt buck-
les before fastening them
over a child.
• After an accident, we recom-
mend that the system be
checked by an authorized
HYUNDAI dealer.
(Continued)
Page 64 of 718
345
Safety features of your vehicle
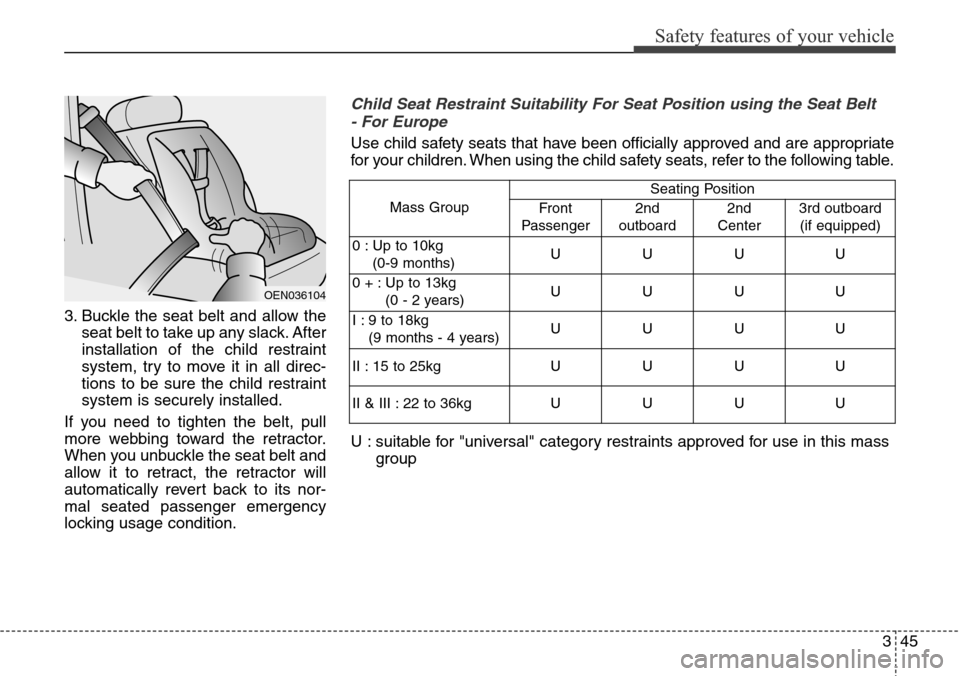
3. Buckle the seat belt and allow the
seat belt to take up any slack. After
installation of the child restraint
system, try to move it in all direc-
tions to be sure the child restraint
system is securely installed.
If you need to tighten the belt, pull
more webbing toward the retractor.
When you unbuckle the seat belt and
allow it to retract, the retractor will
automatically revert back to its nor-
mal seated passenger emergency
locking usage condition.
OEN036104
Child Seat Restraint Suitability For Seat Position using the Seat Belt
- For Europe
Use child safety seats that have been officially approved and are appropriate
for your children. When using the child safety seats, refer to the following table.
U : suitable for "universal" category restraints approved for use in this mass
group
Mass GroupSeating Position
Front
Passenger2nd
outboard2nd
Center3rd outboard
(if equipped)
0 : Up to 10kg
(0-9 months)UUU U
0 + : Up to 13kg
(0 - 2 years)UUU U
I : 9 to 18kg
(9 months - 4 years)UUU U
II : 15 to 25kg U U U U
II & III : 22 to 36kg U U U U
Page 76 of 718
357
Safety features of your vehicle
In addition, do not place front-facing
child restraints in the front passen-
ger’s seat either. If the front passen-
ger air bag inflates, it would cause
serious or fatal injuries to the child.
If your vehicle is equipped with the
passenger’s front air bag ON/OFF
switch, you can activate or deactivate
the front passenger’s air bag when
necessary.Air bag warning and indicator
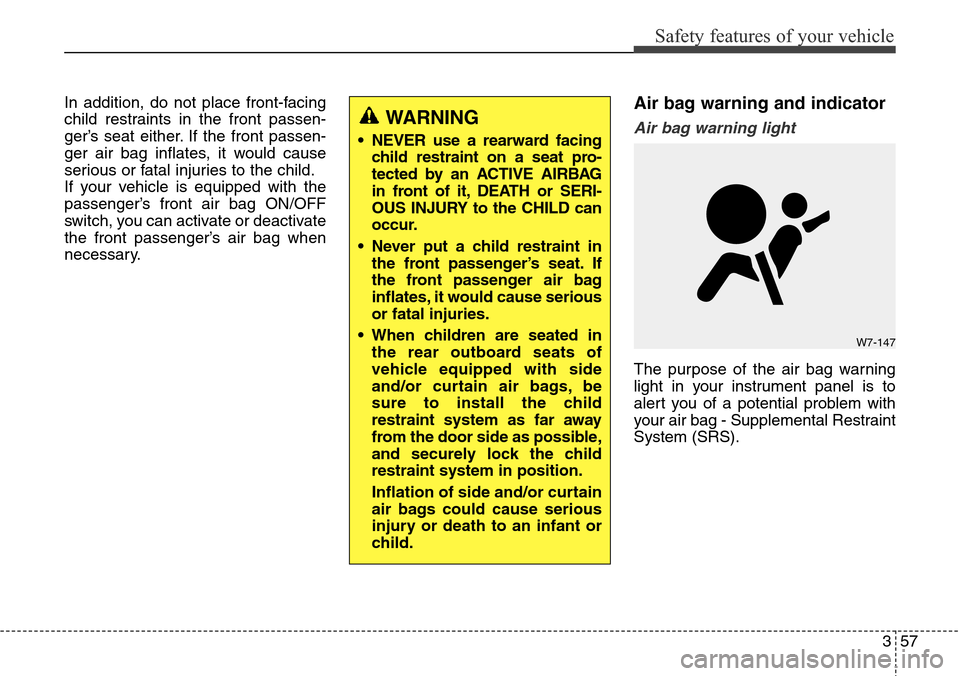
Air bag warning light
The purpose of the air bag warning
light in your instrument panel is to
alert you of a potential problem with
your air bag - Supplemental Restraint
System (SRS).
WARNING
• NEVER use a rearward facing
child restraint on a seat pro-
tected by an ACTIVE AIRBAG
in front of it, DEATH or SERI-
OUS INJURY to the CHILD can
occur.
• Never put a child restraint in
the front passenger’s seat. If
the front passenger air bag
inflates, it would cause serious
or fatal injuries.
• When children are seated in
the rear outboard seats of
vehicle equipped with side
and/or curtain air bags, be
sure to install the child
restraint system as far away
from the door side as possible,
and securely lock the child
restraint system in position.
Inflation of side and/or curtain
air bags could cause serious
injury or death to an infant or
child.
W7-147
Page 81 of 718
Safety features of your vehicle
62 3
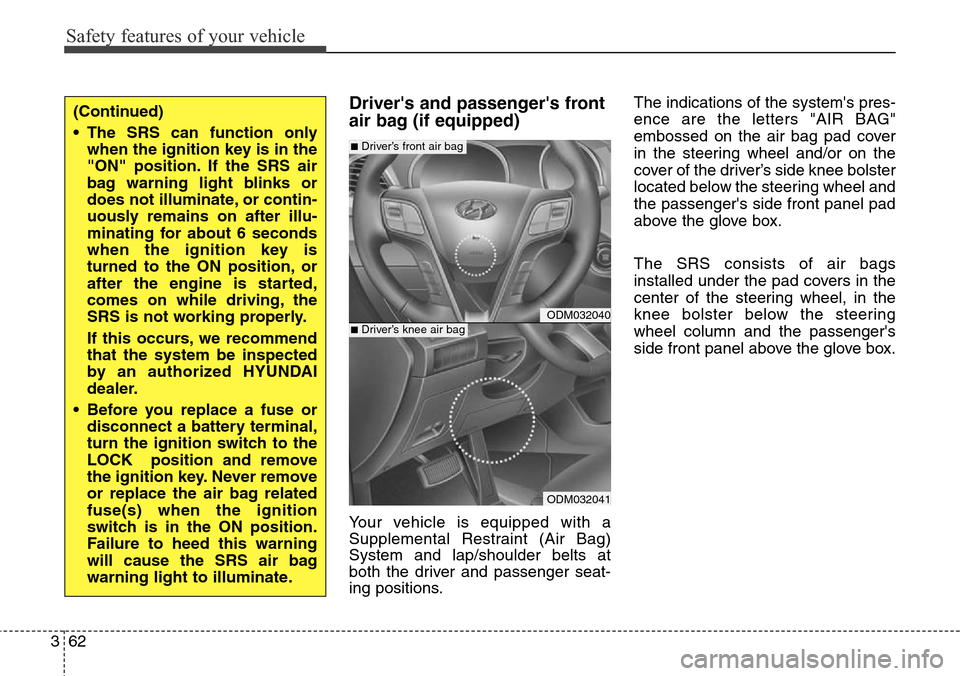
Driver's and passenger's front
air bag (if equipped)
Your vehicle is equipped with a
Supplemental Restraint (Air Bag)
System and lap/shoulder belts at
both the driver and passenger seat-
ing positions.The indications of the system's pres-
ence are the letters "AIR BAG"
embossed on the air bag pad cover
in the steering wheel and/or on the
cover of the driver’s side knee bolster
located below the steering wheel and
the passenger's side front panel pad
above the glove box.
The SRS consists of air bags
installed under the pad covers in the
center of the steering wheel, in the
knee bolster below the steering
wheel column and the passenger's
side front panel above the glove box.
(Continued)
• The SRS can function only
when the ignition key is in the
"ON" position. If the SRS air
bag warning light blinks or
does not illuminate, or contin-
uously remains on after illu-
minating for about 6 seconds
when the ignition key is
turned to the ON position, or
after the engine is started,
comes on while driving, the
SRS is not working properly.
If this occurs, we recommend
that the system be inspected
by an authorized HYUNDAI
dealer.
• Before you replace a fuse or
disconnect a battery terminal,
turn the ignition switch to the
LOCK position and remove
the ignition key. Never remove
or replace the air bag related
fuse(s) when the ignition
switch is in the ON position.
Failure to heed this warning
will cause the SRS air bag
warning light to illuminate.
ODM032040
ODM032041
■Driver’s front air bag
■Driver’s knee air bag