rear view mirror Hyundai Grand Santa Fe 2016 Owner's Manual
[x] Cancel search | Manufacturer: HYUNDAI, Model Year: 2016, Model line: Grand Santa Fe, Model: Hyundai Grand Santa Fe 2016Pages: 717, PDF Size: 18.59 MB
Page 14 of 717
Your vehicle at a glance
2 2
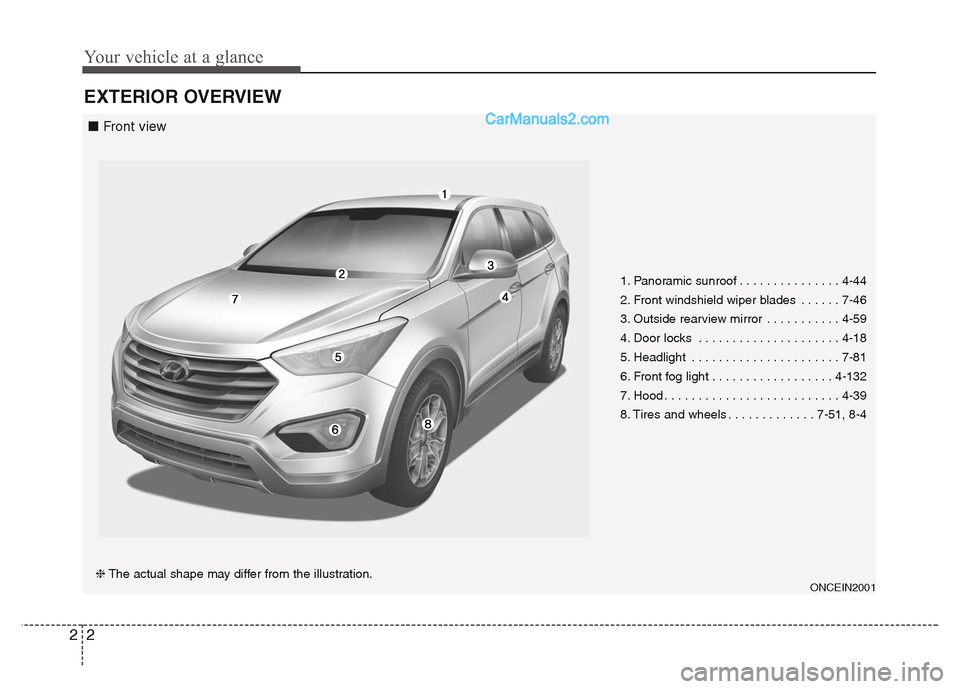
EXTERIOR OVERVIEW
1. Panoramic sunroof . . . . . . . . . . . . . . . 4-44
2. Front windshield wiper blades . . . . . . 7-46
3. Outside rearview mirror . . . . . . . . . . . 4-59
4. Door locks . . . . . . . . . . . . . . . . . . . . . 4-18
5. Headlight . . . . . . . . . . . . . . . . . . . . . . 7-81
6. Front fog light . . . . . . . . . . . . . . . . . . 4-132
7. Hood . . . . . . . . . . . . . . . . . . . . . . . . . . 4-39
8. Tires and wheels . . . . . . . . . . . . . 7-51, 8-4
ONCEIN2001❈The actual shape may differ from the illustration.
■ Front view
Page 16 of 717
Your vehicle at a glance
4 2
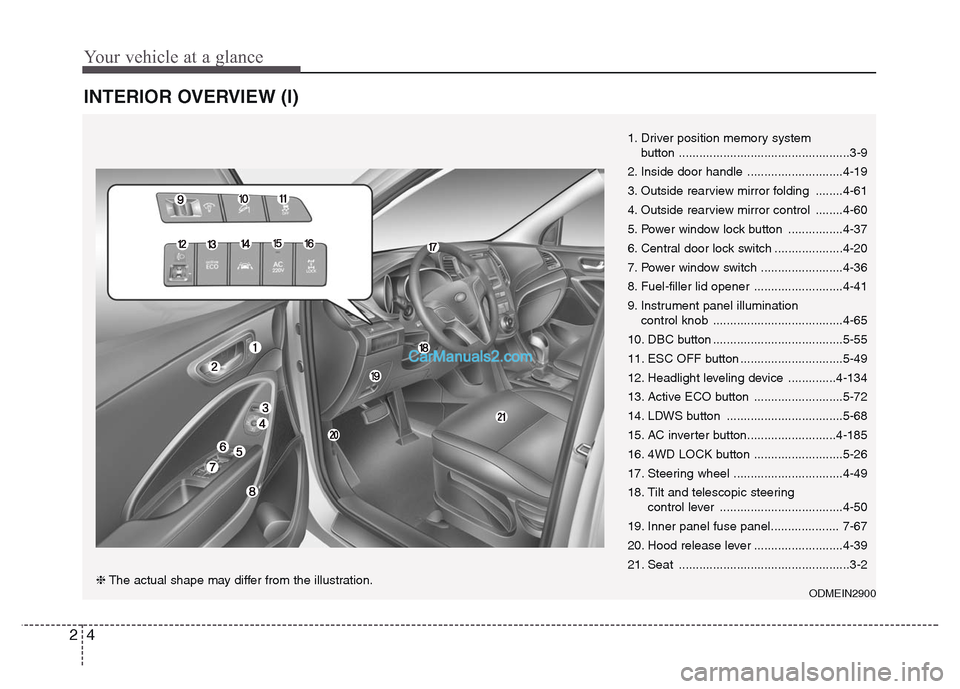
INTERIOR OVERVIEW (I)
1. Driver position memory system
button ..................................................3-9
2. Inside door handle ............................4-19
3. Outside rearview mirror folding ........4-61
4. Outside rearview mirror control ........4-60
5. Power window lock button ................4-37
6. Central door lock switch ....................4-20
7. Power window switch ........................4-36
8. Fuel-filler lid opener ..........................4-41
9. Instrument panel illumination
control knob ......................................4-65
10. DBC button ......................................5-55
11. ESC OFF button ..............................5-49
12. Headlight leveling device ..............4-134
13. Active ECO button ..........................5-72
14. LDWS button ..................................5-68
15. AC inverter button..........................4-185
16. 4WD LOCK button ..........................5-26
17. Steering wheel ................................4-49
18. Tilt and telescopic steering
control lever ....................................4-50
19. Inner panel fuse panel.................... 7-67
20. Hood release lever ..........................4-39
21. Seat ..................................................3-2
ODMEIN2900❈The actual shape may differ from the illustration.
Page 28 of 717
39
Safety features of your vehicle
Lumbar support (for driver’s seat)
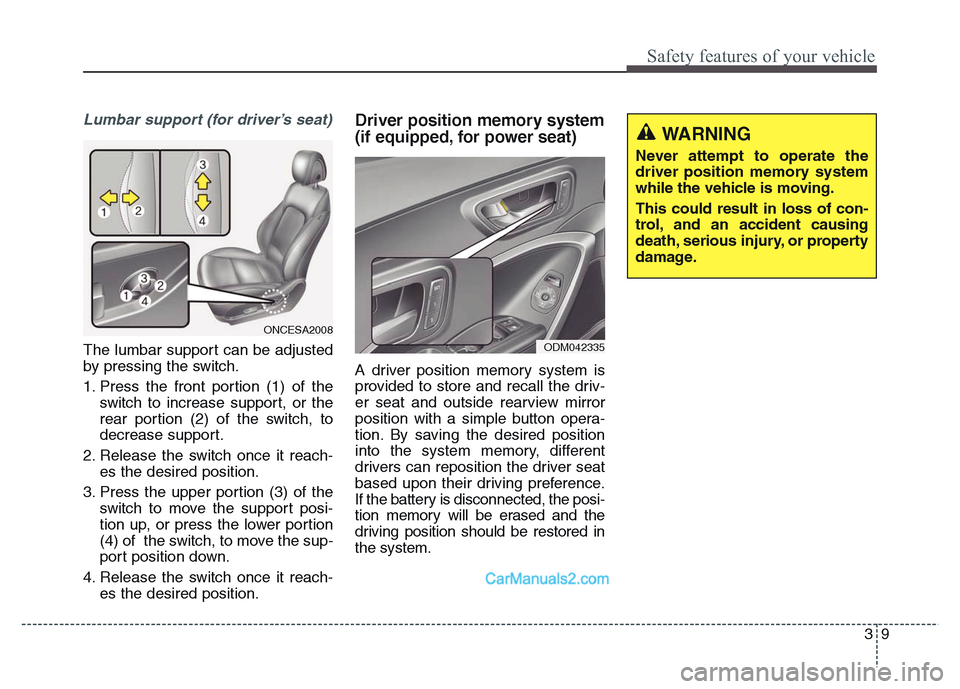
The lumbar support can be adjusted
by pressing the switch.
1. Press the front portion (1) of the
switch to increase support, or the
rear portion (2) of the switch, to
decrease support.
2. Release the switch once it reach-
es the desired position.
3. Press the upper portion (3) of the
switch to move the support posi-
tion up, or press the lower portion
(4) of the switch, to move the sup-
port position down.
4. Release the switch once it reach-
es the desired position.
Driver position memory system
(if equipped, for power seat)
A driver position memory system is
provided to store and recall the driv-
er seat and outside rearview mirror
position with a simple button opera-
tion. By saving the desired position
into the system memory, different
drivers can reposition the driver seat
based upon their driving preference.
If the battery is disconnected, the posi-
tion memory will be erased and the
driving position should be restored in
the system.
ONCESA2008
ODM042335
WARNING
Never attempt to operate the
driver position memory system
while the vehicle is moving.
This could result in loss of con-
trol, and an accident causing
death, serious injury, or property
damage.
Page 29 of 717
Safety features of your vehicle
10 3
Storing positions into memory
using the buttons on the door
Storing driver’s seat positions
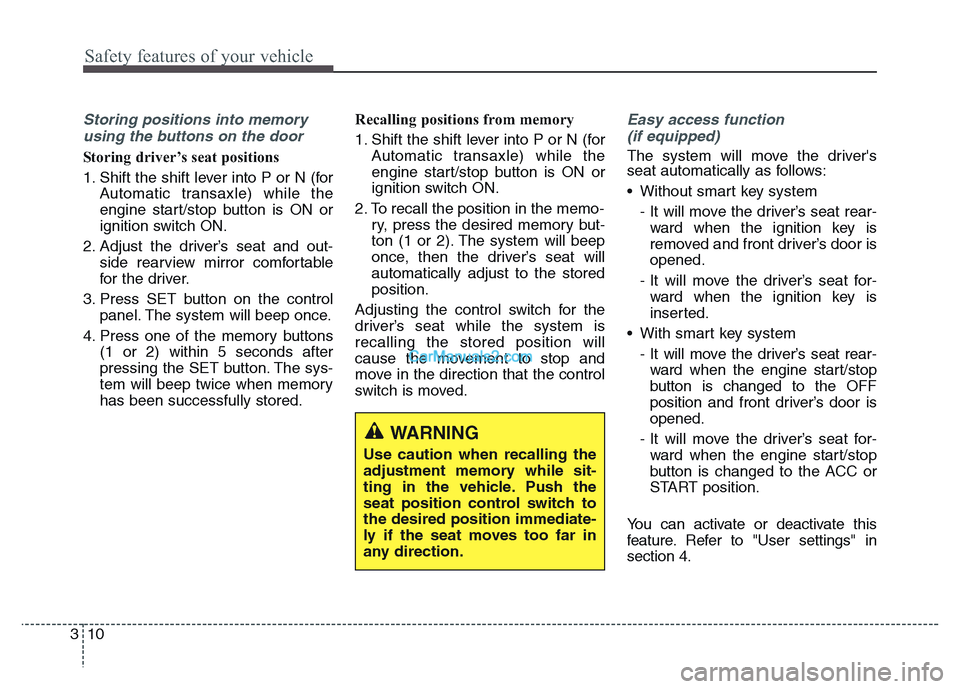
1. Shift the shift lever into P or N (for
Automatic transaxle) while the
engine start/stop button is ON or
ignition switch ON.
2. Adjust the driver’s seat and out-
side rearview mirror comfortable
for the driver.
3. Press SET button on the control
panel. The system will beep once.
4. Press one of the memory buttons
(1 or 2) within 5 seconds after
pressing the SET button. The sys-
tem will beep twice when memory
has been successfully stored.Recalling positions from memory
1. Shift the shift lever into P or N (for
Automatic transaxle) while the
engine start/stop button is ON or
ignition switch ON.
2. To recall the position in the memo-
ry, press the desired memory but-
ton (1 or 2). The system will beep
once, then the driver’s seat will
automatically adjust to the stored
position.
Adjusting the control switch for the
driver’s seat while the system is
recalling the stored position will
cause the movement to stop and
move in the direction that the control
switch is moved.
Easy access function
(if equipped)
The system will move the driver's
seat automatically as follows:
• Without smart key system
- It will move the driver’s seat rear-
ward when the ignition key is
removed and front driver’s door is
opened.
- It will move the driver’s seat for-
ward when the ignition key is
inserted.
• With smart key system
- It will move the driver’s seat rear-
ward when the engine start/stop
button is changed to the OFF
position and front driver’s door is
opened.
- It will move the driver’s seat for-
ward when the engine start/stop
button is changed to the ACC or
START position.
You can activate or deactivate this
feature. Refer to "User settings" in
section 4.
WARNING
Use caution when recalling the
adjustment memory while sit-
ting in the vehicle. Push the
seat position control switch to
the desired position immediate-
ly if the seat moves too far in
any direction.
Page 98 of 717
Features of your vehicle
Keys . . . . . . . . . . . . . . . . . . . . . . . . . . . . . . . . . . . . . . 4-5
• Record your key number . . . . . . . . . . . . . . . . . . . . . . . 4-5
• Key operations . . . . . . . . . . . . . . . . . . . . . . . . . . . . . . . . 4-5
• Immobilizer system . . . . . . . . . . . . . . . . . . . . . . . . . . . . 4-6
Remote keyless entry . . . . . . . . . . . . . . . . . . . . . . . . 4-8
• Operations . . . . . . . . . . . . . . . . . . . . . . . . . . . . . . . . . . . 4-8
• Transmitter precautions . . . . . . . . . . . . . . . . . . . . . . . 4-10
• Battery replacement . . . . . . . . . . . . . . . . . . . . . . . . . . 4-11
Smart key . . . . . . . . . . . . . . . . . . . . . . . . . . . . . . . . 4-12
• Smart key function . . . . . . . . . . . . . . . . . . . . . . . . . . . 4-12
• Smart key precautions . . . . . . . . . . . . . . . . . . . . . . . . 4-13
• Door lock/unlock in an emergency situation . . . . . . 4-14
Theft-alarm system . . . . . . . . . . . . . . . . . . . . . . . . 4-15
• Armed stage . . . . . . . . . . . . . . . . . . . . . . . . . . . . . . . . . 4-15
• Theft-alarm stage . . . . . . . . . . . . . . . . . . . . . . . . . . . . 4-17
• Disarmed stage. . . . . . . . . . . . . . . . . . . . . . . . . . . . . . . 4-17
Door locks . . . . . . . . . . . . . . . . . . . . . . . . . . . . . . . . 4-18
• From outside the vehicle . . . . . . . . . . . . . . . . . . . . . . 4-18
• From inside the vehicle . . . . . . . . . . . . . . . . . . . . . . . . 4-19
• Door lock/unlock features. . . . . . . . . . . . . . . . . . . . . . 4-21
• Child-protector rear door lock . . . . . . . . . . . . . . . . . 4-22
Tailgate . . . . . . . . . . . . . . . . . . . . . . . . . . . . . . . . . . 4-23
• Non-powered tailgate . . . . . . . . . . . . . . . . . . . . . . . . . 4-23
• Power tailgate . . . . . . . . . . . . . . . . . . . . . . . . . . . . . . . 4-25
• Smart tailgate. . . . . . . . . . . . . . . . . . . . . . . . . . . . . . . . 4-30
• Emergency tailgate safety release . . . . . . . . . . . . . . . 4-33
Windows . . . . . . . . . . . . . . . . . . . . . . . . . . . . . . . . . 4-34
• Power windows . . . . . . . . . . . . . . . . . . . . . . . . . . . . . . 4-35
Hood. . . . . . . . . . . . . . . . . . . . . . . . . . . . . . . . . . . . . 4-39
• Opening the hood . . . . . . . . . . . . . . . . . . . . . . . . . . . . 4-39
• Closing the hood . . . . . . . . . . . . . . . . . . . . . . . . . . . . . 4-40
Fuel filler lid . . . . . . . . . . . . . . . . . . . . . . . . . . . . . . 4-41
• Opening the fuel filler lid . . . . . . . . . . . . . . . . . . . . . . 4-41
• Closing the fuel filler lid . . . . . . . . . . . . . . . . . . . . . . . 4-41
• Emergency fuel filler lid release. . . . . . . . . . . . . . . . . 4-43
Panorama sunroof . . . . . . . . . . . . . . . . . . . . . . . . . 4-44
• Sunroof open warning. . . . . . . . . . . . . . . . . . . . . . . . . 4-44
• Sunshade . . . . . . . . . . . . . . . . . . . . . . . . . . . . . . . . . . . 4-45
• Sliding the sunroof . . . . . . . . . . . . . . . . . . . . . . . . . . . 4-46
• Tilting the sunroof . . . . . . . . . . . . . . . . . . . . . . . . . . . 4-46
• Closing the sunroof . . . . . . . . . . . . . . . . . . . . . . . . . . . 4-47
• Resetting the sunroof . . . . . . . . . . . . . . . . . . . . . . . . . 4-48
Steering wheel . . . . . . . . . . . . . . . . . . . . . . . . . . . . . 4-49
• Electronic power steering . . . . . . . . . . . . . . . . . . . . . . 4-49
• Tilt steering . . . . . . . . . . . . . . . . . . . . . . . . . . . . . . . . . 4-50
• Heated steering wheel . . . . . . . . . . . . . . . . . . . . . . . . . 4-50
• Horn . . . . . . . . . . . . . . . . . . . . . . . . . . . . . . . . . . . . . . . 4-51
• Flex steering wheel . . . . . . . . . . . . . . . . . . . . . . . . . . . 4-52
Mirrors . . . . . . . . . . . . . . . . . . . . . . . . . . . . . . . . . . 4-55
• Inside rearview mirror . . . . . . . . . . . . . . . . . . . . . . . . 4-55
• Outside rearview mirror . . . . . . . . . . . . . . . . . . . . . . 4-59
4
Page 152 of 717
455
Features of your vehicle
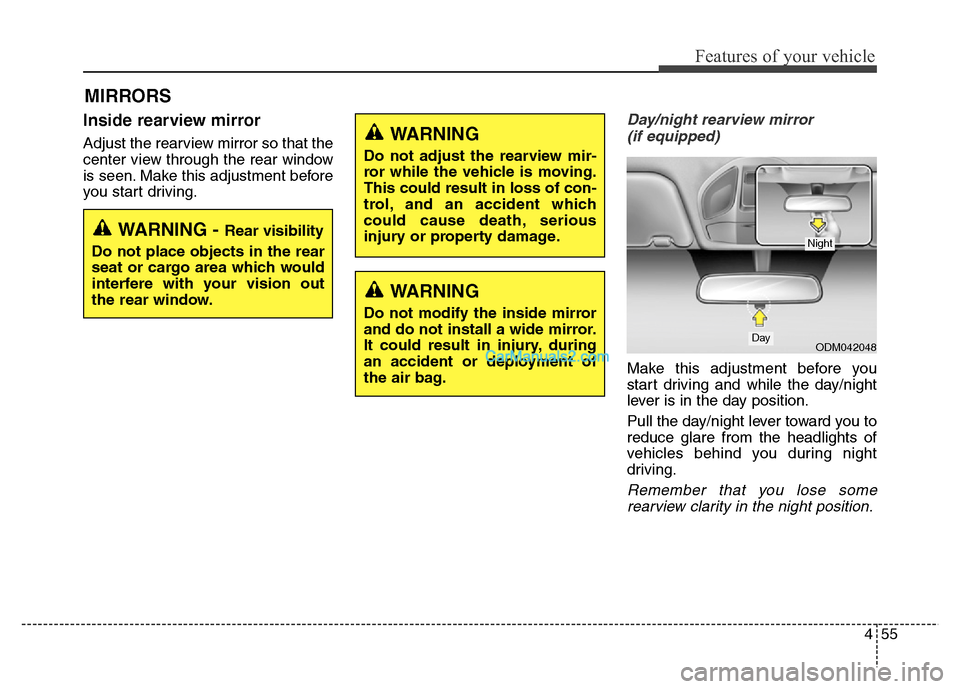
Inside rearview mirror
Adjust the rearview mirror so that the
center view through the rear window
is seen. Make this adjustment before
you start driving.
Day/night rearview mirror
(if equipped)
Make this adjustment before you
start driving and while the day/night
lever is in the day position.
Pull the day/night lever toward you to
reduce glare from the headlights of
vehicles behind you during night
driving.
Remember that you lose some
rearview clarity in the night position.
MIRRORS
WARNING - Rear visibility
Do not place objects in the rear
seat or cargo area which would
interfere with your vision out
the rear window.
ODM042048Day
Night
WARNING
Do not adjust the rearview mir-
ror while the vehicle is moving.
This could result in loss of con-
trol, and an accident which
could cause death, serious
injury or property damage.
WARNING
Do not modify the inside mirror
and do not install a wide mirror.
It could result in injury, during
an accident or deployment of
the air bag.
Page 153 of 717
Features of your vehicle
56 4
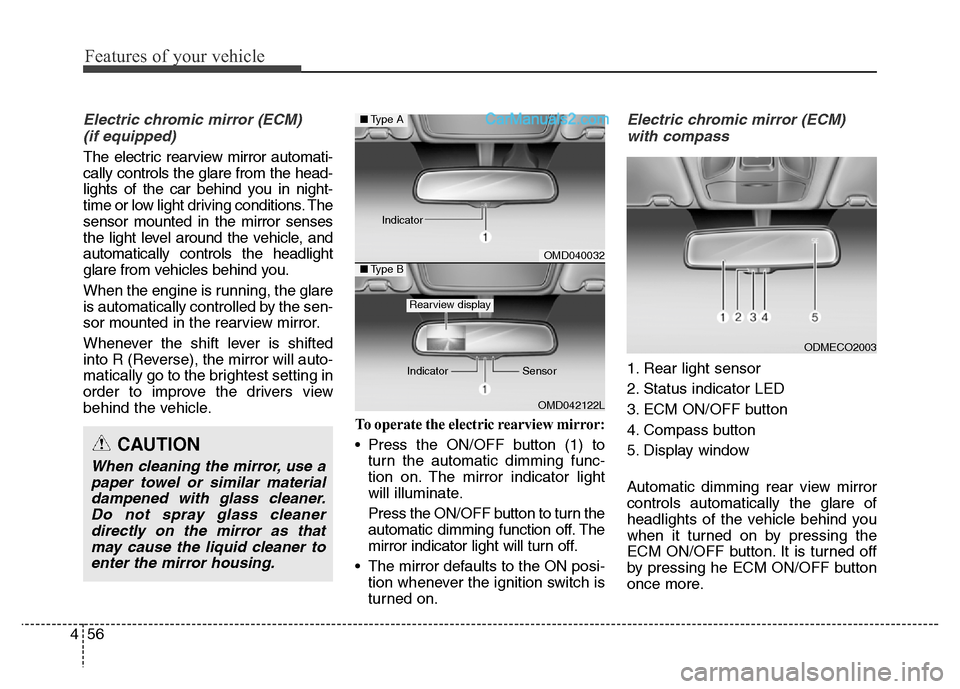
Electric chromic mirror (ECM)
(if equipped)
The electric rearview mirror automati-
cally controls the glare from the head-
lights of the car behind you in night-
time or low light driving conditions. The
sensor mounted in the mirror senses
the light level around the vehicle, and
automatically controls the headlight
glare from vehicles behind you.
When the engine is running, the glare
is automatically controlled by the sen-
sor mounted in the rearview mirror.
Whenever the shift lever is shifted
into R (Reverse), the mirror will auto-
matically go to the brightest setting in
order to improve the drivers view
behind the vehicle.
To operate the electric rearview mirror:
• Press the ON/OFF button (1) to
turn the automatic dimming func-
tion on. The mirror indicator light
will illuminate.
Press the ON/OFF button to turn the
automatic dimming function off. The
mirror indicator light will turn off.
• The mirror defaults to the ON posi-
tion whenever the ignition switch is
turned on.
Electric chromic mirror (ECM)
with compass
1. Rear light sensor
2. Status indicator LED
3. ECM ON/OFF button
4. Compass button
5. Display window
Automatic dimming rear view mirror
controls automatically the glare of
headlights of the vehicle behind you
when it turned on by pressing the
ECM ON/OFF button. It is turned off
by pressing he ECM ON/OFF button
once more.
ODMECO2003
OMD040032
OMD042122L
■Type A
■Type B
Rearview display
Indicator Sensor Indicator
CAUTION
When cleaning the mirror, use a
paper towel or similar material
dampened with glass cleaner.
Do not spray glass cleaner
directly on the mirror as that
may cause the liquid cleaner to
enter the mirror housing.
Page 156 of 717
459
Features of your vehicle
Outside rearview mirror
Be sure to adjust mirror angles
before driving.
Your vehicle is equipped with both
left-hand and right-hand outside
rearview mirrors. The mirrors can be
adjusted remotely with the remote
switch. The mirror heads can be fold-
ed back to prevent damage during an
automatic car wash or when passing
in a narrow street.WARNING - Rearview
mirrors
• The outside rearview mirror is
convex. Objects seen in the
mirror are closer than they
appear.
• Use your interior rearview
mirror or direct observation to
determine the actual distance
of following vehicles when
changing lanes.CAUTION
Do not scrape ice off the mirror
face; this may damage the sur-
face of the glass. If ice should
restrict movement of the mirror,
do not force the mirror for
adjustment. To remove ice, use
a deicer spray, or a sponge or
soft cloth with very warm water.
CAUTION
If the mirror is jammed with ice,
do not adjust the mirror by force.
Use an approved spray de-icer
(not radiator antifreeze) to
release the frozen mechanism or
move the vehicle to a warm
place and allow the ice to melt.
Page 157 of 717
Features of your vehicle
60 4
Remote control
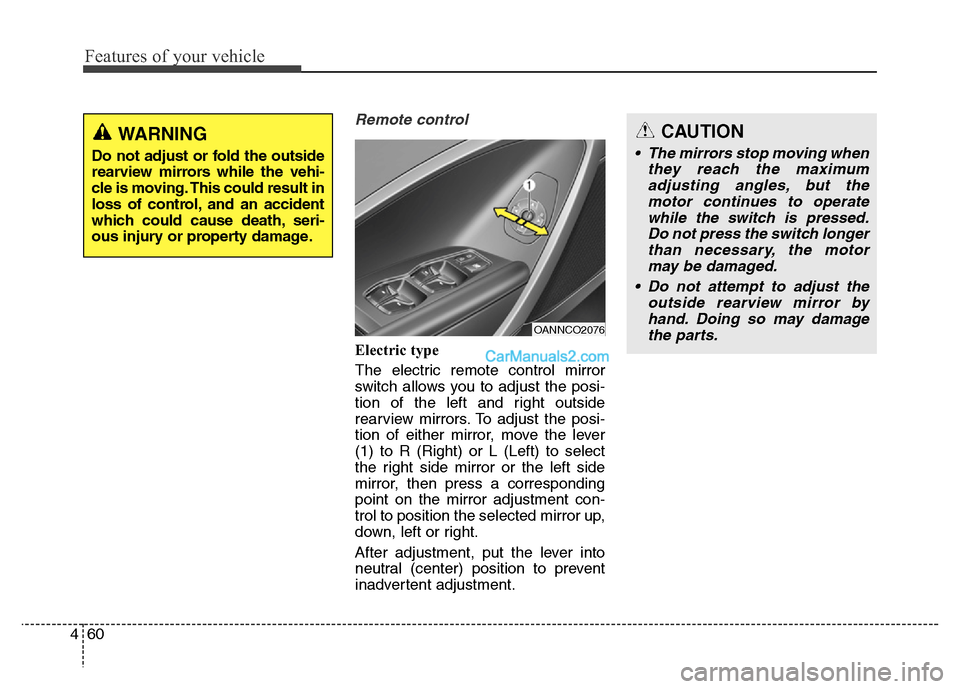
Electric type
The electric remote control mirror
switch allows you to adjust the posi-
tion of the left and right outside
rearview mirrors. To adjust the posi-
tion of either mirror, move the lever
(1) to R (Right) or L (Left) to select
the right side mirror or the left side
mirror, then press a corresponding
point on the mirror adjustment con-
trol to position the selected mirror up,
down, left or right.
After adjustment, put the lever into
neutral (center) position to prevent
inadvertent adjustment.
OANNCO2076
CAUTION
• The mirrors stop moving when
they reach the maximum
adjusting angles, but the
motor continues to operate
while the switch is pressed.
Do not press the switch longer
than necessary, the motor
may be damaged.
• Do not attempt to adjust the
outside rearview mirror by
hand. Doing so may damage
the parts.
WARNING
Do not adjust or fold the outside
rearview mirrors while the vehi-
cle is moving. This could result in
loss of control, and an accident
which could cause death, seri-
ous injury or property damage.
Page 158 of 717
461
Features of your vehicle
Reverse parking aid function
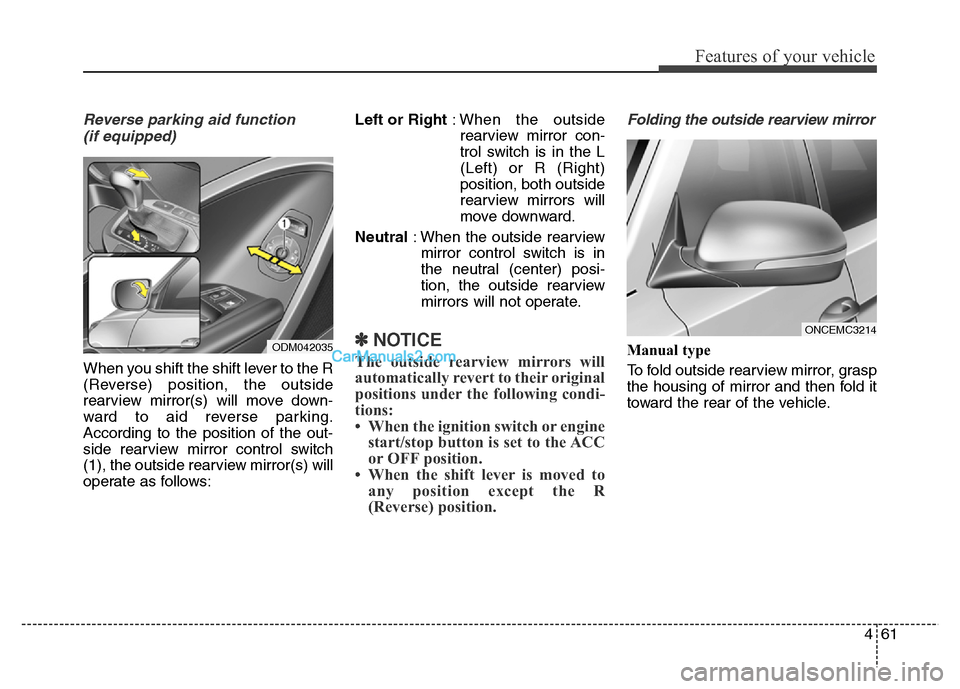
(if equipped)
When you shift the shift lever to the R
(Reverse) position, the outside
rearview mirror(s) will move down-
ward to aid reverse parking.
According to the position of the out-
side rearview mirror control switch
(1), the outside rearview mirror(s) will
operate as follows:Left or Right: When the outside
rearview mirror con-
trol switch is in the L
(Left) or R (Right)
position, both outside
rearview mirrors will
move downward.
Neutral: When the outside rearview
mirror control switch is in
the neutral (center) posi-
tion, the outside rearview
mirrors will not operate.
✽NOTICE
The outside rearview mirrors will
automatically revert to their original
positions under the following condi-
tions:
• When the ignition switch or engine
start/stop button is set to the ACC
or OFF position.
• When the shift lever is moved to
any position except the R
(Reverse) position.
Folding the outside rearview mirror
Manual type
To fold outside rearview mirror, grasp
the housing of mirror and then fold it
toward the rear of the vehicle.
ONCEMC3214
ODM042035