oil type Hyundai Grandeur 2002 Owner's Manual
[x] Cancel search | Manufacturer: HYUNDAI, Model Year: 2002, Model line: Grandeur, Model: Hyundai Grandeur 2002Pages: 230, PDF Size: 3.82 MB
Page 52 of 230
FEATURES OF YOUR HYUNDAI 1- 39
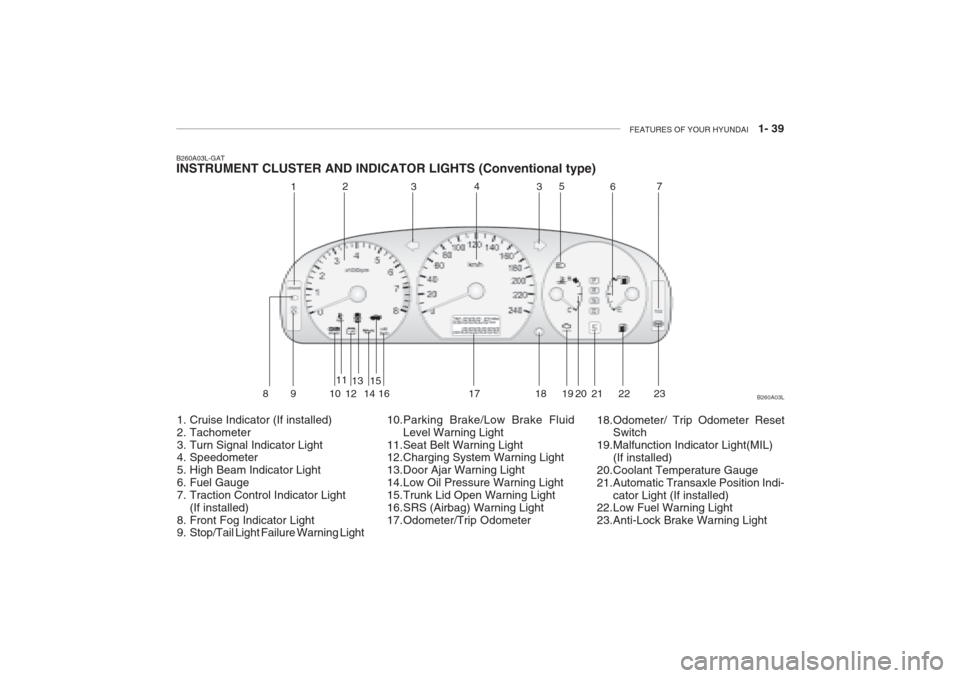
B260A03L-GAT INSTRUMENT CLUSTER AND INDICATOR LIGHTS (Conventional type)
1. Cruise Indicator (If installed)
2. Tachometer
3. Turn Signal Indicator Light
4. Speedometer
5. High Beam Indicator Light
6. Fuel Gauge
7. Traction Control Indicator Light (If installed)
8. Front Fog Indicator Light
9. Stop/Tail Light Failure Warning Light 10.Parking Brake/Low Brake Fluid
Level Warning Light
11.Seat Belt Warning Light
12.Charging System Warning Light
13.Door Ajar Warning Light
14.Low Oil Pressure Warning Light
15.Trunk Lid Open Warning Light
16.SRS (Airbag) Warning Light
17.Odometer/Trip Odometer 18.Odometer/ Trip Odometer Reset
Switch
19.Malfunction Indicator Light(MIL)
(If installed)
20.Coolant Temperature Gauge
21.Automatic Transaxle Position Indi-
cator Light (If installed)
22.Low Fuel Warning Light
23.Anti-Lock Brake Warning Light B260A03L
1
2
343
5
67
89 1 011
1213
1415
16 17 18 19 20 21 22
23
Page 53 of 230
1- 40 FEATURES OF YOUR HYUNDAI
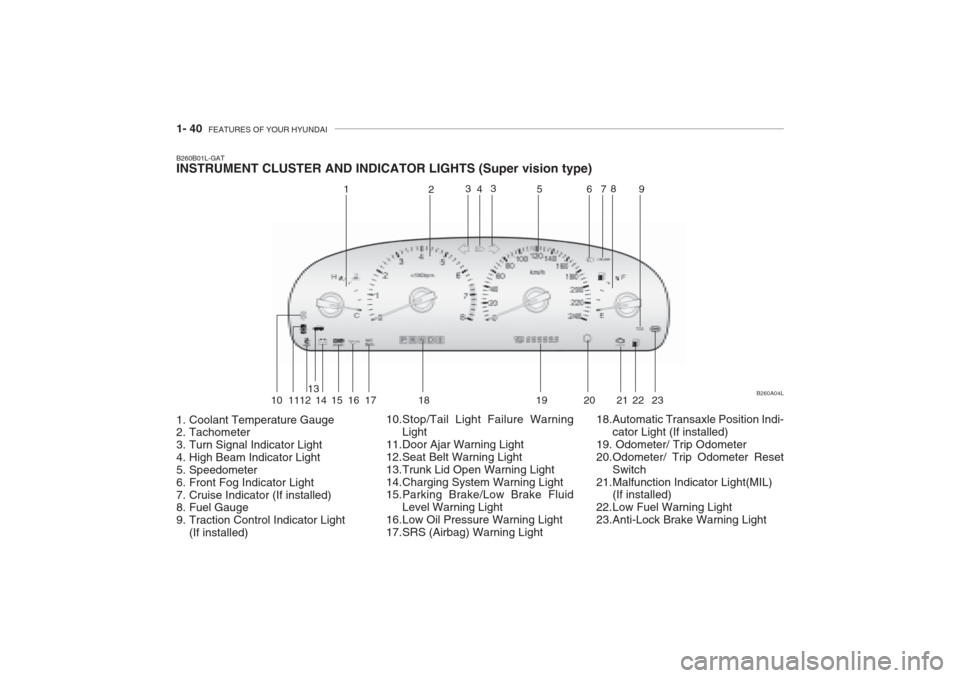
B260B01L-GAT INSTRUMENT CLUSTER AND INDICATOR LIGHTS (Super vision type)
1. Coolant Temperature Gauge
2. Tachometer
3. Turn Signal Indicator Light
4. High Beam Indicator Light
5. Speedometer
6. Front Fog Indicator Light
7. Cruise Indicator (If installed)
8. Fuel Gauge
9. Traction Control Indicator Light
(If installed) 10.Stop/Tail Light Failure Warning
Light
11.Door Ajar Warning Light
12.Seat Belt Warning Light
13.Trunk Lid Open Warning Light
14.Charging System Warning Light
15.Parking Brake/Low Brake Fluid Level Warning Light
16.Low Oil Pressure Warning Light
17.SRS (Airbag) Warning Light 18.Automatic Transaxle Position Indi-
cator Light (If installed)
19. Odometer/ Trip Odometer
20.Odometer/ Trip Odometer Reset Switch
21.Malfunction Indicator Light(MIL) (If installed)
22.Low Fuel Warning Light
23.Anti-Lock Brake Warning Light B260A04L
1
2
4
3 3
56 78
9
10 1112 13
14 15 16 17 18 19 20 21 22 23
Page 145 of 230
2- 16 DRIVING YOUR HYUNDAI
C160F01A-AAT Check Spark Plugs and Ignition System Inspect your spark plugs as described in Section 6 and replace them if neces-sary. Also check all ignition wiring andcomponents to be sure they are notcracked, worn or damaged in any way. C160G01A-GAT To Keep Locks from Freezing To keep the locks from freezing, squirt an approved de-icer fluid or glycerineinto the key opening. If a lock is cov-ered with ice, squirt it with an approvedde-icing fluid to remove the ice. If the lock is frozen internally, you may be able to thaw it out by using a heatedkey. Handle the heated key with careto avoid burning your fingers. NOTE: The proper temperature for using the immobilizer key is from -40°C to 80°C. If you heat the immobilizerkey over 80°C to open the frozenlock, it may cause damage to thetransponder in its head.
C160C01A-AAT Use High Quality Ethylene Glycol Coolant Your Hyundai is delivered with high quality ethylene glycol coolant in thecooling system. It is the only type of coolant that should be used because it helps prevent corrosion in the coolingsystem, lubricates the water pump andprevents freezing. Be sure to replaceor replenish your coolant in accor-dance with the maintenance schedule in Section 5. Before winter, have your coolant tested to assure that its freez-ing point is sufficient for the tempera-tures anticipated during the winter. C160D01A-AAT Check Battery and Cables Winter puts additional burdens on the battery system. Visually inspect thebattery and cables as described inSection 6. The level of charge in yourbattery can be checked by your Hyun- dai dealer or a service station.
C160E01A-AATChange to "Winter Weight" Oil if Necessary In some climates it is recommended that a lower viscosity "winter weight"oil be used during cold weather. See Section 9 for recommendations. If you aren't sure what weight oil you shoulduse, consult your Hyundai dealer.
noted that installing tire chains on thetire will provide a greater driving force,but will not prevent side skids. NOTE: Tire chains are not legal in all prov- inces. Check province laws before fitting tire chains.
Page 146 of 230
DRIVING YOUR HYUNDAI 2- 17
C160I01A-AAT Don't Let Your Parking Brake Freeze Under some conditions your parking brake can freeze in the engaged posi-tion. This is most likely to happenwhen there is an accumulation of snow or ice around or near the rear brakes or if the brakes are wet. If there is a riskthe parking brake may freeze, apply itonly temporarily while you put the gearselector lever in "P" (automatic) or infirst or reverse gear (manual transaxle) and block the rear wheels so the car cannot roll. Then release the parkingbrake.
C160H01A-AAT Use Approved Anti-Freeze in Window Washer System To keep the water in the window washer system from freezing, add an approvedanti-freeze solution in accordance withinstructions on the container. Windowwasher anti-freeze is available fromHyundai dealers and most auto parts outlets. Do not use engine coolant or other types of anti-freeze as thesemay damage the finish.
C160K01A-AAT Carry Emergency Equipment Depending on the severity of the weather where you drive your car, youshould carry appropriate emergency equipment. Some of the items you may want to carry include tire chains,tow straps or chains, flashlight, emer-gency flares, sand, a shovel, jumpercables, a window scraper, gloves,ground cloth, coveralls, a blanket, etc.
C160J01A-AAT Don't Let Ice and Snow Accumu- late Underneath Under some conditions, snow and ice can build up under the fenders andinterfere with the steering. When driv-ing in severe winter conditions wherethis may happen, you should periodi- cally check underneath the car to be sure the movement of the front wheelsand the steering components is notobstructed.
C170A01A-AAT HIGH SPEED MOTORING Pre-Trip Inspections 1. Tires: Adjust the tire inflation pressures tospecification. Low tire inflation pres-sures will result in overheating andpossible failure of the tires. Avoid using worn or damaged tires which may result in reduced traction ortire failure. NOTE: Never exceed the maximum tire in- flation pressure shown on the tires. 2. Fuel, engine coolant and engine oil: High speed travel consumes 1.5 timesmore fuel than urban motoring. Do notforget to check both engine coolantand engine oil. 3. Drive belt: A loose or damaged drive belt mayresult in overheating of the engine.
Page 168 of 230
4- 6 CORROSION PREVENTION AND APPEARANCE CARE
E040E01A-AAT Cleaning the Windows You may use any household window cleaner on the windows. However,when cleaning the inside of the rearwindow be careful not to damage therear window defroster wiring. E050A01A-AAT Any Questions? If you have any questions about the care of your car, consult your Hyundaidealer.
E040D01A-AAT Cleaning the Seat Belts To clean the seat belts, use a cloth or sponge with mild soap or detergentand warm water. Do not use strongdetergents, dye, bleach or abrasivematerials on the seat belts as this may weaken the fabric. While cleaning the belts, inspect themfor excessive wear, cuts, fraying orother signs of damage and replacethem if necessary.
E040C01A-AAT Cleaning the Carpets Use a foam-type carpet cleaner. Clean- ers of this type are available in aerosolcans in liquid form or powder. Read theinstructions and follow them exactly.Using a vacuum cleaner with the ap- propriate attachment, remove as much dirt from the carpets as possible. Applythe foam following the manufacturer'sdirections, then rub in overlappingcircles. Do not add water. These clean-ers work best when the carpet is kept as dry as possible.
will keep your leather lustrous, beauti- ful and ensure you have many years ofwear.Take a piece of cheese cloth and usingany mild soap and lukewarm water, work up a good lather. Thoroughly wash the leather. Wipe clean with aslightly damp cloth and dry with softcloth. Do this as often as the leatherbecomes soiled. During tanning operations, sufficient oils are incorporated through process-ing that none need be applied duringthe life of the leather. Oil applied to thefinished surface will in no way help theleather and may do more harm than good. Varnishes and furniture polishes should never be used under any con-ditions.
Page 172 of 230
5- 4 VEHICLE MAINTENANCE REQUIREMENTS
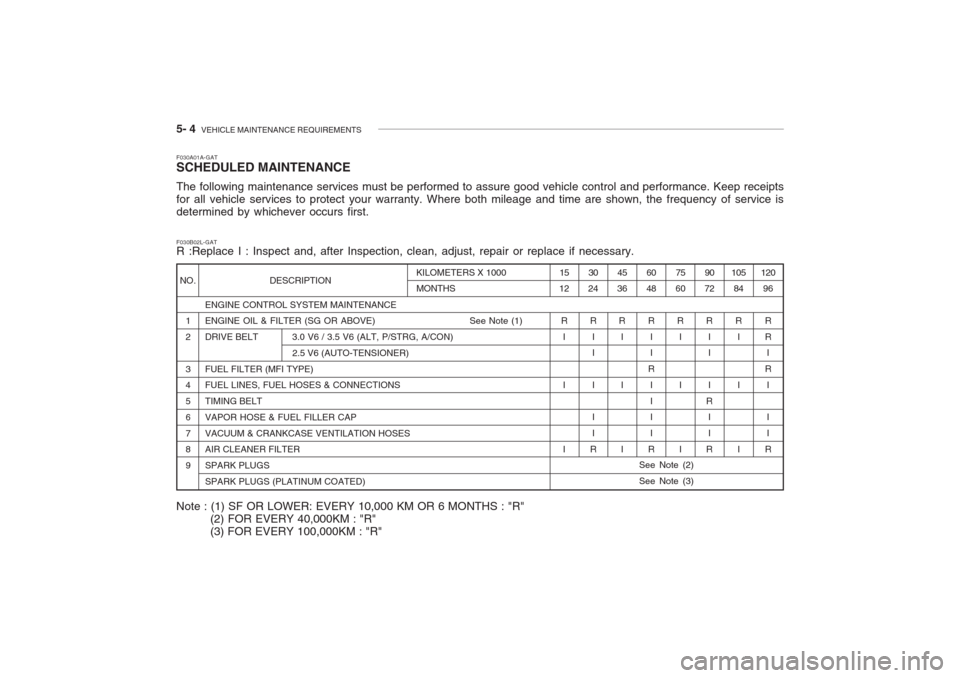
NO.
1 2 3 4 567 8 9 DESCRIPTION
ENGINE CONTROL SYSTEM MAINTENANCE ENGINE OIL & FILTER (SG OR ABOVE) See Note (1)
DRIVE BELT 3.0 V6 / 3.5 V6 (ALT, P/STRG, A/CON) 2.5 V6 (AUTO-TENSIONER)
FUEL FILTER (MFI TYPE) FUEL LINES, FUEL HOSES & CONNECTIONS TIMING BELTVAPOR HOSE & FUEL FILLER CAPVACUUM & CRANKCASE VENTILATION HOSES AIR CLEANER FILTER SPARK PLUGSSPARK PLUGS (PLATINUM COATED)
F030A01A-GAT SCHEDULED MAINTENANCE The following maintenance services must be performed to assure good vehicle control and performance. Keep receipts for all vehicle services to protect your warranty. Where both mileage and time are shown, the frequency of service isdetermined by whichever occurs first. F030B02L-GAT R :Replace I : Inspect and, after Inspection, clean, adjust, repair or replace if necessary.105
84
R I I I 120
96
R RI
R
I I I
R
90
72
R I I I
R I I
R
75
60
R I I I
60 48
R II
R I I I I
R
45
36
R I I I
30
24
R I I I I I
R
15
12
RI I I
KILOMETERS X 1000 MONTHS
Note : (1) SF OR LOWER: EVERY 10,000 KM OR 6 MONTHS : "R"
(2) FOR EVERY 40,000KM : "R" (3) FOR EVERY 100,000KM : "R"
See Note (2) See Note (3)
Page 201 of 230
6- 24 DO-IT-YOURSELF MAINTENANCE
G240A01A-AAT
POWER STEERING HOSES
It is suggested that you check the
power steering hose connections for fluid leakage at regular intervals.
The power steering hoses should be
replaced if there is severe surface cracking, scuffing or worn spots. De- terioration of the hose could causepremature failure.
G230A03A-GAT
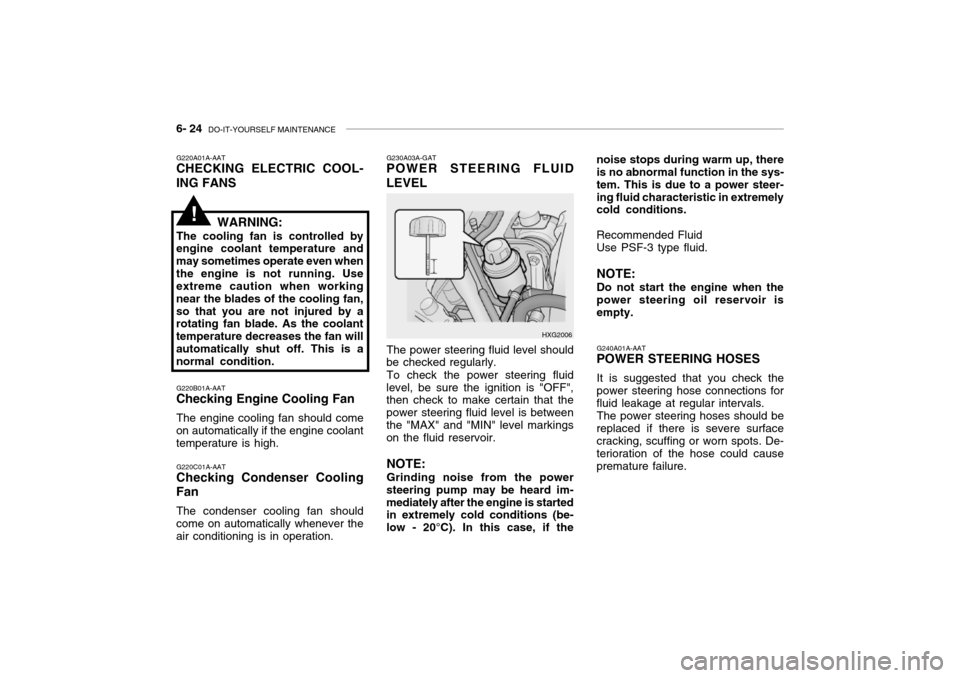
POWER STEERING FLUID LEVEL
HXG2006
The power steering fluid level should
be checked regularly.
To check the power steering fluid
level, be sure the ignition is "OFF", then check to make certain that the power steering fluid level is betweenthe "MAX" and "MIN" level markings on the fluid reservoir.
NOTE: Grinding noise from the power
steering pump may be heard im- mediately after the engine is started in extremely cold conditions (be- low - 20°C). In this case, if the noise stops during warm up, there is no abnormal function in the sys- tem. This is due to a power steer-ing fluid characteristic in extremely cold conditions. Recommended Fluid Use PSF-3 type fluid. NOTE: Do not start the engine when the power steering oil reservoir is empty.
G220A01A-AAT
CHECKING ELECTRIC COOL- ING FANS
WARNING:
The cooling fan is controlled by
engine coolant temperature and may sometimes operate even whenthe engine is not running. Use extreme caution when working near the blades of the cooling fan,so that you are not injured by a rotating fan blade. As the coolant temperature decreases the fan willautomatically shut off. This is a normal condition.
G220B01A-AAT
Checking Engine Cooling Fan
The engine cooling fan should come
on automatically if the engine coolanttemperature is high.
G220C01A-AAT
Checking Condenser Cooling Fan
The condenser cooling fan should
come on automatically whenever the air conditioning is in operation.
!
Page 202 of 230
DO-IT-YOURSELF MAINTENANCE 6- 25
G290A02L-GAT
HEADLIGHT AIMING ADJUST- MENT
HID Type (If installed)
WARNING:
If you need headlight aiming ad- justment, have your vehicle in- spected by your Hyundai Dealer. Don't attempt to replace or inspect the HID headlight bulb to prevent danger of an electric shock.
Vertical Aiming HorizontalAiming
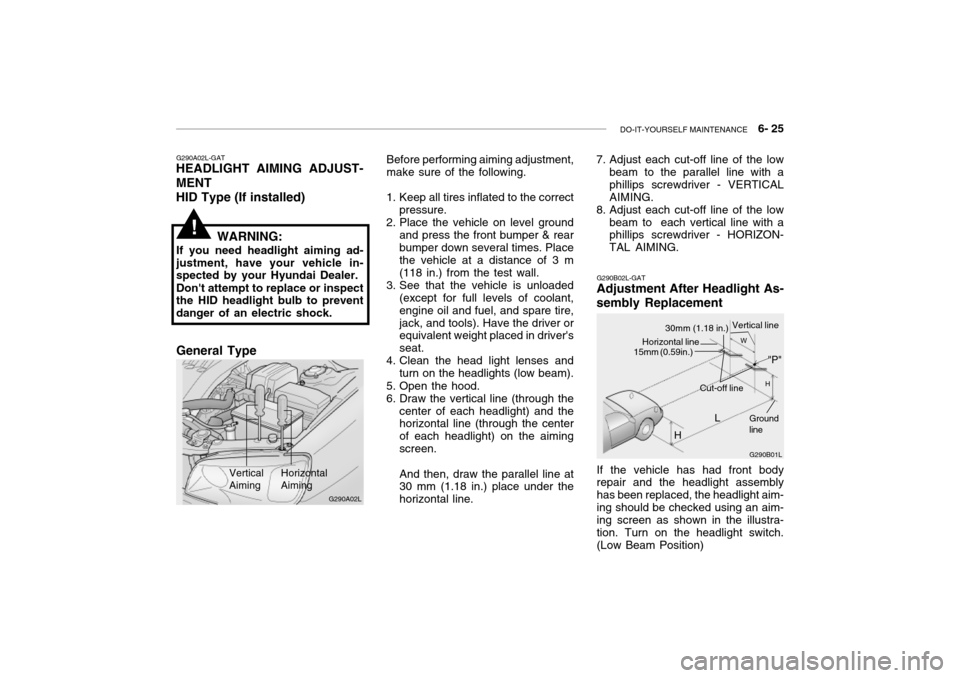
Before performing aiming adjustment, make sure of the following.
1. Keep all tires inflated to the correct pressure.
2. Place the vehicle on level ground
and press the front bumper & rear bumper down several times. Place the vehicle at a distance of 3 m (118 in.) from the test wall.
3. See that the vehicle is unloaded (except for full levels of coolant,engine oil and fuel, and spare tire,jack, and tools). Have the driver or equivalent weight placed in driver's seat.
4. Clean the head light lenses and
turn on the headlights (low beam).
5. Open the hood.
6. Draw the vertical line (through the center of each headlight) and the horizontal line (through the center of each headlight) on the aimingscreen. And then, draw the parallel line at 30 mm (1.18 in.) place under the horizontal line.
!
G290B02L-GAT
Adjustment After Headlight As- sembly Replacement
G290B01L
LW
H
H Cut-off line
Ground line
If the vehicle has had front body repair and the headlight assembly has been replaced, the headlight aim-ing should be checked using an aim- ing screen as shown in the illustra- tion. Turn on the headlight switch.(Low Beam Position)
"P"
Horizontal line15mm (0.59in.)
30mm (1.18 in.) Vertical line
7. Adjust each cut-off line of the low
beam to the parallel line with a phillips screwdriver - VERTICALAIMING.
8. Adjust each cut-off line of the low
beam to each vertical line with a phillips screwdriver - HORIZON- TAL AIMING.
G290A02L
General Type
Page 203 of 230
6- 26 DO-IT-YOURSELF MAINTENANCE
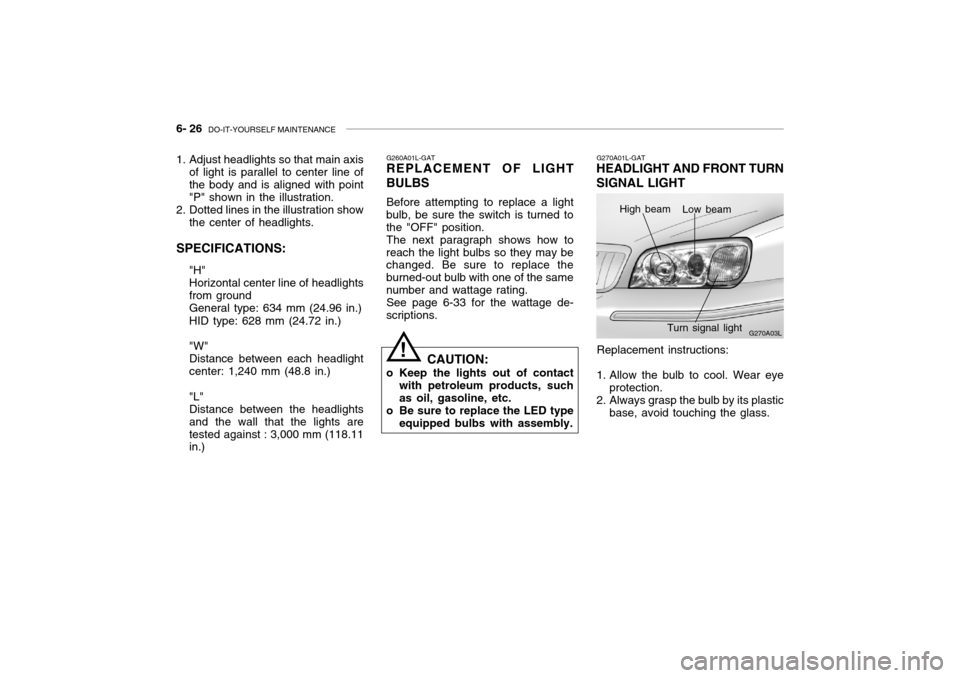
Replacement instructions:
1. Allow the bulb to cool. Wear eye protection.
2. Always grasp the bulb by its plastic base, avoid touching the glass.
G260A01L-GAT
REPLACEMENT OF LIGHT BULBS
Before attempting to replace a light
bulb, be sure the switch is turned to the "OFF" position. The next paragraph shows how to
reach the light bulbs so they may be changed. Be sure to replace the burned-out bulb with one of the samenumber and wattage rating. See page 6-33 for the wattage de-
scriptions.
G270A03L
G270A01L-GAT
HEADLIGHT AND FRONT TURN SIGNAL LIGHT
High beam Low beam
Turn signal light
! CAUTION:
o Keep the lights out of contact with petroleum products, such as oil, gasoline, etc.
o Be sure to replace the LED type equipped bulbs with assembly.
1. Adjust headlights so that main axis
of light is parallel to center line ofthe body and is aligned with point"P" shown in the illustration.
2. Dotted lines in the illustration show
the center of headlights.
SPECIFICATIONS: "H"Horizontal center line of headlightsfrom groundGeneral type: 634 mm (24.96 in.) HID type: 628 mm (24.72 in.) "W" Distance between each headlightcenter: 1,240 mm (48.8 in.) "L" Distance between the headlightsand the wall that the lights aretested against : 3,000 mm (118.11 in.)
Page 222 of 230

9- 2 VEHICLE SPECIFICATIONS
3.0 V6
J010A02L-GAT MEASUREMENT
4,875 (191.8) 1,800 (70.86)
1,420 (55.9)
2,750 (108.2) 1,540 (60.6)
1,530 (60.23)
Overall lengthOverall widthOverall height Wheel base Wheel tread
Front
Rear
Type Wheel free play Rack strokeOil pump type Rack and pinion0 ~ 30 mm (0 ~ 1.18 in.) 146 mm (5.74 in.) Vane type
J060A01L-GAT FUEL SYSTEM
J020A01L-GAT POWER STEERING
Fuel tank capacity 70 liter J030A03L-GAT TIRE
205/65 R15 94V 205/60 R16 96V
StandardOption
J050A01L-GAT BRAKE
Dual hydraulic with brake booster Ventilated discSolid disc Cable operated on rear wheel
Type Front brake typeRear brake type Parking brake
Item Battery
Alternator 120A (13.5V)
2.5 V6
110A (13.5V)
J040A02L-GAT ELECTRICAL
MF 68AH (MF)
3.5 V6
mm (in.)