check engine Hyundai Grandeur 2003 Owner's Guide
[x] Cancel search | Manufacturer: HYUNDAI, Model Year: 2003, Model line: Grandeur, Model: Hyundai Grandeur 2003Pages: 235, PDF Size: 14.25 MB
Page 179 of 235

VEHICLE MAINTENANCE REQUIREMENTS 5- 7
F060A01A-AAT
EXPLANATION OF SCHEDULED MAINTENANCE ITEMS
F060M01A-AAT
o Engine Oil and Filter
The engine oil and filter should be changed at the intervals specified in the maintenance schedule. If the car is being driven in severe conditions,more frequent oil and filter changes are required. F060B01A-AAT
o Drive Belts
Inspect all drive belts for evidence of cuts, cracks, excessive wear or oil and replace if necessary. Drive beltsshould be checked periodically for proper tension and adjusted as nec- essary. After installing a new filter, run the
engine for several minutes, and checkfor leaks at the connections. Fuelfilters should be installed by trained technicians.
F060D01A-AAT
o Fuel Lines, Fuel Hoses and Connections
Check the fuel lines, fuel hoses and connections for leakage and damage.Have a trained technician replace any damaged or leaking parts immedi- ately. F060E01A-AAT
o Timing Belt Inspect all parts related to the timing belt for damage and deformation. Replace any damaged parts immedi- ately. F060G01A-AAT
o Vapor Hose and Fuel Filler Cap The vapor hose and fuel filler cap should be inspected at those inter- vals specified in the maintenance schedule. Make sure that a new va-por hose or fuel filler cap is correctly replaced. F060F01A-AAT
o Vacuum, Crankcase Ventila-
tion Hoses
Inspect the surface of hoses for evi- dence of heat and/or mechanical dam-age. Hard and brittle rubber, crack- ing, tears, cuts, abrasions, and ex- cessive swelling indicate deteriora-tion. Particular attention should be paid to examine those hose surfaces nearest to high heat sources, such asthe exhaust manifold.Inspect the hose routing to assurethat the hoses do not come in contact with any heat source, sharp edges or moving component which might causeheat damage or mechanical wear. Inspect all hose connections, such as clamps and couplings, to make surethey are secure, and that no leaks are present. Hoses should be replaced immediately if there is any evidenceof deterioration or damage.
F060C01A-AAT
o Fuel Filter
A clogged filter can limit the speed atwhich the vehicle may be driven, dam- age the emission system and cause hard starting. If an excessive amountof foreign matter accumulates in the fuel tank, the filter may require re- placement more frequently.
Page 180 of 235

5- 8 VEHICLE MAINTENANCE REQUIREMENTS
F060H01A-AAT
o Air Cleaner Filter A Genuine Hyundai air cleaner filter is
recommended when the filter is re- placed. F060J01A-AAT
o Spark Plugs Make sure to install new spark plugs of the correct heat range. F070C02A-AAT
o Coolant The coolant should be changed at the intervals specified in the mainte- nance schedule. F070D01A-AAT
o Manual Transaxle Oil
Inspect the manual transaxle oil ac-cording to the maintenance schedule.
NOTE: If the oil level is low, check forpossible leaks before adding oil. Do not overfill. F070E03A-AAT
o Automatic Transaxle Fluid and
Filter
The fluid level should be in the "HOT" range of the dipstick, after the engine and transaxle are at normal operatingtemperature. Check the automatic transaxle fluid level with the engine running and the transaxle in neutral,with the parking brake properly ap- plied. Use DIAMOND ATF SP-III or SK ATF SP-III when adding or chang-ing fluid. F070F01A-AAT
o Brake Hoses and Lines
Visually check for proper installation,chafing, cracks, deterioration and any leakage. Replace any deteriorated or damaged parts immediately. F070G02A-AAT
o Brake Fluid
Check brake fluid level in the brake fluid reservoir. The level should be between "MIN" and "MAX" marks on the side of the reservoir. Use onlyhydraulic brake fluid conforming to DOT 3 or DOT 4.
F070H01A-AAT
o Rear Brake Drums/Linings,
Parking Brake
Check the rear brake drums and lin-
ings for scoring, burning, leaking fluid,broken parts, and excessive wear. Inspect the parking brake system in-cluding the parking brake lever and cables. For detailed service proce- dures, refer to the Shop Manual.
F070B01A-GAT
o Cooling System Check the cooling system part, such as radiator, coolant reservoir, hosesand connections for leakage and dam- age. Replace any damaged parts.
Page 181 of 235

VEHICLE MAINTENANCE REQUIREMENTS 5- 9
F070L01A-AAT
o Suspension Mounting Bolts
Check the suspension connections for looseness or damage. Retighten to the specified torque. F070M01Y-AAT
o Steering Gear Box, Linkage &
Boots / Lower Arm Ball Joint, Upper Arm Ball Joint
With the vehicle stopped and engine off, check for excessive free-play inthe steering wheel.Check the linkage for bends or dam-age. Check the dust boots and balljoints for deterioration, cracks, or dam- age. Replace any damaged parts. F070N01A-AAT
o Power Steering Pump, Belt
and Hoses
Check the power steering pump and
hoses for leakage and damage. Re- place any damaged or leaking parts immediately. Inspect the power steer- ing belt for evidence of cuts, cracks,excessive wear, oiliness and proper tension. Replace or adjust it if neces- sary. F070P01A-AAT
o Driveshafts and Boots Check the drive shafts, boots and clamps for cracks, deterioration, or damage. Replace any damaged parts and, if necessary, repack the grease. F070Q01A-AAT
o Air Conditioning Refrigerant Check the air conditioning lines and connections for leakage and damage. Check air conditioning performance according to the relevant shop manualif necessary.
F070J01A-AAT
o Brake Pads, Calipers and
Rotors
Check the pads for excessive wear,
discs for run out and wear, and cali-pers for fluid leakage.
F070K01A-AAT
o Exhaust Pipe and Muffler
Visually inspect the exhaust pipes,
muffler and hangers for cracks, dete-rioration, or damage. Start the engine and listen carefully for any exhaust gas leakage. Tighten connections orreplace parts as necessary.
Page 182 of 235

6. Do-It-Yourself MaintenanceEngine Compartment ..................................................................... 6-2
General Checks .............................................................................. 6-5
Checking the Engine Oil ................................................................ 6-6
Changing the Oil and Filter ........................................................... 6-7
Checking and Changing the Engine Coolant ............................... 6-8
Spark Plugs .................................................................................. 6-10
Changing the Air Cleaner Filter ................................................... 6-11
Checking the Transaxle Oil (Manual) .......................................... 6-13
Checking the Transaxle Fluid (Automatic) .................................. 6-14
Checking the Brakes .................................................................... 6-15
Checking the Clutch Fluid ............................................................ 6-16
Air Conditioning Care ................................................................... 6-17
Changing the Air Filter (For Evaporator and Blower Unit) ......... 6-18
Checking Drive Belts .................................................................... 6-21
Checking and Replacing Fuses ................................................... 6-21
Power Steering Fluid Level .......................................................... 6-24
Headlight Aiming Adjustment ....................................................... 6-24
Replacement of Light Bulbs ......................................................... 6-26
Bulb Wattage ................................................................................ 6-33
Junction Box Description ............................................................. 6-34
6
Page 186 of 235

DO-IT-YOURSELF MAINTENANCE 6- 5
G020A02A-AAT
GENERAL CHECKS Engine Compartment
The following should be checked regu- larly:
o Engine oil level and condition
o Transaxle fluid level and condition
o Brake fluid level
o Clutch fluid level
o Coolant level
o Windshield washer fluid level
o Accessory drive belt condition
o Coolant hose condition
o Fluid leaks (on or below compo- nents)
o Power steering fluid level and con-
dition
o Battery condition
o Air filter condition G020C01A-AAT Vehicle Interior The following should be checked each time when the vehicle is driven:
o Lights operation
o Windshield wiper operation
o Horn operation
o Defroster, heater system operation
(and air conditioning, if installed)
o Steering operation and condition
o Mirror condition and operation
o Turn signal operation
o Accelerator pedal operation
o Brake operation, including parking brake
o Manual transaxle operation, includ- ing clutch operation
o Automatic transaxle operation, in- cluding "Park" mechanism opera-tion
o Seat control condition and opera- tion
o Seat belt condition and operation
o Sunvisor operation If you notice anything that does not operate correctly or appears to befunctioning incorrectly, inspect it care- fully and seek assistance from your Hyundai dealer if service is needed.
G020B01A-AAT
Vehicle Exterior
The following should be checked
monthly:
o Overall appearance and condition
o Wheel condition and wheel nut torgue
o Exhaust system condition
o Light condition and operation
o Windshield glass condition
o Wiper blade condition
o Paint condition and body corrosion
o Fluid leaks
o Door and hood lock condition
o Tire pressure and condition (including spare tire)
Page 187 of 235
6- 6 DO-IT-YOURSELF MAINTENANCE
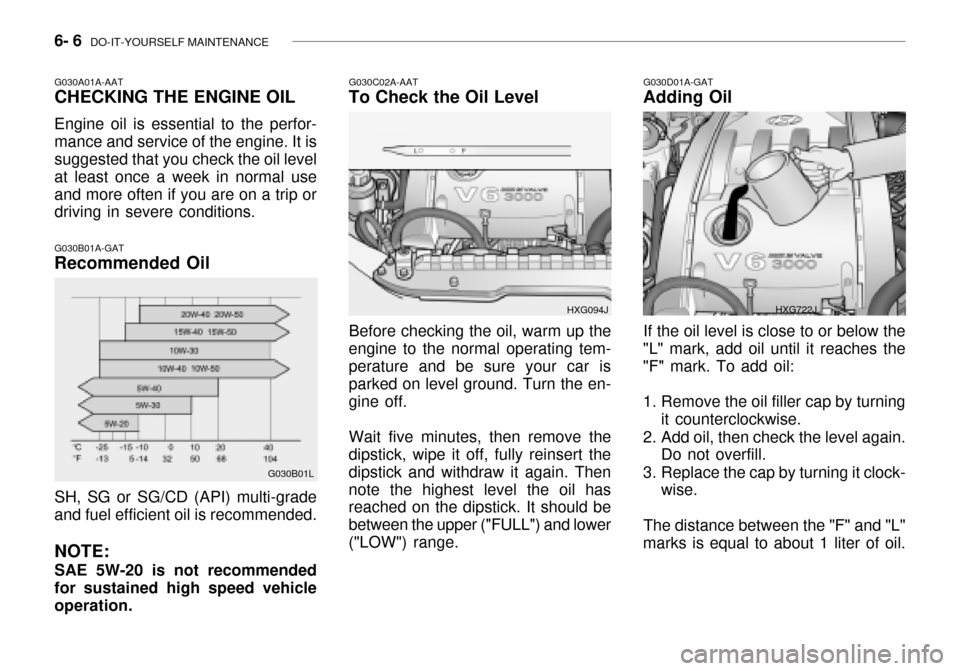
G030A01A-AAT CHECKING THE ENGINE OIL Engine oil is essential to the perfor- mance and service of the engine. It is suggested that you check the oil level at least once a week in normal useand more often if you are on a trip or driving in severe conditions. G030B01A-GAT Recommended Oil
G030B01L
SH, SG or SG/CD (API) multi-grade and fuel efficient oil is recommended. NOTE: SAE 5W-20 is not recommended for sustained high speed vehicle operation.G030C02A-AAT
To Check the Oil Level
Before checking the oil, warm up the
engine to the normal operating tem- perature and be sure your car is parked on level ground. Turn the en-gine off.
Wait five minutes, then remove the
dipstick, wipe it off, fully reinsert thedipstick and withdraw it again. Thennote the highest level the oil has reached on the dipstick. It should be between the upper ("FULL") and lower("LOW") range. HXG094J
G030D01A-GAT
Adding Oil
If the oil level is close to or below the
"L" mark, add oil until it reaches the "F" mark. To add oil:
1. Remove the oil filler cap by turning it counterclockwise.
2. Add oil, then check the level again. Do not overfill.
3. Replace the cap by turning it clock- wise.
The distance between the "F" and "L"
marks is equal to about 1 liter of oil.
HXG722J
Page 189 of 235
6- 8 DO-IT-YOURSELF MAINTENANCE
4. When the oil has stopped draining,
replace the drain plug using a new washer and retighten by turning itclockwise. Oil pan drain plug tightening torque : 3.5 ~4.0 kgf.m
5. Remove the oil filter by turning it counterclockwise with a oil filter wrench of the proper size. A cer- tain amount of oil will come out when you remove the filter. So besure to have your drain pan in place underneath it.
6. Install a new oil filter in accordance with the instructions on the carton or on the filter itself. Do not over-tighten. Oil filter tightening torque : 1.2 ~ 1.6 kgf.m Be sure that the mounting surface on the engine is clean and that theold gasket is removed completely. Lubricate the new gasket on the filter with clean engine oil beforeinstallation. 7. Refill the crankcase with the rec-
ommended engine oil. Refer to thespecification in chapter 9 for en-gine oil capacity.
8. Start the engine and check to be sure no oil is leaking from the drain plug or oil filter.
9. Shut off the engine and recheck the oil level.
NOTE: Always dispose of used engine oil
in an environmentally acceptable manner. It is suggested that it beplaced in a sealed container and taken to a service station for recla- mation. Do not pour the oil on theground or put it in with the house- hold trash.
WARNING:
Used motor oil may cause irrita-
tion or cancer of the skin if left in contact with the skin for prolongedperiods of time. Wash your hands thoroughly with soap and warm water as soon as possible afterhandling used oil. G050A01A-AAT
CHECKING AND CHANGING THE ENGINE COOLANT
WARNING:
Do not remove the radiator cap
when the engine is hot. When the engine is hot, the engine coolantis under pressure and may erupt through the opening if the cap is removed. You could be seriouslyburned if you do not observe this precaution. Do not remove the ra- diator cap until the radiator is coolto the touch.
!
!
Page 190 of 235
DO-IT-YOURSELF MAINTENANCE 6- 9
G050D02A-AAT To Change the Engine Coolant The engine coolant should be changed at those intervals specified in the ve- hicle maintenance schedule in Sec-tion 5.
CAUTION:
Engine coolant can damage thefinish of your car. If you spill en- gine coolant on the car, wash it off thoroughly with clean water.
1. Park the car on level ground, set the parking brake and remove the radiator cap when cool.
2. Be sure your drain receptacle is in place. Open the drain cock on theradiator. Allow all the engine coolant to drain from the cooling system,then securely close the drain cock.
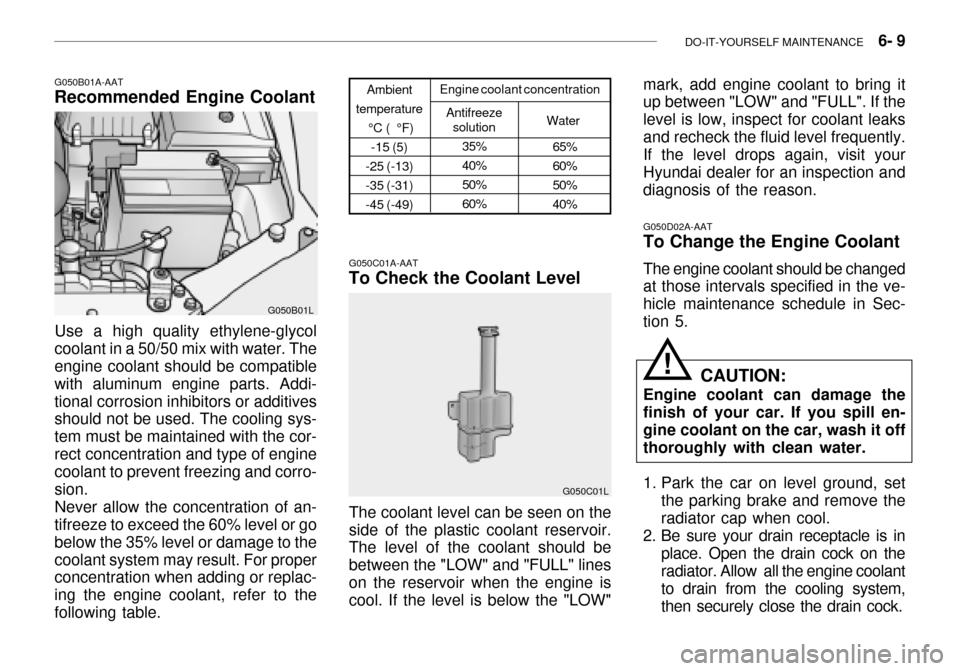
Use a high quality ethylene-glycol
coolant in a 50/50 mix with water. The engine coolant should be compatible with aluminum engine parts. Addi-tional corrosion inhibitors or additives should not be used. The cooling sys- tem must be maintained with the cor-rect concentration and type of engine coolant to prevent freezing and corro- sion.
Never allow the concentration of an-
tifreeze to exceed the 60% level or gobelow the 35% level or damage to thecoolant system may result. For proper concentration when adding or replac- ing the engine coolant, refer to thefollowing table.
Ambient
temperature °C ( °F)-15 (5)
-25 (-13) -35 (-31)-45 (-49) Engine coolant concentration
Antifreeze solution
Water
G050C01A-AAT
To Check the Coolant Level
The coolant level can be seen on the side of the plastic coolant reservoir. The level of the coolant should be between the "LOW" and "FULL" lineson the reservoir when the engine is cool. If the level is below the "LOW" G050C01L
65% 60%50%40%
35%40%50%60%
G050B01A-AAT
Recommended Engine Coolant
G050B01L mark, add engine coolant to bring it up between "LOW" and "FULL". If the level is low, inspect for coolant leaksand recheck the fluid level frequently. If the level drops again, visit your Hyundai dealer for an inspection anddiagnosis of the reason.
!
Page 191 of 235
6- 10 DO-IT-YOURSELF MAINTENANCE
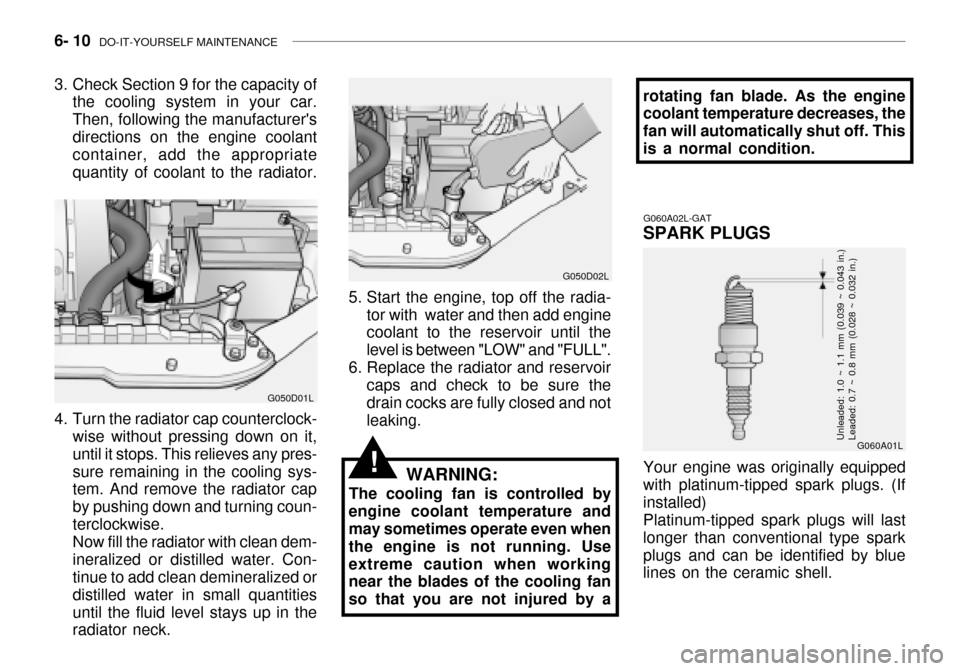
4. Turn the radiator cap counterclock-
wise without pressing down on it, until it stops. This relieves any pres-sure remaining in the cooling sys- tem. And remove the radiator cap by pushing down and turning coun-terclockwise.Now fill the radiator with clean dem-ineralized or distilled water. Con- tinue to add clean demineralized or distilled water in small quantitiesuntil the fluid level stays up in the radiator neck. G050D01L
G050D02L
5. Start the engine, top off the radia- tor with water and then add enginecoolant to the reservoir until the level is between "LOW" and "FULL".
6. Replace the radiator and reservoir
caps and check to be sure thedrain cocks are fully closed and not leaking.
WARNING:
The cooling fan is controlled by
engine coolant temperature andmay sometimes operate even when the engine is not running. Useextreme caution when working near the blades of the cooling fan so that you are not injured by a
3. Check Section 9 for the capacity of
the cooling system in your car.Then, following the manufacturer'sdirections on the engine coolant container, add the appropriate quantity of coolant to the radiator. rotating fan blade. As the engine coolant temperature decreases, the fan will automatically shut off. Thisis a normal condition.
G060A01L
G060A02L-GAT
SPARK PLUGS
Your engine was originally equipped
with platinum-tipped spark plugs. (If installed)
Platinum-tipped spark plugs will last
longer than conventional type sparkplugs and can be identified by blue lines on the ceramic shell.Unleaded: 1.0 ~ 1.1 mm (0.039 ~ 0.043 in.) Leaded: 0.7 ~ 0.8 mm (0.028 ~ 0.032 in.)
!
Page 194 of 235
DO-IT-YOURSELF MAINTENANCE 6- 13
G100A03L
G100A03Y-GAT
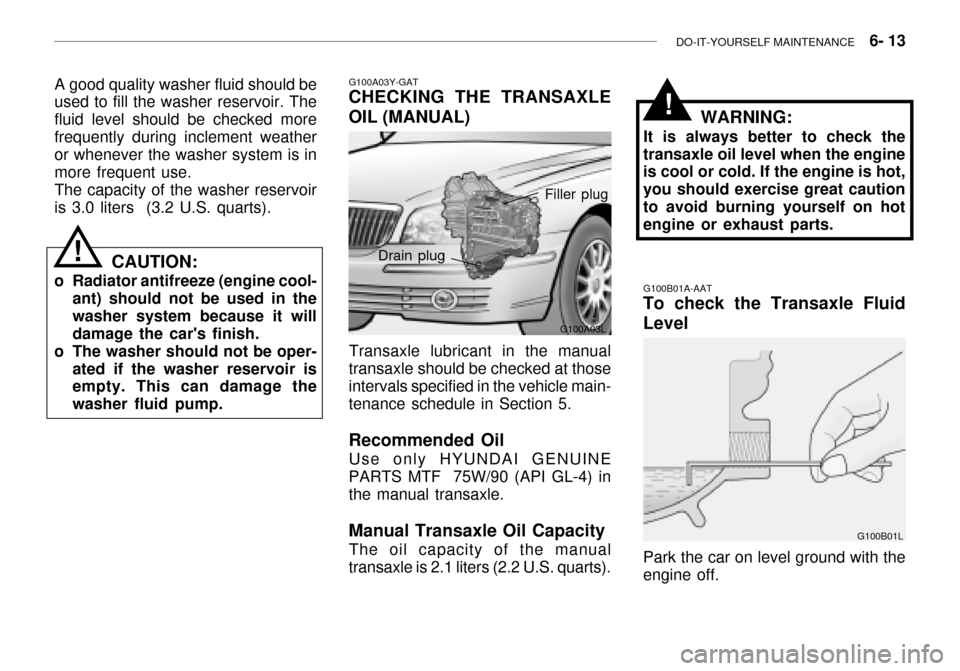
CHECKING THE TRANSAXLE OIL (MANUAL)
Transaxle lubricant in the manual
transaxle should be checked at those intervals specified in the vehicle main-
tenance schedule in Section 5. Recommended Oil
Use only HYUNDAI GENUINE
PARTS MTF 75W/90 (API GL-4) in the manual transaxle. Manual Transaxle Oil Capacity
The oil capacity of the manual
transaxle is 2.1 liters (2.2 U.S. quarts). Drain plug
Filler plugWARNING:
It is always better to check the
transaxle oil level when the engine is cool or cold. If the engine is hot, you should exercise great cautionto avoid burning yourself on hot engine or exhaust parts. G100B01A-AAT
To check the Transaxle Fluid Level
G100B01L
Park the car on level ground with the engine off.
A good quality washer fluid should be used to fill the washer reservoir. The fluid level should be checked morefrequently during inclement weather or whenever the washer system is in more frequent use.The capacity of the washer reservoiris 3.0 liters (3.2 U.S. quarts).
CAUTION:
o Radiator antifreeze (engine cool- ant) should not be used in thewasher system because it willdamage the car's finish.
o The washer should not be oper-
ated if the washer reservoir is empty. This can damage the washer fluid pump.
!
!