clock Hyundai Grandeur 2003 Owner's Manual
[x] Cancel search | Manufacturer: HYUNDAI, Model Year: 2003, Model line: Grandeur, Model: Hyundai Grandeur 2003Pages: 235, PDF Size: 14.25 MB
Page 11 of 235

YOUR VEHICLE AT A GLANCE
1. Headlight Leveling Switch (If installed)
2. Rear Fog Light Switch (If installed)
3. Panel Brightness Control Knob(Rheostat Switch)
4. Traction Control Switch (If installed)
5. Multi-Function Light Switch
6. Cruise Control Main Switch (If installed)
7. Horn and Driver's Airbag
8. Cruise Control Switch/ Audio Remote Control Switch (If installed)
9. Windshield Wiper/Washer Switch
10. Ignition Switch
CAUTION:
When installing a container of liquid air freshener inside the vehicle, do not place it near theinstrument cluster nor on the instrument panel pad surface. If there is any leakage from the air freshener onto these areas (Instrument cluster, instrument panel pad or air ventilator), itmay damage these parts. If the liquid from air freshener does leak onto these areas, wash them with water immediately. 11. Hazard Warning Switch
12. Digital Clock
13. Audio System (If installed)
14. Passenger's Airbag (If installed)
15. Hood Release Lever
16. Parking Brake Release Lever/Parking Brake (Foot type)
17. Heater/Air Conditioning Control Panel
18. Shift Lever (If installed)
19. Ashtray
20. Accessory Box
21. Glove Box
!
Page 13 of 235

YOUR VEHICLE AT A GLANCE
1. Passenger's Airbag (If installed)
2. Digital Clock
3. Hazard Warning Switch
4. Cruise Control Main Switch (If installed)
5. Multi-Function Light Switch
6. Traction Control Switch (If installed)
7. Horn and Driver's Airbag
8. Cruise Control Switch/ Audio Remote Control Switch(If installed)
9. Ignition Switch
10. Windshield Wiper/Washer Switch 11. Panel Brightness Control Knob
(Rheostat Switch)
12. Rear Fog Light Switch (If installed)
13. Headlight Leveling Switch (If installed)
14. Glove Box
15. Audio System (If installed)
16. Heater/Air Conditioning Control Panel
17. Shift Lever (If installed)
18. Ashtray
19. Accessory Box
20. Parking Brake Release Lever/Parking Brake (Foot type)
21. Hood Release Lever
CAUTION:
When installing a container of liquid air freshener inside the vehicle, do not place it near theinstrument cluster nor on the instrument panel pad surface. If there is any leakage from theair freshener onto these areas (Instrument cluster, instrument panel pad or air ventilator), it may damage these parts. If the liquid from air freshener does leak onto these areas, wash them with water immediately.
!
Page 51 of 235
FEATURES OF YOUR HYUNDAI 1- 37
o Do not place any objects (an
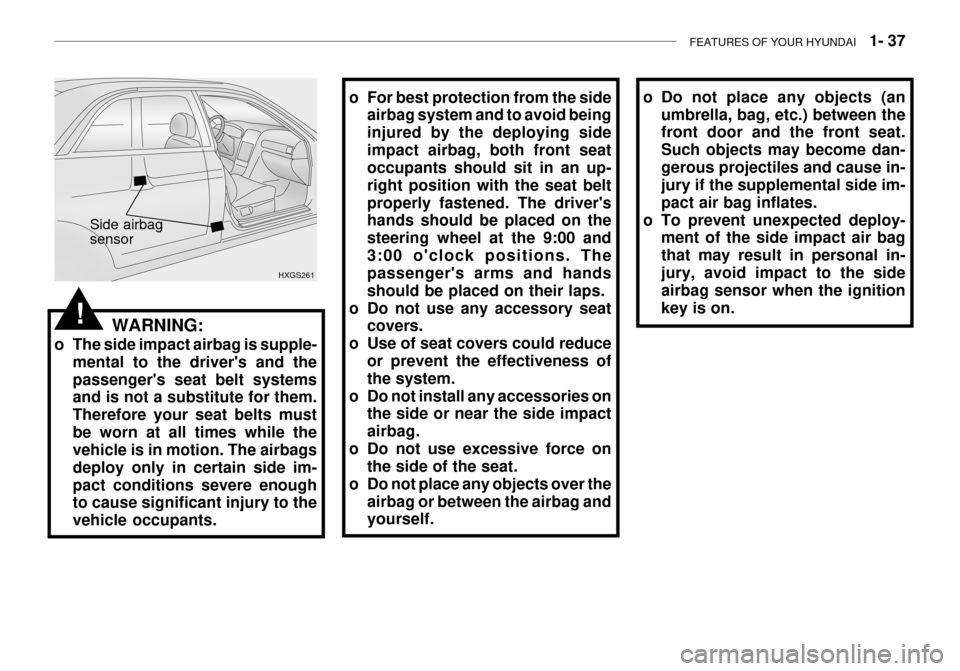
umbrella, bag, etc.) between the front door and the front seat. Such objects may become dan-gerous projectiles and cause in- jury if the supplemental side im- pact air bag inflates.
o To prevent unexpected deploy- ment of the side impact air bagthat may result in personal in-jury, avoid impact to the side airbag sensor when the ignition key is on.o For best protection from the sideairbag system and to avoid being injured by the deploying sideimpact airbag, both front seat occupants should sit in an up- right position with the seat beltproperly fastened. The driver's hands should be placed on the steering wheel at the 9:00 and3:00 o'clock positions. The passenger's arms and hands should be placed on their laps.
o Do not use any accessory seat covers.
o Use of seat covers could reduce or prevent the effectiveness ofthe system.
o Do not install any accessories on the side or near the side impactairbag.
o Do not use excessive force on the side of the seat.
o Do not place any objects over the airbag or between the airbag and yourself.
WARNING:
o The side impact airbag is supple- mental to the driver's and the passenger's seat belt systems and is not a substitute for them. Therefore your seat belts mustbe worn at all times while the vehicle is in motion. The airbags deploy only in certain side im-pact conditions severe enough to cause significant injury to the vehicle occupants. HXGS261
Side airbag sensor
!
Page 68 of 235
1- 54 FEATURES OF YOUR HYUNDAI
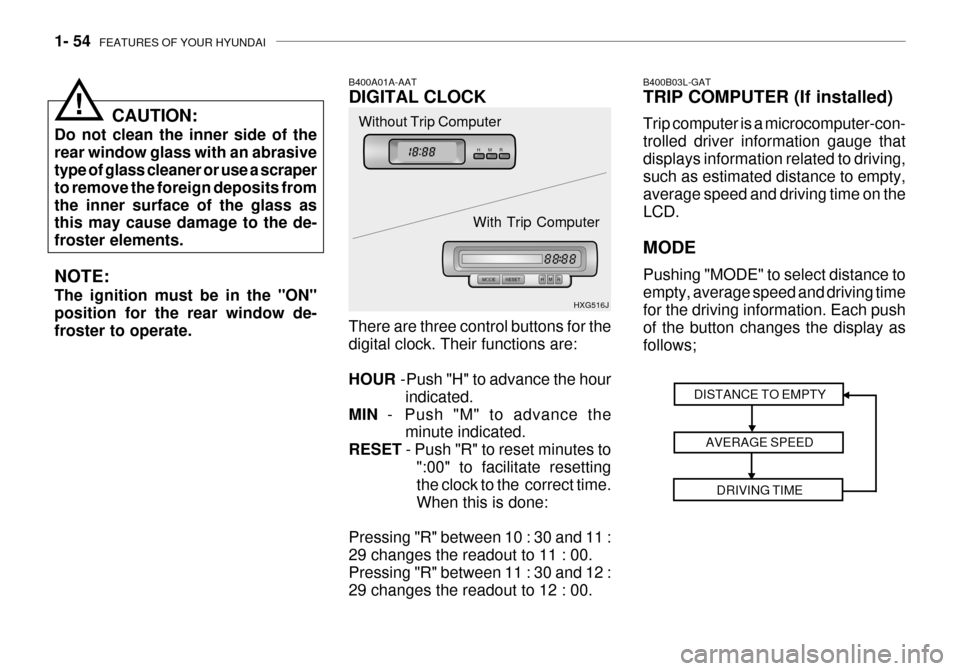
B400A01A-AAT DIGITAL CLOCK There are three control buttons for the digital clock. Their functions are: HOUR -Push "H" to advance the hour
indicated.
MIN - Push "M" to advance the
minute indicated.
RESET - Push "R" to reset minutes to
":00" to facilitate resetting the clock to the correct time. When this is done:
Pressing "R" between 10 : 30 and 11 :29 changes the readout to 11 : 00.Pressing "R" between 11 : 30 and 12 : 29 changes the readout to 12 : 00. HXG516J
CAUTION:
Do not clean the inner side of the rear window glass with an abrasive type of glass cleaner or use a scraper to remove the foreign deposits fromthe inner surface of the glass as this may cause damage to the de- froster elements. NOTE: The ignition must be in the "ON" position for the rear window de-froster to operate. Without Trip Computer
With Trip Computer
!
DISTANCE TO EMPTYAVERAGE SPEEDDRIVING TIME
B400B03L-GAT TRIP COMPUTER (If installed) Trip computer is a microcomputer-con- trolled driver information gauge thatdisplays information related to driving, such as estimated distance to empty, average speed and driving time on theLCD. MODE Pushing "MODE" to select distance to empty, average speed and driving time for the driving information. Each push of the button changes the display asfollows;
Page 74 of 235
1- 60 FEATURES OF YOUR HYUNDAI
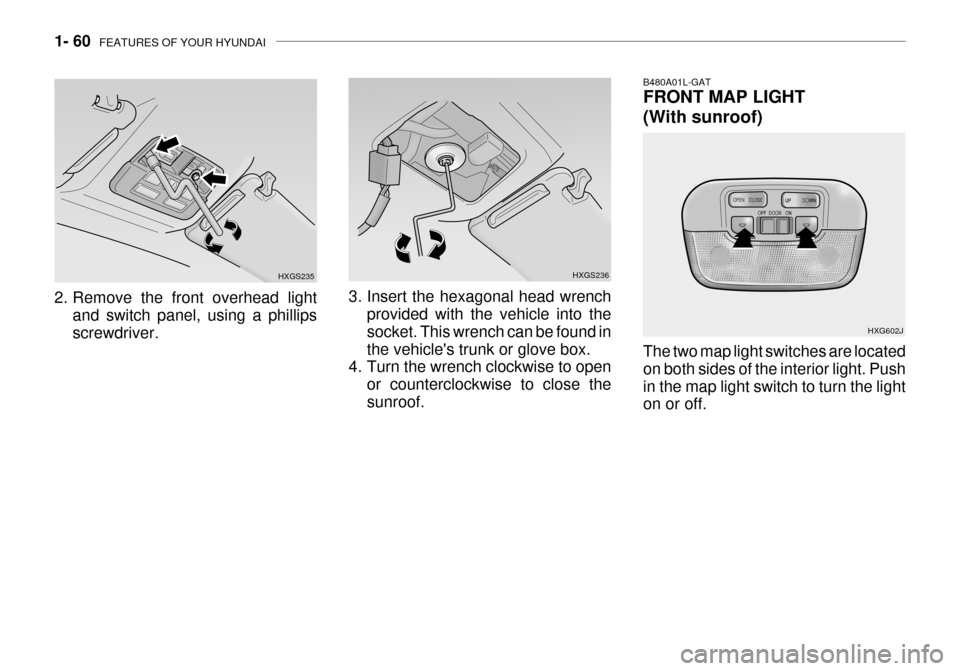
2. Remove the front overhead light
and switch panel, using a phillips screwdriver. HXGS235
HXGS236
3. Insert the hexagonal head wrench provided with the vehicle into the socket. This wrench can be found inthe vehicle's trunk or glove box.
4. Turn the wrench clockwise to open
or counterclockwise to close thesunroof.
B480A01L-GAT FRONT MAP LIGHT
(With sunroof) The two map light switches are located on both sides of the interior light. Pushin the map light switch to turn the light on or off. HXG602J
Page 81 of 235
FEATURES OF YOUR HYUNDAI 1- 67
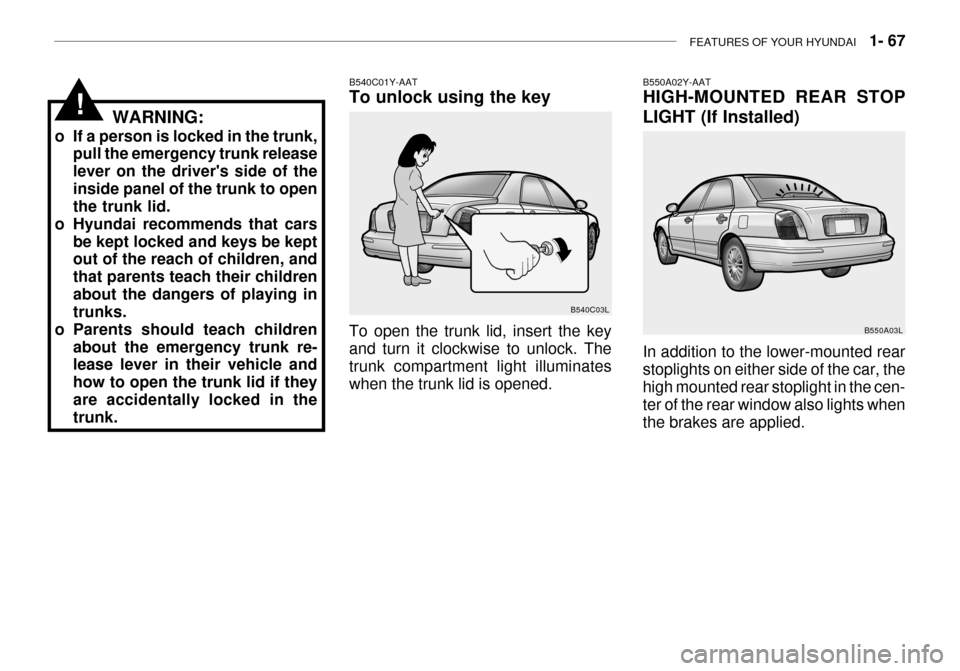
B550A02Y-AAT HIGH-MOUNTED REAR STOP
LIGHT (If Installed) In addition to the lower-mounted rear stoplights on either side of the car, thehigh mounted rear stoplight in the cen- ter of the rear window also lights when the brakes are applied. B550A03L
To open the trunk lid, insert the key and turn it clockwise to unlock. The trunk compartment light illuminates when the trunk lid is opened.
WARNING:
o If a person is locked in the trunk, pull the emergency trunk releaselever on the driver's side of theinside panel of the trunk to open the trunk lid.
o Hyundai recommends that cars be kept locked and keys be keptout of the reach of children, and that parents teach their childrenabout the dangers of playing in trunks.
o Parents should teach children about the emergency trunk re-lease lever in their vehicle and how to open the trunk lid if theyare accidentally locked in the trunk. B540C01Y-AAT To unlock using the key
B540C03L
!
Page 110 of 235

1- 96 FEATURES OF YOUR HYUNDAI
B940B02L-GAT
1. POWER ON-OFF/VOLUME
CONTROL KNOB
The radio unit may be operated when the ignition key is in the "ACC" or "ON" position. Press the button to switch thepower on. The display shows the radio frequency in the radio mode, the tape direction indicator in the tape mode, or
CD track in the CD AUTO CHANGER mode. To switch the power off, press the button again. VOLUME Control Rotate the knob clockwise to increase the volume and turn the knob counter- clockwise to reduce the volume.
2. BASS/BALANCE Control BASS Control Knob Press to pop the knob out. To increase the bass, rotate the knob clockwise, while to decrease the bass, rotate theknob counterclockwise. 4. TUNE (Manual) Select Button Press the (+) side or (-) side to increase or to decrease the frequency. With thebutton held down for 0.5 sec. or more, the frequency selection will increase or decrease rapidly. SEEK Operation (Automatic Channel Selection) Press the TUNE select button 1 sec. or more. When the (+) side is pressed, theunit will automatically tune to the next higher frequency and when
the (-) side
is pressed, it will automatically tune to the next lower frequency. 5. PRESET STATION Select
Buttons
Six (6) stations for AM, FM and FM2 respectively can be preset in the elec- tronic memory circuit.
BALANCE Control Further pull the popped-up knob. Ro- tate the knob clockwise to emphasizeright speaker sound (left speaker sound will be attenuated). When the control knob is turned counterclockwise, leftspeaker sound will be emphasized (right speaker sound will be attenuated). 3. TREBLE/FAD Knob TREBLE Control Knob Press to pop the knob out and turn to the left or right for the desired treble tone. FAD (Fader Control) Knob Further pull the popped-up knob. Turn the control knob clockwise to empha-size rear speaker sound (front speaker sound will be attenuated). When the control knob is turned counterclock-wise, front speaker sound will be em- phasized (rear speaker sound will be attenuated).
Page 118 of 235

1- 104 FEATURES OF YOUR HYUNDAI
B940H02L-GAT
1. POWER ON-OFF/VOLUME
CONTROL KNOB
The radio unit may be operated when the ignition key is in the "ACC" or "ON" position. Press the button to switch thepower on. The display shows the radio frequency in the radio mode, the tape direction indicator in the tape mode, orCD track either in the CD mode or CD AUTO CHANGER mode. To switch the power off, press the button again. VOLUME Control Rotate the knob clockwise to increase the volume and turn the knob counter- clockwise to reduce the volume.
2. BASS/BALANCE Control BASS Control Knob Press to pop the knob out. To increase the bass, rotate the knob clockwise, while to decrease the bass, rotate theknob counterclockwise. BALANCE Control Further pull the popped-up knob. Rotate the knob clockwise to emphasize rightspeaker sound (left speaker sound will be attenuated). When the control knob is turned counter clockwise, left speakersound will be emphasized (right speaker sound will be attenuated).
3. TREBLE/FAD Knob TREBLE Control Knob Press to pop the knob out and turn to the left or right for the desired treble tone. FAD (Fader Control) Knob Further pull the popped-up knob. Turn the control knob clockwise to empha-size rear speaker sound (front speaker sound will be attenuated). When the control knob is turned counterclock-wise, front speaker sound will be em- phasized (rear speaker sound will be attenuated). 4. TUNE (Manual) Select Button Press the (+) side or (-) side to in- crease or to decrease the frequency.With the button held down for 0.5 sec. or more, the frequency selection will increase or decrease rapidly. SEEK Operation (Automatic Channel Selection) Press the TUNE select button 1 sec. or more.
When the (+) side is pressed, the
unit will automatically tune to the next higher frequency and when the (-) side is pressed, it will automatically tune tothe next low er frequency.
5. PRESET STATION Select Buttons
Six (6) stations for AM, FM and FM2respectively can be preset in the elec- tronic memory circuit.
Page 136 of 235
2- 4 DRIVING YOUR HYUNDAI
C070C01E
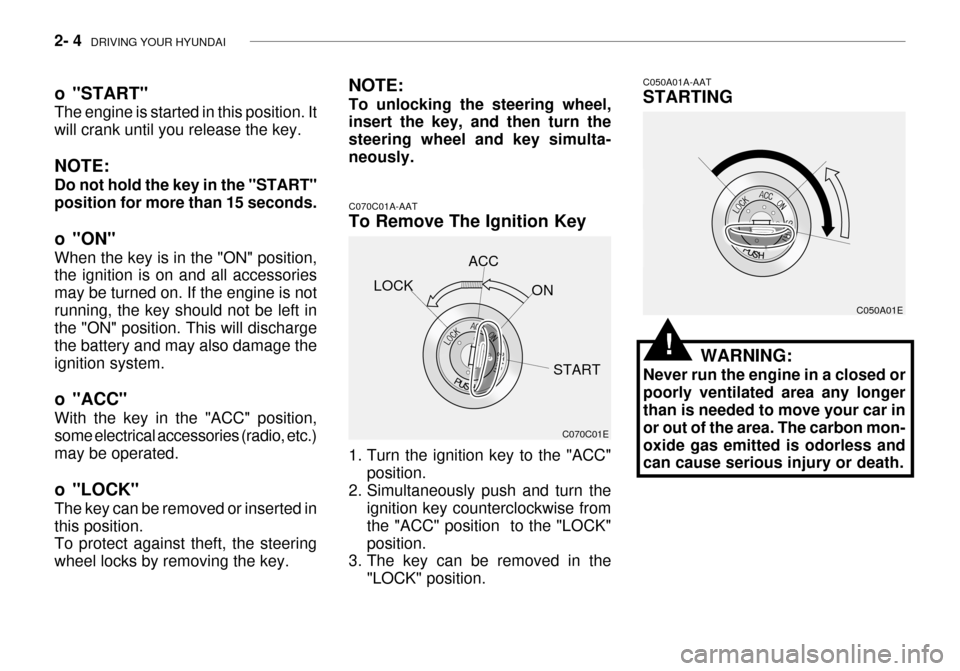
C070C01A-AAT
To Remove The Ignition Key
1. Turn the ignition key to the "ACC"
position.
2. Simultaneously push and turn the ignition key counterclockwise from the "ACC" position to the "LOCK"position.
3. The key can be removed in the
"LOCK" position. C050A01A-AAT STARTING
C050A01E
WARNING:
Never run the engine in a closed or poorly ventilated area any longer than is needed to move your car in or out of the area. The carbon mon-oxide gas emitted is odorless and can cause serious injury or death.
LOCK
ACC
ON
START
o "START" The engine is started in this position. It will crank until you release the key. NOTE: Do not hold the key in the "START" position for more than 15 seconds.
o "ON" When the key is in the "ON" position, the ignition is on and all accessories may be turned on. If the engine is notrunning, the key should not be left in the "ON" position. This will discharge the battery and may also damage theignition system.
o "ACC" With the key in the "ACC" position, some electrical accessories (radio, etc.)may be operated.
o "LOCK" The key can be removed or inserted in this position. To protect against theft, the steering wheel locks by removing the key. NOTE: To unlocking the steering wheel, insert the key, and then turn the steering wheel and key simulta-neously.
!
Page 161 of 235
WHAT TO DO IN AN EMERGENCY 3- 7
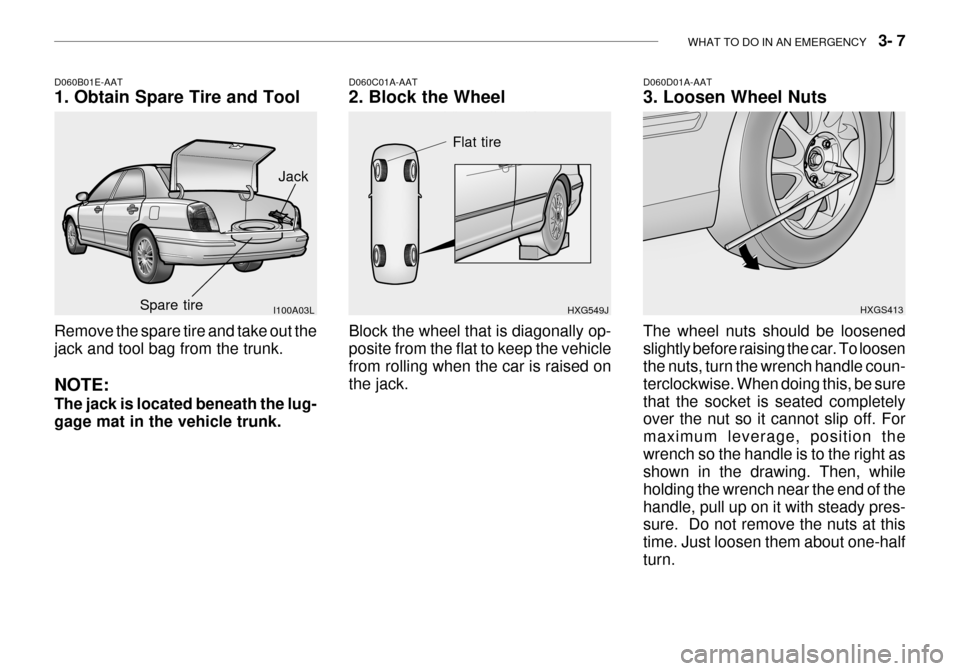
Remove the spare tire and take out the jack and tool bag from the trunk. NOTE: The jack is located beneath the lug- gage mat in the vehicle trunk.
D060B01E-AAT 1. Obtain Spare Tire and Tool
I100A03L
D060C01A-AAT 2. Block the Wheel Block the wheel that is diagonally op- posite from the flat to keep the vehicle from rolling when the car is raised on the jack.HXG549JD060D01A-AAT 3. Loosen Wheel Nuts
HXGS413
The wheel nuts should be loosened slightly before raising the car. To loosen the nuts, turn the wrench handle coun- terclockwise. When doing this, be surethat the socket is seated completely over the nut so it cannot slip off. For maximum leverage, position thewrench so the handle is to the right as shown in the drawing. Then, while holding the wrench near the end of thehandle, pull up on it with steady pres- sure. Do not remove the nuts at this time. Just loosen them about one-halfturn.
Jack
Spare tire
Flat tire