low oil pressure Hyundai Grandeur 2003 Owner's Manual
[x] Cancel search | Manufacturer: HYUNDAI, Model Year: 2003, Model line: Grandeur, Model: Hyundai Grandeur 2003Pages: 235, PDF Size: 14.25 MB
Page 14 of 235

YOUR VEHICLE AT A GLANCE
Turn Signal Indicator Lights ABS Service Reminder Indicator Traction Control Indicator Light Seat Belt Warning LightHigh Beam Indicator Light Trunk Lid Open Warning Light Front Fog Indicator LightLow Oil Pressure Warning LightParking Brake/Low Brake Fluid Level Warning Light Charging System Warning Light Door Ajar Warning Light and Chime Low Fuel Level Warning Light SRS (Airbag) Service Reminder Indicator Cruise Indicator Light Stop/Tail Light Failure Warning Light Malfunction Indicator Light
B255A01L-GAT INDICATOR SYMBOLS ON THE INSTRUMENT PANEL * More detailed explanations of these items will be found beginning on page 1-42
Page 54 of 235
1- 40 FEATURES OF YOUR HYUNDAI
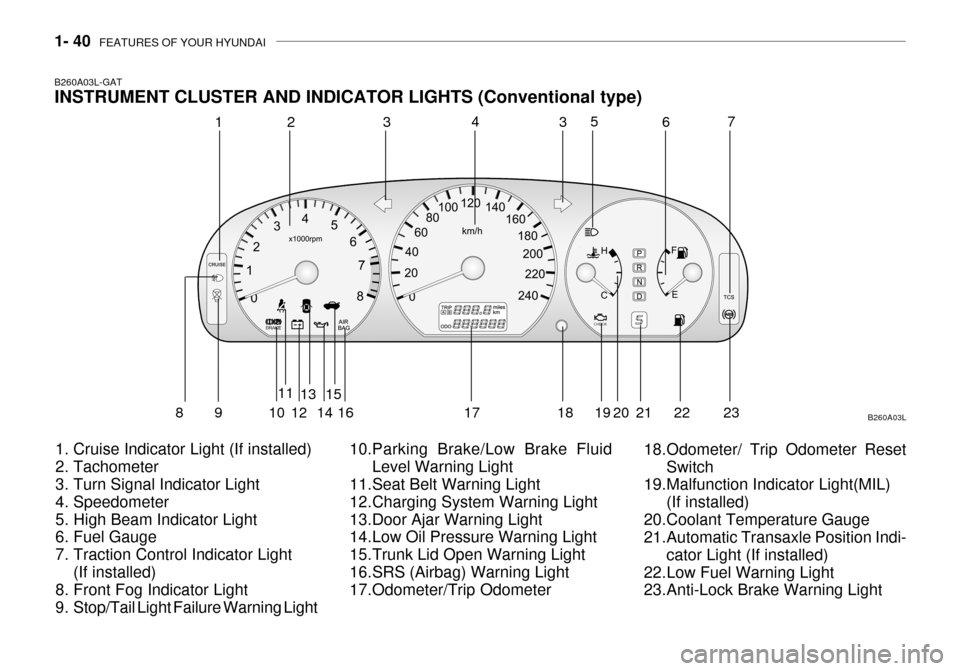
B260A03L-GAT INSTRUMENT CLUSTER AND INDICATOR LIGHTS (Conventional type)
1. Cruise Indicator Light (If installed)
2. Tachometer
3. Turn Signal Indicator Light
4. Speedometer
5. High Beam Indicator Light
6. Fuel Gauge
7. Traction Control Indicator Light (If installed)
8. Front Fog Indicator Light
9. Stop/Tail Light Failure Warning Light 10.Parking Brake/Low Brake Fluid
Level Warning Light
11.Seat Belt Warning Light
12.Charging System Warning Light
13.Door Ajar Warning Light
14.Low Oil Pressure Warning Light
15.Trunk Lid Open Warning Light
16.SRS (Airbag) Warning Light
17.Odometer/Trip Odometer 18.Odometer/ Trip Odometer Reset
Switch
19.Malfunction Indicator Light(MIL)
(If installed)
20.Coolant Temperature Gauge
21.Automatic Transaxle Position Indi-
cator Light (If installed)
22.Low Fuel Warning Light
23.Anti-Lock Brake Warning Light B260A03L
1
2
3435
67
89 1 011
1213
1415
16 17 18 19 20 21 22
23
Page 55 of 235
FEATURES OF YOUR HYUNDAI 1- 41
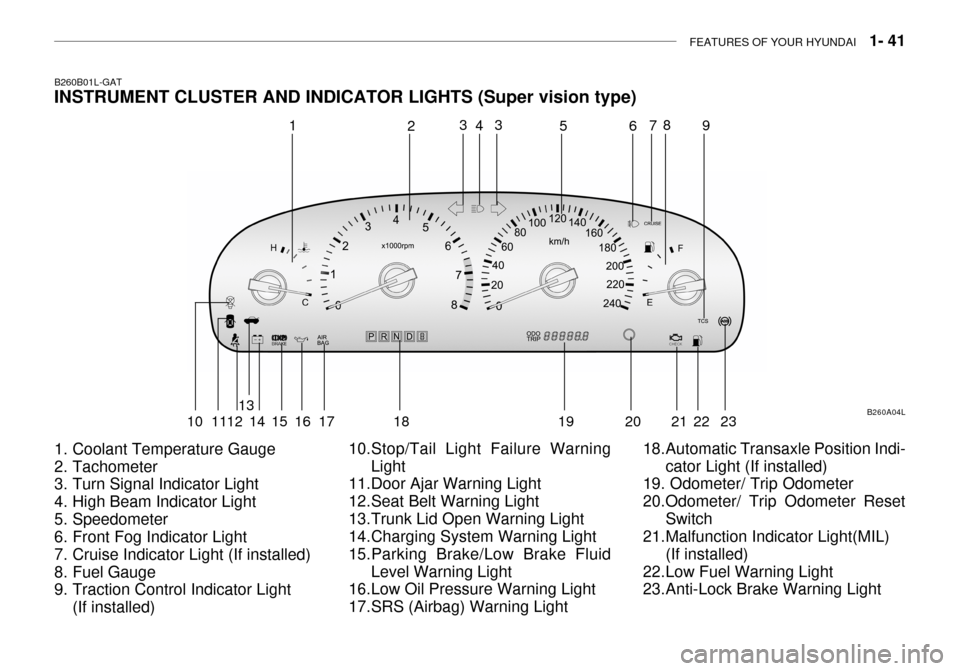
B260B01L-GAT INSTRUMENT CLUSTER AND INDICATOR LIGHTS (Super vision type)
1. Coolant Temperature Gauge
2. Tachometer
3. Turn Signal Indicator Light
4. High Beam Indicator Light
5. Speedometer
6. Front Fog Indicator Light
7. Cruise Indicator Light (If installed)
8. Fuel Gauge
9. Traction Control Indicator Light
(If installed) 10.Stop/Tail Light Failure Warning
Light
11.Door Ajar Warning Light
12.Seat Belt Warning Light
13.Trunk Lid Open Warning Light
14.Charging System Warning Light
15.Parking Brake/Low Brake Fluid
Level Warning Light
16.Low Oil Pressure Warning Light
17.SRS (Airbag) Warning Light 18.Automatic Transaxle Position Indi-
cator Light (If installed)
19. Odometer/ Trip Odometer
20.Odometer/ Trip Odometer Reset
Switch
21.Malfunction Indicator Light(MIL)
(If installed)
22.Low Fuel Warning Light
23.Anti-Lock Brake Warning Light B260A04L
1
2
4
3 3
56 78
9
10 1112 13
14 15 16 17 18 19 20 21 22 23
Page 57 of 235
FEATURES OF YOUR HYUNDAI 1- 43
B260A01B-GAT
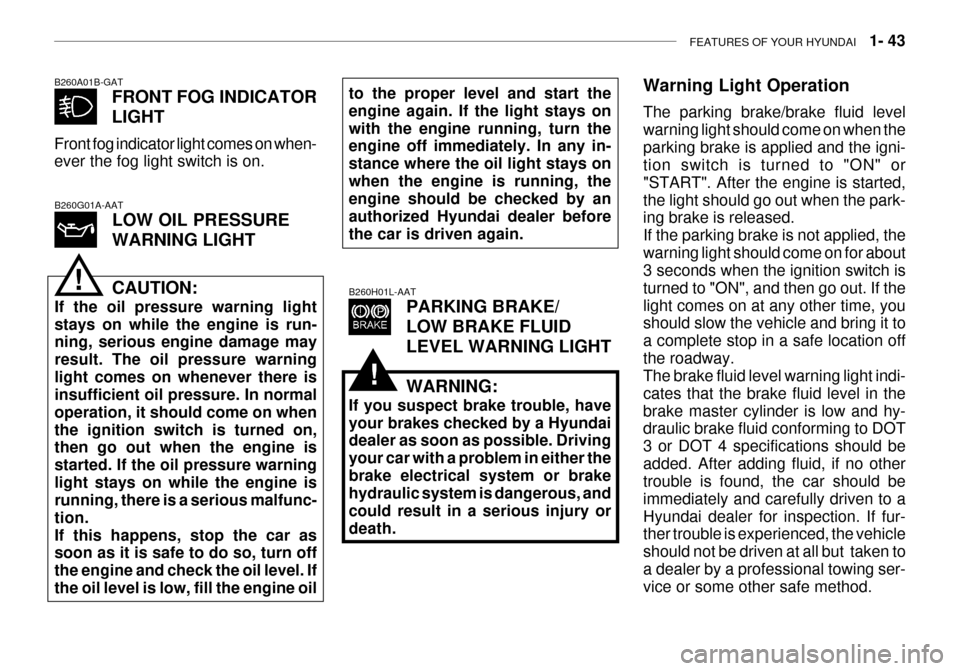
FRONT FOG INDICATOR LIGHT
Front fog indicator light comes on when- ever the fog light switch is on.
B260G01A-AAT LOW OIL PRESSURE WARNING LIGHT CAUTION:
If the oil pressure warning light stays on while the engine is run- ning, serious engine damage may result. The oil pressure warninglight comes on whenever there is insufficient oil pressure. In normal operation, it should come on whenthe ignition switch is turned on, then go out when the engine is started. If the oil pressure warninglight stays on while the engine is running, there is a serious malfunc- tion.If this happens, stop the car as soon as it is safe to do so, turn off the engine and check the oil level. Ifthe oil level is low, fill the engine oil to the proper level and start theengine again. If the light stays onwith the engine running, turn the engine off immediately. In any in- stance where the oil light stays onwhen the engine is running, the engine should be checked by an authorized Hyundai dealer beforethe car is driven again.
!B260H01L-AAT
PARKING BRAKE/ LOW BRAKE FLUID
LEVEL WARNING LIGHT
WARNING:
If you suspect brake trouble, have your brakes checked by a Hyundai dealer as soon as possible. Driving your car with a problem in either thebrake electrical system or brake hydraulic system is dangerous, and could result in a serious injury ordeath. Warning Light Operation The parking brake/brake fluid level warning light should come on when theparking brake is applied and the igni- tion switch is turned to "ON" or "START". After the engine is started,the light should go out when the park- ing brake is released. If the parking brake is not applied, thewarning light should come on for about 3 seconds when the ignition switch is turned to "ON", and then go out. If thelight comes on at any other time, you should slow the vehicle and bring it to a complete stop in a safe location offthe roadway. The brake fluid level warning light indi- cates that the brake fluid level in thebrake master cylinder is low and hy- draulic brake fluid conforming to DOT 3 or DOT 4 specifications should beadded. After adding fluid, if no other trouble is found, the car should be immediately and carefully driven to aHyundai dealer for inspection. If fur- ther trouble is experienced, the vehicle should not be driven at all but taken toa dealer by a professional towing ser- vice or some other safe method.
!
Page 150 of 235
2- 18 DRIVING YOUR HYUNDAI
C190B01S-AAT Trailer Hitches Select the proper hitch and ball combi- nation, making sure that it's location is compatible with that of the trailer or vehicle being towed. Use a quality non-equalizing hitch whichdistributes the tongue load uniformly throughout the chassis. The hitch should be bolted securely to the car and installed by a qualified technician. DO NOT USE A HITCHDESIGNED FOR TEMPORARY IN- STALLATION AND NEVER USE ONE THAT ATTACHES ONLY TO THEBUMPER.
C180A01A-AAT USE OF LIGHTS Check your lights regularly for correct operation and always keep them clean.When driving during the day in condi- tions of poor visibility, it is helpful to drive with headlights on low beam.This enables you to be seen as well as to see. C190A01A-GAT TRAILER OR VEHICLE TOWING If you are considering towing with your car, you should first check with your Province Department of Motor Vehicles to determine their legal requirements.Since laws vary from province to prov- ince the requirements for towing trail- ers, cars, or other types of vehicles orapparatus may differ. Ask your Hyundai dealer for further details before towing.
CAUTION:
Do not do any towing with your carduring its first 2,000 km (1,200 miles) in order to allow the engine to prop-erly break in. Failure to heed this caution may result in serious en- gine or transaxle damage.
!
C170A01A-AAT HIGH SPEED MOTORING Pre-Trip Inspections 1. Tires: Adjust the tire inflation pressures to specification. Low tire inflation pres-sures will result in overheating and possible failure of the tires. Avoid using worn or damaged tireswhich may result in reduced traction or tire failure. NOTE: Never exceed the maximum tire in- flation pressure shown on the tires. 2. Fuel, engine coolant and engine oil: High speed travel consumes more fuel than urban motoring. Do not forget tocheck both engine coolant and engine oil. 3. Drive belt: A loose or damaged drive belt may result in overheating of the engine.
Page 186 of 235

DO-IT-YOURSELF MAINTENANCE 6- 5
G020A02A-AAT
GENERAL CHECKS Engine Compartment
The following should be checked regu- larly:
o Engine oil level and condition
o Transaxle fluid level and condition
o Brake fluid level
o Clutch fluid level
o Coolant level
o Windshield washer fluid level
o Accessory drive belt condition
o Coolant hose condition
o Fluid leaks (on or below compo- nents)
o Power steering fluid level and con-
dition
o Battery condition
o Air filter condition G020C01A-AAT Vehicle Interior The following should be checked each time when the vehicle is driven:
o Lights operation
o Windshield wiper operation
o Horn operation
o Defroster, heater system operation
(and air conditioning, if installed)
o Steering operation and condition
o Mirror condition and operation
o Turn signal operation
o Accelerator pedal operation
o Brake operation, including parking brake
o Manual transaxle operation, includ- ing clutch operation
o Automatic transaxle operation, in- cluding "Park" mechanism opera-tion
o Seat control condition and opera- tion
o Seat belt condition and operation
o Sunvisor operation If you notice anything that does not operate correctly or appears to befunctioning incorrectly, inspect it care- fully and seek assistance from your Hyundai dealer if service is needed.
G020B01A-AAT
Vehicle Exterior
The following should be checked
monthly:
o Overall appearance and condition
o Wheel condition and wheel nut torgue
o Exhaust system condition
o Light condition and operation
o Windshield glass condition
o Wiper blade condition
o Paint condition and body corrosion
o Fluid leaks
o Door and hood lock condition
o Tire pressure and condition (including spare tire)
Page 188 of 235
DO-IT-YOURSELF MAINTENANCE 6- 7
G040A02A-AAT
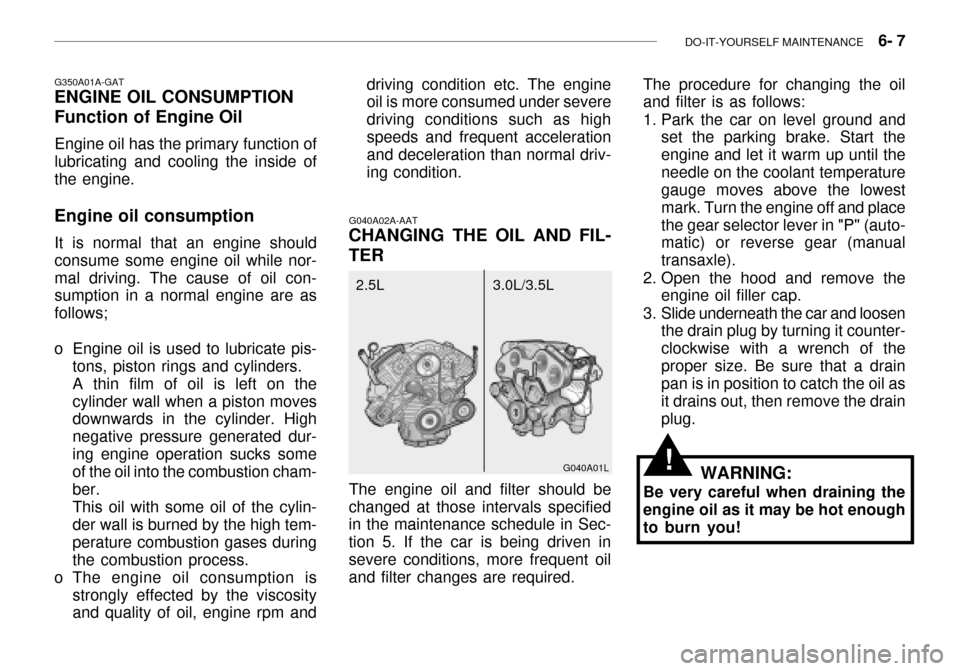
CHANGING THE OIL AND FIL- TER The procedure for changing the oil and filter is as follows:
1. Park the car on level ground and
set the parking brake. Start the engine and let it warm up until theneedle on the coolant temperature gauge moves above the lowest mark. Turn the engine off and placethe gear selector lever in "P" (auto- matic) or reverse gear (manual transaxle).
2. Open the hood and remove the engine oil filler cap.
3. Slide underneath the car and loosen the drain plug by turning it counter-clockwise with a wrench of theproper size. Be sure that a drain pan is in position to catch the oil as it drains out, then remove the drainplug.
WARNING:
Be very careful when draining theengine oil as it may be hot enoughto burn you!
The engine oil and filter should be
changed at those intervals specified in the maintenance schedule in Sec- tion 5. If the car is being driven insevere conditions, more frequent oil and filter changes are required. G040A01L
3.0L/3.5L
2.5L
G350A01A-GAT
ENGINE OIL CONSUMPTION Function of Engine Oil
Engine oil has the primary function of lubricating and cooling the inside ofthe engine.
Engine oil consumption It is normal that an engine shouldconsume some engine oil while nor-
mal driving. The cause of oil con- sumption in a normal engine are as follows;
o Engine oil is used to lubricate pis- tons, piston rings and cylinders.A thin film of oil is left on thecylinder wall when a piston moves downwards in the cylinder. High negative pressure generated dur-ing engine operation sucks some of the oil into the combustion cham- ber. This oil with some oil of the cylin- der wall is burned by the high tem- perature combustion gases duringthe combustion process.
o The engine oil consumption is
strongly effected by the viscosity and quality of oil, engine rpm and driving condition etc. The engine
oil is more consumed under severe driving conditions such as highspeeds and frequent acceleration and deceleration than normal driv- ing condition.
!
Page 206 of 235
DO-IT-YOURSELF MAINTENANCE 6- 25
Before performing aiming adjustment,
make sure of the following.
1. Keep all tires inflated to the correct
pressure.
2. Place the vehicle on level ground
and press the front bumper & rear bumper down several times. Place the vehicle at a distance of 3 m (118 in.) from the test wall.
3. See that the vehicle is unloaded (except for full levels of coolant,engine oil and fuel, and spare tire,jack, and tools). Have the driver or equivalent weight placed in driver's seat.
4. Clean the head light lenses and
turn on the headlights (low beam).
5. Open the hood.
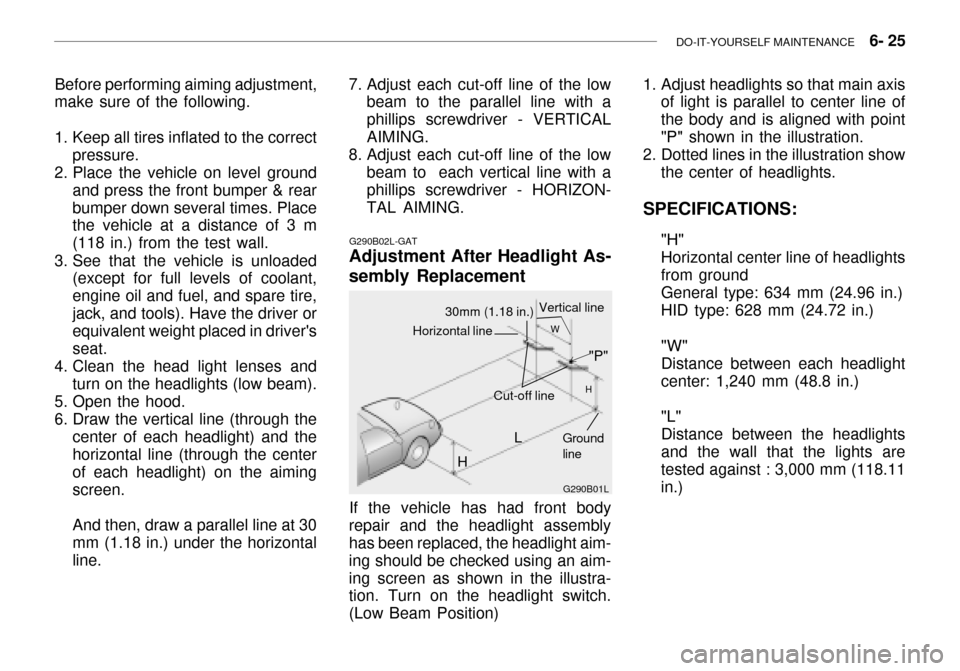
6. Draw the vertical line (through the center of each headlight) and the horizontal line (through the center of each headlight) on the aimingscreen. And then, draw a parallel line at 30 mm (1.18 in.) under the horizontal line.
G290B02L-GAT
Adjustment After Headlight As- sembly Replacement
G290B01L
LW
H
H Cut-off line
Ground line
If the vehicle has had front body
repair and the headlight assembly has been replaced, the headlight aim- ing should be checked using an aim-ing screen as shown in the illustra- tion. Turn on the headlight switch. (Low Beam Position)
"P"
Horizontal line
30mm (1.18 in.) Vertical line
7. Adjust each cut-off line of the low
beam to the parallel line with a phillips screwdriver - VERTICALAIMING.
8. Adjust each cut-off line of the low
beam to each vertical line with a phillips screwdriver - HORIZON- TAL AIMING. 1. Adjust headlights so that main axis
of light is parallel to center line ofthe body and is aligned with point"P" shown in the illustration.
2. Dotted lines in the illustration show the center of headlights.
SPECIFICATIONS: "H"Horizontal center line of headlightsfrom groundGeneral type: 634 mm (24.96 in.) HID type: 628 mm (24.72 in.) "W" Distance between each headlightcenter: 1,240 mm (48.8 in.) "L" Distance between the headlightsand the wall that the lights aretested against : 3,000 mm (118.11 in.)