weight Hyundai H-1 (Grand Starex) 2005 Owner's Manual
[x] Cancel search | Manufacturer: HYUNDAI, Model Year: 2005, Model line: H-1 (Grand Starex), Model: Hyundai H-1 (Grand Starex) 2005Pages: 205, PDF Size: 9.14 MB
Page 17 of 205
1
BEFORE DRIVING YOUR VEHICLE
3
B030A01P-GAT BEFORE OPERATION PRECAUTIONS FOR NEWVEHICLE The performance and life of a vehicle depend largely on how the vehicle is handled when new.To maintain the parts smoothly and sustain high performance for a long time to come, be sure to observe thefollowing points. Make sure that your vehicle does not miss the first 5,000 km inspec- tions. After the first 5,000 km of driving, take your vehicle to your nearest service shop for inspection. B040A01P-GAT OPERATION IN FOREIGN COUN- TRIES If you are going to drive your Hyundai in another country, be sure to:
o Observe all regulations regarding
registration and insurance.
o Determine that acceptable fuel is available.
!
B055A02P-GAT LOADING YOUR VEHICLE Never load the luggage and people to exceed GVWR(MLW) and GAWR ofyour vehicle. You can find the GVWR(MLW) and GAWR -maximum loading capacities-on the VIN plate. The GVWR(Gross Vehicle Weight Rating) or MLW(Maximum LoadedWeight) means total weight of the ve- hicle, all occupants, fuel and cargo. And GAWR means the maximumweights that the front and rear axles can endure the weights including ve- hicle itself weight.
WARNING:
Improperly loading your car canseriously affect its steering and braking performance causing a crash in which you may be seri-ously injured or killed. NOTE: Your warranty does not cover parts or components that fail because of overloading.
Page 44 of 205
1BEFORE DRIVING YOUR VEHICLE
30
!
!
B080A01A-AAT ADJUSTABLE FRONT SEATS
WARNING:
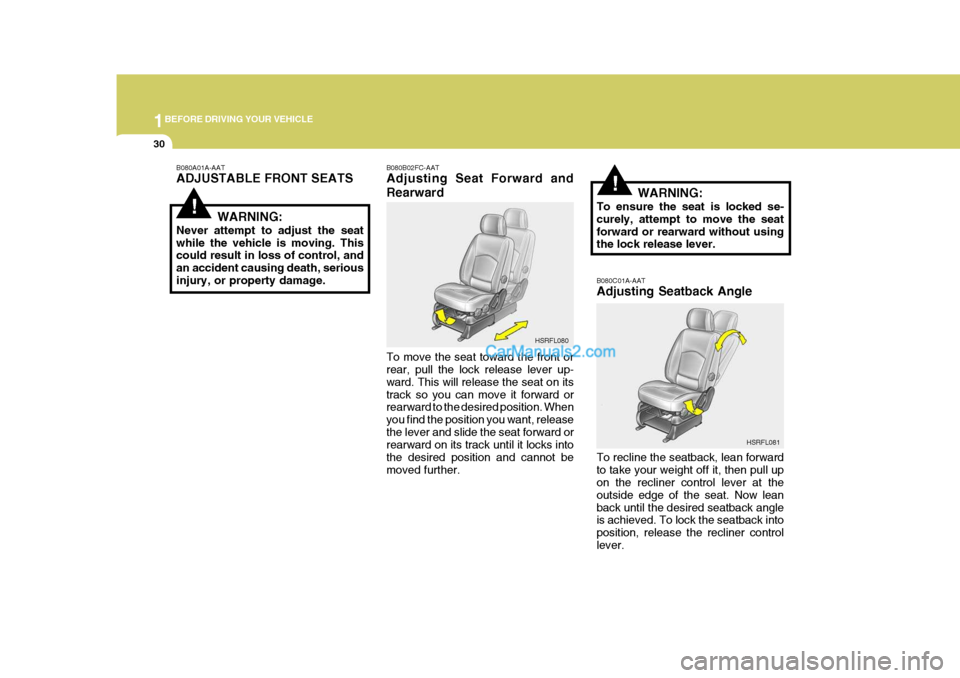
Never attempt to adjust the seat while the vehicle is moving. This could result in loss of control, and an accident causing death, seriousinjury, or property damage. B080B02FC-AAT Adjusting Seat Forward and Rearward To move the seat toward the front or rear, pull the lock release lever up- ward. This will release the seat on itstrack so you can move it forward or rearward to the desired position. When you find the position you want, releasethe lever and slide the seat forward or rearward on its track until it locks into the desired position and cannot bemoved further. B080C01A-AAT Adjusting Seatback Angle To recline the seatback, lean forward to take your weight off it, then pull up on the recliner control lever at the outside edge of the seat. Now leanback until the desired seatback angle is achieved. To lock the seatback into position, release the recliner controllever.
HSRFL080
HSRFL081
WARNING:
To ensure the seat is locked se-curely, attempt to move the seatforward or rearward without using the lock release lever.
Page 90 of 205
3 STARTING AND OPERATING
22
!
D110A01P-GAT GOOD BRAKING PRACTICES
WARNING:
Nothing should be carried on top of the cargo area cover behind the rear seat. If there were an accident or a sudden stop, such objectscould move forward and cause dam- age to the vehicle or injure the oc- cupants.
o After being parked, check to be sure the parking brake is not engagedand that the parking brake indicator light is out before driving away.
o Driving through water may get the brakes wet. They can also get wetwhen the vehicle is washed. Your vehicle may not stop as quickly if thebrakes are wet and it may also pull to one side. To dry the brakes, apply the brakes lightly until the brakingaction returns to normal, taking care to keep the vehicle under control at all times. If the braking action doesnot return to normal, stop as soon as it is safe to do so and call your Hyundai dealer for assistance. o Don’t coast down hills with the ve-
hicle out of gear. This may be ex-tremely hazardous. Keep the vehicle in gear at all times, use the brakes to slow down, thenshift to a lower gear so that engine braking will help you maintain a safe speed.
o Don’t "ride" the brake pedal. Rest- ing your foot on the brake pedalwhile driving can be dangerous be-cause it can result in the brakes overheating and losing their effec- tiveness. It also increases the wearof the brake components.
o If a tire goes flat while you are
driving, apply the brakes gently andkeep the vehicle pointed straight ahead while you slow down. When you are moving slowly enough for itto be safe to do so, pull off the road and stop in a safe place.
o If your vehicle is equipped with an automatic transmission, don’t letyour vehicle creep forward. To avoid creeping forward, keepyour foot on the brake pedal when the vehicle is stopped.
D130A01P-GAT LOADING Loading should not be to the point at which the Maximum Gross VehicleWeight is exceeded. Loading should be as uniform as pos- sible.Driving stability will be reduced if the load is unequal between front/rear or left/right.Avoid sudden starts, sudden braking, and sharp cornering.
Page 94 of 205
3 STARTING AND OPERATING
26
o Keep your car in good condition. Forbetter fuel economy and reduced maintenance costs, maintain your car in accordance with the mainte- nance schedule in Section 6. If youdrive your car in severe conditions, more frequent maintenance is re- quired (see Section 6 for details).
o Keep your car clean. For maximum service, your Hyundai should bekept clean and free of corrosivematerials. It is especially important that mud, dirt, ice, etc. not be al- lowed to accumulate on the under-side of the car. This extra weight can result in increased fuel con- sumption and also contribute to cor-rosion.
o Travel lightly. Don't carry unneces-
sary weight in your car. Weight re-duces fuel economy.
o Don't let the engine idle longer than
necessary. If you are waiting (andnot in traffic), turn off your engine and restart only when you're ready to go. o Remember, your Hyundai does not
require extended warm-up. As soonas the engine is running smoothly, you can drive away. In very cold weather, however, give your enginea slightly longer warm-up period.
o Don't "lug" or "over-rev" the engine.
Lugging is driving too slowly in toohigh a gear resulting in the engine bucking. If this happens, shift to a lower gear. Over-revving is racingthe engine beyond its safe limit. This can be avoided by shifting at the recommended speeds.
o Use your air conditioning sparingly. The air conditioning system is oper-ated by engine power so your fueleconomy is reduced when you use it.
o Don't "ride" the brake or clutch pedal.
This can increase fuel consumption and also increase wear on these components. In addition, driving with your foot resting on the brake pedalmay cause the brakes to overheat, which reduces their effectiveness and may lead to more serious con-sequences.
o Take care of your tires. Keep them
inflated to the recommended pres-sure. Incorrect inflation, either too much or too little, results in unnec- essary tire wear. Check the tire pres-sures at least once a month.
o Be sure that the wheels are aligned
correctly. Improper alignment canresult from hitting curbs or driving too fast over irregular surfaces. Poor alignment causes faster tire wearand may also result in other prob- lems as well as greater fuel con- sumption.
Page 95 of 205
3
STARTING AND OPERATING
27
D170B01P-GAT (1) Speed Avoid rapid acceleration, sudden starts, and maximum speed driving; suchoperation will result in more fuel con- sumption. D170C01P-GAT (2) Shifting Shift only at an appropriate vehicle speed and engine rpm.Always use the highest gear possible. Fuel consumption depends largely on the manner in which vehicle is drivenbut it is also affected by other driving conditions. D170D01P-GAT (3) City traffic Frequent starting and stopping in- creases the average fuel consump- tion. Use roads with smooth traffic flowwhenever possible. When driving on congested roads, avoid use of a low gear at high engine rpm. D170G01P-GAT (6) Tire inflation pressure Check the tire inflation pressure at regular intervals. Low tire inflation pres- sures increase road resistance and fuel consumption. In addition, low tirepressures adversely affect tire wear and driving control.D170H01P-GAT (7) Load Do not drive with unnecessary articles in the luggage compartment.Especially during city driving where frequent starting and stopping is nec- essary, the increased weight of thevehicle will greatly affect fuel consump- tion. Also avoid driving with unnecessaryluggage, etc., on the roof; the increased air resistance will cause more fuel consumption.
D170I01P-GAT (8) Cold engine starting Starting of a cold engine consumes more fuel. Unnecessary fuel consump- tion is also caused by keeping a hot engine running. After the engine isstarted, begin driving soon.
D170E01P-GAT (4) Idling The vehicle consumes fuel even dur- ing idling. Avoid extended idling when-ever possible. D170F01P-GAT (5) High speed The higher the vehicles speed, the more fuel consumed. Avoid driving at full speed. Even a slight release of the accelerator pedal will save significant amount of fuel.
Page 104 of 205
4
CORROSION PREVENTION AND APPEARANCE CARE
3
4
IN CASE OF EMERGENCY
3
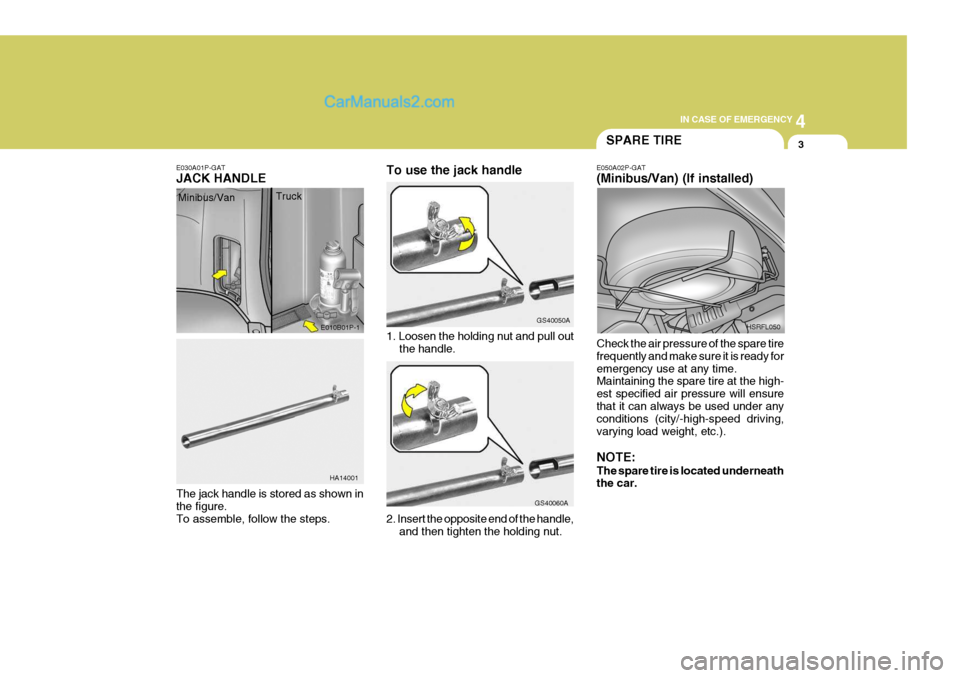
E030A01P-GAT JACK HANDLE
1. Loosen the holding nut and pull outthe handle.
The jack handle is stored as shown in the figure. To assemble, follow the steps. 2. Insert the opposite end of the handle,
and then tighten the holding nut.
E010B01P-1
HA14001 GS40050A
GS40060A
SPARE TIRE
E050A02P-GAT (Minibus/Van) (If installed) Check the air pressure of the spare tire frequently and make sure it is ready foremergency use at any time. Maintaining the spare tire at the high- est specified air pressure will ensurethat it can always be used under any conditions (city/-high-speed driving, varying load weight, etc.). NOTE: The spare tire is located underneath the car. HSRFL050
Minibus/Van
Truck To use the jack handle
Page 117 of 205
44IN CASE OF EMERGENCY
16
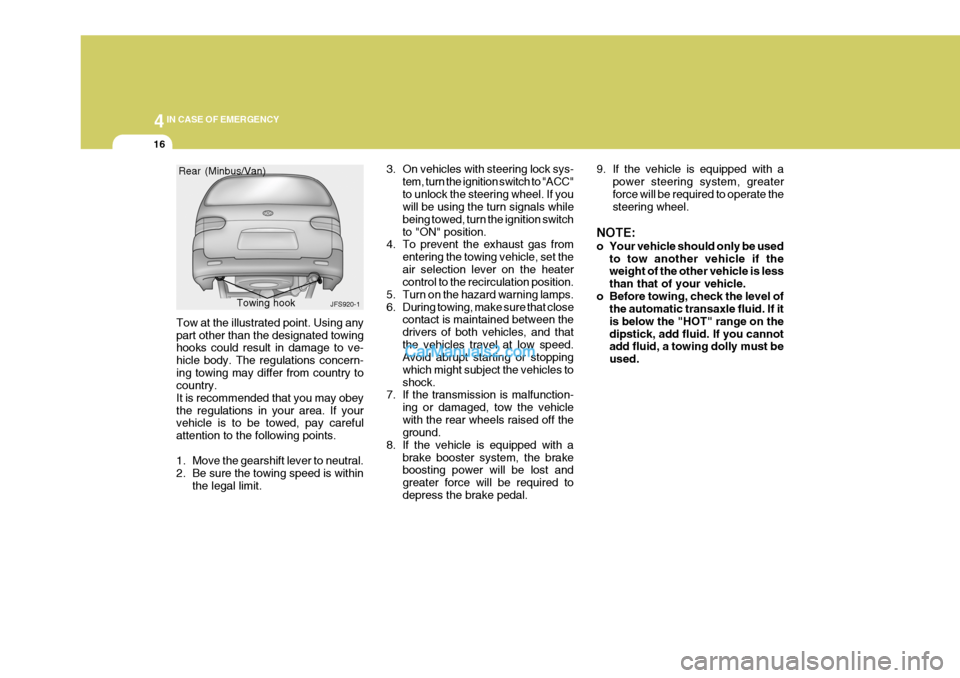
Tow at the illustrated point. Using any part other than the designated towing hooks could result in damage to ve- hicle body. The regulations concern-ing towing may differ from country to country. It is recommended that you may obeythe regulations in your area. If your vehicle is to be towed, pay careful attention to the following points.
1. Move the gearshift lever to neutral.
2. Be sure the towing speed is within
the legal limit. 3. On vehicles with steering lock sys-
tem, turn the ignition switch to "ACC"to unlock the steering wheel. If you will be using the turn signals while being towed, turn the ignition switchto "ON" position.
4. To prevent the exhaust gas from
entering the towing vehicle, set theair selection lever on the heater control to the recirculation position.
5. Turn on the hazard warning lamps.
6. During towing, make sure that close contact is maintained between thedrivers of both vehicles, and thatthe vehicles travel at low speed. Avoid abrupt starting or stopping which might subject the vehicles toshock.
7. If the transmission is malfunction-
ing or damaged, tow the vehiclewith the rear wheels raised off the ground.
8. If the vehicle is equipped with a brake booster system, the brakeboosting power will be lost and greater force will be required todepress the brake pedal.
JFS920-1
Rear (Minbus/Van)
Towing hook
9. If the vehicle is equipped with apower steering system, greater force will be required to operate the steering wheel.
NOTE:
o Your vehicle should only be used to tow another vehicle if the weight of the other vehicle is less than that of your vehicle.
o Before towing, check the level of the automatic transaxle fluid. If itis below the "HOT" range on thedipstick, add fluid. If you cannot add fluid, a towing dolly must be used.
Page 119 of 205
44IN CASE OF EMERGENCY
18
and stop as soon as it is safe to do so, and allow the engine toidle until it cools down. You may proceed once the engine has cooled sufficiently.
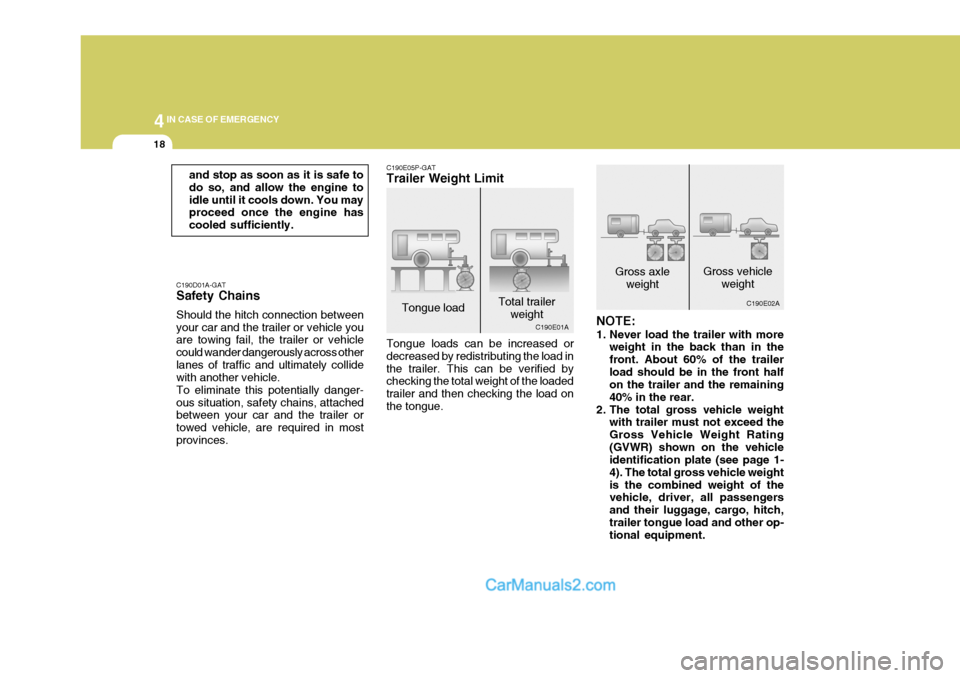
C190D01A-GAT Safety Chains Should the hitch connection between your car and the trailer or vehicle you are towing fail, the trailer or vehicle could wander dangerously across otherlanes of traffic and ultimately collide with another vehicle. To eliminate this potentially danger-ous situation, safety chains, attached between your car and the trailer or towed vehicle, are required in mostprovinces. C190E05P-GAT Trailer Weight Limit Tongue loads can be increased or decreased by redistributing the load inthe trailer. This can be verified by checking the total weight of the loaded trailer and then checking the load onthe tongue.
NOTE:
1. Never load the trailer with more
weight in the back than in the front. About 60% of the trailerload should be in the front half on the trailer and the remaining 40% in the rear.
2. The total gross vehicle weight with trailer must not exceed theGross Vehicle Weight Rating(GVWR) shown on the vehicle identification plate (see page 1- 4). The total gross vehicle weightis the combined weight of the vehicle, driver, all passengers and their luggage, cargo, hitch,trailer tongue load and other op- tional equipment.
Tongue load
Total trailer
weight Gross axle
weight Gross vehicle
weight
C190E01A C190E02A
Page 120 of 205
4
CORROSION PREVENTION AND APPEARANCE CARE
19
4
IN CASE OF EMERGENCY
19
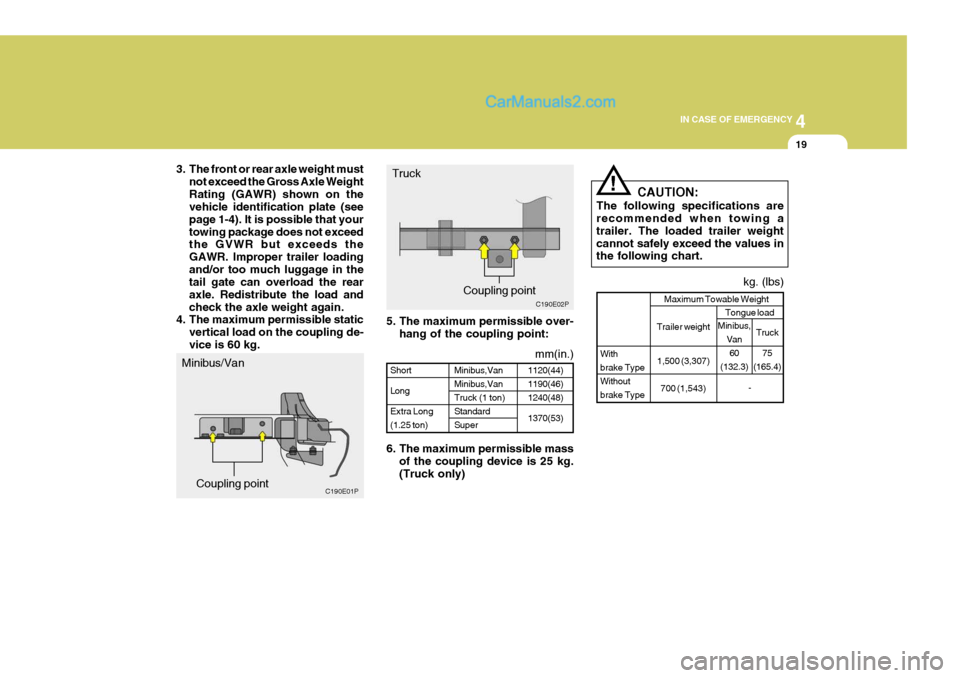
5. The maximum permissible over-
hang of the coupling point:
6. The maximum permissible mass of the coupling device is 25 kg. (Truck only) CAUTION:
The following specifications are recommended when towing a trailer. The loaded trailer weightcannot safely exceed the values in the following chart.
!
Truck
Coupling point
1120(44) 1190(46)1240(48) 1370(53)
ShortLongExtra Long (1.25 ton) Minibus,VanMinibus,VanTruck (1 ton)StandardSuper
kg. (lbs)
With brake TypeWithoutbrake Type Maximum Towable Weight
Trailer weight
1,500 (3,307) 700 (1,543) Tongue load
-
Minibus,
Van60
(132.3) Truck
75
(165.4)
C190E02P
mm(in.)
C190E01P
3. The front or rear axle weight must
not exceed the Gross Axle Weight Rating (GAWR) shown on the vehicle identification plate (see page 1-4). It is possible that yourtowing package does not exceed the GVWR but exceeds the GAWR. Improper trailer loadingand/or too much luggage in the tail gate can overload the rear axle. Redistribute the load andcheck the axle weight again.
4. The maximum permissible static
vertical load on the coupling de-vice is 60 kg.
Minibus/Van
Coupling point
Page 130 of 205
4
CORROSION PREVENTION AND APPEARANCE CARE
29
4
IN CASE OF EMERGENCY
29
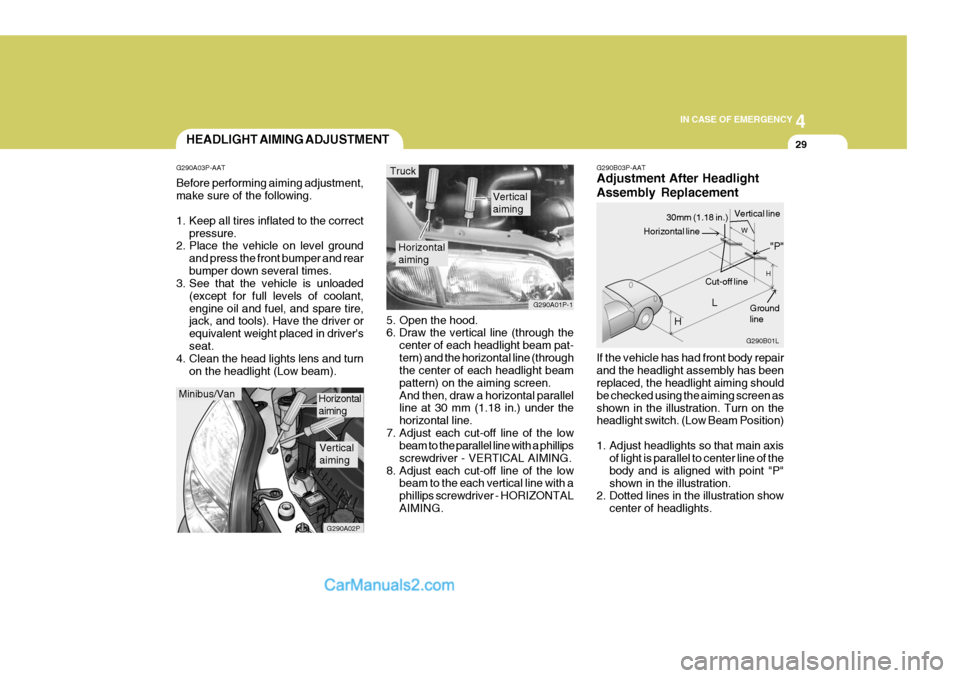
G290B03P-AAT Adjustment After Headlight Assembly Replacement If the vehicle has had front body repair and the headlight assembly has been replaced, the headlight aiming should be checked using the aiming screen asshown in the illustration. Turn on the headlight switch. (Low Beam Position)
1. Adjust headlights so that main axis
of light is parallel to center line of the body and is aligned with point "P"shown in the illustration.
2. Dotted lines in the illustration show
center of headlights.
5. Open the hood.
6. Draw the vertical line (through the
center of each headlight beam pat- tern) and the horizontal line (through the center of each headlight beam pattern) on the aiming screen.And then, draw a horizontal parallel line at 30 mm (1.18 in.) under the horizontal line.
7. Adjust each cut-off line of the low beam to the parallel line with a phillipsscrewdriver - VERTICAL AIMING.
8. Adjust each cut-off line of the low beam to the each vertical line with aphillips screwdriver - HORIZONTALAIMING.
Horizontal aiming
Verticalaiming
G290A01P-1
Truck
G290B01L
LW
H
H Cut-off line
Ground line
"P"
Horizontal line
30mm (1.18 in.) Vertical line
HEADLIGHT AIMING ADJUSTMENT
G290A03P-AAT Before performing aiming adjustment, make sure of the following.
1. Keep all tires inflated to the correct pressure.
2. Place the vehicle on level ground
and press the front bumper and rear bumper down several times.
3. See that the vehicle is unloaded
(except for full levels of coolant,engine oil and fuel, and spare tire, jack, and tools). Have the driver or equivalent weight placed in driver'sseat.
4. Clean the head lights lens and turn
on the headlight (Low beam).
Minibus/Van
G290A02P
Horizontal aiming
Verticalaiming