Trip Hyundai H-1 (Grand Starex) 2007 Owner's Manual
[x] Cancel search | Manufacturer: HYUNDAI, Model Year: 2007, Model line: H-1 (Grand Starex), Model: Hyundai H-1 (Grand Starex) 2007Pages: 284, PDF Size: 11.33 MB
Page 68 of 284
2
Instrument Cluster And Indicator Lights ....................... 2-2
Warning And Indicator Lights ........................................ 2-8
Instrument Cluster....................................................... 2-12
Odometer/Trip odmeter ................................................ 2-14
Multimeter .................................................................... 2-16
Muti-funition Light Switch ............................................. 2-19
Windshield Wiper And Washer Switch ........................2-21
Headlamp Leveling Device System .............................2-23
Instrument Panel Light Control (Rheostat) ..................2-24
Engine Rpm Adjustment Knob ..................................... 2-24
Fog Lamp Switch ......................................................... 2-25
Front/Rear Window Defroster Switch ..........................2-26
Interior Light ....................... .......................................... 2-28
Sunroof ........................................................................ 2-30
Mirror ........................................................................... 2-34
Drink H older ................................................................ 2-35
Ashtray ........................................................................ 2-36
Digital Clock ................................................................ 2-37
Horn ............................................................................. 2-37
Heating And Cooling Control .......................................2-38
Rear Heater And Air Conditioner ................................. 2-45
Overhead Air C onditioning ........................................... 2-47
Climate Control Air Filter .............................................. 2-47
Stereo Sound System ................................................. 2-49
Audio System .............................................................. 2-51
Antenna ....................................................................... 2-73
INSTRUMENTS AND CONTROLS
2
Page 70 of 284
2
INSTRUMENTS AND CONTROLS
3
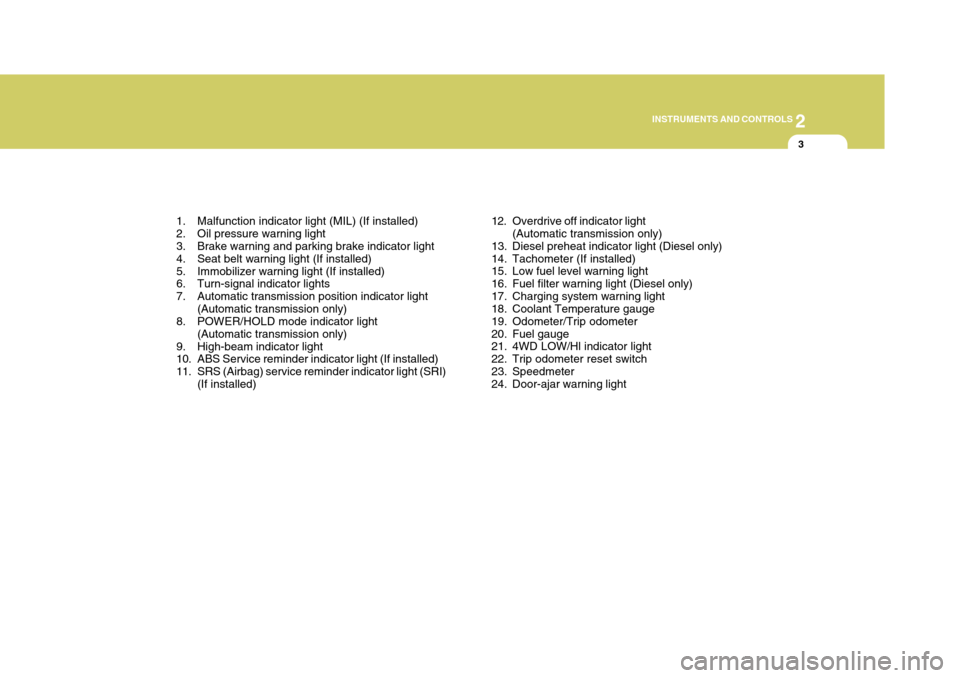
1. Malfunction indicator light (MIL) (If installed)
2. Oil pressure warning light
3. Brake warning and parking brake indicator light
4. Seat belt warning light (If installed)
5. Immobilizer warning light (If installed)
6. Turn-signal indicator lights
7. Automatic transmission position indicator light (Automatic transmission only)
8. POWER/HOLD mode indicator light
(Automatic transmission only)
9. High-beam indicator light
10. ABS Service reminder indicator light (If installed)
11. SRS (Airbag) service reminder indicator light (SRI) (If installed) 12. Overdrive off indicator light
(Automatic transmission only)
13. Diesel preheat indicator light (Diesel only)
14. Tachometer (If installed)
15. Low fuel level warning light
16. Fuel filter warning light (Diesel only)
17. Charging system warning light
18. Coolant Temperature gauge
19. Odometer/Trip odometer
20. Fuel gauge
21. 4WD LOW/Hl indicator light
22. Trip odometer reset switch
23. Speedmeter
24. Door-ajar warning light
Page 72 of 284
2
INSTRUMENTS AND CONTROLS
5
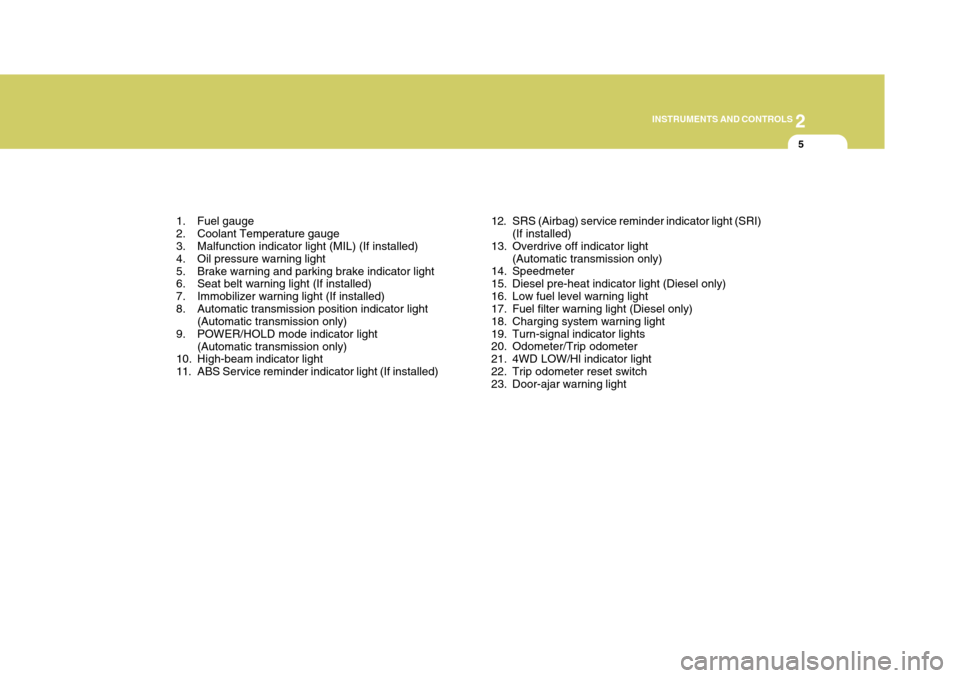
1. Fuel gauge
2. Coolant Temperature gauge
3. Malfunction indicator light (MIL) (If installed)
4. Oil pressure warning light
5. Brake warning and parking brake indicator light
6. Seat belt warning light (If installed)
7. Immobilizer warning light (If installed)
8. Automatic transmission position indicator light (Automatic transmission only)
9. POWER/HOLD mode indicator light
(Automatic transmission only)
10. High-beam indicator light
11. ABS Service reminder indicator light (If installed) 12. SRS (Airbag) service reminder indicator light (SRI)
(If installed)
13. Overdrive off indicator light (Automatic transmission only)
14. Speedmeter
15. Diesel pre-heat indicator light (Diesel only)
16. Low fuel level warning light
17. Fuel filter warning light (Diesel only)
18. Charging system warning light
19. Turn-signal indicator lights
20. Odometer/Trip odometer
21. 4WD LOW/Hl indicator light
22. Trip odometer reset switch
23. Door-ajar warning light
Page 74 of 284
2
INSTRUMENTS AND CONTROLS
7
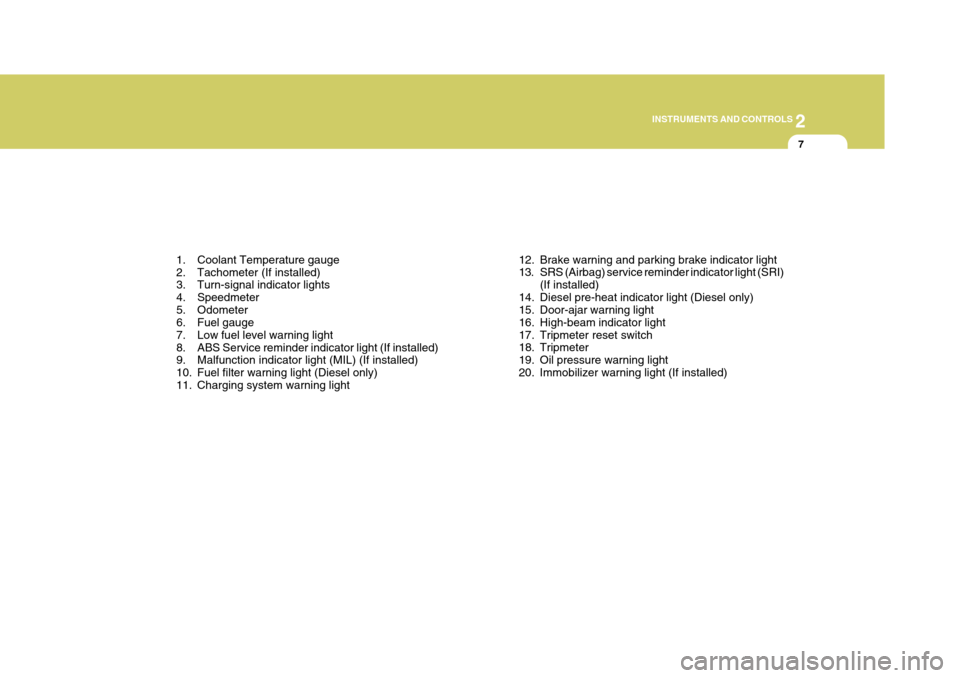
1. Coolant Temperature gauge
2. Tachometer (If installed)
3. Turn-signal indicator lights
4. Speedmeter
5. Odometer
6. Fuel gauge
7. Low fuel level warning light
8. ABS Service reminder indicator light (If installed)
9. Malfunction indicator light (MIL) (If installed)
10. Fuel filter warning light (Diesel only)
11. Charging system warning light 12. Brake warning and parking brake indicator light
13. SRS (Airbag) service reminder indicator light (SRI)
(If installed)
14. Diesel pre-heat indicator light (Diesel only)
15. Door-ajar warning light
16. High-beam indicator light
17. Tripmeter reset switch
18. Tripmeter
19. Oil pressure warning light
20. Immobilizer warning light (If installed)
Page 81 of 284
2 INSTRUMENTS AND CONTROLS
14
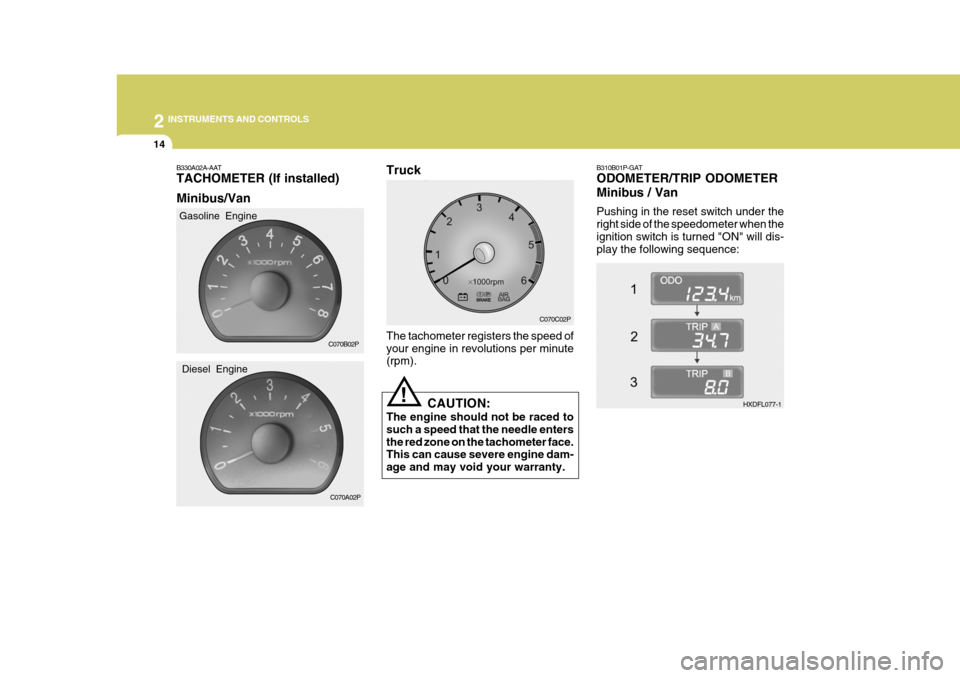
B310B01P-GAT ODOMETER/TRIP ODOMETER Minibus / Van Pushing in the reset switch under the right side of the speedometer when theignition switch is turned "ON" will dis- play the following sequence:
HXDFL077-1
B330A02A-AAT TACHOMETER (If installed) Minibus/Van
Gasoline Engine
Diesel Engine The tachometer registers the speed of your engine in revolutions per minute (rpm).
C070B02P
C070A02P CAUTION:
The engine should not be raced to such a speed that the needle entersthe red zone on the tachometer face. This can cause severe engine dam- age and may void your warranty.
! C070C02P
Truck
Page 82 of 284
2
INSTRUMENTS AND CONTROLS
15
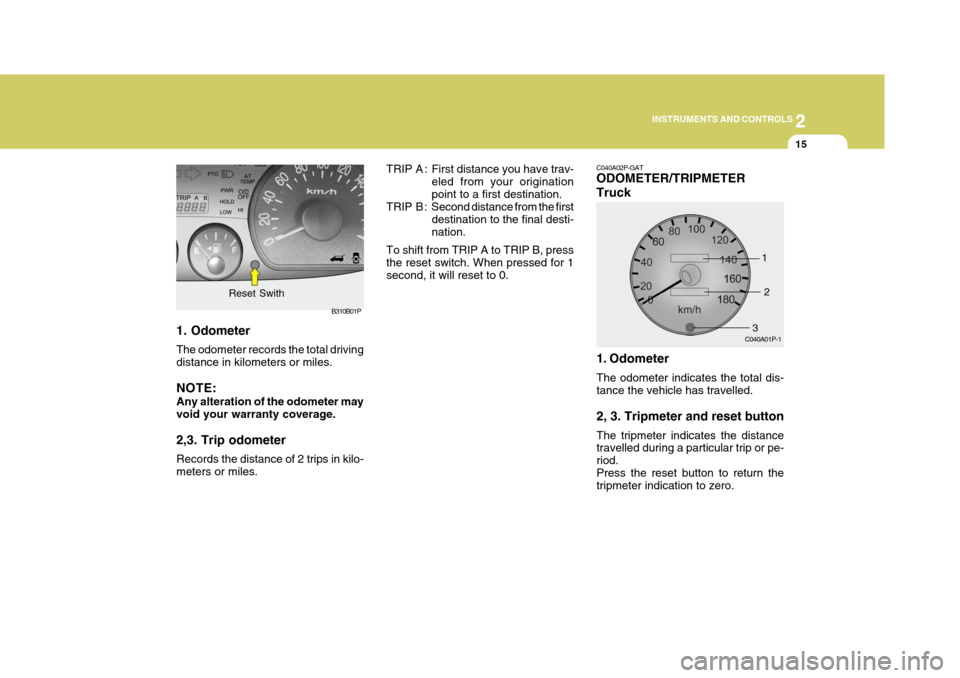
1. Odometer The odometer records the total driving distance in kilometers or miles. NOTE: Any alteration of the odometer may void your warranty coverage. 2,3. Trip odometer Records the distance of 2 trips in kilo- meters or miles. B310B01P
Reset Swith TRIP A : First distance you have trav-
eled from your originationpoint to a first destination.
TRIP B : Second distance from the first
destination to the final desti-nation.
To shift from TRIP A to TRIP B, pressthe reset switch. When pressed for 1 second, it will reset to 0. C040A02P-GAT ODOMETER/TRIPMETER Truck
C040A01P-1
1. Odometer The odometer indicates the total dis- tance the vehicle has travelled. 2, 3. Tripmeter and reset button The tripmeter indicates the distance travelled during a particular trip or pe- riod.Press the reset button to return the tripmeter indication to zero. 1
2
3
Page 173 of 284

3
STARTING AND OPERATING
31
D180J01P-GAT Weather strip To prevent freezing of the weather strip on the doors, the roof, etc., theyshould be treated with silicone grease. D180K01P-GAT Snow tires The use of snow tires is recommended for driving in snow and ice. To pre- serve driving stability, mount snow tires of the same size and tread pattern onall four wheels. Snow tires worn more than 50% are no longer suitable for use as snow tires.Snow tires which do not meet specifi- cations must not be used. NOTE: The laws and regulations concern- ing snow tires (driving speed, re- quired use, type, etc.) vary. Find out and follow the laws and regula-tions in your area. D180L01P-GAT Tire chains If tire chains are to be used, be sure that they are mounted on the rearwheels. Use only tire chains which are de- signed for use with the tires mountedon the vehicle; use of the incorrect size or type of chain could result in damage to the vehicle body.Before driving over long stretches of road which are free of snow, you should remove the chains to avoid damage tothe tires. NOTE: The laws and regulations concern- ing tire chains vary. Find out and follow the laws and regulations in your area.
D180H01P-GAT Parking brake If the atmospheric temperature is be- low freezing, park the vehicle with thegearshift lever in 1st or reverse and do not engage the parking brake. If the parking brake is engaged and there ismoisture on the brake linings, the lin- ings could become frozen to the brake drums, making it impossible to releasethe parking brake. When parking on a steep slope, turn the front wheels in towards the kerband chock the wheels.
D180I01P-GAT Washing the vehicle The salt and other chemicals spread on winter roads in some areas can have a detrimental effect on a vehicle body. You should therefore wash thevehicle as often as convenient in ac- cordance with our care-instruction. Have a preservative applied and theunderfloor protection checked at an authorized HYUNDAI dealer before and after the cold weather season.
Page 196 of 284

44IN CASE OF EMERGENCY
20
!WARNING:
o Improperly loading your car and trailer can serious affect its steer- ing and braking performance causing a crash in which youmay be seriously injured.
o For automatic transmission ve-
hicles, the trailer should be towedwith the towing vehicle unloaded, with the exception of the driver. Otherwise, the automatic trans-mission oil temperature may rise to a temperature that may result in serious damage of the auto- matic transmission. C190F02A-GAT Trailer or Vehicle Towing Tips
1. Before towing, check hitch and
safety chain connections as well as proper operation of the trailer run- ning lights, brake lights, and turn signals.
2. Always drive your vehicle at a mod- erate speed (Less than 100 km/h).
3. Trailer towing requires more fuel than normal conditions.
4. To maintain engine braking effi-
ciency and electrical charging per-formance, do not use fifth gear (manual transmission) or overdrive (automatic transmission).
5. Always secure items in the trailer to prevent load shift while driving.
6. Check the condition and air pres- sure of all tires on the trailer and your car. Low tire pressure can se- riously affect the handling. Alsocheck the spare tire.
7. The vehicle/trailer combination is
more affected by crosswind andbuffeting. When being passed by a large vehicle, keep a constant speed and steer straight ahead. If there is too much wind buffeting,slow down to get out of the othervehicle’s air turbulence.
8. When parking your car and trailer,
especially on a hill, be sure to followall the normal precautions. Turn your front wheel into the curb, set the parking brake firmly, and put thetransmission in 1st or "R" (manual transmission) or "P" (automatic transmission). In addition, placewheel chocks at each of the trailer’s tires.
9. If the trailer has electric brakes, start your vehicle and trailer mov-ing, and then apply the trailer brake controller by hand to be sure thebrakes are working. This lets you check your electrical connection at the same time.
10.During your trip, check occasion- ally to be sure that the load issecure, and that the lights and anytrailer brakes are still working.
11.Avoid jerky starts, sudden accel-
eration or sudden stops.
12.Avoid sharp turns and rapid lane changes.
Page 203 of 284

4
CORROSION PREVENTION AND APPEARANCE CARE
27
4
IN CASE OF EMERGENCY
27
CAUTION:
When replacing a fusible link, never use anything but a new fusible link with the same or lower amperagerating. Never use a piece of wire or a higher-rated fusible link. This could result in serious damage andcreate a fire hazard.! G200B02A-AAT Replacing Accessory Fuse The fuse box for the lights and other electrical accessories will be found lowon the dashboard on the driver's side. Inside the box you will find a list show- ing the circuits protected by each fuse.If any of your car's lights or other electrical accessories stop working, a blown fuse could be the reason. If thefuse has burned out, you will see that the metal strip inside the fuse has burned through.HSR4021
CHECKING AND REPLACING FUSES
G200A01A-AAT Replacing a Fusible Link
HSRFL200
Melted
Good
A fusible link will melt if the electrical circuits from the battery are ever over-loaded, thus preventing damage to the entire wiring harness. (This could be caused by a short in the system draw-ing too much current.) If this ever happens, have a Hyundai dealer de- termine the cause, repair the systemand replace the fusible link. The fusible links are located in a fuse box for easy inspection.
Page 252 of 284

8DO-IT YOURSELF MAINTENANCE
8
Select engine oil of the proper SAE viscosity number according to the at-mospheric temperature.Recommended viscosity is given inthe following illustration. The engine oil quality should meet the following API classification: 2.6 N/A : CF-4 or ABOVE 2.5 4D56 : CF-4 or ABOVE 2.5 CRDi : CF-4 or ABOVE The engine oil quality should meet the following ACEA classification: 2.6 N/A : B2 or B3 2.5 4D56 : B2 or B3 2.5 CRDi : B4 NOTE: For diesel-powered vehicle SAE 0W-30 oil should be used only inareas where extremely cold tem- peratures of 10°C (50°F) or below are experienced. For diesel-poweredvehicle, if the atmospheric tempera- tures are 0°C (32°F) or below, SAE 30 oil must not be used.
G030A02O-GAT
Recommended Oil Gasoline Engine
G030B01JMEngine oil is essential to the perfor-
mance and service of the engine. It is suggested that you check the oil level at least once a week in normal use and more often if you are on a trip ordriving in severe conditions.
The engine oil quality should meet the
following classification.
API SJ, SL or ABOVE, ILSAC GF-3 or ABOVE NOTE:
o For good fuel economy, SAE 5W- 20 (5W-30), ILSAC GF-3 engine oil is preferred regardless of regional option and engine variation.
o If SAE 5W-20, ILSAC GF-3 engine oil is not available, secondaryrecommended engine oil for cor- responding temperature range can be used.
This oil should be used only inareas where the atmospheric tem-peratures are 0°C(32°F) or above.