lights Hyundai H-1 (Grand Starex) 2012 User Guide
[x] Cancel search | Manufacturer: HYUNDAI, Model Year: 2012, Model line: H-1 (Grand Starex), Model: Hyundai H-1 (Grand Starex) 2012Pages: 338, PDF Size: 9.51 MB
Page 118 of 338
Features of your vehicle
48 4
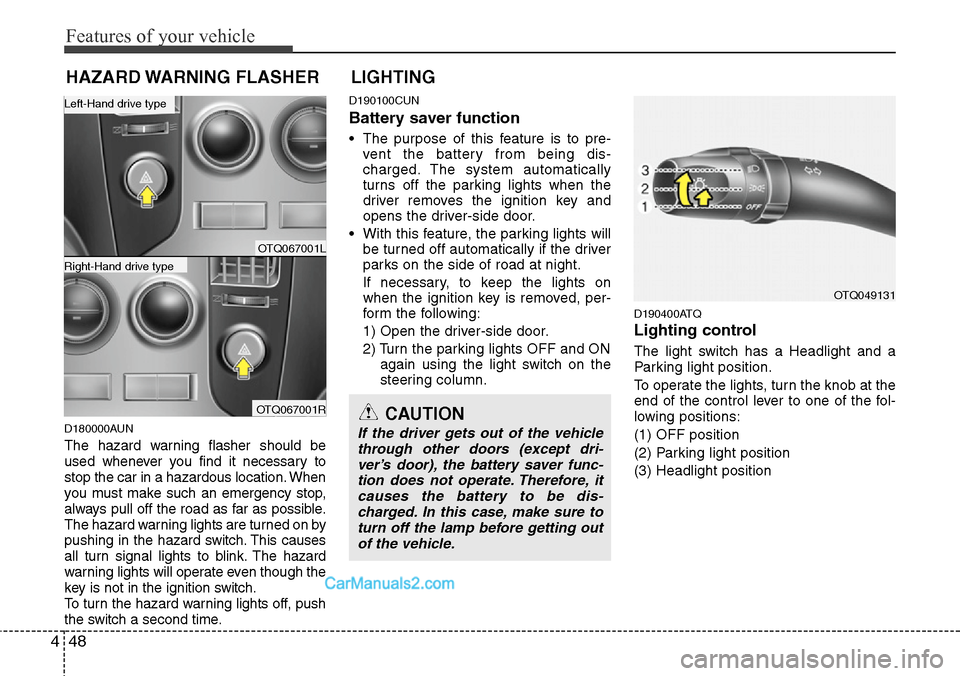
D180000AUN
The hazard warning flasher should be
used whenever you find it necessary to
stop the car in a hazardous location. When
you must make such an emergency stop,
always pull off the road as far as possible.
The hazard warning lights are turned on by
pushing in the hazard switch. This causes
all turn signal lights to blink. The hazard
warning lights will operate even though the
key is not in the ignition switch.
To turn the hazard warning lights off, push
the switch a second time.
D190100CUN
Battery saver function
• The purpose of this feature is to pre-
vent the battery from being dis-
charged. The system automatically
turns off the parking lights when the
driver removes the ignition key and
opens the driver-side door.
• With this feature, the parking lights will
be turned off automatically if the driver
parks on the side of road at night.
If necessary, to keep the lights on
when the ignition key is removed, per-
form the following:
1) Open the driver-side door.
2) Turn the parking lights OFF and ON
again using the light switch on the
steering column.
D190400ATQ
Lighting control
The light switch has a Headlight and a
Parking light position.
To operate the lights, turn the knob at the
end of the control lever to one of the fol-
lowing positions:
(1) OFF position
(2) Parking light position
(3) Headlight position
LIGHTING
OTQ049131
CAUTION
If the driver gets out of the vehicle
through other doors (except dri-
ver’s door), the battery saver func-
tion does not operate. Therefore, it
causes the battery to be dis-
charged. In this case, make sure to
turn off the lamp before getting out
of the vehicle.
HAZARD WARNING FLASHER
OTQ067001L
OTQ067001R
Right-Hand drive type
Left-Hand drive type
Page 119 of 338
449
Features of your vehicle
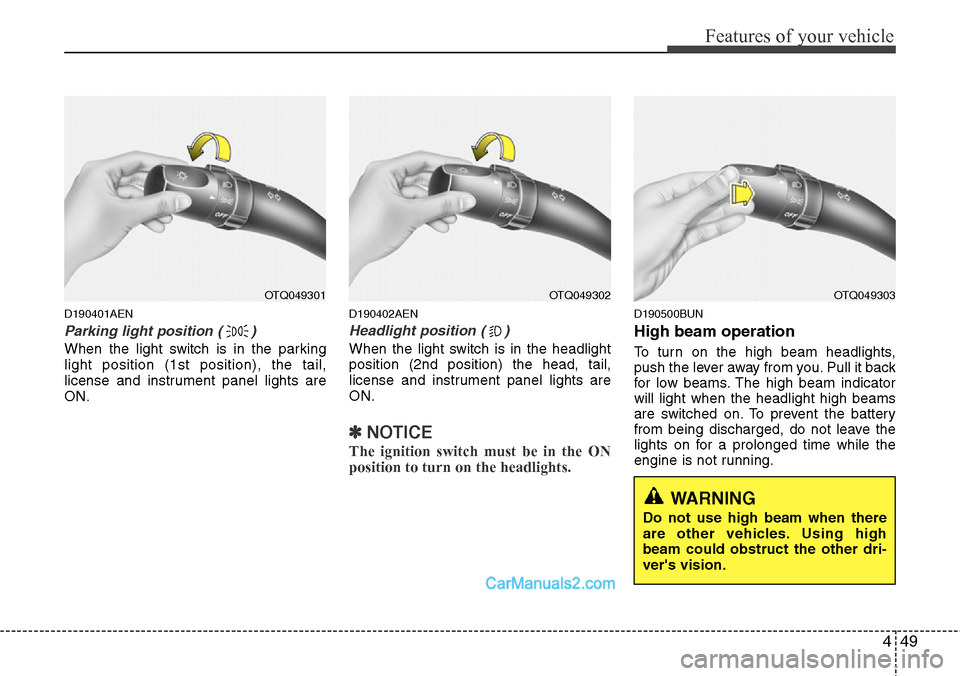
D190401AEN
Parking light position ( )
When the light switch is in the parking
light position (1st position), the tail,
license and instrument panel lights are
ON.
D190402AEN
Headlight position ( )
When the light switch is in the headlight
position (2nd position) the head, tail,
license and instrument panel lights are
ON.
✽NOTICE
The ignition switch must be in the ON
position to turn on the headlights.
D190500BUN
High beam operation
To turn on the high beam headlights,
push the lever away from you. Pull it back
for low beams. The high beam indicator
will light when the headlight high beams
are switched on. To prevent the battery
from being discharged, do not leave the
lights on for a prolonged time while the
engine is not running.
OTQ049301OTQ049302OTQ049303
WARNING
Do not use high beam when there
are other vehicles. Using high
beam could obstruct the other dri-
ver's vision.
Page 120 of 338
Features of your vehicle
50 4
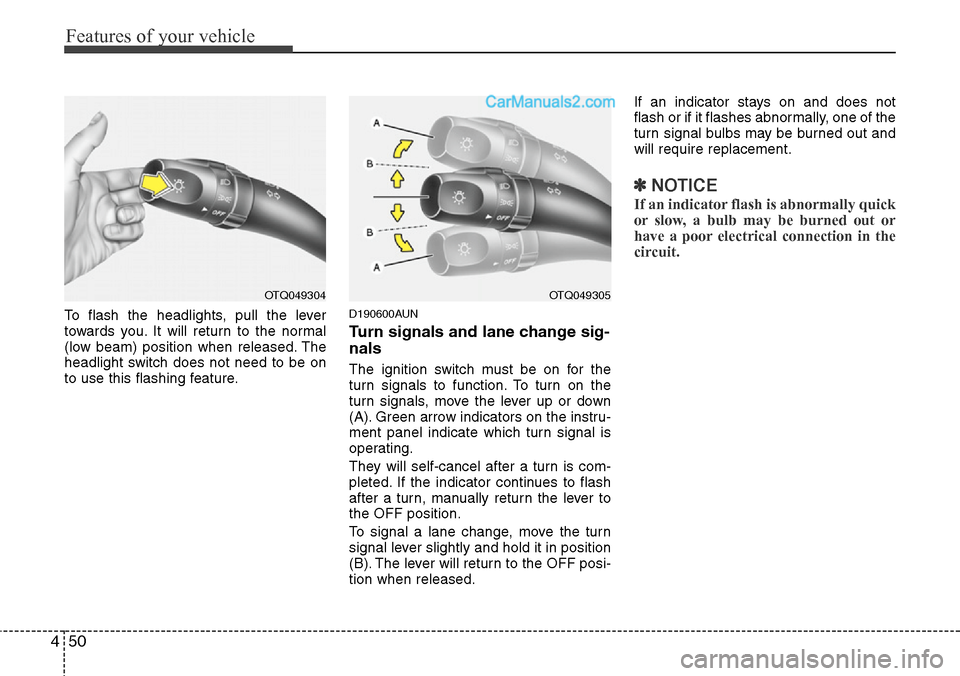
To flash the headlights, pull the lever
towards you. It will return to the normal
(low beam) position when released. The
headlight switch does not need to be on
to use this flashing feature.D190600AUN
Turn signals and lane change sig-
nals
The ignition switch must be on for the
turn signals to function. To turn on the
turn signals, move the lever up or down
(A). Green arrow indicators on the instru-
ment panel indicate which turn signal is
operating.
They will self-cancel after a turn is com-
pleted. If the indicator continues to flash
after a turn, manually return the lever to
the OFF position.
To signal a lane change, move the turn
signal lever slightly and hold it in position
(B). The lever will return to the OFF posi-
tion when released.If an indicator stays on and does not
flash or if it flashes abnormally, one of the
turn signal bulbs may be burned out and
will require replacement.
✽NOTICE
If an indicator flash is abnormally quick
or slow, a bulb may be burned out or
have a poor electrical connection in the
circuit.
OTQ049304OTQ049305
Page 121 of 338
451
Features of your vehicle
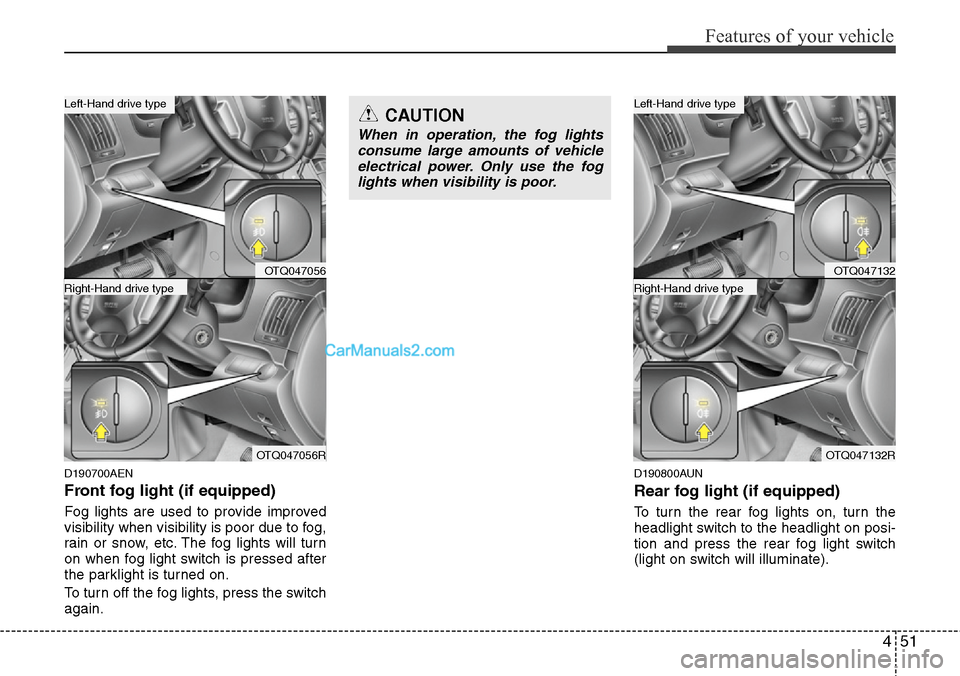
D190700AEN
Front fog light (if equipped)
Fog lights are used to provide improved
visibility when visibility is poor due to fog,
rain or snow, etc. The fog lights will turn
on when fog light switch is pressed after
the parklight is turned on.
To turn off the fog lights, press the switch
again.
D190800AUN
Rear fog light (if equipped)
To turn the rear fog lights on, turn the
headlight switch to the headlight on posi-
tion and press the rear fog light switch
(light on switch will illuminate).
CAUTION
When in operation, the fog lights
consume large amounts of vehicle
electrical power. Only use the fog
lights when visibility is poor.
OTQ047056
OTQ047056R
Right-Hand drive type
Left-Hand drive type
OTQ047132
OTQ047132R
Right-Hand drive type
Left-Hand drive type
Page 122 of 338
Features of your vehicle
52 4
The rear fog lights turn on when the rear
fog switch is pressed after the front fog
switch is turned to ON and the headlight
switch to the parklight position. (if
equipped)
To turn the rear fog lights off, press the
rear fog light switch again or turn the
headlight switch to the OFF position.
D190900AUN
Daytime running light
(if equipped)
Daytime Running Lights (DRL) can make
it easier for others to see the front of your
vehicle during the day. DRL can be help-
ful in many different driving conditions,
and it is especially helpful after dawn and
before sunset.
The DRL system will make the head-
lights turn OFF when:
1. The parklight switch is ON.
2. Engine stops.
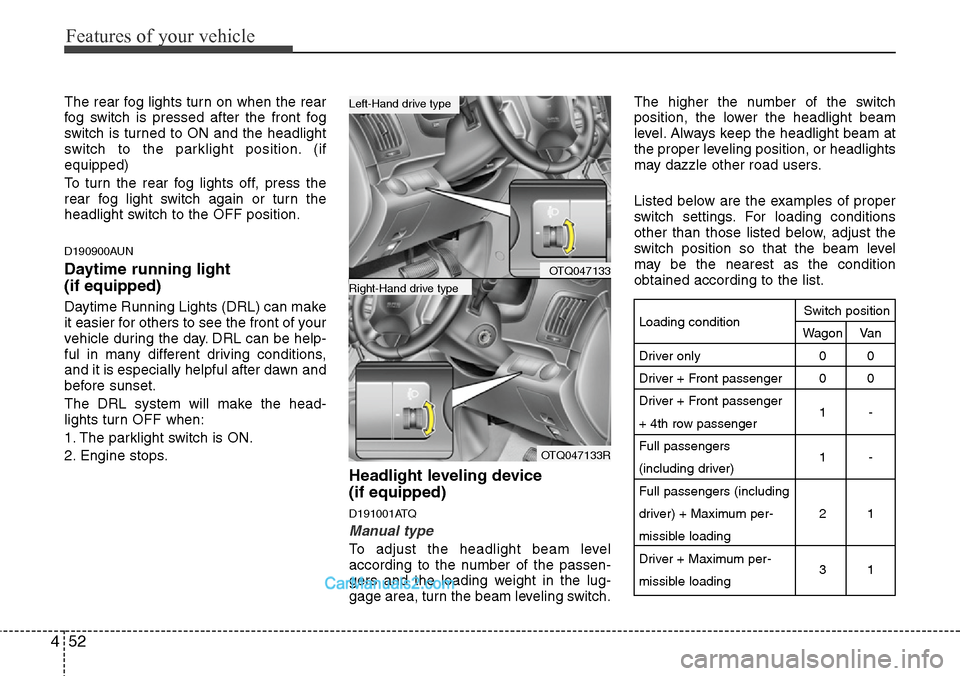
Headlight leveling device
(if equipped)
D191001ATQ
Manual type
To adjust the headlight beam level
according to the number of the passen-
gers and the loading weight in the lug-
gage area, turn the beam leveling switch.The higher the number of the switch
position, the lower the headlight beam
level. Always keep the headlight beam at
the proper leveling position, or headlights
may dazzle other road users.
Listed below are the examples of proper
switch settings. For loading conditions
other than those listed below, adjust the
switch position so that the beam level
may be the nearest as the condition
obtained according to the list.
OTQ047133
OTQ047133R
Right-Hand drive type
Left-Hand drive type
Loading condition
Driver only
Driver + Front passenger
Driver + Front passenger
+ 4th row passenger
Full passengers
(including driver)
Full passengers (including
driver) + Maximum per-
missible loading
Driver + Maximum per-
missible loadingSwitch position
Wagon Van
00
00
1-
1-
21
31
Page 126 of 338
Features of your vehicle
56 4
D210000BEN
D210100ATQ
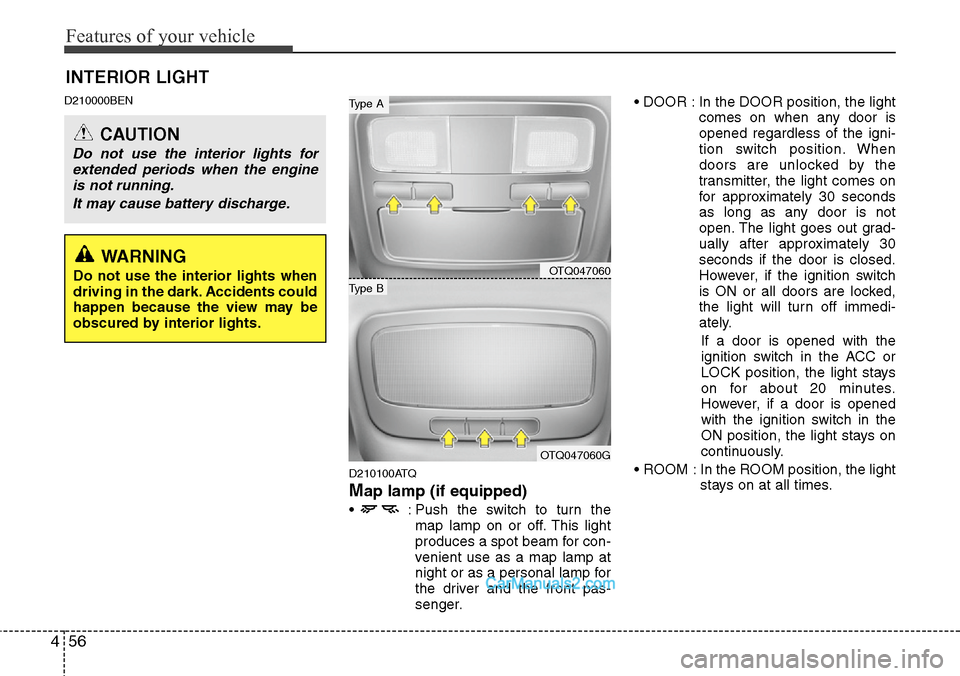
Map lamp (if equipped)
• : Push the switch to turn the
map lamp on or off. This light
produces a spot beam for con-
venient use as a map lamp at
night or as a personal lamp for
the driver and the front pas-
senger.• DOOR : In the DOOR position, the light
comes on when any door is
opened regardless of the igni-
tion switch position. When
doors are unlocked by the
transmitter, the light comes on
for approximately 30 seconds
as long as any door is not
open. The light goes out grad-
ually after approximately 30
seconds if the door is closed.
However, if the ignition switch
is ON or all doors are locked,
the light will turn off immedi-
ately.
If a door is opened with the
ignition switch in the ACC or
LOCK position, the light stays
on for about 20 minutes.
However, if a door is opened
with the ignition switch in the
ON position, the light stays on
continuously.
• ROOM : In the ROOM position, the light
stays on at all times.
INTERIOR LIGHT
CAUTION
Do not use the interior lights for
extended periods when the engine
is not running.
It may cause battery discharge.
OTQ047060
OTQ047060G
Type B
Type A
WARNING
Do not use the interior lights when
driving in the dark. Accidents could
happen because the view may be
obscured by interior lights.
Page 191 of 338
53
Driving your vehicle
E020100AUN
Before entering vehicle
• Be sure that all windows, outside mir-
ror(s), and outside lights are clean.
• Check the condition of the tires.
• Check under the vehicle for any sign of
leaks.
• Be sure there are no obstacles behind
you if you intend to back up.
E020200BUN
Necessary inspections
Fluid levels, such as engine oil, engine
coolant, brake fluid, and washer fluid
should be checked on a regular basis,
with the exact interval depending on the
fluid. Further details are provided in sec-
tion 7, “Maintenance”.
E020300AUN
Before starting
• Close and lock all doors.
• Position the seat so that all controls are
easily reached.
• Adjust the inside and outside rearview
mirrors.
• Be sure that all lights work.
• Check all gauges.
• Check the operation of warning lights
when the ignition switch is turned to
the ON position.
• Release the parking brake and make
sure the brake warning light goes out.
For safe operation, be sure you are famil-
iar with your vehicle and its equipment.
BEFORE DRIVING
WARNING
All passengers must be properly
belted whenever the vehicle is mov-
ing. Refer to “Seat belts” in section
3 for more information on their
proper use.
WARNING
Always check the surrounding
areas near your vehicle for people,
especially children, before putting a
car into D (Drive) or R (Reverse).
WARNING
Driving while distracted can result in
a loss of vehicle control, that may
lead to an accident, severe personal
injury, and death. The driver’s pri-
mary responsibility is in the safe and
legal operation of a vehicle, and use
of any handheld devices, other equip-
ment, or vehicle systems which take
the driver’s eyes, attention and focus
away from the safe operation of a
vehicle or which are not permissible
by law should never be used during
operation of the vehicle.
Page 193 of 338
55
Driving your vehicle
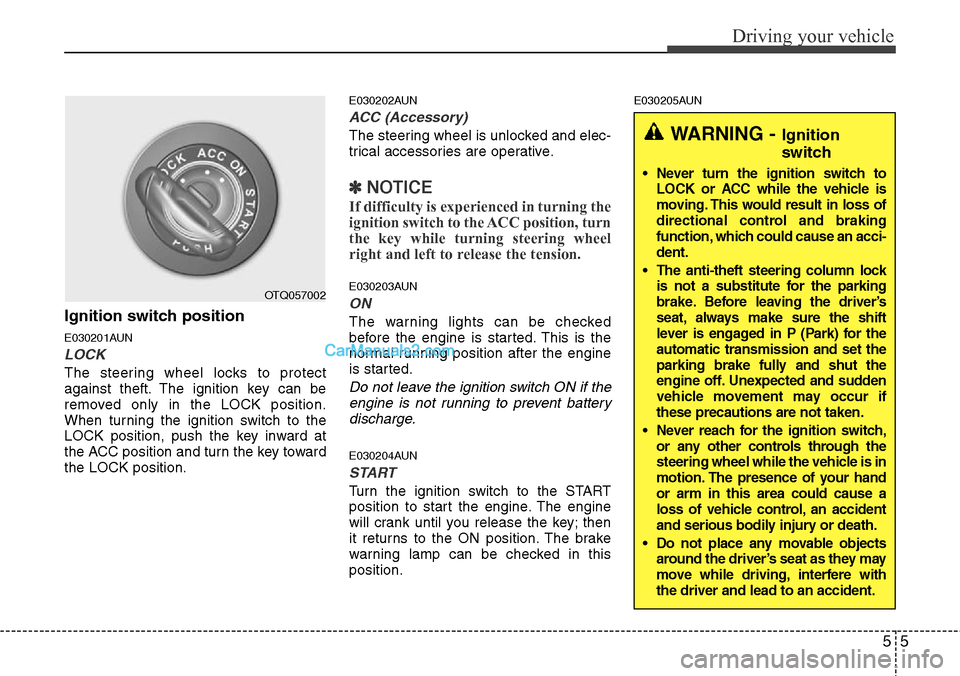
Ignition switch position
E030201AUN
LOCK
The steering wheel locks to protect
against theft. The ignition key can be
removed only in the LOCK position.
When turning the ignition switch to the
LOCK position, push the key inward at
the ACC position and turn the key toward
the LOCK position.
E030202AUN
ACC (Accessory)
The steering wheel is unlocked and elec-
trical accessories are operative.
✽NOTICE
If difficulty is experienced in turning the
ignition switch to the ACC position, turn
the key while turning steering wheel
right and left to release the tension.
E030203AUN
ON
The warning lights can be checked
before the engine is started. This is the
normal running position after the engine
is started.
Do not leave the ignition switch ON if the
engine is not running to prevent battery
discharge.
E030204AUN
START
Turn the ignition switch to the START
position to start the engine. The engine
will crank until you release the key; then
it returns to the ON position. The brake
warning lamp can be checked in this
position.
E030205AUN
WARNING - Ignition
switch
• Never turn the ignition switch to
LOCK or ACC while the vehicle is
moving. This would result in loss of
directional control and braking
function, which could cause an acci-
dent.
• The anti-theft steering column lock
is not a substitute for the parking
brake. Before leaving the driver’s
seat, always make sure the shift
lever is engaged in P (Park) for the
automatic transmission and set the
parking brake fully and shut the
engine off. Unexpected and sudden
vehicle movement may occur if
these precautions are not taken.
• Never reach for the ignition switch,
or any other controls through the
steering wheel while the vehicle is in
motion. The presence of your hand
or arm in this area could cause a
loss of vehicle control, an accident
and serious bodily injury or death.
• Do not place any movable objects
around the driver’s seat as they may
move while driving, interfere with
the driver and lead to an accident.
OTQ057002
Page 212 of 338
Driving your vehicle
24 5
E070501AUN-EE
ESP operation
ESP ON condition
• When the ignition is turned
ON, ESP and ESP OFF indi-
cator lights illuminate for
approximately 3 seconds,
then ESP is turned on.
• Press the ESP OFF button for
at least half a second after
turning the ignition ON to turn
ESP off. (ESP OFF indicator
will illuminate). To turn the
ESP on, press the ESP OFF
button (ESP OFF indicator
light will go off).
• When starting the engine,
you may hear a slight ticking
sound. This is the ESP per-
forming an automatic system
self-check and does not indi-
cate a problem.When operating
When the ESP is in operation,
ESP indicator light blinks.
• When the Electronic Stability
Program is operating properly,
you can feel a slight pulsation
in the vehicle. This is only the
effect of brake control and indi-
cates nothing unusual.
• When moving out of the mud
or slippery road, pressing the
accelerator pedal may not
cause the engine rpm (revo-
lutions per minute) to
increase.
E070502AUN-EE
ESP operation off
ESP OFF state
• To cancel ESP operation,
press the ESP OFF button
(ESP OFF indicator light illu-
minates).
• If the ignition switch is turned
to LOCK position when ESP
is off, ESP remains off. Upon
restarting the engine, the
ESP will automatically turn on
again.
-
ESP
ESP
OFF
Page 217 of 338
529
Driving your vehicle
E100000AFD
Your vehicle's fuel economy depends
mainly on your style of driving, where you
drive and when you drive.
Each of these factors affects how many
miles (kilometers) you can get from a gal-
lon (liter) of fuel. To operate your vehicle
as economically as possible, use the fol-
lowing driving suggestions to help save
money in both fuel and repairs:
• Drive smoothly. Accelerate at a moder-
ate rate. Do not make "jack-rabbit"
starts or full-throttle shifts and maintain
a steady cruising speed. Don't race
between stoplights. Try to adjust your
speed to that of the other traffic so you
don't have to change speeds unneces-
sarily. Avoid heavy traffic whenever
possible. Always maintain a safe dis-
tance from other vehicles so you can
avoid unnecessary braking. This also
reduces brake wear.
• Drive at a moderate speed. The faster
you drive, the more fuel your car uses.
Driving at a moderate speed, especial-
ly on the highway, is one of the most
effective ways to reduce fuel consump-
tion.• Don't "ride" the brake or clutch pedal.
This can increase fuel consumption
and also increase wear on these com-
ponents. In addition, driving with your
foot resting on the brake pedal may
cause the brakes to overheat, which
reduces their effectiveness and may
lead to more serious consequences.
• Take care of your tires. Keep them
inflated to the recommended pressure.
Incorrect inflation, either too much or
too little, results in unnecessary tire
wear. Check the tire pressures at least
once a month.
• Be sure that the wheels are aligned
correctly. Improper alignment can
result from hitting curbs or driving too
fast over irregular surfaces. Poor align-
ment causes faster tire wear and may
also result in other problems as well as
greater fuel consumption.
• Keep your car in good condition. For
better fuel economy and reduced
maintenance costs, maintain your car
in accordance with the maintenance
schedule in Section 7. If you drive your
car in severe conditions, more frequent
maintenance is required (see Section
7 for details).• Keep your car clean. For maximum
service, your vehicle should be kept
clean and free of corrosive materials. It
is especially important that mud, dirt,
ice, etc. not be allowed to accumulate
on the underside of the car. This extra
weight can result in increased fuel con-
sumption and also contribute to corro-
sion.
• Travel lightly. Do not carry unnecessary
weight in your car. Weight reduces fuel
economy.
• Do not let the engine idle longer than
necessary. If you are waiting (and not
in traffic), turn off your engine and
restart only when you're ready to go.
• Remember, your vehicle does not
require extended warm-up. After the
engine has started, allow the engine to
run for 10 to 20 seconds prior to plac-
ing the vehicle in gear. In very cold
weather, however, give your engine a
slightly longer warm-up period.
• Do not "lug" or "over-rev" the engine.
Lugging is driving too slowly in too high
a gear resulting in the engine bucking.
If this happens, shift to a lower gear.
Over-revving is racing the engine
beyond its safe limit. This can be avoid-
ed by shifting at the recommended
speeds.
ECONOMICAL OPERATION