stop start Hyundai H-1 (Grand Starex) 2013 Owner's Guide
[x] Cancel search | Manufacturer: HYUNDAI, Model Year: 2013, Model line: H-1 (Grand Starex), Model: Hyundai H-1 (Grand Starex) 2013Pages: 353, PDF Size: 9.18 MB
Page 242 of 353
63
What to do in an emergency
2. When the car is stopped, turn on your
emergency hazard flashers, set the
parking brake and put the transmission
in P (automatic transmission) or
reverse (manual transmission).
3. Have all passengers get out of the car.
Be sure they all get out on the side of
the car that is away from traffic.
4. When changing a flat tire, follow the
instruction provided later in this sec-
tion.
F020300AEN
If engine stalls while driving
1. Reduce your speed gradually, keeping
a straight line. Move cautiously off the
road to a safe place.
2. Turn on your emergency flashers.
3. Try to start the engine again. If your
vehicle will not start, we recommend
that you consult an authorized
HYUNDAI dealer.
F030100AUN
If engine doesn't turn over or
turns over slowly
1. If your car has an automatic transmis-
sion, be sure the gear selector lever is
in N (Neutral) or P (Park) and the
emergency brake is set.
2. Check the battery connections to be
sure they are clean and tight.
3. Turn on the interior light. If the light
dims or goes out when you operate the
starter, the battery is discharged.
4. Check the starter connections to be
sure they are securely tightened.
5. Do not push or pull the vehicle to start
it. See instructions for "Jump starting".
F030200AEN
If engine turns over normally but
does not start
1. Check fuel level.
2. With the ignition switch in the LOCK
position, check all connectors at the
ignition coils and spark plugs.
Reconnect any that may be discon-
nected or loose.
3. Check the fuel line in the engine com-
partment.
4. If the engine still does not start, we
recommend that you call an author-
ized HYUNDAI dealer.
IF THE ENGINE WILL NOT START
WARNING
If the engine will not start, do not
push or pull the car to start it. This
could result in a collision or cause
other damage. In addition, push or
pull starting may cause the catalyt-
ic converter to be overloaded and
create a fire hazard.
Page 247 of 353
What to do in an emergency
8 6
Your vehicle has also been equipped
with a TPMS malfunction indicator to
indicate when the system is not
operating properly. The TPMS mal-
function indicator is combined with
the low tire pressure telltale. When
the system detects a malfunction,
the telltale will flash for approximate-
ly one minute and then remain con-
tinuously illuminated. This sequence
will continue upon subsequent vehi-
cle start-ups as long as the malfunc-
tion exists. When the malfunction
indicator is illuminated, the system
may not be able to detect or signal
low tire pressure as intended.
TPMS malfunctions may occur for a
variety of reasons, including the
installation of replacement or alter-
nate tires or wheels on the vehicle
that prevent the TPMS from function-
ing properly. Always check the TPMS
malfunction telltale after replacing
one or more tires or wheels on your
vehicle to ensure that the replace-
ment or alternate tires and wheels
allow the TPMS to continue to func-
tion properly.✽NOTICE
If the TPMS Low Tire Pressure
Telltale does not illuminate for three
seconds when the ignition switch is
in the ON position or when the
engine starts, or if it remains illumi-
nated after coming on for approxi-
mately three seconds, take your
vehicle to your nearest authorized
HYUNDAI dealer and have the sys-
tem checked.
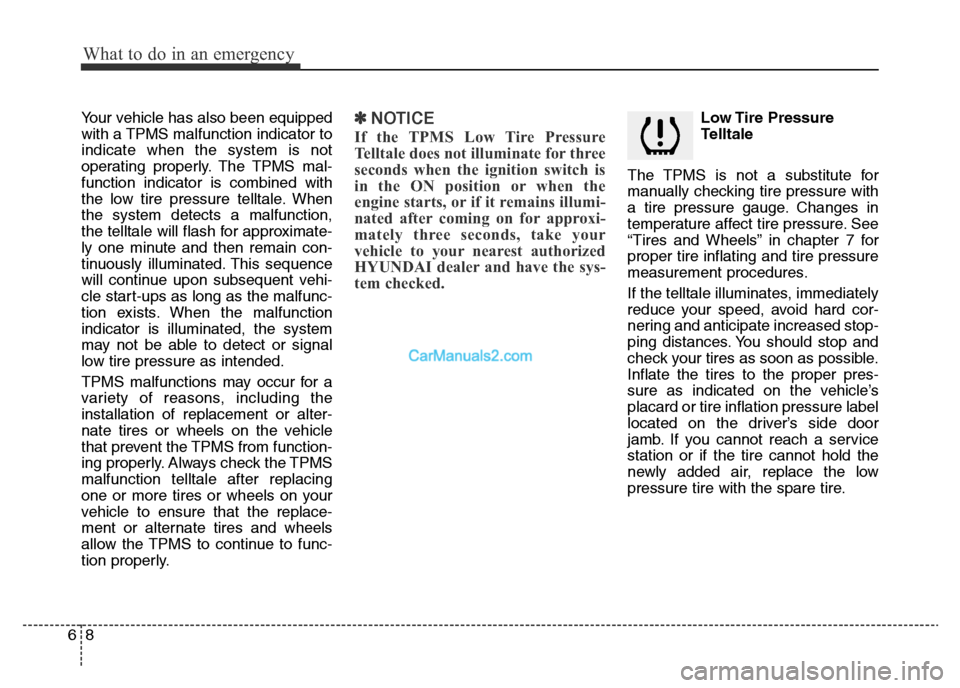
Low Tire Pressure
Telltale
The TPMS is not a substitute for
manually checking tire pressure with
a tire pressure gauge. Changes in
temperature affect tire pressure. See
“Tires and Wheels” in chapter 7 for
proper tire inflating and tire pressure
measurement procedures.
If the telltale illuminates, immediately
reduce your speed, avoid hard cor-
nering and anticipate increased stop-
ping distances. You should stop and
check your tires as soon as possible.
Inflate the tires to the proper pres-
sure as indicated on the vehicle’s
placard or tire inflation pressure label
located on the driver’s side door
jamb. If you cannot reach a service
station or if the tire cannot hold the
newly added air, replace the low
pressure tire with the spare tire.
Page 262 of 353
623
What to do in an emergency
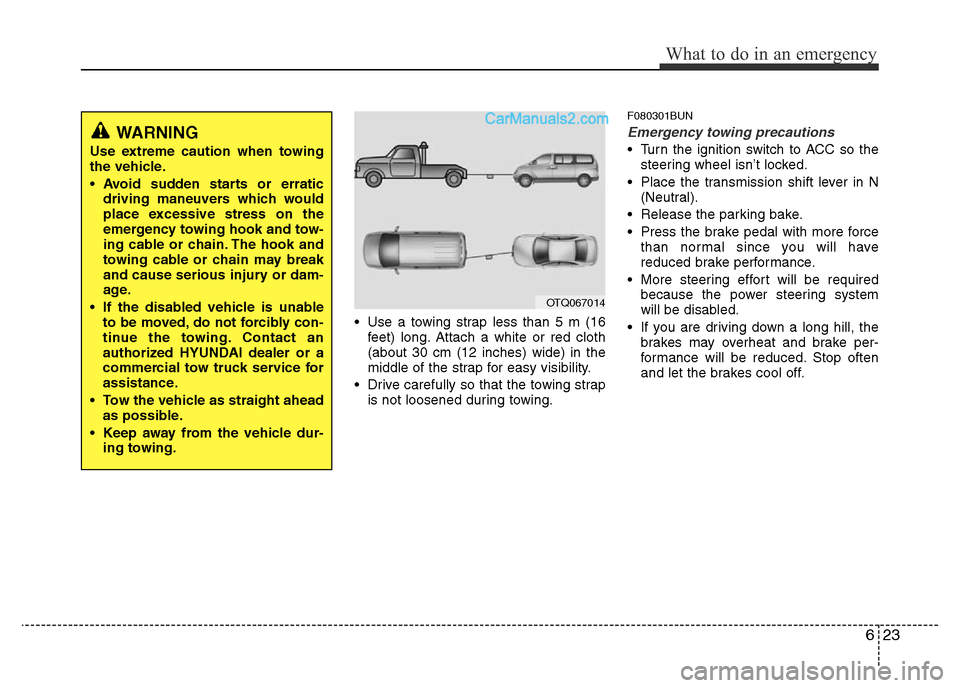
• Use a towing strap less than 5 m (16
feet) long. Attach a white or red cloth
(about 30 cm (12 inches) wide) in the
middle of the strap for easy visibility.
• Drive carefully so that the towing strap
is not loosened during towing.
F080301BUN
Emergency towing precautions
• Turn the ignition switch to ACC so the
steering wheel isn’t locked.
• Place the transmission shift lever in N
(Neutral).
• Release the parking bake.
• Press the brake pedal with more force
than normal since you will have
reduced brake performance.
• More steering effort will be required
because the power steering system
will be disabled.
• If you are driving down a long hill, the
brakes may overheat and brake per-
formance will be reduced. Stop often
and let the brakes cool off.
WARNING
Use extreme caution when towing
the vehicle.
• Avoid sudden starts or erratic
driving maneuvers which would
place excessive stress on the
emergency towing hook and tow-
ing cable or chain. The hook and
towing cable or chain may break
and cause serious injury or dam-
age.
• If the disabled vehicle is unable
to be moved, do not forcibly con-
tinue the towing. Contact an
authorized HYUNDAI dealer or a
commercial tow truck service for
assistance.
• Tow the vehicle as straight ahead
as possible.
• Keep away from the vehicle dur-
ing towing.
OTQ067014
Page 286 of 353
Maintenance
22 7
EXPLANATION OF SCHEDULED MAINTENANCE ITEMS
G050100AUN
Engine oil and filter
The engine oil and filter should be
changed at the intervals specified in the
maintenance schedule. If the car is being
driven in severe conditions, more fre-
quent oil and filter changes are required.
G050200BUN
Drive belts
Inspect all drive belts for evidence of
cuts, cracks, excessive wear or oil satu-
ration and replace if necessary. Drive
belts should be checked periodically for
proper tension and adjusted as neces-
sary.
G050300ATQ
Fuel filter (cartridge)
A clogged filter can limit the speed at
which the vehicle may be driven, damage
the emission system and cause multiple
issues such as hard starting. If an exces-
sive amount of foreign matter accumu-
lates in the fuel tank, the filter may
require replacement more frequently.
After installing a new filter, run the engine
for several minutes, and check for leaks
at the connections. We recommend that
the fuel filter be replaced by an authoized
HYUNDAI dealer.
G050400AEN
Fuel lines, fuel hoses and con-
nections
Check the fuel lines, fuel hoses and con-
nections for leakage and damage. We
recommend that the fuel lines, fuel hoses
and connectionsr be replaced by an
authoized HYUNDAI dealer.
WARNING - Diesel only
Never work on injection system
with engine running or within 30
seconds after shutting off engine.
High pressure pump, rail, injectors
and high pressure pipes are sub-
ject to high pressure even after the
engine stopped. The fuel jet pro-
duced by fuel leaks may cause seri-
ous injury, if it touch the body.
People using pacemakers should
not move than 30cm closer to the
ECU or wiring harness within the
engine room while engine is run-
ning, since the high currents in the
Common Rail system produce con-
siderable magnetic fields.
CAUTION
In case the fuel filter is clogged due
to not conforming to the mainte-
nance period, the fuel injection
equipment may supply the fuel
insufficiently, which may damage
the fuel injection equipment and
cause the engine to stall at worst
cases.
CAUTION
When you are inspecting the belt,
place the ignition switch in the
LOCK/OFF or ACC position.
Page 324 of 353
Maintenance
60 7
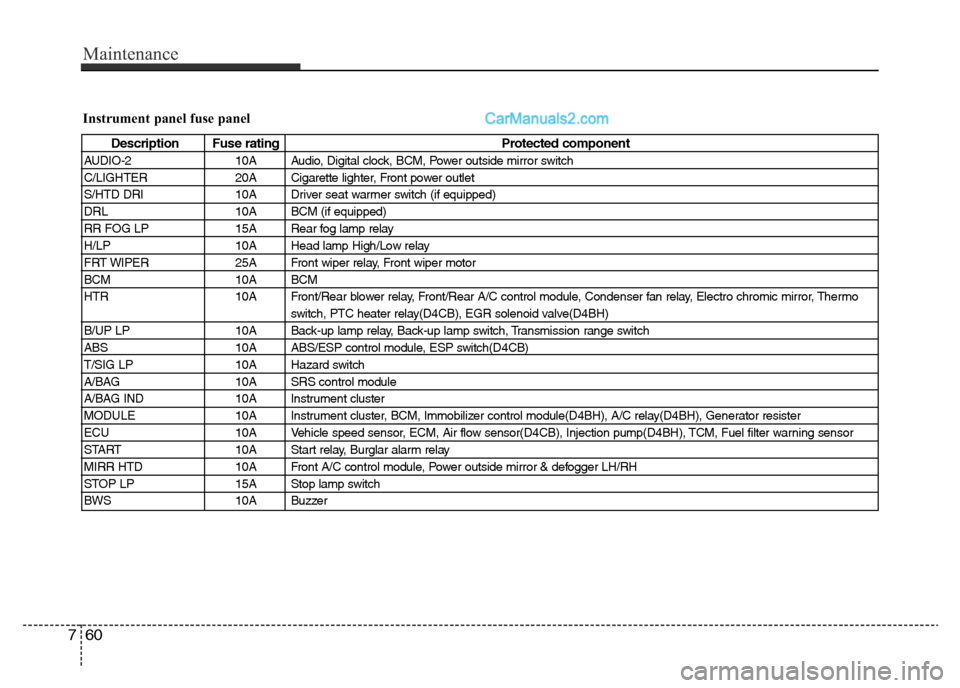
Instrument panel fuse panel
Description Fuse rating Protected component
AUDIO-2 10A Audio, Digital clock, BCM, Power outside mirror switch
C/LIGHTER 20A Cigarette lighter, Front power outlet
S/HTD DRI 10A Driver seat warmer switch (if equipped)
DRL 10A BCM (if equipped)
RR FOG LP 15A Rear fog lamp relay
H/LP 10A Head lamp High/Low relay
FRT WIPER 25A Front wiper relay, Front wiper motor
BCM 10A BCM
HTR 10A Front/Rear blower relay, Front/Rear A/C control module, Condenser fan relay, Electro chromic mirror, Thermo
switch, PTC heater relay(D4CB), EGR solenoid valve(D4BH)
B/UP LP 10A Back-up lamp relay, Back-up lamp switch, Transmission range switch
ABS 10A ABS/ESP control module, ESP switch(D4CB)
T/SIG LP 10A Hazard switch
A/BAG 10A SRS control module
A/BAG IND 10A Instrument cluster
MODULE 10A Instrument cluster, BCM, Immobilizer control module(D4BH), A/C relay(D4BH), Generator resister
ECU 10A Vehicle speed sensor, ECM, Air flow sensor(D4CB), Injection pump(D4BH), TCM, Fuel filter warning sensor
START 10A Start relay, Burglar alarm relay
MIRR HTD 10A Front A/C control module, Power outside mirror & defogger LH/RH
STOP LP 15A Stop lamp switch
BWS 10A Buzzer
Page 326 of 353
Maintenance
62 7
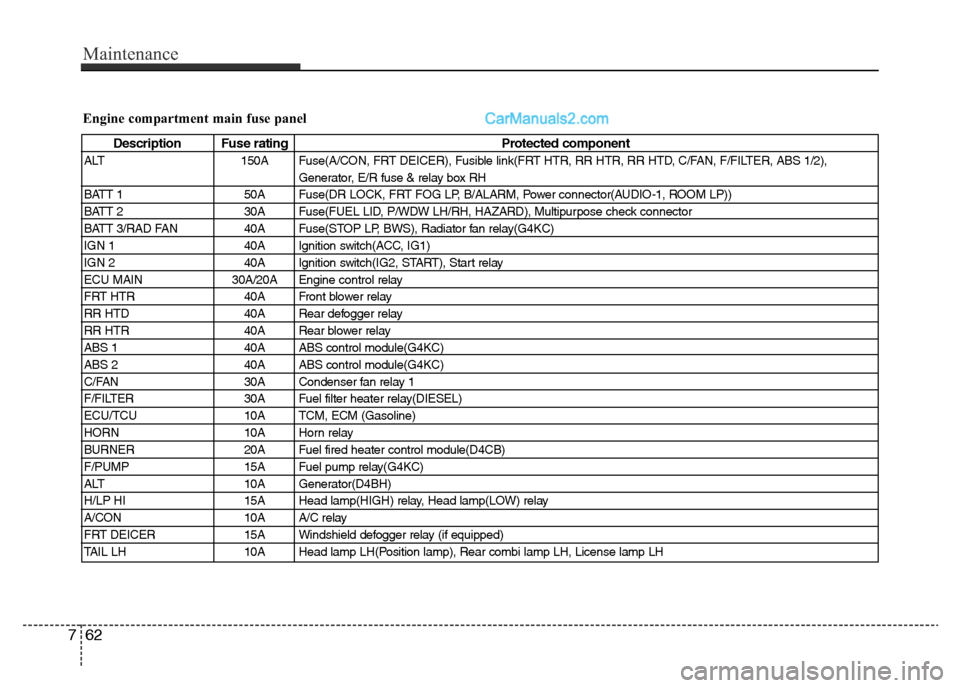
Engine compartment main fuse panel
Description Fuse rating Protected component
ALT 150A Fuse(A/CON, FRT DEICER), Fusible link(FRT HTR, RR HTR, RR HTD, C/FAN, F/FILTER, ABS 1/2),
Generator, E/R fuse & relay box RH
BATT 1 50A Fuse(DR LOCK, FRT FOG LP, B/ALARM, Power connector(AUDIO-1, ROOM LP))
BATT 2 30A Fuse(FUEL LID, P/WDW LH/RH, HAZARD), Multipurpose check connector
BATT 3/RAD FAN 40A Fuse(STOP LP, BWS), Radiator fan relay(G4KC)
IGN 1 40A Ignition switch(ACC, IG1)
IGN 2 40A Ignition switch(IG2, START), Start relay
ECU MAIN 30A/20A Engine control relay
FRT HTR 40A Front blower relay
RR HTD 40A Rear defogger relay
RR HTR 40A Rear blower relay
ABS 1 40A ABS control module(G4KC)
ABS 2 40A ABS control module(G4KC)
C/FAN 30A Condenser fan relay 1
F/FILTER 30A Fuel filter heater relay(DIESEL)
ECU/TCU 10A TCM, ECM (Gasoline)
HORN 10A Horn relay
BURNER 20A Fuel fired heater control module(D4CB)
F/PUMP 15A Fuel pump relay(G4KC)
ALT 10A Generator(D4BH)
H/LP HI 15A Head lamp(HIGH) relay, Head lamp(LOW) relay
A/CON 10A A/C relay
FRT DEICER 15A Windshield defogger relay (if equipped)
TAIL LH 10A Head lamp LH(Position lamp), Rear combi lamp LH, License lamp LH
Page 341 of 353
777
Maintenance
G270300AUN
3. Exhaust emission control
system
The Exhaust Emission Control System is
a highly effective system which controls
exhaust emissions while maintaining
good vehicle performance.
G270301BUN
Vehicle modifications
This vehicle should not be modified.
Modification of your vehicle could affect
its performance, safety or durability and
may even violate governmental safety
and emissions regulations.
In addition, damage or performance
problems resulting from any modification
may not be covered under warranty.
• If you use unauthorized electronic
devices, it may cause the vehicle to
operate abnormally, wire damage, bat-
tery discharge and fire. For your safety,
do not use unauthorized electronic
devices.
G270302AUN
Engine exhaust gas precautions
(carbon monoxide)
• Carbon monoxide can be present with
other exhaust fumes. Therefore, if you
smell exhaust fumes of any kind inside
your vehicle, have it inspected and
repaired immediately. If you ever sus-
pect exhaust fumes are coming into
your vehicle, drive it only with all the
windows fully open. Have your vehicle
checked and repaired immediately.• Do not operate the engine in confined
or closed areas (such as garages) any
more than what is necessary to move
the vehicle in or out of the area.
• When the vehicle is stopped in an
open area for more than a short time
with the engine running, adjust the
ventilation system (as needed) to draw
outside air into the vehicle.
• Never sit in a parked or stopped vehi-
cle for any extended time with the
engine running.
• When the engine stalls or fails to start,
excessive attempts to restart the
engine may cause damage to the
emission control system.
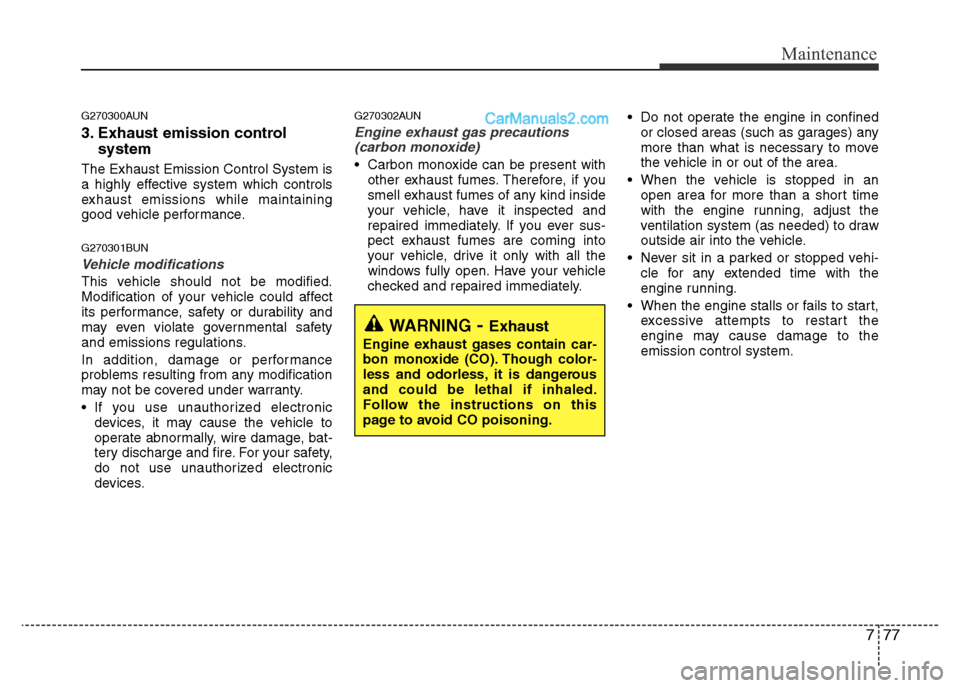
WARNING- Exhaust
Engine exhaust gases contain car-
bon monoxide (CO). Though color-
less and odorless, it is dangerous
and could be lethal if inhaled.
Follow the instructions on this
page to avoid CO poisoning.