hood open Hyundai H-1 (Grand Starex) 2014 Owner's Manual
[x] Cancel search | Manufacturer: HYUNDAI, Model Year: 2014, Model line: H-1 (Grand Starex), Model: Hyundai H-1 (Grand Starex) 2014Pages: 353, PDF Size: 9.18 MB
Page 76 of 353
Features of your vehicle
6 4
THEFT-ALARM SYSTEM (IF EQUIPPED)
D030000AEN
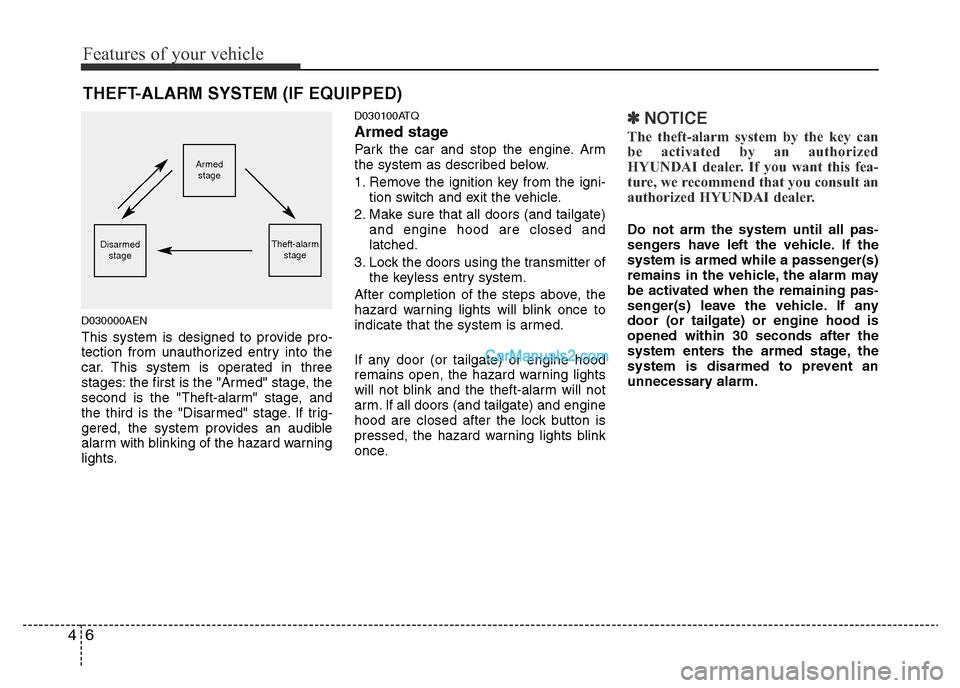
This system is designed to provide pro-
tection from unauthorized entry into the
car. This system is operated in three
stages: the first is the "Armed" stage, the
second is the "Theft-alarm" stage, and
the third is the "Disarmed" stage. If trig-
gered, the system provides an audible
alarm with blinking of the hazard warning
lights.
D030100ATQ
Armed stage
Park the car and stop the engine. Arm
the system as described below.
1. Remove the ignition key from the igni-
tion switch and exit the vehicle.
2. Make sure that all doors (and tailgate)
and engine hood are closed and
latched.
3. Lock the doors using the transmitter of
the keyless entry system.
After completion of the steps above, the
hazard warning lights will blink once to
indicate that the system is armed.
If any door (or tailgate) or engine hood
remains open, the hazard warning lights
will not blink and the theft-alarm will not
arm. If all doors (and tailgate) and engine
hood are closed after the lock button is
pressed, the hazard warning lights blink
once.
✽NOTICE
The theft-alarm system by the key can
be activated by an authorized
HYUNDAI dealer. If you want this fea-
ture, we recommend that you consult an
authorized HYUNDAI dealer.
Do not arm the system until all pas-
sengers have left the vehicle. If the
system is armed while a passenger(s)
remains in the vehicle, the alarm may
be activated when the remaining pas-
senger(s) leave the vehicle. If any
door (or tailgate) or engine hood is
opened within 30 seconds after the
system enters the armed stage, the
system is disarmed to prevent an
unnecessary alarm.
Armed
stage
Theft-alarm
stageDisarmed
stage
Page 77 of 353
47
Features of your vehicle
D030200AEN-EE
Theft-alarm stage
The alarm will be activated if any of the
following occurs while the system is
armed.
• A front or rear door is opened without
using the transmitter.
• The tailgate is opened without using
the transmitter.
• The engine hood is opened.
The horn will sound and the hazard
warning lights will blink continuously for
approximately 30 seconds. To turn off the
system, unlock the doors with the trans-
mitter.
D030400BTQ
Disarmed stage
The system will be disarmed when the
doors (and tailgate) are unlocked with the
transmitter.
After depressing the unlock button, the
hazard warning lights will blink twice to
indicate that the system is disarmed.
After depressing the unlock button, if any
door (or tailgate) is not opened within 30
seconds, the system will be rearmed.
✽NOTICE - Non-immobilizer
system
• Avoid trying to start the engine while
the alarm is activated. The vehicle
starting motor is disabled during the
theft-alarm stage.
If the system is not disarmed with the
transmitter, insert the key into the
ignition switch, turn the ignition
switch to the ON position and wait for
30 seconds. Then the system will be
disarmed.
• If you lose your keys, we recommend
that you contact an authorized
HYUNDAI dealer.
✽NOTICE- Immobilizer system
• If the system is not disarmed with the
transmitter, insert the key into the
ignition switch and start the engine.
Then the system will be disarmed.
• If you lose your keys, we recommend
that you contact an authorized
HYUNDAI dealer.
CAUTION
Do not change, alter or adjust the
theft-alarm system because it could
cause the theft-alarm system to
malfunction and we recommend
that you serviced an authorized
HYUNDAI dealer.
Malfunctions caused by improper
alterations, adjustments or modifi-
cations to the theft-alarm system
are not covered by your vehicle
manufacturer warranty.
Page 91 of 353
421
Features of your vehicle
D090100BUN
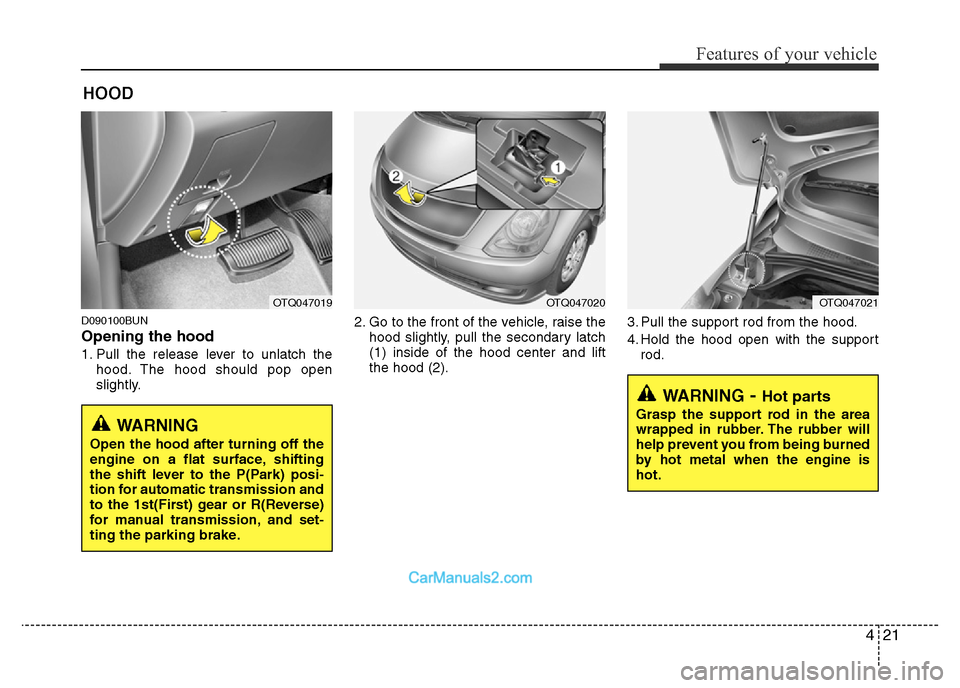
Opening the hood
1. Pull the release lever to unlatch the
hood. The hood should pop open
slightly.2. Go to the front of the vehicle, raise the
hood slightly, pull the secondary latch
(1) inside of the hood center and lift
the hood (2).3. Pull the support rod from the hood.
4. Hold the hood open with the support
rod.
HOOD
OTQ047019OTQ047020OTQ047021
WARNING- Hot parts
Grasp the support rod in the area
wrapped in rubber. The rubber will
help prevent you from being burned
by hot metal when the engine is
hot.WARNING
Open the hood after turning off the
engine on a flat surface, shifting
the shift lever to the P(Park) posi-
tion for automatic transmission and
to the 1st(First) gear or R(Reverse)
for manual transmission, and set-
ting the parking brake.
Page 92 of 353
Features of your vehicle
22 4
D090200AUN
Closing the hood
1. Before closing the hood, check the fol-
lowing:
• All filler caps in engine compartment
must be correctly installed.
• Gloves, rags or any other com-
bustible material must be removed
from the engine compartment.
2. Return the support rod to its clip to
prevent it from rattling.
3. Lower the hood until it is about 30 cm
(1 ft.) above the closed position and let
it drop. Make sure that it locks into
place.
WARNING - Hood
• Before closing the hood, ensure
that all obstructions are removed
from the hood opening. Closing
the hood with an obstruction
present in the hood opening may
result in property damage or
severe personal injury.
• Do not leave gloves, rags or any
other combustible material in the
engine compartment. Doing so
may cause a heat-induced fire.
WARNING
• Always double check to be sure
that the hood is firmly latched
before driving away. If it is not
latched, the hood could fly open
while the vehicle is being driven,
causing a total loss of visibility,
which might result in an accident.
• The support rod must be inserted
completely into the hole provided
in the hood whenever you inspect
the engine compartment. This will
prevent the hood from falling and
possibly injuring you.
• Do not move the vehicle with the
hood in the raised position, as
vision is obstructed and the hood
could fall or be damaged.
Page 245 of 353
What to do in an emergency
6 6
IF THE ENGINE OVERHEATS
F050000BFD
If your temperature gauge indicates over-
heating, you experience a loss of power,
or hear loud pinging or knocking, the
engine is probably too hot. If this hap-
pens, you should:
1. Pull off the road and stop as soon as it
is safe to do so.
2. Place the gear selector lever in P
(automatic transmission) or neutral
(manual transmission) and set the
parking brake. If the air conditioning is
on, turn it off.
3. If engine coolant is running out under
the car or steam is coming out from
the hood, stop the engine. Do not open
the hood until the coolant has stopped
running or the steaming has stopped.
If there is no visible loss of engine
coolant and no steam, leave the
engine running and check to be sure
the engine cooling fan is operating. If
the fan is not running, turn the engine
off.4. Check to see if the water pump drive
belt is missing. If it is not missing,
check to see that it is tight. If the drive
belt seems to be satisfactory, check
for coolant leaking from the radiator,
hoses or under the car. (If the air con-
ditioning had been in use, it is normal
for cold water to be draining from it
when you stop).
5. If the water pump drive belt is broken
or engine coolant is leaking out, stop
the engine immediately and we recom-
mend that you call an authorized
HYUNDAI dealer.6. If you cannot find the cause of the
overheating, wait until the engine tem-
perature has returned to normal. Then,
if coolant has been lost, carefully add
coolant to the reservoir to bring the
fluid level in the reservoir up to the
halfway mark.
7. Proceed with caution, keeping alert for
further signs of overheating. If over-
heating happens again, we recom-
mend that you call an authorized
HYUNDAI dealer.
CAUTION
• Serious loss of coolant indicates
there is a leak in the cooling sys-
tem and we recommend that the
system be checked by an author-
ized HYUNDAI dealer.
• When the engine overheats from
low engine coolant, suddenly
adding engine coolant may cause
cracks in the engine. To prevent
damage, add engine coolant
slowly in small quantities.
WARNING
While the engine is running, keep
hair, hands and clothing away from
moving parts such as the fan and
drive belts to prevent injury.
WARNING
Do not remove the radiator cap
when the engine is hot. This can
allow coolant to be blown out of the
opening and cause serious burns.
Page 329 of 353
765
Maintenance
G220101BTQ
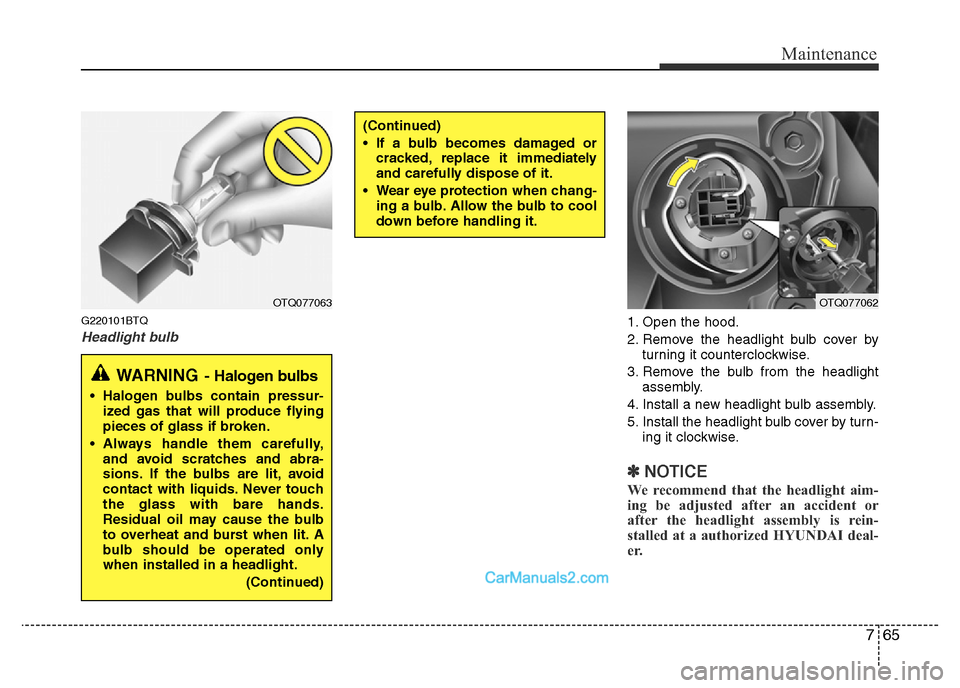
Headlight bulb1. Open the hood.
2. Remove the headlight bulb cover by
turning it counterclockwise.
3. Remove the bulb from the headlight
assembly.
4. Install a new headlight bulb assembly.
5. Install the headlight bulb cover by turn-
ing it clockwise.
✽NOTICE
We recommend that the headlight aim-
ing be adjusted after an accident or
after the headlight assembly is rein-
stalled at a authorized HYUNDAI deal-
er.
(Continued)
• If a bulb becomes damaged or
cracked, replace it immediately
and carefully dispose of it.
• Wear eye protection when chang-
ing a bulb. Allow the bulb to cool
down before handling it.
OTQ077063OTQ077062
WARNING- Halogen bulbs
• Halogen bulbs contain pressur-
ized gas that will produce flying
pieces of glass if broken.
• Always handle them carefully,
and avoid scratches and abra-
sions. If the bulbs are lit, avoid
contact with liquids. Never touch
the glass with bare hands.
Residual oil may cause the bulb
to overheat and burst when lit. A
bulb should be operated only
when installed in a headlight.
(Continued)
Page 331 of 353
767
Maintenance
Position light
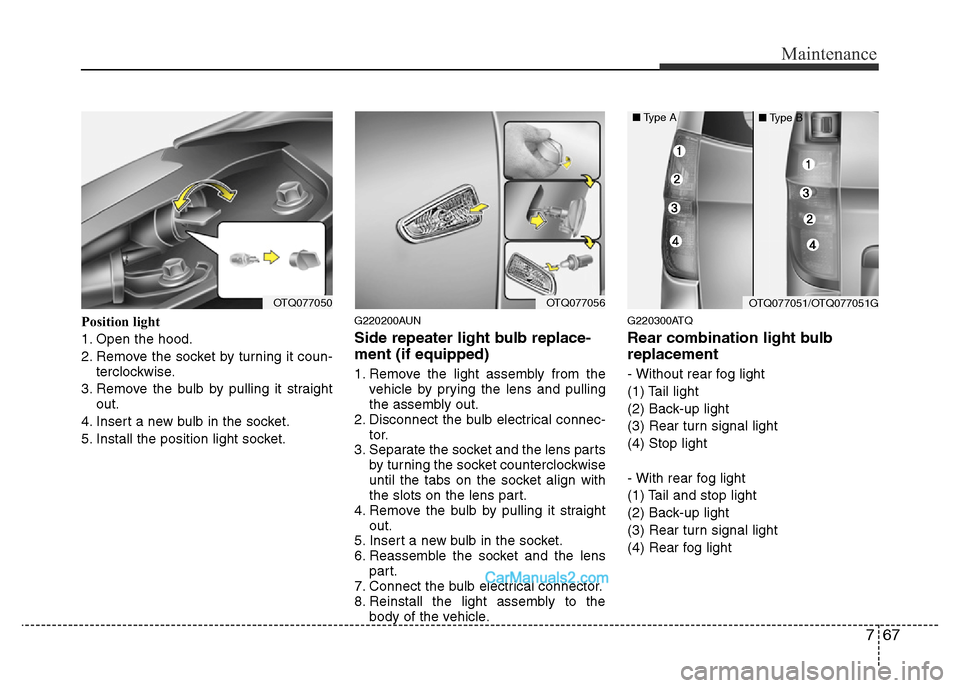
1. Open the hood.
2. Remove the socket by turning it coun-
terclockwise.
3. Remove the bulb by pulling it straight
out.
4. Insert a new bulb in the socket.
5. Install the position light socket.G220200AUN
Side repeater light bulb replace-
ment (if equipped)
1. Remove the light assembly from the
vehicle by prying the lens and pulling
the assembly out.
2. Disconnect the bulb electrical connec-
tor.
3. Separate the socket and the lens parts
by turning the socket counterclockwise
until the tabs on the socket align with
the slots on the lens part.
4. Remove the bulb by pulling it straight
out.
5. Insert a new bulb in the socket.
6. Reassemble the socket and the lens
part.
7. Connect the bulb electrical connector.
8. Reinstall the light assembly to the
body of the vehicle.
G220300ATQ
Rear combination light bulb
replacement
- Without rear fog light
(1) Tail light
(2) Back-up light
(3) Rear turn signal light
(4) Stop light
- With rear fog light
(1) Tail and stop light
(2) Back-up light
(3) Rear turn signal light
(4) Rear fog light
OTQ077050OTQ077056OTQ077051/OTQ077051G
■Type A
■Type B