coolant temperature Hyundai H-100 Truck 2012 Owner's Manual
[x] Cancel search | Manufacturer: HYUNDAI, Model Year: 2012, Model line: H-100 Truck, Model: Hyundai H-100 Truck 2012Pages: 217, PDF Size: 9.37 MB
Page 35 of 217
1
FEATURES OF YOUR HYUNDAI
23
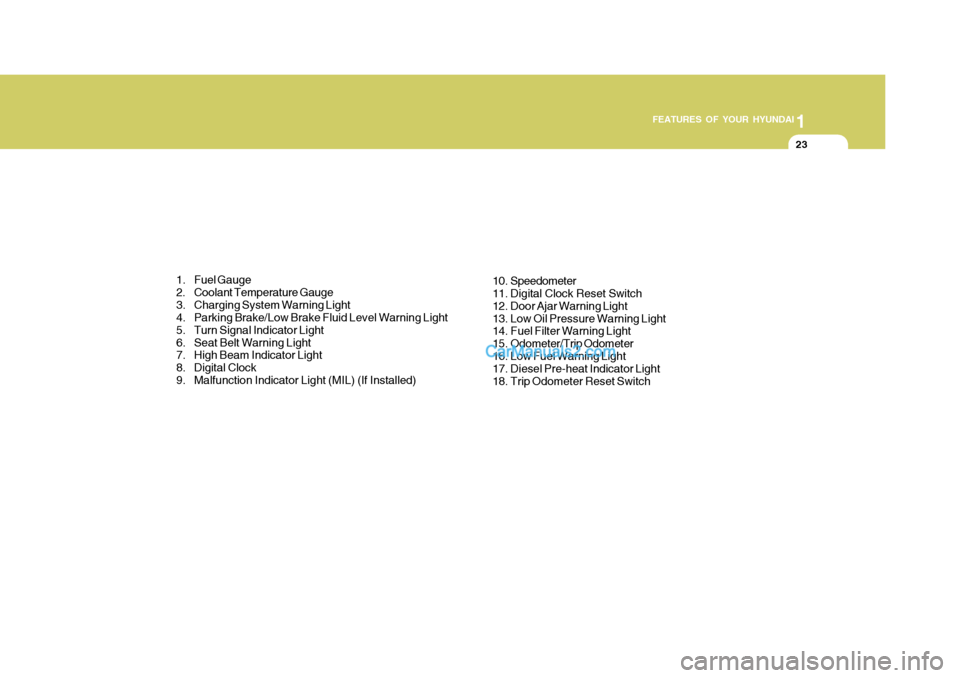
1. Fuel Gauge
2. Coolant Temperature Gauge
3. Charging System Warning Light
4. Parking Brake/Low Brake Fluid Level Warning Light
5. Turn Signal Indicator Light
6. Seat Belt Warning Light
7. High Beam Indicator Light
8. Digital Clock
9. Malfunction Indicator Light (MIL) (If Installed) 10. Speedometer
11. Digital Clock Reset Switch
12. Door Ajar Warning Light
13. Low Oil Pressure Warning Light
14. Fuel Filter Warning Light
15. Odometer/Trip Odometer
16. Low Fuel Warning Light
17. Diesel Pre-heat Indicator Light
18. Trip Odometer Reset Switch
Page 37 of 217
1
FEATURES OF YOUR HYUNDAI
25
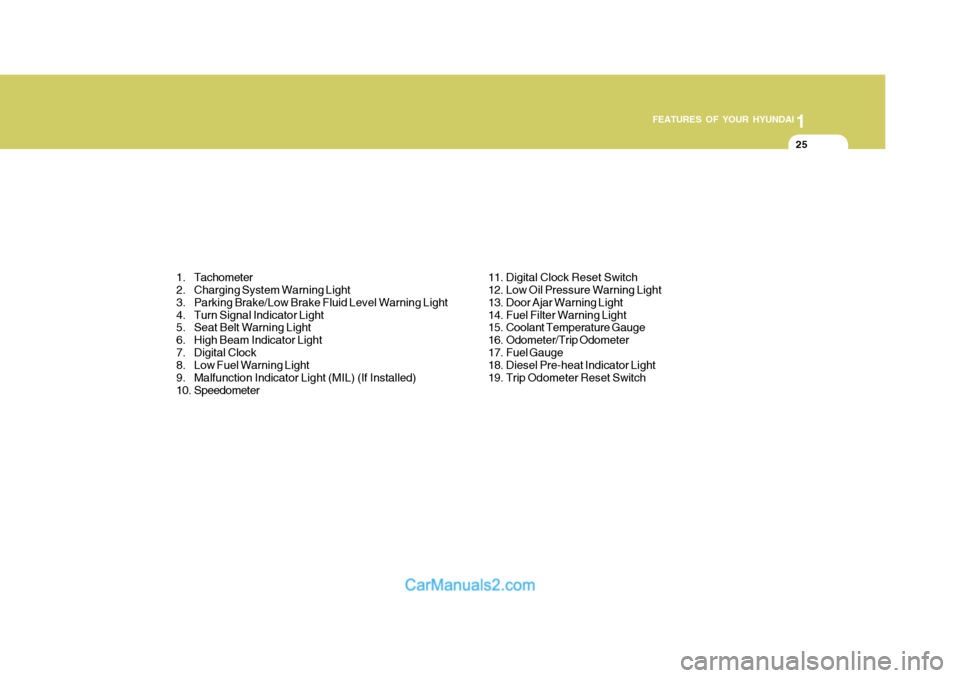
1. Tachometer
2. Charging System Warning Light
3. Parking Brake/Low Brake Fluid Level Warning Light
4. Turn Signal Indicator Light
5. Seat Belt Warning Light
6. High Beam Indicator Light
7. Digital Clock
8. Low Fuel Warning Light
9. Malfunction Indicator Light (MIL) (If Installed)
10. Speedometer 11. Digital Clock Reset Switch
12. Low Oil Pressure Warning Light
13. Door Ajar Warning Light
14. Fuel Filter Warning Light
15. Coolant Temperature Gauge
16. Odometer/Trip Odometer
17. Fuel Gauge
18. Diesel Pre-heat Indicator Light
19. Trip Odometer Reset Switch
Page 112 of 217
2 DRIVING YOUR HYUNDAI
16
C190D01A-GAT Safety Chains Should the hitch connection between your car and the trailer or vehicle you are towing fail, the trailer or vehicle could wander dangerously across otherlanes of traffic and ultimately collide with another vehicle. To eliminate this potentially dangerous situation, safetychains, attached between your car and the trailer or towed vehicle, are re- quired in most provinces.and allow the engine to idle until it cools down. You may proceed once the engine has cooled suffi-ciently.
C190C03S-GAT Trailer Brakes If your trailer is equipped with a braking system, make sure it conforms to fed-eral and/or local regulations and that it is properly installed and operating cor- rectly. NOTE: If you tow a trailer or vehicle, your car will require more frequent main-tenance due to the additional load. See "Maintenance Under Severe Usage Conditions" on page 5-8.
CAUTION:
o Never connect a trailer brake sys- tem directly to the vehicle brakesystem.
o When towing a trailer on steep
grades (in excess of 6%) pay closeattention to the engine coolant temperature gauge to ensure the engine does not overheat. If theneedle of the coolant temperature gauge moves across the dial to- wards "H" (HOT), pull over andstop as soon as it is safe to do so,
!
C190B01S-AAT Trailer Hitches Select the proper hitch and ball combi- nation, making sure that it's location iscompatible with that of the trailer or vehicle being towed. Use a quality non-equalizing hitch whichdistributes the tongue load uniformly throughout the chassis. The hitch should be bolted securely to the car and installed by a qualified technician. DO NOT USE A HITCHDESIGNED FOR TEMPORARY IN- STALLATION AND NEVER USE ONE THAT ATTACHES ONLY TO THEBUMPER.
Page 119 of 217
3 WHAT TO DO IN AN EMERGENCY
4
!
IF THE ENGINE OVERHEATS
D030A01HR-GAT If your temperature gauge indicates overheating, you experience a loss of power, or hear loud pinging or knock- ing, the engine is probably too hot. Ifthis happens to you, you should:
1. Pull off the road and stop as soon as it is safe to do so.
2. Place the gear selector lever in neu-
tral and set the parking brake. If the air conditioning is on, turn it off.
3. If engine coolant is running out un-
der the car or steam is coming outfrom the hood, allow the engine to idle. Do not open the hood until the engine coolant has stopped runningor the steaming has stopped. If there is no visible loss of engine coolant and no steam, leave the enginerunning, lift up the passenger's seat
(Refer to "To Inspect the Engine
Compartment Under the Passenger's
Seat" on page 1-13.) and check to be sure the engine cooling fan is oper- ating. If the fan is not running, turnthe engine off.
6. Carefully remove the jumper cables
in the reverse order of attachment.
If you do not know why your batterybecame discharged (because the lightswere left on, etc.), have the charging system checked by your Hyundai dealer. 4. Check to see if the water pump drive
belt is missing. If it is not missing,check to see that it is tight. If the drive belt seems to be satisfactory, check for coolant leaking from theradiator, hoses or under the car. (If the air conditioning had been in use, it is normal for cold water to bedraining from it when you stop).
WARNING:
While the engine is running, keephair, hands, and clothing away from moving parts such as the fan and drive belts to prevent injury.
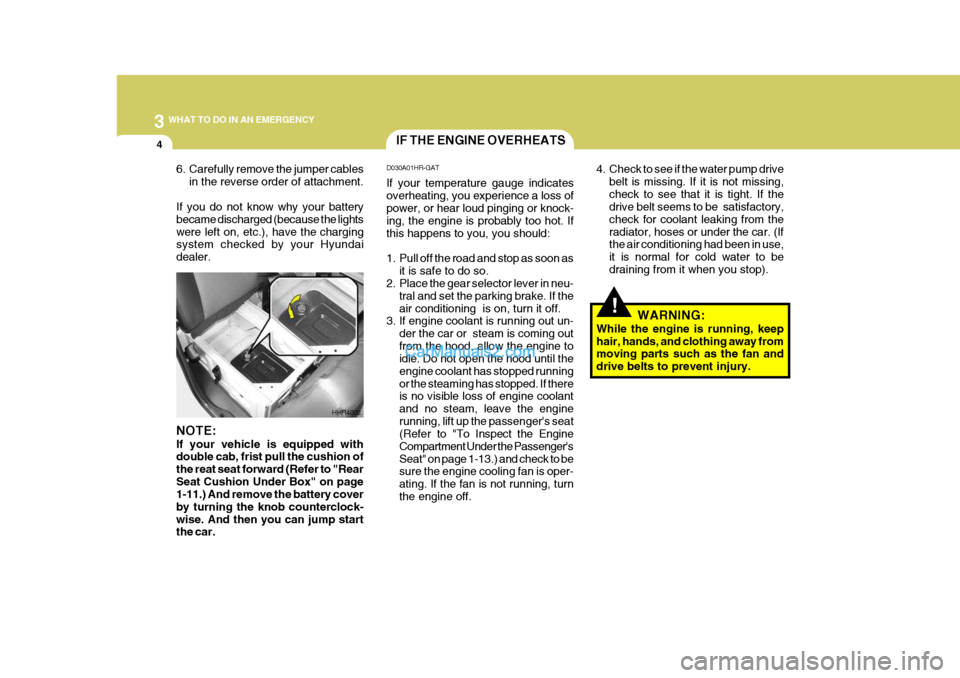
HHR4002
NOTE: If your vehicle is equipped with double cab, frist pull the cushion of the reat seat forward (Refer to "RearSeat Cushion Under Box" on page 1-11.) And remove the battery cover by turning the knob counterclock-wise. And then you can jump start the car.
Page 120 of 217
3
WHAT TO DO IN AN EMERGENCY
5
195/70R15C-6PR 155R12C-8PR 195/70R15C-8PR FRONT
290kPa (42PSI)
- - -
!!
SPARE TIRE
WARNING:
Never work on injection system with engine running or within 30 sec- onds after shutting off engine. High pressure pump, rail, injectors andhigh pressure pipes are subject to high pressure even after the engine stopped. The fuel jet produced byfuel leaks may cause serious in- jury, if it touch the body. People using pacemakers should not movethan 30cm closer to the ECU or wiring harness within the engine room while engine is running, sincethe high currents in the Common Rail system produce considerable magnetic fields. WARNING:
Do not remove the radiator cap whenthe engine is hot. This can allowcoolant to be blown out of the open- ing and cause serious burns.
6. If you cannot find the cause of the overheating, wait until the engine temperature has returned to nor-mal. Then, if the engine coolant has been lost, carefully add coolant to the reservoir (Page 6-10) to bringthe fluid level in the reservoir up to the halfway mark.
7. Proceed with caution, keeping alert
for further signs of overheating. Ifoverheating happens again, call a Hyundai dealer for assistance.
!
5. If the water pump drive belt is broken
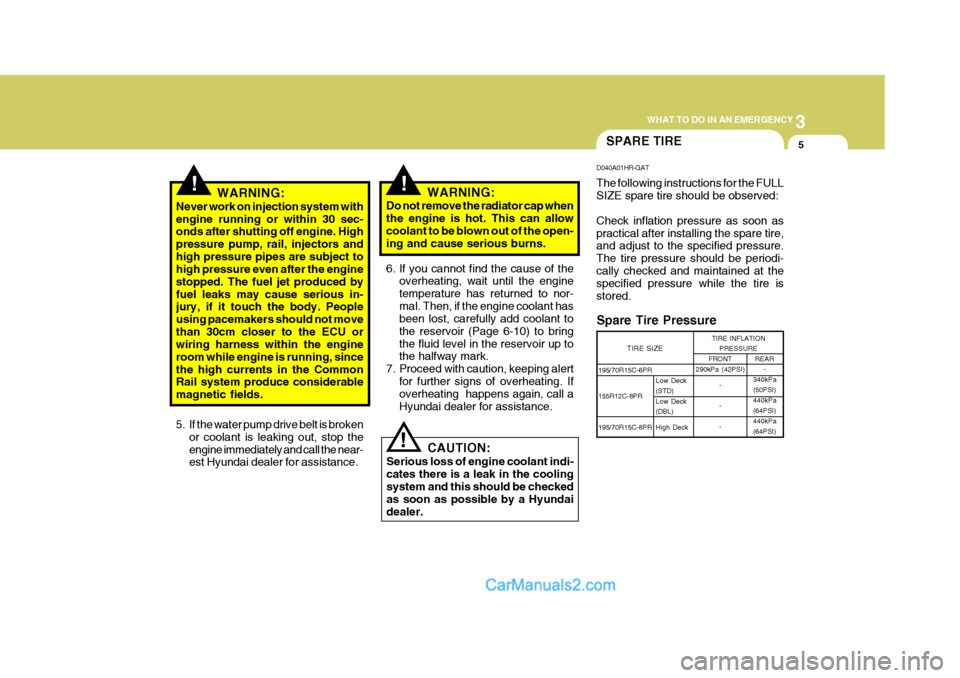
or coolant is leaking out, stop the engine immediately and call the near- est Hyundai dealer for assistance. D040A01HR-GAT The following instructions for the FULL SIZE spare tire should be observed: Check inflation pressure as soon as practical after installing the spare tire, and adjust to the specified pressure. The tire pressure should be periodi-cally checked and maintained at the specified pressure while the tire is stored.
Spare Tire PressureCAUTION:
Serious loss of engine coolant indi- cates there is a leak in the coolingsystem and this should be checked as soon as possible by a Hyundai dealer. TIRE SIZE
TIRE INFLATION
PRESSURE REAR-
340kPa (50PSI)440kPa(64PSI)440kPa (64PSI)
Low Deck (STD)Low Deck (DBL) High Deck
Page 160 of 217
6 DO-IT-YOURSELF MAINTENANCE
8
The engine oil and filter should be changed at those intervals specified inthe maintenance schedule in Section 5. If the car is being driven in severe conditions, more frequent oil and filterchanges are required. The procedure for changing the oil and filter is as follows:
1. Park the car on level ground and set
the parking brake. Start the engine and let it warm up until the needle on the coolant temperature gauge movesabove the lowest mark. Turn the engine off and place the gear selec- tor lever in reverse gear.
2. Lift up the front passenger's seat (Refer to "To Inspect the EngineCompartment Under the FrontPassenger's Seat" on page 1-13.) and remove the engine oil filler cap.
3. Slide underneath the car and loosen the drain plug by turning it counter-clockwise with a wrench of the proper size. Be sure that a drain pan is inposition to catch the oil as it drains out, then remove the drain plug.
CHANGING THE OIL AND FILTER
o Engine oil is used to lubricate pis- tons, piston rings and cylinders. A thin film of oil is left on the cylinder wall when a piston moves down- wards in the cylinder. High negativepressure generated during engine operation sucks some of the oil into the combustion chamber.This oil with some oil of the cylinder wall is burned by the high tempera-
ture combustion gases during thecombustion process.
o The engine oil consumption is
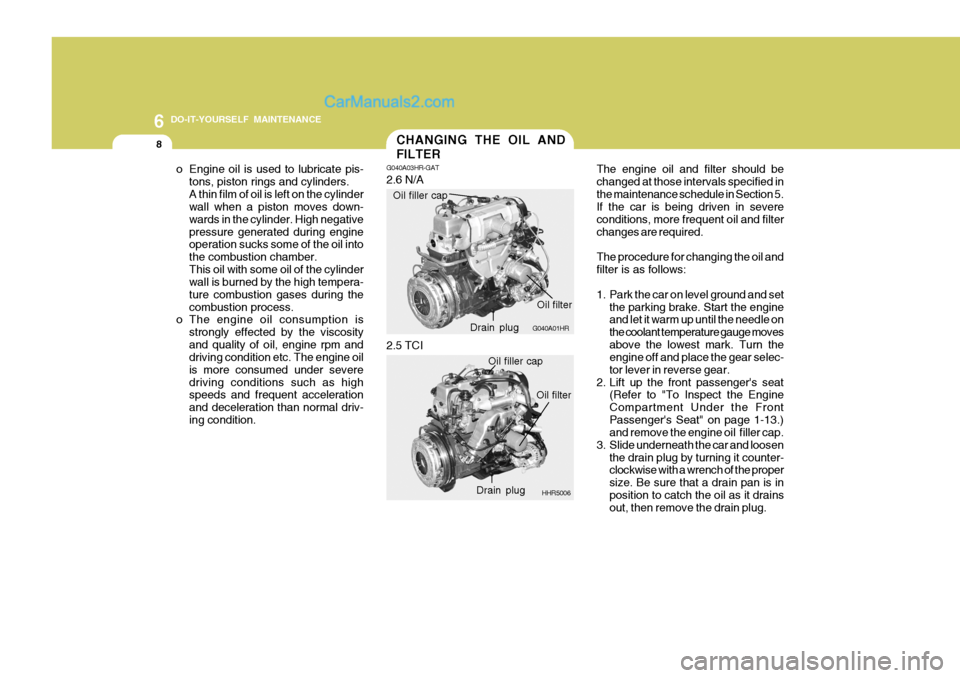
strongly effected by the viscosityand quality of oil, engine rpm and driving condition etc. The engine oil is more consumed under severedriving conditions such as high speeds and frequent acceleration and deceleration than normal driv-ing condition. G040A03HR-GAT 2.6 N/A
G040A01HR
Oil filler capDrain plugOil filter
2.5 TCI
HHR5006
Oil filler cap
Drain plug Oil filter
Page 162 of 217
6 DO-IT-YOURSELF MAINTENANCE
10
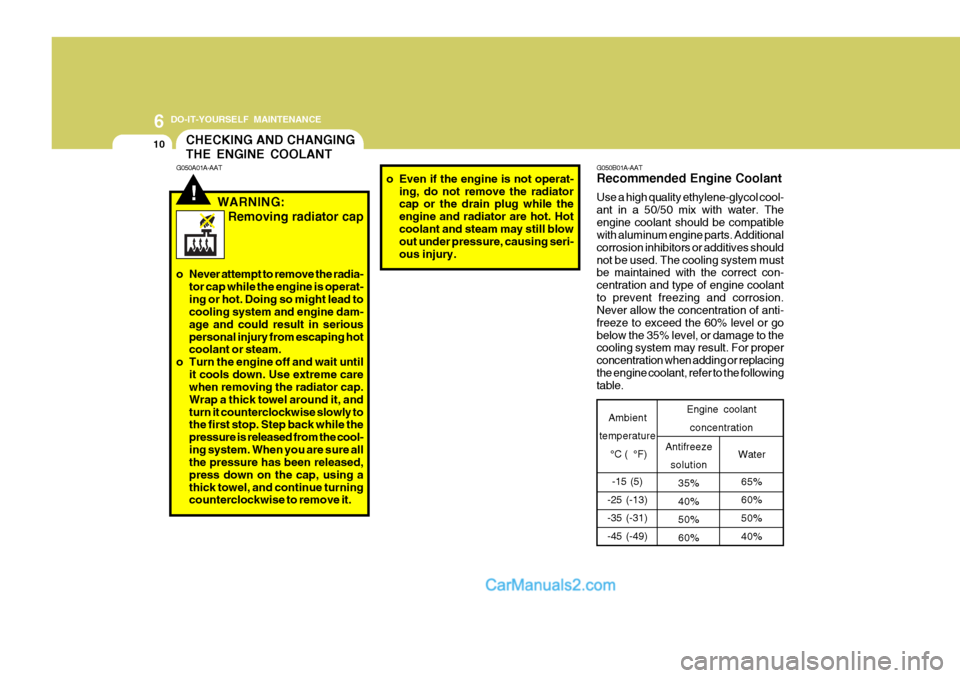
G050B01A-AAT Recommended Engine Coolant Use a high quality ethylene-glycol cool- ant in a 50/50 mix with water. Theengine coolant should be compatible with aluminum engine parts. Additional corrosion inhibitors or additives shouldnot be used. The cooling system must be maintained with the correct con- centration and type of engine coolantto prevent freezing and corrosion. Never allow the concentration of anti- freeze to exceed the 60% level or gobelow the 35% level, or damage to the cooling system may result. For proper concentration when adding or replacingthe engine coolant, refer to the following table.
!
CHECKING AND CHANGING THE ENGINE COOLANT
G050A01A-AAT
WARNING:
o Never attempt to remove the radia-tor cap while the engine is operat- ing or hot. Doing so might lead to cooling system and engine dam- age and could result in seriouspersonal injury from escaping hot coolant or steam.
o Turn the engine off and wait until
it cools down. Use extreme carewhen removing the radiator cap. Wrap a thick towel around it, andturn it counterclockwise slowly to the first stop. Step back while the pressure is released from the cool-ing system. When you are sure all the pressure has been released, press down on the cap, using athick towel, and continue turning counterclockwise to remove it. Removing radiator cap
Water
65% 60% 50% 40%
Antifreeze
solution
35% 40% 50%60%
Ambient
temperature
°C ( °F)
-15 (5)
-25 (-13)-35 (-31) -45 (-49) Engine coolant
concentration
o Even if the engine is not operat-
ing, do not remove the radiator cap or the drain plug while the engine and radiator are hot. Hotcoolant and steam may still blow out under pressure, causing seri- ous injury.
Page 164 of 217
6 DO-IT-YOURSELF MAINTENANCE
12
!WARNING:
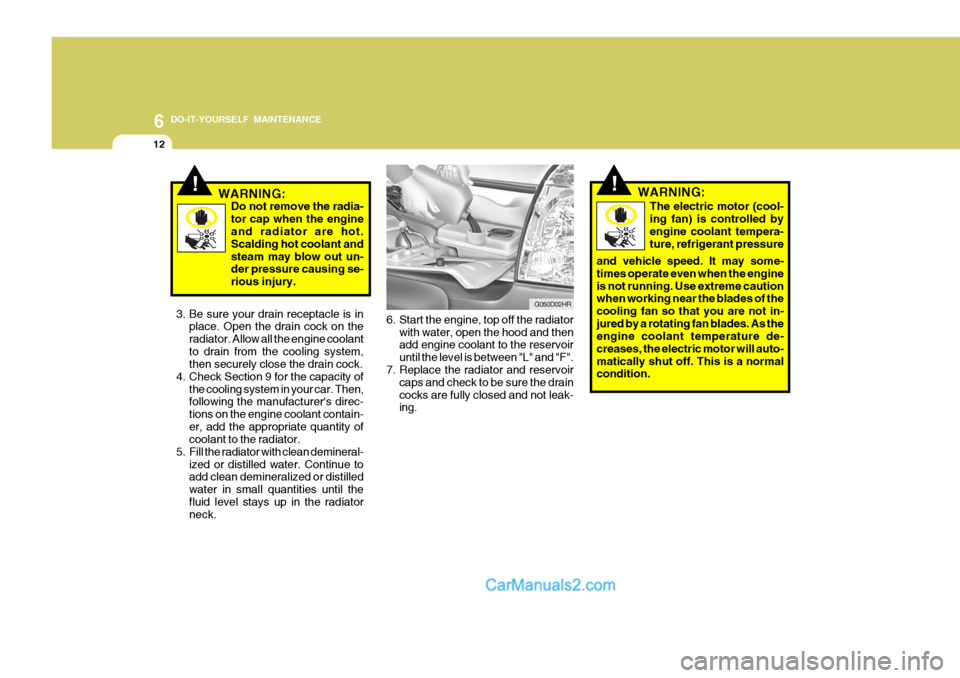
6. Start the engine, top off the radiator with water, open the hood and then add engine coolant to the reservoir until the level is between "L" and "F".
7. Replace the radiator and reservoir
caps and check to be sure the draincocks are fully closed and not leak- ing.
3. Be sure your drain receptacle is inplace. Open the drain cock on the radiator. Allow all the engine coolantto drain from the cooling system, then securely close the drain cock.
4. Check Section 9 for the capacity of
the cooling system in your car. Then,following the manufacturer's direc- tions on the engine coolant contain-er, add the appropriate quantity of coolant to the radiator.
5. Fill the radiator with clean demineral-
ized or distilled water. Continue toadd clean demineralized or distilled water in small quantities until thefluid level stays up in the radiator neck. G050D02HR
!WARNING:
Do not remove the radia- tor cap when the engine and radiator are hot. Scalding hot coolant andsteam may blow out un- der pressure causing se- rious injury.The electric motor (cool- ing fan) is controlled by engine coolant tempera- ture, refrigerant pressure
and vehicle speed. It may some-times operate even when the engineis not running. Use extreme caution when working near the blades of the cooling fan so that you are not in-jured by a rotating fan blades. As the engine coolant temperature de- creases, the electric motor will auto-matically shut off. This is a normal condition.
Page 179 of 217
6
DO-IT-YOURSELF MAINTENANCE
27POWER STEERING FLUID LEVEL
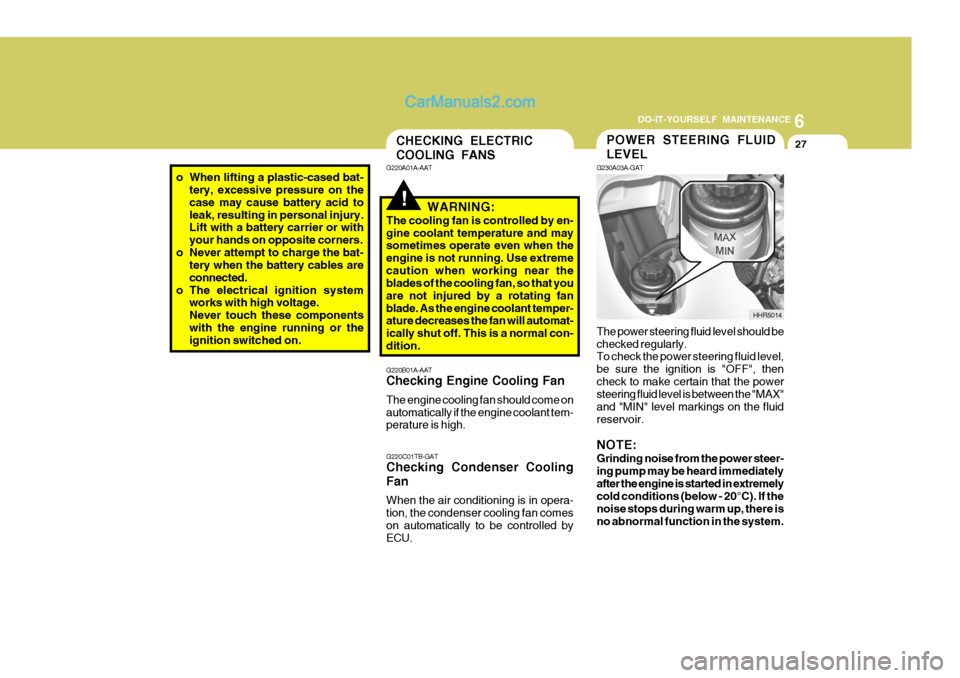
G230A03A-GAT The power steering fluid level should be checked regularly. To check the power steering fluid level, be sure the ignition is "OFF", thencheck to make certain that the power steering fluid level is between the "MAX" and "MIN" level markings on the fluidreservoir. NOTE: Grinding noise from the power steer- ing pump may be heard immediatelyafter the engine is started in extremely cold conditions (below - 20°C). If the noise stops during warm up, there isno abnormal function in the system. HHR5014CHECKING ELECTRIC COOLING FANS
!
G220B01A-AAT Checking Engine Cooling Fan The engine cooling fan should come on automatically if the engine coolant tem- perature is high. G220C01TB-GAT Checking Condenser Cooling Fan When the air conditioning is in opera- tion, the condenser cooling fan comeson automatically to be controlled by ECU.
G220A01A-AAT
WARNING:
The cooling fan is controlled by en- gine coolant temperature and may sometimes operate even when the engine is not running. Use extremecaution when working near the blades of the cooling fan, so that you are not injured by a rotating fanblade. As the engine coolant temper- ature decreases the fan will automat- ically shut off. This is a normal con-dition.
o When lifting a plastic-cased bat- tery, excessive pressure on the case may cause battery acid toleak, resulting in personal injury. Lift with a battery carrier or with your hands on opposite corners.
o Never attempt to charge the bat- tery when the battery cables areconnected.
o The electrical ignition system works with high voltage.Never touch these componentswith the engine running or the ignition switched on.
Page 214 of 217
10
INDEX
3
D Door Central door locks .................................................... 1-6
Door locks ................................................................ 1-5Locking, unlocking front doors with a key ................ 1-5
Drink Holder ................................................................ 1-41
Drive Belts .................................................................. 6-22
Driving Economical driving .................................................. 2-11
Smooth corneri ng ..................................................... 2-12
Winter driving ........................................................... 2-13
E
Emergency Commodity .............................................. 3-15
Emission Contro l System ............................................ 7-2
Engine
Before starting the engine ........................................ 2-3
Changing the oil and filter ......................................... 6-8Compartment ............................................................ 6-3
Coolant ..................................................................... 6-9
Coolant temperature gauge ......................................1-30
Engine idle RPM adjustment knob ..........................1-41
If the engine overheats ............................................. 3-4
Number ..................................................................... 8-2
Oil ............................................................................. 6-6Starting ..................................................................... 2-5 To access the
engine .............................................. 1-12
To inspect the engine compartment under the
driver's seat .......................................................... 1-12
To inspect the engine compartment under the frontpassenger's seat (Fixed seatback type) ............... 1-13
To inspect the engine compartment under the frontpassenger's seat (Fol ding seatback type) ............ 1-13
Engine Exhaust Can Be Dangerous ............................ 2-2
Exterior Tool Box ........................................................ 1-51
FFog Light Front ........................................................................ 1-37
Rear ......................................................................... 1-37
Front Open Service Panel ........................................... 6-2
Front Seats Adjustable front seats ............................................... 1-8
Adjusting seat forward and rearward ......................... 1-8
Adjusting seatback angle ......................................... 1-9
Center seat(with seatback console compartment) ... 1-11
Fuel
Capacity ................................................................... 9-3
Gauge ...................................................................... 1-29
Recommendations .................................................... 1-2
Fuel Tank Cap ............................................................ 1-48
Fuses ......................................................................... 6-23
Fuse Panel Description .............................................. 6-39