reset HYUNDAI I10 2007 Owners Manual
[x] Cancel search | Manufacturer: HYUNDAI, Model Year: 2007, Model line: I10, Model: HYUNDAI I10 2007Pages: 354, PDF Size: 37.04 MB
Page 23 of 354
Safety features of your vehicle
4
3
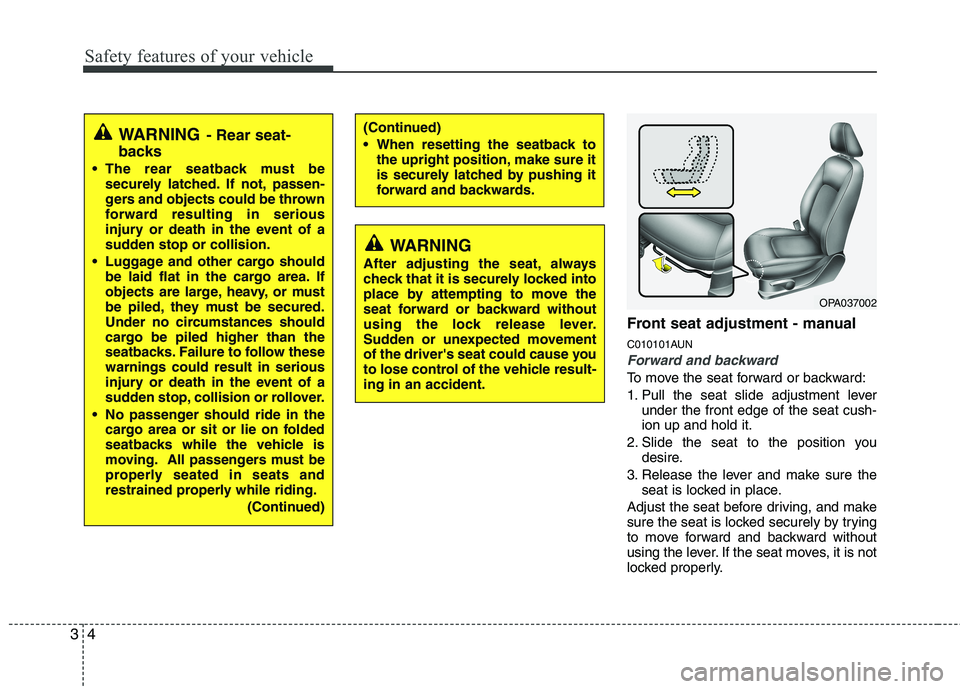
Front seat adjustment - manual
C010101AUN
Forward and backward
To move the seat forward or backward:
1. Pull the seat slide adjustment lever
under the front edge of the seat cush- ion up and hold it.
2. Slide the seat to the position you desire.
3. Release the lever and make sure the seat is locked in place.
Adjust the seat before driving, and make
sure the seat is locked securely by trying
to move forward and backward without
using the lever. If the seat moves, it is not
locked properly.
OPA037002
(Continued)
When resetting the seatback to the upright position, make sure it
is securely latched by pushing it
forward and backwards.WARNING - Rear seat-
backs
The rear seatback must be securely latched. If not, passen-
gers and objects could be thrown
forward resulting in serious
injury or death in the event of a
sudden stop or collision.
Luggage and other cargo should be laid flat in the cargo area. If
objects are large, heavy, or must
be piled, they must be secured.
Under no circumstances should
cargo be piled higher than the
seatbacks. Failure to follow thesewarnings could result in serious
injury or death in the event of a
sudden stop, collision or rollover.
No passenger should ride in the cargo area or sit or lie on folded
seatbacks while the vehicle is
moving. All passengers must be
properly seated in seats and
restrained properly while riding.
(Continued)
WARNING
After adjusting the seat, always
check that it is securely locked into
place by attempting to move the
seat forward or backward without
using the lock release lever.
Sudden or unexpected movement
of the driver's seat could cause you
to lose control of the vehicle result-ing in an accident.
Page 103 of 354
Features of your vehicle
24
4
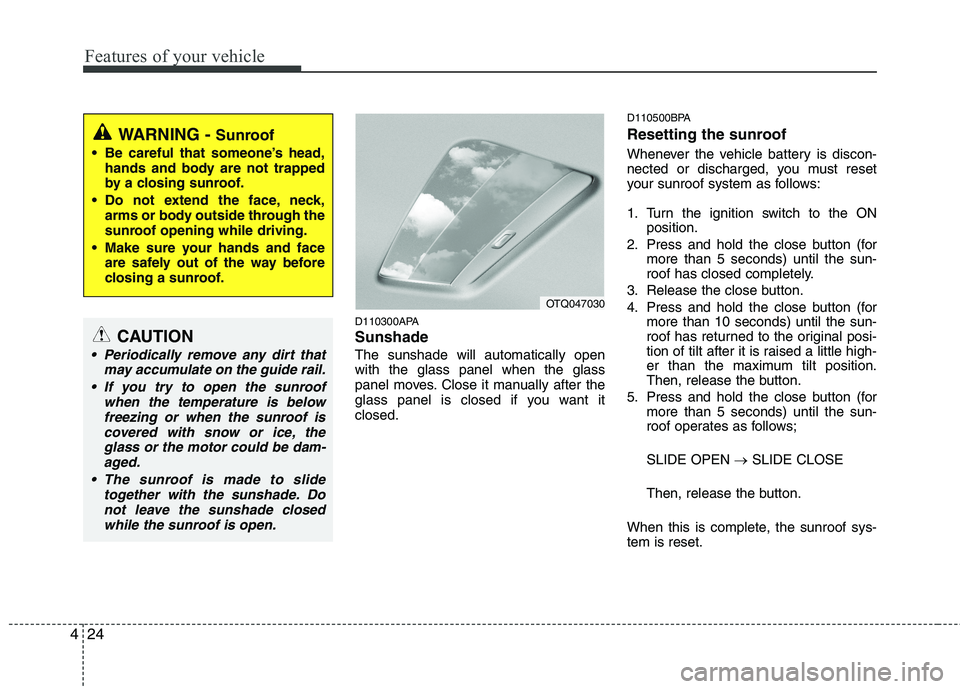
D110300APA Sunshade The sunshade will automatically open with the glass panel when the glass
panel moves. Close it manually after the
glass panel is closed if you want itclosed. D110500BPA
Resetting the sunroof
Whenever the vehicle battery is discon-
nected or discharged, you must reset
your sunroof system as follows:
1. Turn the ignition switch to the ON
position.
2. Press and hold the close button (for more than 5 seconds) until the sun-
roof has closed completely.
3. Release the close button.
4. Press and hold the close button (for more than 10 seconds) until the sun-
roof has returned to the original posi-
tion of tilt after it is raised a little high-
er than the maximum tilt position.
Then, release the button.
5. Press and hold the close button (for more than 5 seconds) until the sun-
roof operates as follows; SLIDE OPEN �SLIDE CLOSE
Then, release the button.
When this is complete, the sunroof sys- tem is reset.
OTQ047030
WARNING - Sunroof
Be careful that someone’s head, hands and body are not trapped
by a closing sunroof.
Do not extend the face, neck, arms or body outside through the
sunroof opening while driving.
Make sure your hands and face are safely out of the way before
closing a sunroof.
CAUTION
Periodically remove any dirt that
may accumulate on the guide rail.
If you try to open the sunroof when the temperature is belowfreezing or when the sunroof iscovered with snow or ice, the glass or the motor could be dam-aged.
The sunroof is made to slide together with the sunshade. Donot leave the sunshade closedwhile the sunroof is open.
Page 113 of 354
Features of your vehicle
34
4
D150205APA
Odometer/Tripmeter
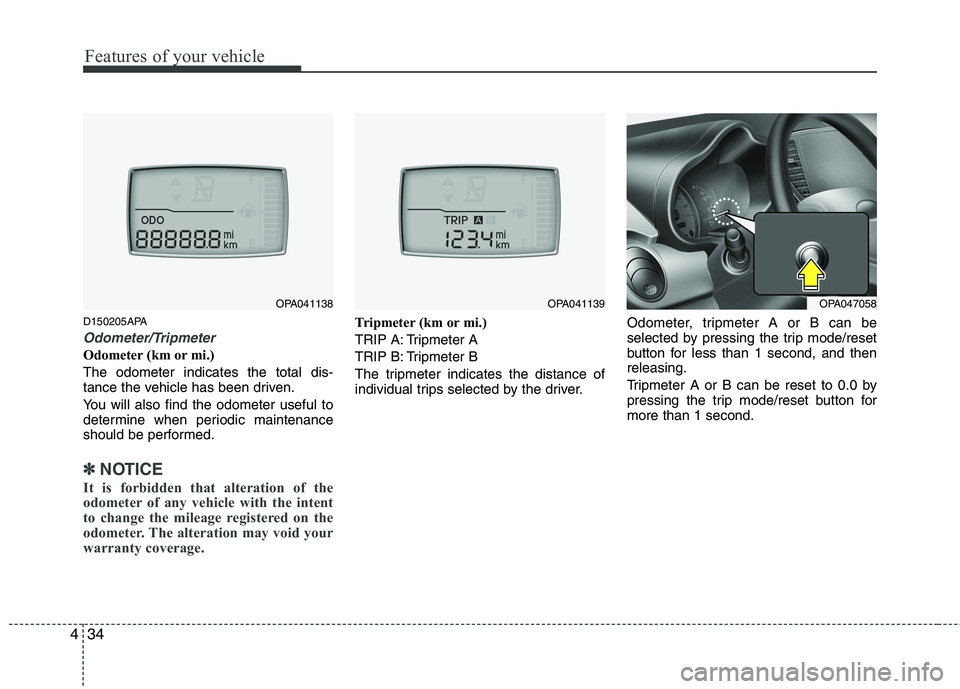
Odometer (km or mi.) The odometer indicates the total dis-
tance the vehicle has been driven.
You will also find the odometer useful to
determine when periodic maintenance
should be performed.
✽✽
NOTICE
It is forbidden that alteration of the
odometer of any vehicle with the intent
to change the mileage registered on the
odometer. The alteration may void your
warranty coverage.
Tripmeter (km or mi.)
TRIP A: Tripmeter A
TRIP B: Tripmeter B
The tripmeter indicates the distance of
individual trips selected by the driver. Odometer, tripmeter A or B can be
selected by pressing the trip mode/reset
button for less than 1 second, and thenreleasing.
Tripmeter A or B can be reset to 0.0 by
pressing the trip mode/reset button formore than 1 second.
OPA041138OPA041139OPA047058
Page 151 of 354
Features of your vehicle
72
4
D280600AEN
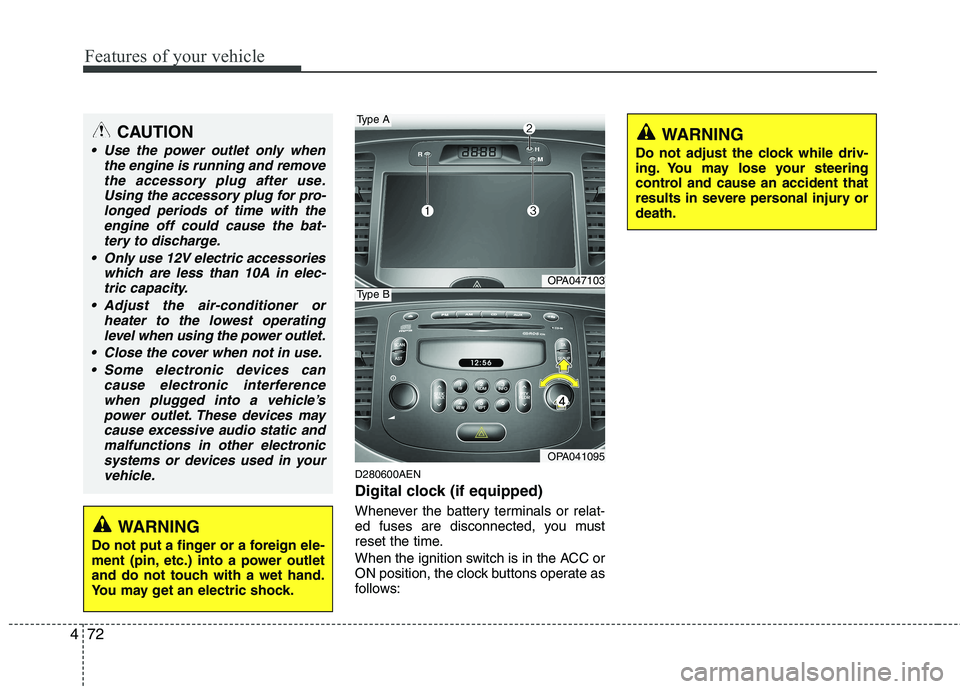
Digital clock (if equipped)
Whenever the battery terminals or relat-
ed fuses are disconnected, you must
reset the time.
When the ignition switch is in the ACC or
ON position, the clock buttons operate as
follows:
CAUTION
Use the power outlet only when
the engine is running and remove
the accessory plug after use.Using the accessory plug for pro-longed periods of time with the engine off could cause the bat-
tery to discharge.
Only use 12V electric accessories which are less than 10A in elec-tric capacity.
Adjust the air-conditioner or heater to the lowest operatinglevel when using the power outlet.
Close the cover when not in use. Some electronic devices can cause electronic interference
when plugged into a vehicle’spower outlet. These devices may cause excessive audio static andmalfunctions in other electronic
systems or devices used in yourvehicle.
WARNING
Do not put a finger or a foreign ele-
ment (pin, etc.) into a power outlet
and do not touch with a wet hand.
You may get an electric shock.
OPA047103
OPA041095
Type A
Type B
WARNING
Do not adjust the clock while driv-
ing. You may lose your steering
control and cause an accident that
results in severe personal injury ordeath.
Page 152 of 354
473
Features of your vehicle
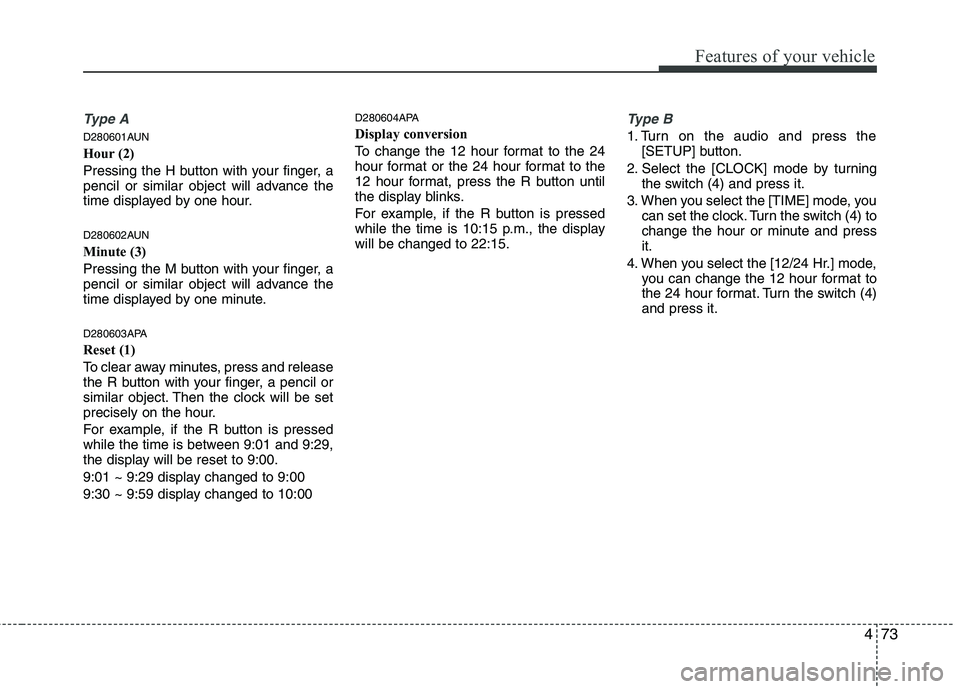
Type A
D280601AUN
Hour (2)
Pressing the H button with your finger, a
pencil or similar object will advance the
time displayed by one hour.
D280602AUN
Minute (3)
Pressing the M button with your finger, a
pencil or similar object will advance the
time displayed by one minute.
D280603APA
Reset (1)
To clear away minutes, press and release
the R button with your finger, a pencil or
similar object. Then the clock will be set
precisely on the hour.
For example, if the R button is pressed
while the time is between 9:01 and 9:29,
the display will be reset to 9:00.
9:01 ~ 9:29 display changed to 9:00
9:30 ~ 9:59 display changed to 10:00D280604APA
Display conversion
To change the 12 hour format to the 24
hour format or the 24 hour format to the
12 hour format, press the R button until
the display blinks.
For example, if the R button is pressed
while the time is 10:15 p.m., the displaywill be changed to 22:15.
Type B
1. Turn on the audio and press the
[SETUP] button.
2. Select the [CLOCK] mode by turning the switch (4) and press it.
3. When you select the [TIME] mode, you can set the clock. Turn the switch (4) to
change the hour or minute and pressit.
4. When you select the [12/24 Hr.] mode, you can change the 12 hour format to
the 24 hour format. Turn the switch (4)and press it.
Page 158 of 354
479
Features of your vehicle
If the SEEK button is pressed for less
than 0.8 second, it will work as follows in
each mode.
RADIO mode
It will function as the PRESET STATION
select buttons.
CD/USB/iPod mode
It will function as the TRACK UP/DOWN
button.
Detailed information for audio control
buttons is described in the followingpages in this section.
MODE (3)
Press the button to change audio source. FM1 ➠FM2 ➠AM ➠CD ➠USB ➠FM...
MUTE (4, if equipped)
Press the MUTE button to cancel the
sound.
Press the MUTE button again to acti- vate the sound. D300800AHM
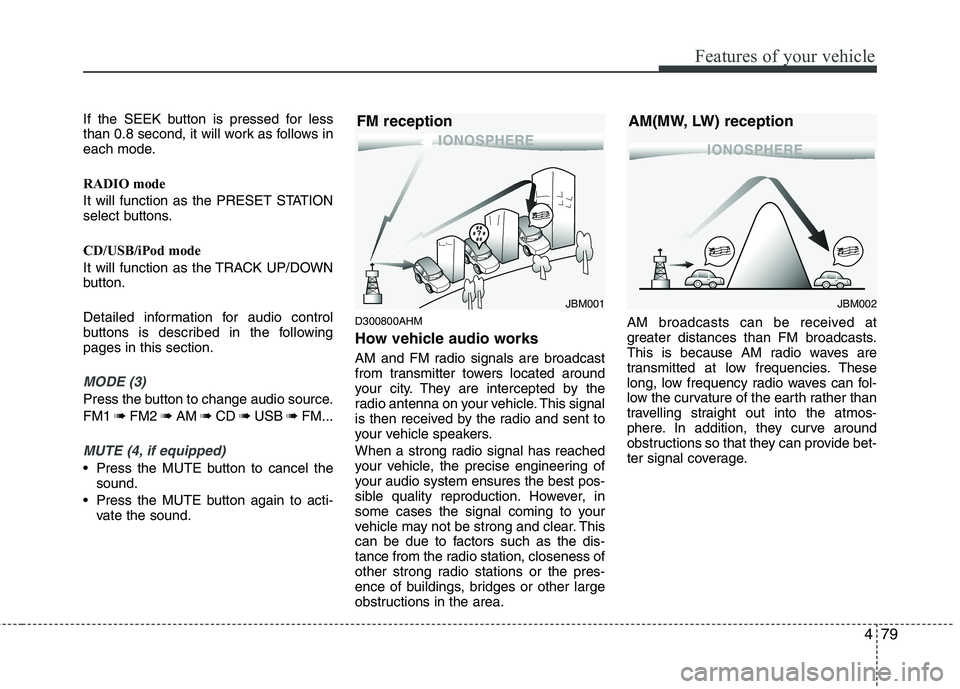
How vehicle audio works
AM and FM radio signals are broadcast
from transmitter towers located around
your city. They are intercepted by the
radio antenna on your vehicle. This signal
is then received by the radio and sent to
your vehicle speakers.
When a strong radio signal has reached
your vehicle, the precise engineering of
your audio system ensures the best pos-
sible quality reproduction. However, in
some cases the signal coming to your
vehicle may not be strong and clear. This
can be due to factors such as the dis-
tance from the radio station, closeness of
other strong radio stations or the pres-
ence of buildings, bridges or other large
obstructions in the area. AM broadcasts can be received at
greater distances than FM broadcasts.
This is because AM radio waves are
transmitted at low frequencies. These
long, low frequency radio waves can fol-
low the curvature of the earth rather than
travelling straight out into the atmos-
phere. In addition, they curve around
obstructions so that they can provide bet-
ter signal coverage.
JBM002
AM(MW, LW) receptionJBM001
FM reception
Page 162 of 354
483
Features of your vehicle
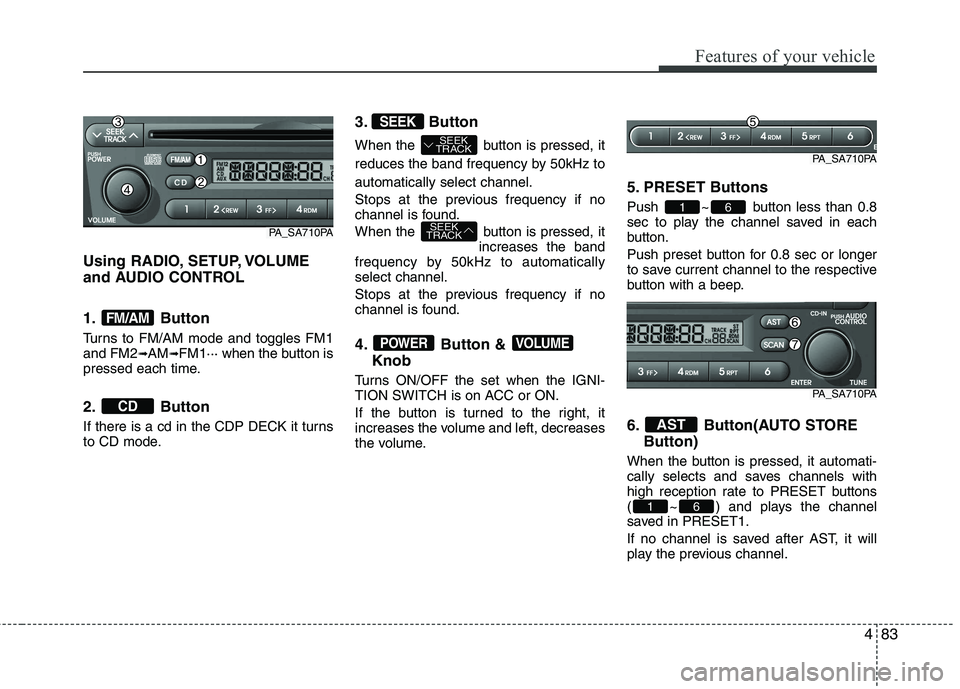
Using RADIO, SETUP, VOLUME
and AUDIO CONTROL
1. Button
Turns to FM/AM mode and toggles FM1 and FM2➟AM ➟FM1··· when the button is
pressed each time.
2. Button
If there is a cd in the CDP DECK it turns
to CD mode. 3. Button
When the button is pressed, it
reduces the band frequency by 50kHz toautomatically select channel.
Stops at the previous frequency if no
channel is found.
When the button is pressed, it
increases the band
frequency by 50kHz to automatically select channel.
Stops at the previous frequency if no
channel is found.
4. Button &
Knob
Turns ON/OFF the set when the IGNI-
TION SWITCH is on ACC or ON.
If the button is turned to the right, it
increases the volume and left, decreases
the volume. 5. PRESET Buttons
Push ~ button less than 0.8
sec to play the channel saved in each
button.
Push preset button for 0.8 sec or longer
to save current channel to the respective
button with a beep.
6. Button(AUTO STORE
Button)
When the button is pressed, it automati-
cally selects and saves channels with
high reception rate to PRESET buttons
( ~ ) and plays the channel
saved in PRESET1.
If no channel is saved after AST, it will
play the previous channel.
61
AST
61
VOLUMEPOWER
SEEK
TRACK
SEEK
TRACK
SEEK
CD
FM/AM
PA_SA710PA
PA_SA710PA
PA_SA710PA
Page 167 of 354
Features of your vehicle
88
4
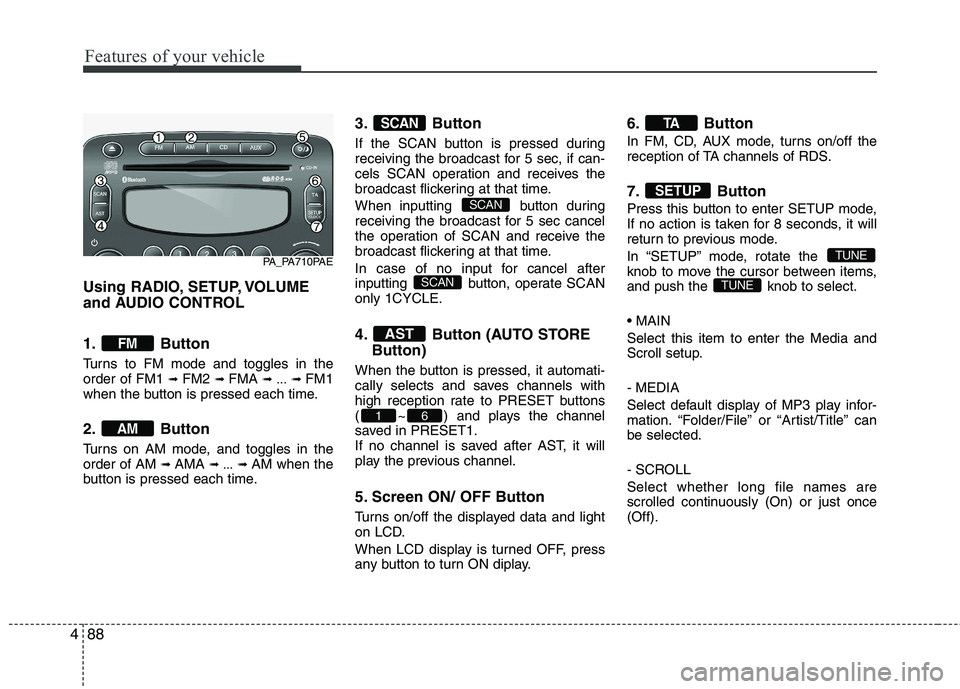
Using RADIO, SETUP, VOLUME
and AUDIO CONTROL
1. Button
Turns to FM mode and toggles in the order of FM1 ➟ FM2 ➟ FMA ➟ ... ➟ FM1
when the button is pressed each time.
2. Button
Turns on AM mode, and toggles in the order of AM ➟ AMA ➟ ... ➟ AM when the
button is pressed each time. 3. Button
If the SCAN button is pressed during
receiving the broadcast for 5 sec, if can-
cels SCAN operation and receives the
broadcast flickering at that time.
When inputting button during
receiving the broadcast for 5 sec cancel
the operation of SCAN and receive the
broadcast flickering at that time.
In case of no input for cancel after
inputting button,
operate SCAN
only 1CYCLE. 4.
Button (AUTO STORE
Button)
When the button is pressed, it automati-
cally selects and saves channels with
high reception rate to PRESET buttons
( ~ ) and plays the channel
saved in PRESET1.
If no channel is saved after AST, it will
play the previous channel.
5. Screen ON/ OFF Button
Turns on/off the displayed data and light
on LCD.
When LCD display is turned OFF, press
any button to turn ON diplay. 6. Button
In FM, CD, AUX mode, turns on/off the
reception of TA channels of RDS.
7. Button
Press this button to enter SETUP mode,
If no action is taken for 8 seconds, it will
return to previous mode.
In “SETUP” mode, rotate the
knob to move the cursor between items,
and push the knob to select. Select this item to enter the Media and
Scroll setup. - MEDIA
Select default display of MP3 play infor-
mation. “Folder/File” or “Artist/Title” canbe selected.
- SCROLL Select whether long file names are
scrolled continuously (On) or just once(Off).
TUNE
TUNE
SETUP
TA
61
AST
SCAN
SCAN
SCAN
AM
FM
PA_PA710PAE
Page 169 of 354
Features of your vehicle
90
4
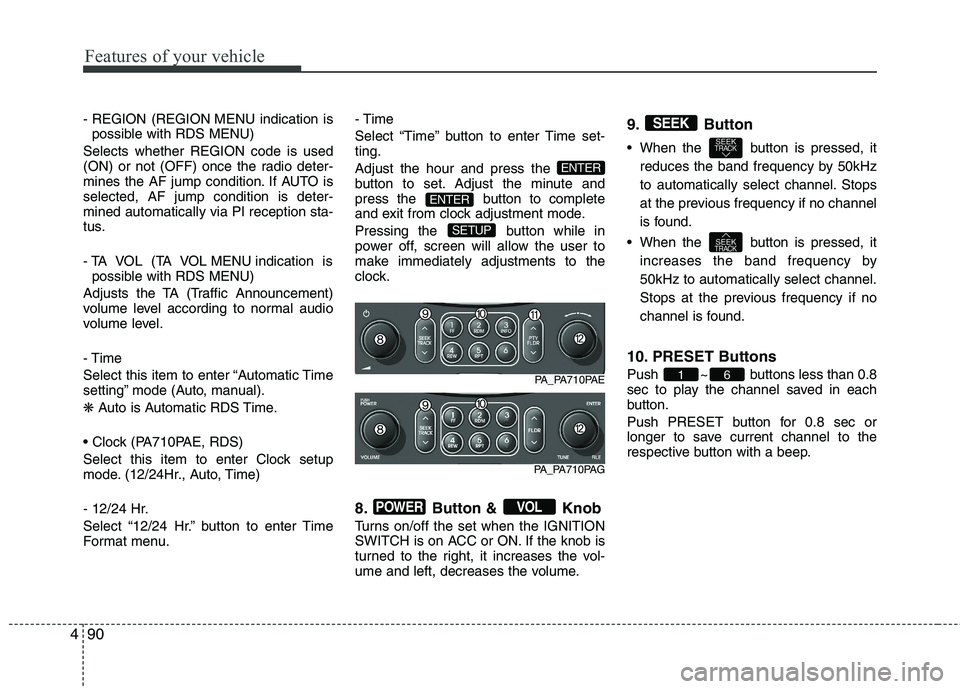
- REGION (REGION MENU indication is
possible with RDS MENU)
Selects whether REGION code is used
(ON) or not (OFF) once the radio deter-
mines the AF jump condition. If AUTO isselected, AF jump condition is deter-mined automatically via PI reception sta-
tus.
- TA VOL (TA VOL MENU indication is possible with RDS MENU)
Adjusts the TA (Traffic Announcement)
volume level according to normal audio
volume level. - Time
Select this item to enter “Automatic Time
setting” mode (Auto, manual). ❋ Auto is Automatic RDS Time.
Select this item to enter Clock setup
mode. (12/24Hr., Auto, Time)
- 12/24 Hr.
Select “12/24 Hr.” button to enter Time
Format menu. - Time
Select “Time” button to enter Time set- ting. Adjust the hour and press the
button to set. Adjust the minute and
press the button to complete
and exit from clock adjustment mode.
Pressing the button while in
power off, screen will allow the user to
make immediately adjustments to the
clock.
8. Button & Knob
Turns on/off the set when the IGNITION
SWITCH is on ACC or ON. If the knob is
turned to the right, it increases the vol-
ume and left, decreases the volume.9. Button
When the button is pressed, it
reduces the band frequency by 50kHz
to automatically select channel. Stops
at the previous frequency if no channel
is found.
When the button is pressed, it increases the band frequency by50kHz to automatically select channel.
Stops at the previous frequency if no
channel is found.
10. PRESET Buttons
Push ~ buttons less than 0.8
sec to play the channel saved in each
button.
Push PRESET button for 0.8 sec or
longer to save current channel to the
respective button with a beep.
61
SEEKTRACK
SEEKTRACK
SEEK
VOLPOWER
SETUP
ENTER
ENTER
PA_PA710PAE
PA_PA710PAG
Page 178 of 354
499
Features of your vehicle
✽✽NOTICE FOR USING THE
iPodDEVICE
Some iPod models might not support the communication protocol and the
files will not be played.
Supported iPod models:
- iPod Mini
- iPod 4th (Photo) ~ 6th (Classic) gen-
eration
- iPod Nano 1st~4th generation
- iPod Touch 1st~2nd generation
The order of search or playback of songs in the iPod can be different
from the order searched in the audio
system.
If the iPod disabled due to its own malfunction, reset the iPod. (Reset:
Refer to iPod manual)
An iPod may not operate normally on
low battery.
Some iPod devices, such as the
iPhone, can be connected through the
Bluetooth® interface. The device
must have audio Bluetooth® capabili-
ty (such as for stereo headphone
Bluetooth®). The device can play, but
it will not be controlled by the audio
system.(Continued)
When the iPod cable is connect- ed, the system can be switched toAUX mode even without iPoddevice and may cause noise.
Disconnect the iPod cable whenyou are not using the iPod device.
When not using iPod with car audio, detach the iPod cable from
iPod. Otherwise, iPod may remainin accessory mode, and may notwork properly.CAUTION IN USING THE
iPod DEVICE
The Hyundai iPod Power Cable is needed in order to operate iPod
with the audio buttons on theaudio system. The USB cable pro-vided by Apple may cause mal- function and should not be used
for Hyundai vehicles.
❋
❋ The Hyundai iPod Power Cable
may be purchased throughyour Hyundai Dealership.
When connecting iPod with the iPod Power Cable, insert the con-nector to the multimedia socketcompletely. If not inserted com- pletely, communications between
iPod and audio may be interrupt-ed.
When adjusting the sound effects of the iPod and the audio system,the sound effects of both devices
will overlap and might reduce or distort the quality of the sound.
Deactivate (turn off) the equalizer function of an iPod when adjust-
ing the audio system’s volume,and turn off the equalizer of theaudio system when using theequalizer of an iPod.
(Continued)