park assist HYUNDAI I10 2017 Owners Manual
[x] Cancel search | Manufacturer: HYUNDAI, Model Year: 2017, Model line: I10, Model: HYUNDAI I10 2017Pages: 343, PDF Size: 9.14 MB
Page 12 of 343
Your vehicle at a glance
2 2
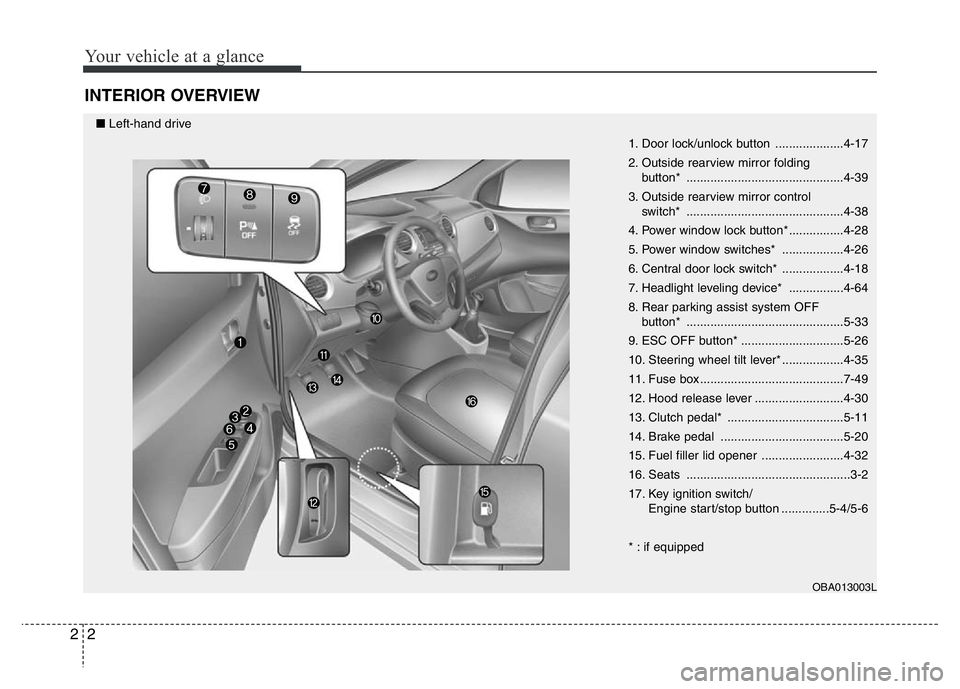
INTERIOR OVERVIEW
1. Door lock/unlock button ....................4-17
2. Outside rearview mirror folding
button* ..............................................4-39
3. Outside rearview mirror control
switch* ..............................................4-38
4. Power window lock button* ................4-28
5. Power window switches* ..................4-26
6. Central door lock switch* ..................4-18
7. Headlight leveling device* ................4-64
8. Rear parking assist system OFF
button* ..............................................5-33
9. ESC OFF button* ..............................5-26
10. Steering wheel tilt lever* ..................4-35
11. Fuse box ..........................................7-49
12. Hood release lever ..........................4-30
13. Clutch pedal* ..................................5-11
14. Brake pedal ....................................5-20
15. Fuel filler lid opener ........................4-32
16. Seats ................................................3-2
17. Key ignition switch/
Engine start/stop button ..............5-4/5-6
* : if equipped
OBA013003L
■Left-hand drive
Page 13 of 343
23
Your vehicle at a glance
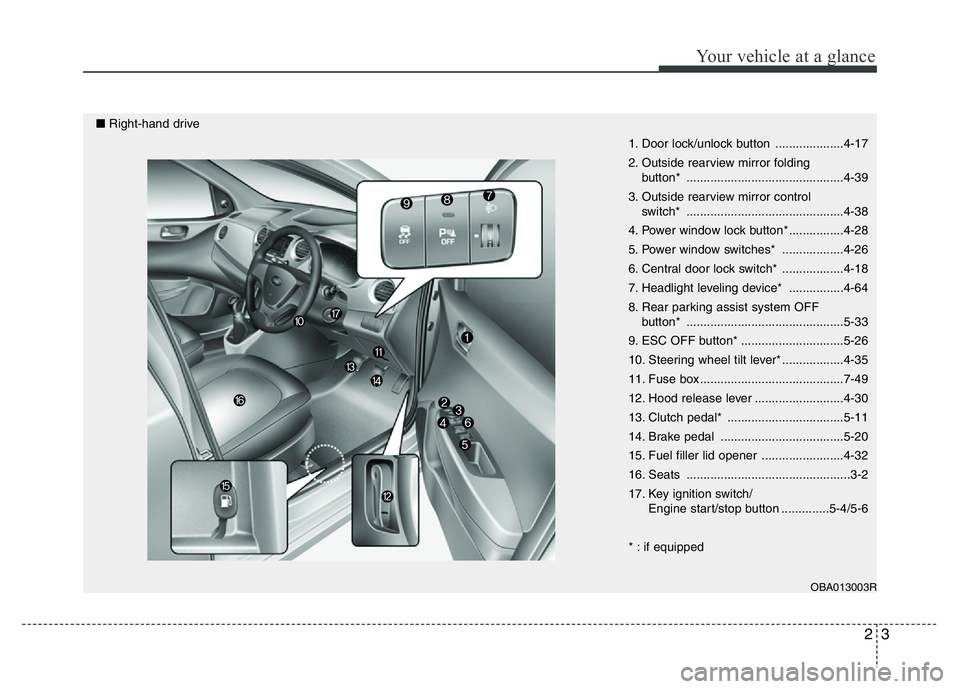
1. Door lock/unlock button ....................4-17
2. Outside rearview mirror folding
button* ..............................................4-39
3. Outside rearview mirror control
switch* ..............................................4-38
4. Power window lock button* ................4-28
5. Power window switches* ..................4-26
6. Central door lock switch* ..................4-18
7. Headlight leveling device* ................4-64
8. Rear parking assist system OFF
button* ..............................................5-33
9. ESC OFF button* ..............................5-26
10. Steering wheel tilt lever* ..................4-35
11. Fuse box ..........................................7-49
12. Hood release lever ..........................4-30
13. Clutch pedal* ..................................5-11
14. Brake pedal ....................................5-20
15. Fuel filler lid opener ........................4-32
16. Seats ................................................3-2
17. Key ignition switch/
Engine start/stop button ..............5-4/5-6
* : if equipped
OBA013003R
■Right-hand drive
Page 194 of 343
Driving your vehicle
BEFORE DRIVING. . . . . . . . . . . . . . . . . . . . . . . . . 5-3
• Before entering vehicle . . . . . . . . . . . . . . . . . . . . . . . . . 5-3
• Before starting . . . . . . . . . . . . . . . . . . . . . . . . . . . . . . . 5-3
KEY IGNITION SWITCH . . . . . . . . . . . . . . . . . . . 5-4
• Ignition switch position . . . . . . . . . . . . . . . . . . . . . . . . . 5-4
• Starting the engine . . . . . . . . . . . . . . . . . . . . . . . . . . . . 5-5
ENGINE START/STOP BUTTON . . . . . . . . . . . . . 5-6
• Illuminated engine start/stop button . . . . . . . . . . . . . . 5-6
• Engine start/stop button position. . . . . . . . . . . . . . . . . 5-6
• Starting the engine . . . . . . . . . . . . . . . . . . . . . . . . . . . . 5-9
MANUAL TRANSAXLE . . . . . . . . . . . . . . . . . . . 5-11
• Manual transaxle operation . . . . . . . . . . . . . . . . . . . 5-11
• Good driving practices . . . . . . . . . . . . . . . . . . . . . . . . 5-12
AUTOMATIC TRANSAXLE . . . . . . . . . . . . . . . 5-14
• Automatic transaxle operation . . . . . . . . . . . . . . . . . 5-15
• Parking . . . . . . . . . . . . . . . . . . . . . . . . . . . . . . . . . . . . 5-18
• Good driving practices . . . . . . . . . . . . . . . . . . . . . . . . 5-18
BRAKING SYSTEM . . . . . . . . . . . . . . . . . . . . . . 5-20
• Power brakes . . . . . . . . . . . . . . . . . . . . . . . . . . . . . . . 5-20
• Disc brakes wear indicator . . . . . . . . . . . . . . . . . . . . 5-21
• Rear drum brakes . . . . . . . . . . . . . . . . . . . . . . . . . . . . 5-21
• Parking brake . . . . . . . . . . . . . . . . . . . . . . . . . . . . . . . 5-21
• Anti-lock Brake System (ABS). . . . . . . . . . . . . . . . . . 5-23
• Electronic Stability Control (ESC) . . . . . . . . . . . . . . 5-26
• Vehicle Stability Management (VSM) . . . . . . . . . . . . 5-29• Hill-Start Assist Control (HAC) . . . . . . . . . . . . . . . . 5-30
• Emergency Stop Signal (ESS) . . . . . . . . . . . . . . . . . . 5-31
• Good braking practices . . . . . . . . . . . . . . . . . . . . . . . 5-31
REAR PARKING ASSIST SYSTEM. . . . . . . . . . 5-32
SPECIAL DRIVING CONDITIONS . . . . . . . . . . 5-34
• Hazardous driving conditions . . . . . . . . . . . . . . . . . 5-34
• Rocking the vehicle . . . . . . . . . . . . . . . . . . . . . . . . . . . 5-34
• Smooth cornering . . . . . . . . . . . . . . . . . . . . . . . . . . . . 5-35
• Driving at night . . . . . . . . . . . . . . . . . . . . . . . . . . . . . . 5-35
• Driving in the rain . . . . . . . . . . . . . . . . . . . . . . . . . . . . 5-35
• Driving in flooded areas . . . . . . . . . . . . . . . . . . . . . . . 5-36
WINTER DRIVING . . . . . . . . . . . . . . . . . . . . . . . 5-37
• Snow or icy conditions . . . . . . . . . . . . . . . . . . . . . . . . 5-37
VEHICLE WEIGHT . . . . . . . . . . . . . . . . . . . . . . 5-40
• Overloading . . . . . . . . . . . . . . . . . . . . . . . . . . . . . . . . . 5-40
5
Page 197 of 343
Driving your vehicle
4 5
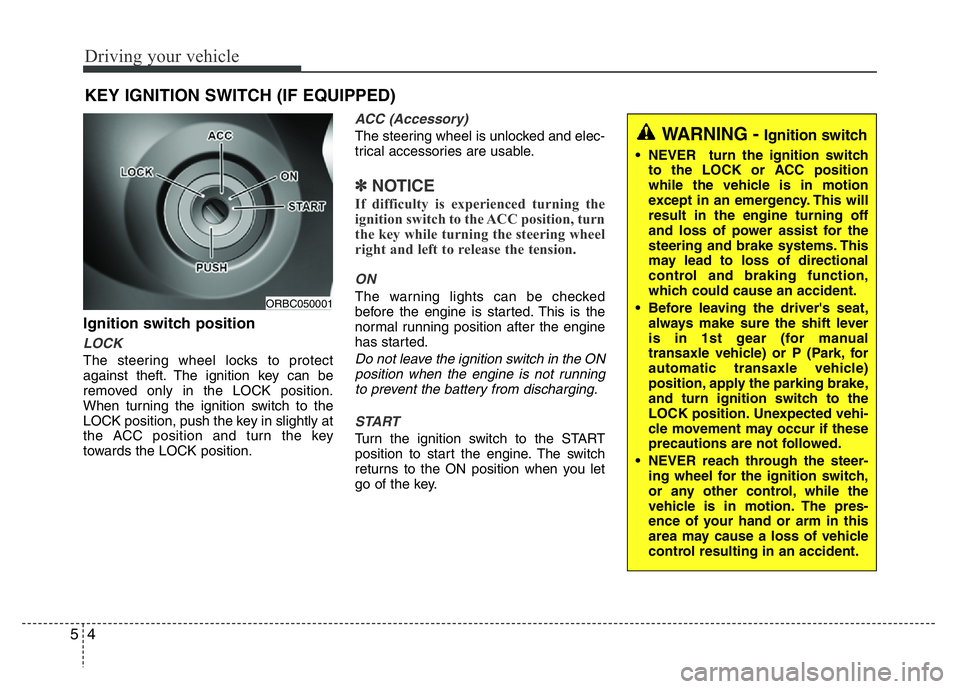
Ignition switch position
LOCK
The steering wheel locks to protect
against theft. The ignition key can be
removed only in the LOCK position.
When turning the ignition switch to the
LOCK position, push the key in slightly at
the ACC position and turn the key
towards the LOCK position.
ACC (Accessory)
The steering wheel is unlocked and elec-
trical accessories are usable.
✽NOTICE
If difficulty is experienced turning the
ignition switch to the ACC position, turn
the key while turning the steering wheel
right and left to release the tension.
ON
The warning lights can be checked
before the engine is started. This is the
normal running position after the engine
has started.
Do not leave the ignition switch in the ON
position when the engine is not running
to prevent the battery from discharging.
START
Turn the ignition switch to the START
position to start the engine. The switch
returns to the ON position when you let
go of the key.
KEY IGNITION SWITCH (IF EQUIPPED)
ORBC050001
WARNING - Ignition switch
• NEVER turn the ignition switch
to the LOCK or ACC position
while the vehicle is in motion
except in an emergency. This will
result in the engine turning off
and loss of power assist for the
steering and brake systems. This
may lead to loss of directional
control and braking function,
which could cause an accident.
• Before leaving the driver's seat,
always make sure the shift lever
is in 1st gear (for manual
transaxle vehicle) or P (Park, for
automatic transaxle vehicle)
position, apply the parking brake,
and turn ignition switch to the
LOCK position. Unexpected vehi-
cle movement may occur if these
precautions are not followed.
• NEVER reach through the steer-
ing wheel for the ignition switch,
or any other control, while the
vehicle is in motion. The pres-
ence of your hand or arm in this
area may cause a loss of vehicle
control resulting in an accident.
Page 201 of 343
Driving your vehicle
8 5
START/RUN
With manual transaxle
To start the engine, depress the clutch
and brake pedals and press the engine
start/stop button with the shift lever in
neutral.
With automatic transaxle
To start the engine, depress the brake
pedal and press the engine start/stop
button with the shift lever in the P (Park)
or the N (Neutral) position. For your safe-
ty, start the engine with the shift lever in
the P (Park) position.
✽ NOTICE
If you press the engine start/stop button
without depressing the clutch pedal for
manual transaxle vehicles or without
depressing the brake pedal for automat-
ic transaxle vehicles, the engine will not
start and the engine start/stop button
changes as follow:
OFF
➔ACC ➔ON ➔OFF or ACC
WARNING
• NEVER press the engine
start/stop button while the vehi-
cle is in motion except in an
emergency. This will result in the
engine turning off and loss of
power assist for the steering and
brake systems. This may lead to
loss of directional control and
braking function, which could
cause an accident.
• Before leaving the driver's seat,
always make sure the shift lever
is in the P (Park) position, set the
parking brake, press the engine
start/stop button to the OFF posi-
tion, and take the smart key with
you. Unexpected vehicle move-
ment may occur if these precau-
tions are not followed.
• NEVER reach through the steer-
ing wheel for the engine
start/stop button, or any other
control, while the vehicle is in
motion. The presence of your
hand or arm in this area may
cause a loss of vehicle control
resulting in an accident.
Page 223 of 343
Driving your vehicle
30 5
VSM OFF condition
To cancel VSM operation, press the ESC
OFF button. ESC OFF indicator light
( ) will illuminate.
To turn on VSM, press the ESC OFF but-
ton again. The ESC OFF indicator light
will go out.Hill-Start Assist Control (HAC)
(if equipped)
The Hill-Start Assist Control (HAC) pre-
vents the vehicle from rolling backwards
when starting a vehicle from a stop on a
hill. The system operates the brakes
automatically for approximately 1.5 sec-
onds and releases the brake when the
accelerator pedal is depressed or after
1.5 seconds.
✽NOTICE
• The HAC does not operate when the
shift lever is in P (Park) or N (Neutral)
(for automatic transaxle vehicle.)
• The HAC operates when:
- the shift lever is in N (Neutral) or D
(Drive) on up hill.
- the shift lever is in R (Reverses) on
down hill.
(for manual transaxle vehicle)
• The HAC activates even though the
ESC (Electronic Stability Control) is
off but does not activate when the
ESC has malfunctioned.
WARNING
If ESC indicator light ( ) or EPS
warning light ( ) stays on, your
vehicle may have a malfunction
with the VSM system. When the
warning light illuminates we recom-
mend that the vehicle be checked
by an authorized HYUNDAI dealer
as soon as possible.
WARNING
Always be ready to depress the
accelerator pedal when starting off
on a incline. The HAC activates only
for approximately 1.5 seconds.
CAUTION
Driving with varying tire or wheel
sizes may cause the ESC system to
malfunction. When replacing tires,
make sure they are the same size as
your original tires for this vehicle.
Page 224 of 343
531
Driving your vehicle
Emergency Stop Signal (ESS)
(if equipped)
The Emergency Stop Signal system
alerts the driver behind by blinking the
stop light when the vehicle brakes rapid-
ly and severely.
The system is activated when:
• The vehicle suddenly stops (vehicle
speed is over 55km/h (34mph) and the
vehicle deceleration is greater than
7m/s2).
• The ABS is activating.
When vehicle speed is under 40 km/h
(25mph) and the ABS deactivates or
the sudden stop situation is over, the
stop light will stop blinking. Instead, the
hazard warning flasher will turn on
automatically. The hazard warning
flasher will turn off when vehicle speed
is over 10km/h (6mph) after the vehicle
has stopped. Also, it will turn off when
the vehicle is driven at low speed for
some time. You can turn it off manually
by pressing the hazard warning flasher
switch.
Good braking practices Wet brakes can be dangerous! The
brakes may get wet if the vehicle is driv-
en through standing water or if it is
washed. Your vehicle will not stop as
quickly if the brakes are wet. Wet brakes
may cause the vehicle to pull to one side.
To dry the brakes, apply the brakes light-
ly until the braking action returns to nor-
mal, taking care to keep the vehicle
under control at all times. If the braking
action does not return to normal, stop as
soon as it is safe to do so and we rec-
ommend that you call an authorized
HYUNDAI dealer for assistance.
DO NOT drive with your foot resting on
the brake pedal. Even light, but constant
pedal pressure can result in the brakes
overheating, brake wear, and possibly
even brake failure.
If a tire goes flat while you are driving,
apply the brakes gently and keep the
vehicle pointed straight ahead while you
slow down. When you are moving slowly
enough for it to be safe to do so, pull off
the road and stop in a safe location.
Keep your foot firmly on the brake pedal
when the vehicle is stopped to prevent
the vehicle from rolling forward.
WARNING
Whenever leaving the vehicle or
parking, always come to a complete
stop and continue to depress the
brake pedal. Move the shift lever
into the 1st gear (for manual
transaxle vehicle) or P (Park, for
automatic transaxle vehicle) posi-
tion, then apply the parking brake,
and place the ignition switch in the
LOCK/OFF position.
Vehicles with the parking brake not
fully engaged are at risk for moving
inadvertently and causing injury to
yourself or others.
Page 225 of 343
Driving your vehicle
32 5
REAR PARKING ASSIST SYSTEM (IF EQUIPPED)
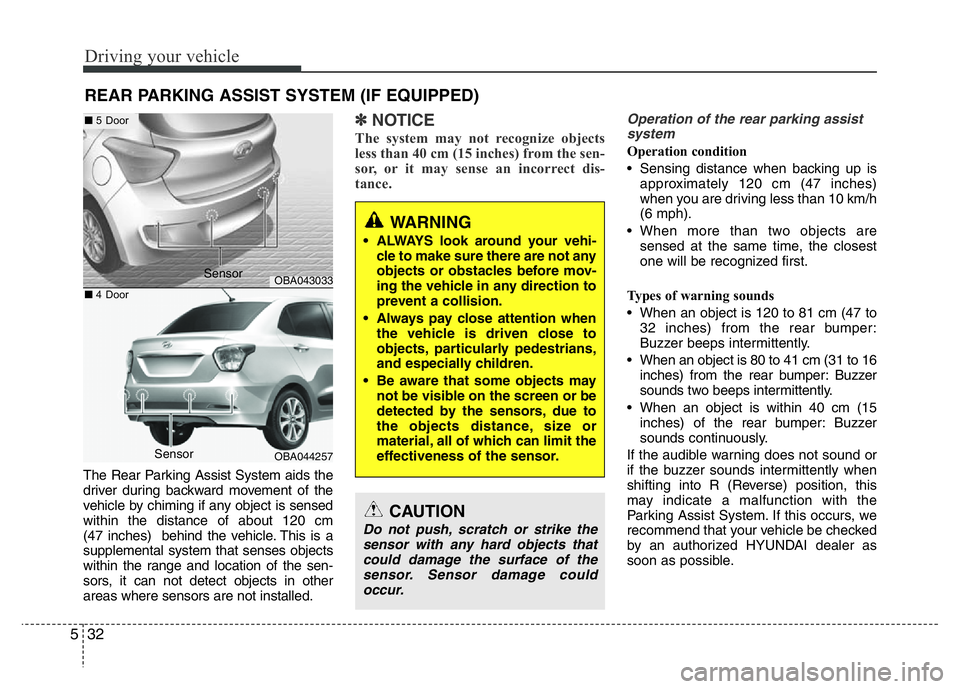
The Rear Parking Assist System aids the
driver during backward movement of the
vehicle by chiming if any object is sensed
within the distance of about 120 cm
(47 inches) behind the vehicle. This is a
supplemental system that senses objects
within the range and location of the sen-
sors, it can not detect objects in other
areas where sensors are not installed.
✽NOTICE
The system may not recognize objects
less than 40 cm (15 inches) from the sen-
sor, or it may sense an incorrect dis-
tance.
Operation of the rear parking assist
system
Operation condition
• Sensing distance when backing up is
approximately 120 cm (47 inches)
when you are driving less than 10 km/h
(6 mph).
• When more than two objects are
sensed at the same time, the closest
one will be recognized first.
Types of warning sounds
• When an object is 120 to 81 cm (47 to
32 inches) from the rear bumper:
Buzzer beeps intermittently.
• When an object is 80 to 41 cm (31 to 16
inches) from the rear bumper: Buzzer
sounds two beeps intermittently.
• When an object is within 40 cm (15
inches) of the rear bumper: Buzzer
sounds continuously.
If the audible warning does not sound or
if the buzzer sounds intermittently when
shifting into R (Reverse) position, this
may indicate a malfunction with the
Parking Assist System. If this occurs, we
recommend that your vehicle be checked
by an authorized HYUNDAI dealer as
soon as possible.
OBA043033
OBA044257
WARNING
• ALWAYS look around your vehi-
cle to make sure there are not any
objects or obstacles before mov-
ing the vehicle in any direction to
prevent a collision.
• Always pay close attention when
the vehicle is driven close to
objects, particularly pedestrians,
and especially children.
• Be aware that some objects may
not be visible on the screen or be
detected by the sensors, due to
the objects distance, size or
material, all of which can limit the
effectiveness of the sensor.
CAUTION
Do not push, scratch or strike the
sensor with any hard objects that
could damage the surface of the
sensor. Sensor damage could
occur.
■5 Door
■4 Door
Sensor
Sensor
Page 226 of 343
533
Driving your vehicle
Non-operational conditions of rear
parking assist system
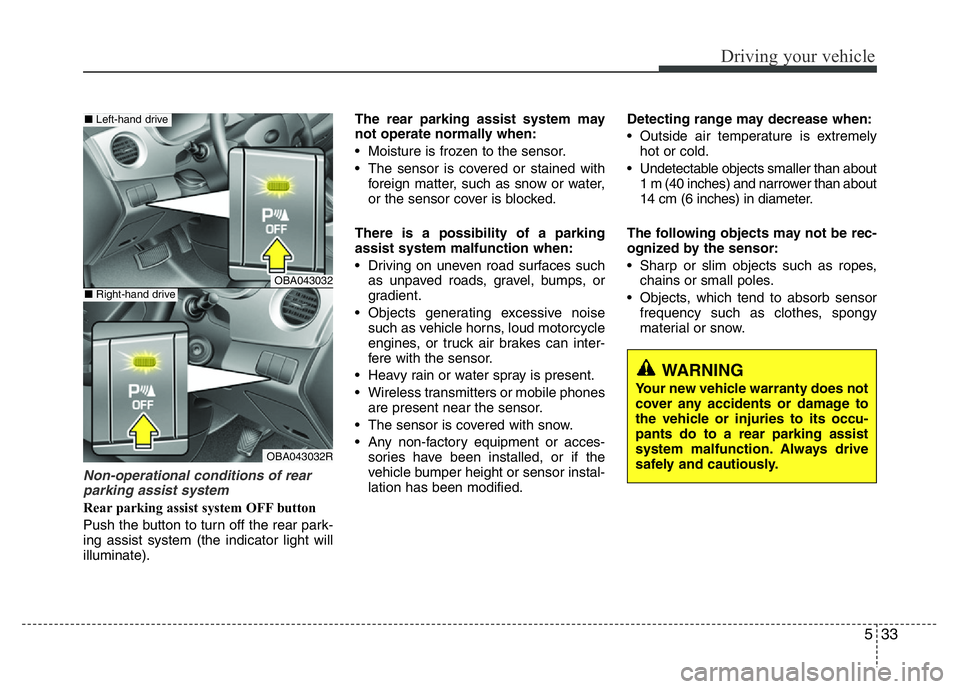
Rear parking assist system OFF button
Push the button to turn off the rear park-
ing assist system (the indicator light will
illuminate).The rear parking assist system may
not operate normally when:
• Moisture is frozen to the sensor.
• The sensor is covered or stained with
foreign matter, such as snow or water,
or the sensor cover is blocked.
There is a possibility of a parking
assist system malfunction when:
• Driving on uneven road surfaces such
as unpaved roads, gravel, bumps, or
gradient.
• Objects generating excessive noise
such as vehicle horns, loud motorcycle
engines, or truck air brakes can inter-
fere with the sensor.
• Heavy rain or water spray is present.
• Wireless transmitters or mobile phones
are present near the sensor.
• The sensor is covered with snow.
• Any non-factory equipment or acces-
sories have been installed, or if the
vehicle bumper height or sensor instal-
lation has been modified.Detecting range may decrease when:
• Outside air temperature is extremely
hot or cold.
• Undetectable objects smaller than about
1 m (40 inches) and narrower than about
14 cm (6 inches) in diameter.
The following objects may not be rec-
ognized by the sensor:
• Sharp or slim objects such as ropes,
chains or small poles.
• Objects, which tend to absorb sensor
frequency such as clothes, spongy
material or snow.
WARNING
Your new vehicle warranty does not
cover any accidents or damage to
the vehicle or injuries to its occu-
pants do to a rear parking assist
system malfunction. Always drive
safely and cautiously.
OBA043032
OBA043032R
■Left-hand drive
■Right-hand drive
Page 238 of 343
65
What to do in an emergency
✽ NOTICE
An inappropriately disposed
battery can be harmful to the
environment and human health.
Dispose the battery according
to your local law(s) or regula-
tion.
Jump starting procedure
1. Position the vehicles close enough that
the jumper cables will reach, but do not
allow the vehicles to touch.
2. Avoid fans or any moving parts in the
engine compartment at all times, even
when the vehicles are turned off.
3. Turn off all electrical devices such as
radios, lights, air conditioning, etc. Put
the vehicles in P (Park, for automatic
transaxle vehicle) or neutral (for manu-
al transaxle vehicle), and set the park-
ing brakes. Turn both vehicles OFF.
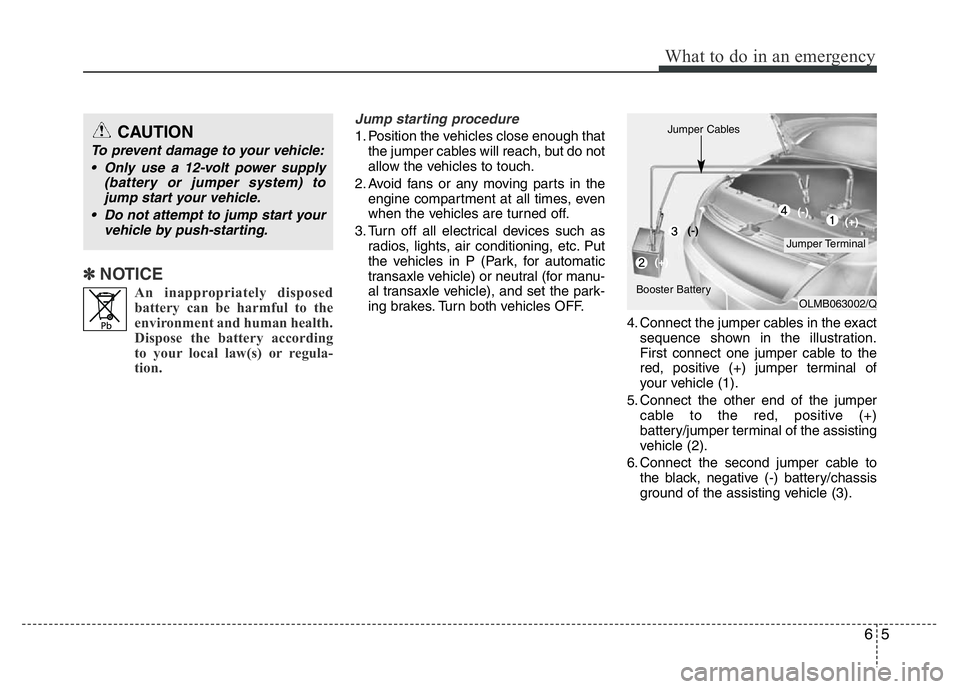
4. Connect the jumper cables in the exact
sequence shown in the illustration.
First connect one jumper cable to the
red, positive (+) jumper terminal of
your vehicle (1).
5. Connect the other end of the jumper
cable to the red, positive (+)
battery/jumper terminal of the assisting
vehicle (2).
6. Connect the second jumper cable to
the black, negative (-) battery/chassis
ground of the assisting vehicle (3).CAUTION
To prevent damage to your vehicle:
• Only use a 12-volt power supply
(battery or jumper system) to
jump start your vehicle.
• Do not attempt to jump start your
vehicle by push-starting.
OLMB063002/Q
Jumper Terminal Jumper Cables
Booster Battery(-)
(+)(+) (-)