DISP HYUNDAI I10 2018 Owner's Guide
[x] Cancel search | Manufacturer: HYUNDAI, Model Year: 2018, Model line: I10, Model: HYUNDAI I10 2018Pages: 343, PDF Size: 9.14 MB
Page 192 of 343
✽NOTICE - USING THE
Bluetooth®Wireless Technology
CELLULAR PHONE
• Do not use a cellular phone or perform
Bluetooth®Wireless Technology set-
tings (e.g. pairing a phone) while driv-
ing.
• Some Bluetooth
®Wireless Technology -
enabled phones may not be recognized
by the system or fully compatible with
the system.
• Before using Bluetooth
®Wireless
Technology related features of the
audio system, refer your phone’s User’s
Manual for phone-side Bluetooth
®
Wireless Technology operations.
• The phone must be paired to the audio
system to use Bluetooth
®Wireless
Technology related features.
• You will not be able to use the hands-
free feature when your phone (in the
car) is outside of the cellular service
area (e.g. in a tunnel, in a underground,
in a mountainous area, etc.).
(Continued)(Continued)
• If the cellular phone signal is poor or
the vehicles interior noise is too loud, it
may be difficult to hear the other per-
son’s voice during a call.
• Do not place the phone near or inside
metallic objects, otherwise communica-
tions with Bluetooth
®Wireless
Technology system or cellular service
stations can be disturbed.
• While a phone is connected through
Bluetooth
®Wireless Technology your
phone may discharge quicker than
usual for additional Bluetooth
®
Wireless Technology-related opera-
tions.
• Some cellular phones or other devices
may cause interference noise or mal-
function to audio system. In this case,
store the device in a different location
may resolve the condition.
• Phone contact names should be saved
in English or they may not be displayed
correctly.
(Continued)(Continued)
• If Priority is set upon vehicle
ignition(IGN/ACC ON), the Bluetooth
®
Wireless Technology phone will be
automatically connected.
Even if you are outside, the Bluetooth
®
Wireless Technology phone will be
automatically connected once you are
in the vicinity of the vehicle.
If you do not want automatic
Bluetooth
®Wireless Technology con-
nection, turn the Bluetooth®Wireless
Technology feature off.
• The hands-free call volume and quality
may differ depending on the mobile
phone type.
•Bluetooth
®Wireless Technology fea-
tures can be used only when the mobile
phone has been paired and connected
with the device. For more information
on pairing and connecting Bluetooth
®
Wireless Technology enabled mobile
phones, refer to the “Phone Setup” sec-
tion.
(Continued)
Features of your vehicle
131 4
Page 193 of 343
(Continued)
• When a Bluetooth®Wireless
Technology mobile phone is connected,
a ( ) icon will appear at the top of the
screen. If a ( ) icon is not displayed,
this indicates that a Bluetooth
®
Wireless Technology enabled device has
not been connected. You must connect
the device before use. For more infor-
mation on Bluetooth
®Wireless
Technology mobile phones, refer to the
“Phone Setup” section.
• Pairing and connecting a Bluetooth
®
Wireless Technology enabled mobile
phone will work only when the
Bluetooth
®Wireless Technology option
within your mobile phone has been
turned on. (Methods of turning on the
Bluetooth
®Wireless Technology
enabled feature may differ depending
on the mobile phone.)
(Continued)(Continued)
• In some mobile phones, starting the
ignition while talking through
Bluetooth
®Wireless Technology
enabled handsfree call will result in the
call becoming disconnected. (Switch the
call back to your mobile phone when
starting the ignition.)
• Some features may not be supported in
some Bluetooth
®Wireless Technology
mobile phone and devices.
•Bluetooth
®Wireless Technology
enabled operation may be unstable
depending on the communication state.
• Placing the audio system within an elec-
tromagnetic environment may result in
noise interference.
4132
Features of your vehicle
Page 196 of 343
53
Driving your vehicle
Before entering vehicle
• Be sure that all windows, outside mir-
ror(s), and outside lights are clean.
• Visually check the tires for uneven
wear and damage.
• Check under the vehicle for any sign of
leaks.
• Be sure there are no obstacles behind
you if you intend to back up.
Before starting
• Make sure the hood, the tailgate, and
the doors are securely closed and
locked.
• Adjust the position of the seat and
steering wheel.
• Adjust the inside and outside rearview
mirrors.
• Verify all lights work.
• Fasten your seatbelt. Check that all
passengers have fastened their seat-
belts.
• Check the gauges and indicators in the
instrument panel and the messages on
the instrument display when the igni-
tion switch is in the ON position.
• Check that any items you are carrying
are stored properly or fastened down
securely.
BEFORE DRIVING
WARNING
All passengers must be properly
belted whenever the vehicle is mov-
ing. Refer to “Seat belts” in chapter
3 for more information on their
proper use.
WARNING- Driving under
the influence of alcohol or
drugs
NEVER drink or take drugs and
drive. Drinking or taking drugs and
driving is dangerous and may
result in an accident and SERIOUS
INJURY or DEATH.
Drunk driving is the number one
contributor to the highway death
toll each year. Even a small amount
of alcohol will affect your reflexes,
perceptions and judgment. Just
one drink can reduce your ability to
respond to changing conditions
and emergencies and your reaction
time gets worse with each addition-
al drink.
Driving while under the influence of
drugs is as dangerous or more dan-
gerous than driving under the influ-
ence of alcohol.
You are much more likely to have a
serious accident if you drink or
take drugs and drive. If you are
drinking or taking drugs, don't
drive. Do not ride with a driver who
has been drinking or taking drugs.
Choose a designated driver or call
a taxi.
Page 208 of 343
515
Driving your vehicle
Automatic transaxle operation
The automatic transaxle has four forward
speeds and one reverse speed. The indi-
vidual speeds are selected automatically,
in the D (Drive) position.The indicator in the instrument cluster
displays the shift lever position when the
ignition switch is in the ON position.
P (Park)
Always come to a complete stop before
shifting into P (Park).
To shift from P (Park), you must depress
firmly on the brake pedal and make sure
your foot is off the accelerator pedal.
The shift lever must be in P (Park) before
turning the engine off.
R (Reverse)
Use this position to drive the vehicle
backward.
WARNING
To reduce the risk of serious injury
or death:
• ALWAYS check the surrounding
areas near your vehicle for peo-
ple, especially children, before
shifting a vehicle into D (Drive) or
R (Reverse).
• Before leaving the driver’s seat,
always make sure the shift lever
is in the P (Park) position, then
set the parking brake, and place
the ignition switch in the
LOCK/OFF position. Unexpected
and sudden vehicle movement
can occur if these precautions
are not followed.
WARNING
• Shifting into P (Park) while the
vehicle is in motion may cause
you to lose control of the vehicle.
• After the vehicle has stopped,
always make sure the shift lever
is in P (Park), apply the parking
brake, and turn the engine off.
• Do not use the P (Park) position
in place of the parking brake.
CAUTION
Always come to a complete stop
before shifting into or out of R
(Reverse); you may damage the
transaxle if you shift into R
(Reverse) while the vehicle is in
motion.
Page 221 of 343
Driving your vehicle
28 5
ESC OFF usage
When driving
The ESC OFF mode should only be used
briefly to help free the vehicle if stuck in
snow or mud by temporarily stopping
operation of the ESC to maintain wheel
torque.
To turn ESC off while driving, press the
ESC OFF button while driving on a flat
road surface.✽NOTICE
Turning the ESC OFF does not affect
ABS or standard brake system opera-
tion.
CAUTION
Driving with varying tire or wheel
sizes may cause the ESC system to
malfunction. When replacing tires,
make sure they are the same size as
your original tires for this vehicle.
CAUTION
To prevent damage to the transaxle:
• Do not allow wheel(s) of one axle
to spin excessively while the
ESC, ABS, and brake warning
lights are displayed. The repairs
would not be covered by the vehi-
cle warranty. Reduce engine
power and do not spin the
wheel(s) excessively while these
lights are displayed.
• When operating the vehicle on a
dynamometer, ensure the ESC is
turned off (ESC OFF light illumi-
nated).
WARNING
When the ESC is blinking, this indi-
cates the ESC is active:
Drive slowly and NEVER attempt to
accelerate. NEVER press the ESC
OFF button while the ESC indicator
light is blinking or you may lose
control of the vehicle resulting in
an accident.
Page 238 of 343
65
What to do in an emergency
✽ NOTICE
An inappropriately disposed
battery can be harmful to the
environment and human health.
Dispose the battery according
to your local law(s) or regula-
tion.
Jump starting procedure
1. Position the vehicles close enough that
the jumper cables will reach, but do not
allow the vehicles to touch.
2. Avoid fans or any moving parts in the
engine compartment at all times, even
when the vehicles are turned off.
3. Turn off all electrical devices such as
radios, lights, air conditioning, etc. Put
the vehicles in P (Park, for automatic
transaxle vehicle) or neutral (for manu-
al transaxle vehicle), and set the park-
ing brakes. Turn both vehicles OFF.
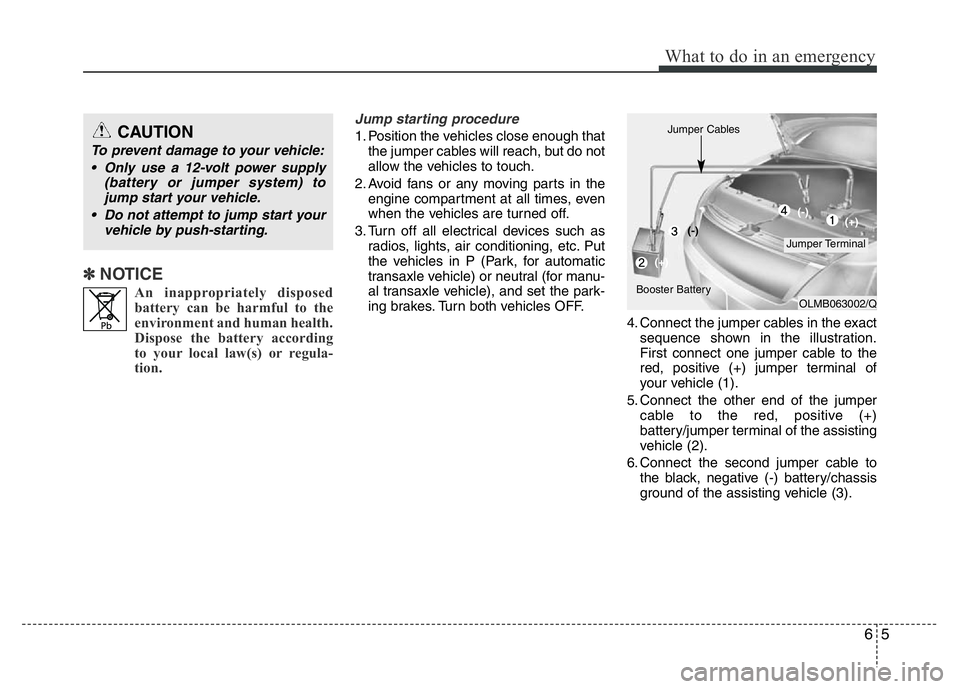
4. Connect the jumper cables in the exact
sequence shown in the illustration.
First connect one jumper cable to the
red, positive (+) jumper terminal of
your vehicle (1).
5. Connect the other end of the jumper
cable to the red, positive (+)
battery/jumper terminal of the assisting
vehicle (2).
6. Connect the second jumper cable to
the black, negative (-) battery/chassis
ground of the assisting vehicle (3).CAUTION
To prevent damage to your vehicle:
• Only use a 12-volt power supply
(battery or jumper system) to
jump start your vehicle.
• Do not attempt to jump start your
vehicle by push-starting.
OLMB063002/Q
Jumper Terminal Jumper Cables
Booster Battery(-)
(+)(+) (-)
Page 278 of 343
Maintenance
26 7
BRAKES/CLUTCH(IF EQUIPPED) FLUID
Checking the brake/clutch fluid
level
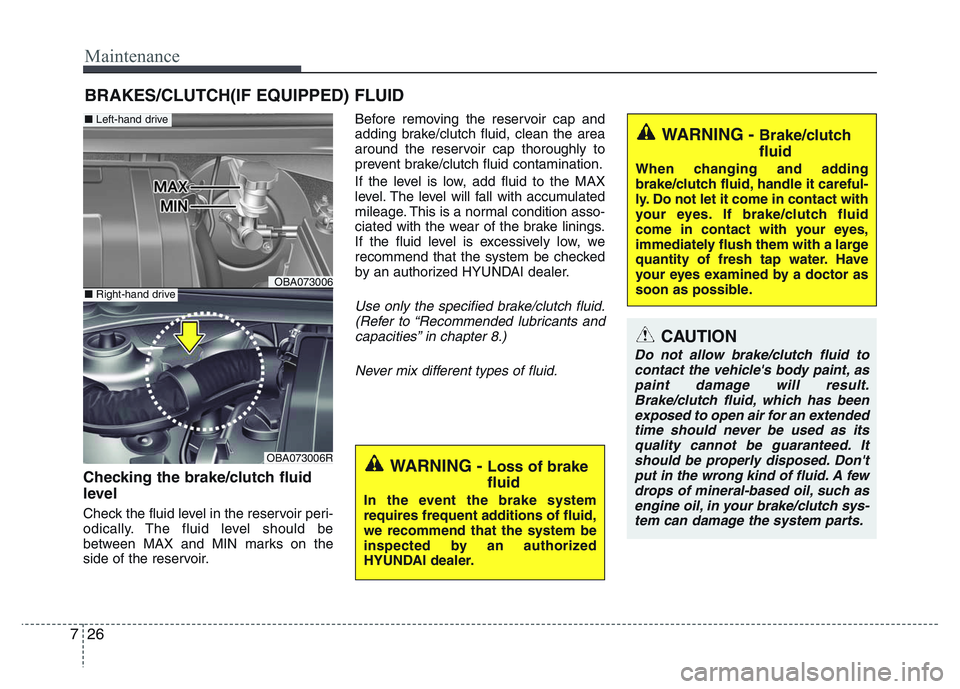
Check the fluid level in the reservoir peri-
odically. The fluid level should be
between MAX and MIN marks on the
side of the reservoir.Before removing the reservoir cap and
adding brake/clutch fluid, clean the area
around the reservoir cap thoroughly to
prevent brake/clutch fluid contamination.
If the level is low, add fluid to the MAX
level. The level will fall with accumulated
mileage. This is a normal condition asso-
ciated with the wear of the brake linings.
If the fluid level is excessively low, we
recommend that the system be checked
by an authorized HYUNDAI dealer.
Use only the specified brake/clutch fluid.
(Refer to “Recommended lubricants and
capacities” in chapter 8.)
Never mix different types of fluid.
WARNING - Brake/clutch
fluid
When changing and adding
brake/clutch fluid, handle it careful-
ly. Do not let it come in contact with
your eyes. If brake/clutch fluid
come in contact with your eyes,
immediately flush them with a large
quantity of fresh tap water. Have
your eyes examined by a doctor as
soon as possible.
WARNING - Loss of brake
fluid
In the event the brake system
requires frequent additions of fluid,
we recommend that the system be
inspected by an authorized
HYUNDAI dealer.
CAUTION
Do not allow brake/clutch fluid to
contact the vehicle's body paint, as
paint damage will result.
Brake/clutch fluid, which has been
exposed to open air for an extended
time should never be used as its
quality cannot be guaranteed. It
should be properly disposed. Don't
put in the wrong kind of fluid. A few
drops of mineral-based oil, such as
engine oil, in your brake/clutch sys-
tem can damage the system parts.
OBA073006
OBA073006R
■Left-hand drive
■Right-hand drive
Page 291 of 343
739
Maintenance
✽ NOTICE
An inappropriately disposed
battery can be harmful to the
environment and human health.
Dispose the battery according
to your local law(s) or regula-
tion.
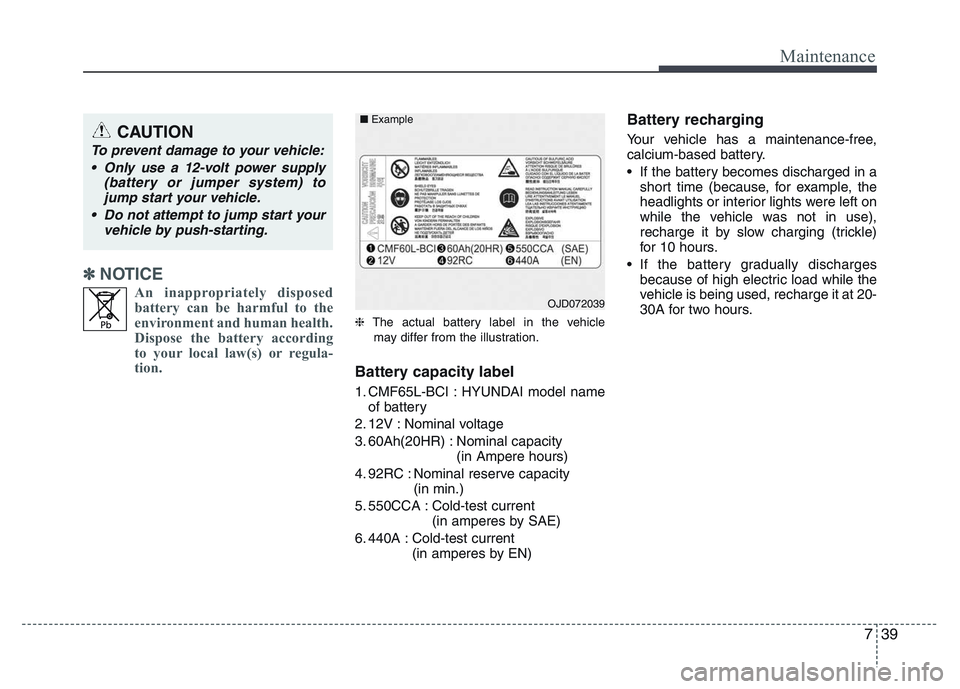
❈The actual battery label in the vehicle
may differ from the illustration.
Battery capacity label
1. CMF65L-BCI : HYUNDAI model name
of battery
2. 12V : Nominal voltage
3. 60Ah(20HR) : Nominal capacity
(in Ampere hours)
4. 92RC : Nominal reserve capacity
(in min.)
5. 550CCA : Cold-test current
(in amperes by SAE)
6. 440A : Cold-test current
(in amperes by EN)
Battery recharging
Your vehicle has a maintenance-free,
calcium-based battery.
• If the battery becomes discharged in a
short time (because, for example, the
headlights or interior lights were left on
while the vehicle was not in use),
recharge it by slow charging (trickle)
for 10 hours.
• If the battery gradually discharges
because of high electric load while the
vehicle is being used, recharge it at 20-
30A for two hours.
OJD072039 ■Example
CAUTION
To prevent damage to your vehicle:
• Only use a 12-volt power supply
(battery or jumper system) to
jump start your vehicle.
• Do not attempt to jump start your
vehicle by push-starting.
Page 300 of 343
Maintenance
48 7
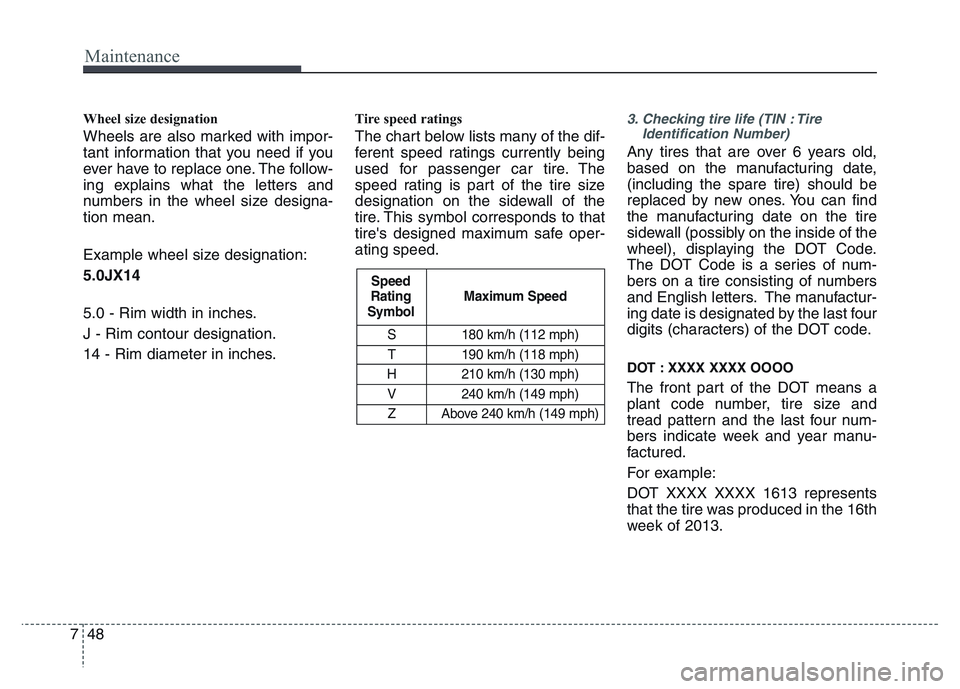
S 180 km/h (112 mph)
T 190 km/h (118 mph)
H 210 km/h (130 mph)
V 240 km/h (149 mph)
Z Above 240 km/h (149 mph)
Maximum Speed Speed
Rating
Symbol
Wheel size designation
Wheels are also marked with impor-
tant information that you need if you
ever have to replace one. The follow-
ing explains what the letters and
numbers in the wheel size designa-
tion mean.
Example wheel size designation:
5.0JX14
5.0 - Rim width in inches.
J - Rim contour designation.
14 - Rim diameter in inches.
Tire speed ratings
The chart below lists many of the dif-
ferent speed ratings currently being
used for passenger car tire. The
speed rating is part of the tire size
designation on the sidewall of the
tire. This symbol corresponds to that
tire's designed maximum safe oper-
ating speed.
3. Checking tire life (TIN : Tire
Identification Number)
Any tires that are over 6 years old,
based on the manufacturing date,
(including the spare tire) should be
replaced by new ones. You can find
the manufacturing date on the tire
sidewall (possibly on the inside of the
wheel), displaying the DOT Code.
The DOT Code is a series of num-
bers on a tire consisting of numbers
and English letters. The manufactur-
ing date is designated by the last four
digits (characters) of the DOT code.
DOT : XXXX XXXX OOOO
The front part of the DOT means a
plant code number, tire size and
tread pattern and the last four num-
bers indicate week and year manu-
factured.
For example:
DOT XXXX XXXX 1613 represents
that the tire was produced in the 16th
week of 2013.
Page 322 of 343
Maintenance
70 7
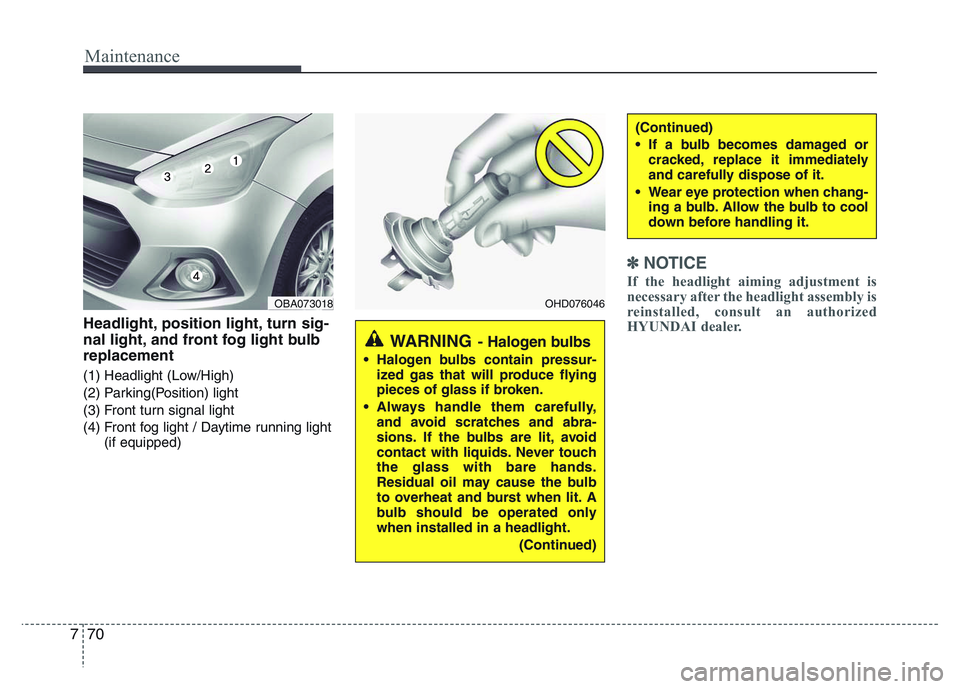
Headlight, position light, turn sig-
nal light, and front fog light bulb
replacement
(1) Headlight (Low/High)
(2) Parking(Position) light
(3) Front turn signal light
(4) Front fog light / Daytime running light
(if equipped)
✽NOTICE
If the headlight aiming adjustment is
necessary after the headlight assembly is
reinstalled, consult an authorized
HYUNDAI dealer.
OBA073018OHD076046
WARNING- Halogen bulbs
• Halogen bulbs contain pressur-
ized gas that will produce flying
pieces of glass if broken.
• Always handle them carefully,
and avoid scratches and abra-
sions. If the bulbs are lit, avoid
contact with liquids. Never touch
the glass with bare hands.
Residual oil may cause the bulb
to overheat and burst when lit. A
bulb should be operated only
when installed in a headlight.
(Continued)
(Continued)
• If a bulb becomes damaged or
cracked, replace it immediately
and carefully dispose of it.
• Wear eye protection when chang-
ing a bulb. Allow the bulb to cool
down before handling it.