air conditioning HYUNDAI I20 2021 Owner's Manual
[x] Cancel search | Manufacturer: HYUNDAI, Model Year: 2021, Model line: I20, Model: HYUNDAI I20 2021Pages: 444, PDF Size: 8.93 MB
Page 203 of 444
6-75
06
To cancel or reset the Auto Defogging
System
Press the front windscreen defroster
button for 3 seconds when the ignition
switch is in the ON position.
When the Auto Defogging System is
cancelled, defrost button indicator will
blink 3 times.
When the Auto Defogging System is
reset, defrost button indicator will blink
6 times without a signal.
i Information
When the air conditioning is turned on by
Auto defogging system, if you try to turn
off the air conditioning, the indicator will
blink 3 times and the air conditioning will
not be turned off.
To maintain the effectiveness and
efficiency of the Auto Defogging System,
do not select Recirculation mode whilst
the system is operating.
When the Auto Defogging System is
operating, the blower speed adjustment
knob, the temperature adjustment knob,
and the air intake control button are all
disabled.
NOTICE
Do not remove the sensor cover
located at the top of the driver side
windscreen glass.
Damage to system parts could occur
and may not be covered by your vehicle
warranty.
Defroster
NOTICE
To prevent damage to the conductors
bonded to the inside surface of the rear
window, never use sharp instruments
or window cleaners containing
abrasives to clean the window.
i Information
If you want to defrost and defog the
front windshield, refer to “Windshield
Defrosting and Defogging” in this chapter.
Page 206 of 444

6-78
Convenient features
Glove box
OBI3050061OBI3050061
To open the glove box, pull the lever and
the glove box will automatically open.
Close the glove box after use.
WARNING
ALWAYS close the glove box door after
use.
An open glove box door can cause
serious injury to the passenger in an
accident, even if the passenger is
wearing a seat belt.
Cool box (if equipped)
OBI3050060OBI3050060
You can keep beverage cans or other
items cool in the glove box.
1. Turn on the air conditioning.
2. Turn the open/close switch of the vent
installed in the glove box to the open
position.
3. When the cool box is not used, turn
the switch to the closed position.
WARNING
Do not put perishable food in the cool
box because it may not maintain the
necessary consistent temperature to
keep the food fresh.
i Information
• If the vent is blocked by items in the
coolbox, cooling will be reduced.
• If the climate control system
temperature control is in the warm
or hot position, Cold air only will flow
into the glove box.
Page 319 of 444
9-5
09
CAUTION
• Improper jump starting procedure
can result in battery explosion and
acid burn hazard.
• Loosely connected battery cables
could damage the electronic control
units.
• To disconnect battery terminals
wait for at least 2 minutes to allow
discharge of high voltage or it could
lead to personal injury.
• While disconnecting, always
disconnect the -VE terminal first and
while connecting, always connect the
-VE terminal last.
NOTICE
To prevent damage to your vehicle:
• Only use a 12-volt power supply
(battery or jumper system) to jump
start your vehicle.
• Do not attempt to jump start your
vehicle by push-starting.
i Information
Pb
An inappropriately disposed
battery can be harmful to the
environment and human health.
Dispose the battery according to
your local law(s) or regulation.
Jump starting procedure
1. Position the vehicles close enough
that the jumper cables will reach, but
do not allow the vehicles to touch.
2. Avoid fans or any moving parts in the
engine compartment at all times, even
when the vehicles are turned off.
3. Turn off all electrical devices such
as radios, lights, air conditioning,
etc. Put the vehicles in N (Neutral,
for Automated manual transmission
vehicle) or neutral (for manual
transmission vehicle), and set the
parking brakes. Turn both vehicles
OFF.
OBI3090046LOBI3090046L
(-)
(+)
Booster BatteryBooster Battery
(-)
(+)
Jumper TerminalJumper Terminal
Jumper CablesJumper Cables
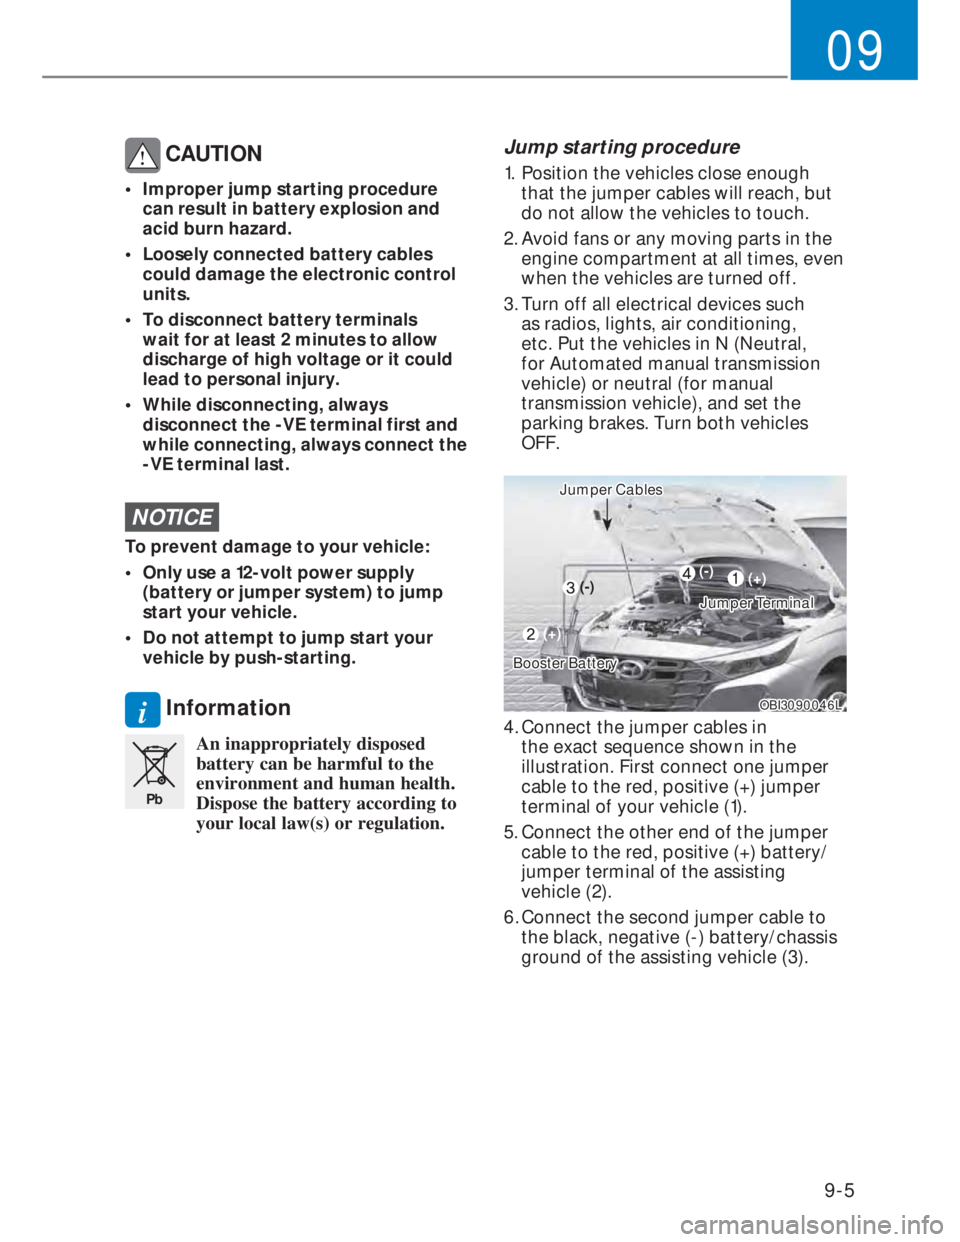
4. Connect the jumper cables in
the exact sequence shown in the
illustration. First connect one jumper
cable to the red, positive (+) jumper
terminal of your vehicle (1).
5. Connect the other end of the jumper
cable to the red, positive (+) battery/
jumper terminal of the assisting
vehicle (2).
6. Connect the second jumper cable to
the black, negative (-) battery/chassis
ground of the assisting vehicle (3).
Page 321 of 444
9-7
09
If your temperature gauge indicates
overheating, you experience a loss of
power, or hear loud pinging or knocking,
the engine may be overheating. If this
happens, you should:
1. Pull off the road and stop as soon as it
is safe to do so.
2. Place the shift lever in N (Neutral,
for Automated manual transmission
vehicle) or neutral (for manual
transmission vehicle) and set the
parking brake. If the air conditioning is
ON, turn it OFF.
3. If engine coolant is running out under
the vehicle or steam is coming out
from the hood, stop the engine. Do
not open the hood until the coolant
has stopped running or the steaming
has stopped. If there is no visible
loss of engine coolant and no steam,
leave the engine running and check
to be sure the engine cooling fan is
operating. If the fan is not running,
turn the engine off.
WARNING
While the engine is running,
keep hands, clothing and
tools away from the moving
parts such as the cooling
fan and drive belt to
prevent serious injury.4. Check for coolant leaking from the
radiator, hoses or under the vehicle. (If
the air conditioning had been in use, it
is normal for cold water to be draining
from it when you stop.)
5. If engine coolant is leaking out,
stop the engine immediately and
we recommend that you call an
authorized HYUNDAI dealer for
assistance.
WARNING
NEVER remove the radiator
cap or the drain plug while
the engine and radiator are
hot. Hot coolant and steam
may blow out under
pressure, causing serious injury.
Turn the engine off and wait until the
engine cools down. Use extreme care
when removing the radiator cap. Wrap
a thick towel around it, and turn it
counterclockwise slowly to the first
stop. Step back while the pressure
is released from the cooling system.
When you are sure all the pressure
has been released, press down on the
cap, using a thick towel, and continue
turning counterclockwise to remove it.
IF THE ENGINE OVERHEATS
Page 348 of 444
10-9
10
While operating your vehicle:
• Note any changes in the sound of the
exhaust or any smell of exhaust fumes
in the vehicle.
• Check for vibrations in the steering
wheel. Notice any increased steering
effort or looseness in the steering
wheel, or change in its straight-ahead
position.
• Notice if your vehicle constantly turns
slightly or “pulls” to one side when
traveling on smooth, level road.
• When stopping, listen and check for
unusual sounds, pulling to one side,
increased brake pedal travel or “hard-
to-push” brake pedal.
• If any slipping or changes in the
operation of your transmission occurs,
check the transmission fluid level.
• Check the parking brake.
• Check for fluid leaks under your
vehicle (water dripping from the air
conditioning system during or after
use is normal).
At least monthly:
• Check the coolant level in the engine
coolant reservoir.
• Check the operation of all exterior
lights, including the stoplights, turn
signals and hazard warning flashers.
• Check the inflation pressures of all
tires including the spare for tires that
are worn, show uneven wear, or are
damaged.
• Check for loose wheel lug nuts.
At least twice a year
(i.e., every Spring and Fall):
• Check the radiator, heater and air
conditioning hoses for leaks or
damage.
• Check the windshield washer spray
and wiper operation. Clean wiper
blades with clean cloth dampened
with washer fluid.
• Check the headlight alignment.
• Check the muffler, exhaust pipes,
shields and clamps.
• Check the lap/shoulder belts for wear
and function.
At least once a year:
• Clean the body and door drain holes.
• Lubricate the door hinges and checks,
and hood hinges.
• Lubricate the door and hood locks and
latches.
• Lubricate the door rubber
weatherstrips.
• Check the air conditioning system.
• Inspect and lubricate Automated
manual transmission linkage and
controls.
• Clean the battery and terminals.
• Check the brake/clutch fluid level.
Page 366 of 444
10-27
10
Brake hoses and lines
Visually check for proper installation,
chafing, cracks, deterioration and any
leakage. Replace any deteriorated or
damaged parts immediately.
Brake/clutch fluid (if equipped)
Check brake/clutch fluid level in the
brake fluid reservoir. The level should
be between “MIN” (Minimum) and
“MAX” (Maximum) marks on the side of
the reservoir. Use only hydraulic brake/
clutch fluid conforming to DOT 3 or 4
specification.
Parking brake
Inspect the parking brake system
including the parking brake lever and
cables.
Rear brake drums and linings
(if equipped)
Check the rear brake drums and linings
for scoring, burning, leaking fluid,
broken parts, and excessive wear.
Brake pads, calipers and discs
Check the pads for excessive wear, discs
for run out and wear, and calipers for
fluid leakage.
Suspension mounting bolts
Check the suspension connections for
looseness or damage. Retighten to the
specified torque.
Steering gear box, linkage &
boots/lower arm ball joint
With the vehicle stopped and engine
off, check for excessive free-play in the
steering wheel.
Check the linkage for bends or damage.
Check the dust boots and ball joints
for deterioration, cracks, or damage.
Replace any damaged parts.
Drive shafts and boots
Check the drive shafts, boots and
clamps for cracks, deterioration, or
damage. Replace any damaged parts
and, if necessary, repack the grease.
Air conditioning refrigerant
(if equipped)
Check the air conditioning lines and
connections for leakage and damage.