ESP HYUNDAI I20 2022 Workshop Manual
[x] Cancel search | Manufacturer: HYUNDAI, Model Year: 2022, Model line: I20, Model: HYUNDAI I20 2022Pages: 444, PDF Size: 8.93 MB
Page 413 of 444
10-74
Maintenance
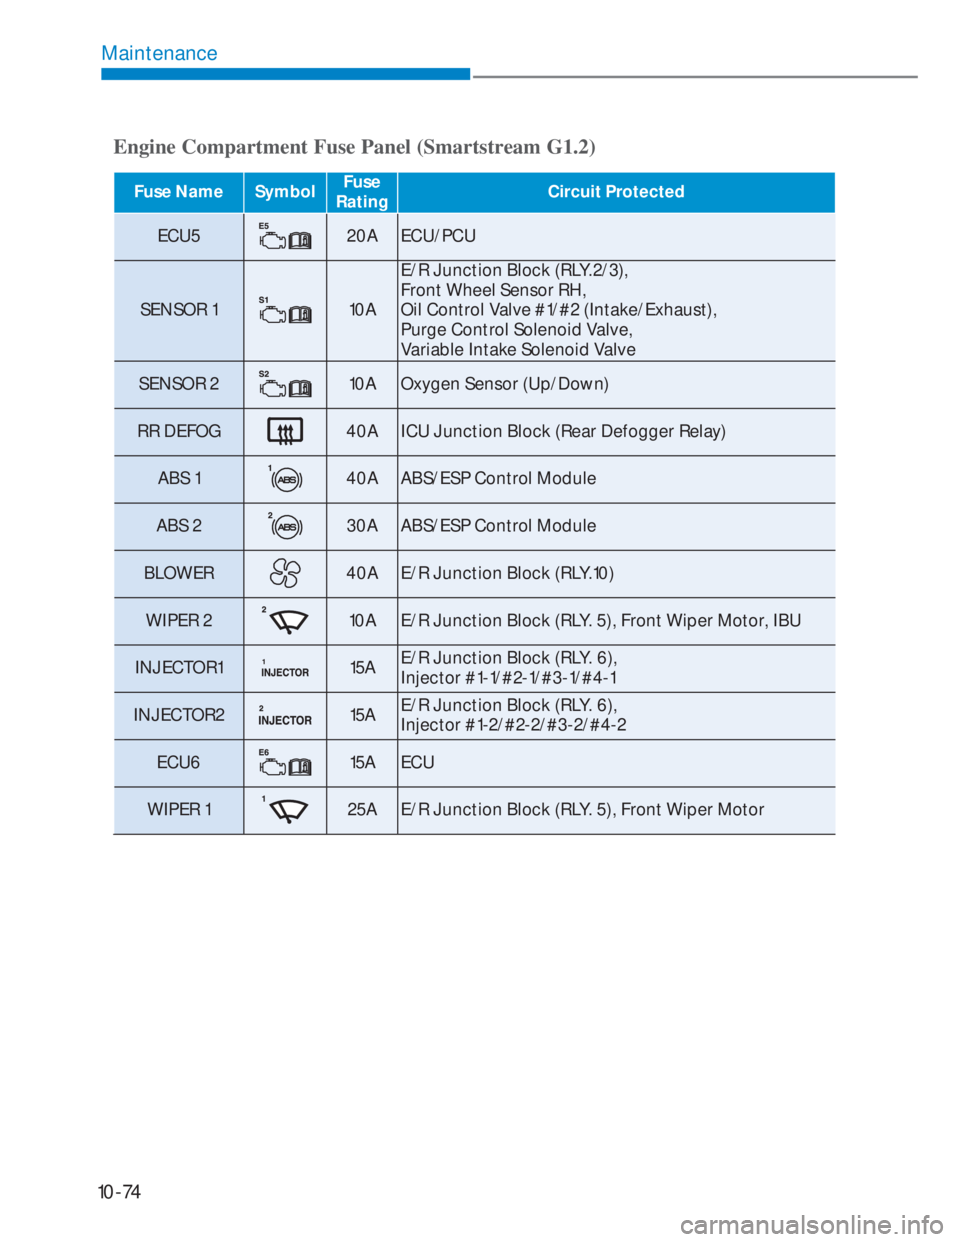
Engine Compartment Fuse Panel (Smartstream G1.2)
Fuse Name SymbolFuse
RatingCircuit Protected
ECU520A ECU/PCU
SENSOR 1
10AE/R Junction Block (RLY.2/3),
Front Wheel Sensor RH,
Oil Control Valve #1/#2 (Intake/Exhaust),
Purge Control Solenoid Valve,
Variable Intake Solenoid Valve
SENSOR 2
10A Oxygen Sensor (Up/Down)
RR DEFOG
40A ICU Junction Block (Rear Defogger Relay)
ABS 1
40A ABS/ESP Control Module
ABS 2
30A ABS/ESP Control Module
BLOWER
40A E/R Junction Block (RLY.10)
WIPER 2
10A E/R Junction Block (RLY. 5), Front Wiper Motor, IBU
INJECTOR1
15AE/R Junction Block (RLY. 6),
Injector #1-1/#2-1/#3-1/#4-1
INJECTOR2
15AE/R Junction Block (RLY. 6),
Injector #1-2/#2-2/#3-2/#4-2
ECU6
15A ECU
WIPER 1
25A E/R Junction Block (RLY. 5), Front Wiper Motor
Page 415 of 444
10-76
Maintenance
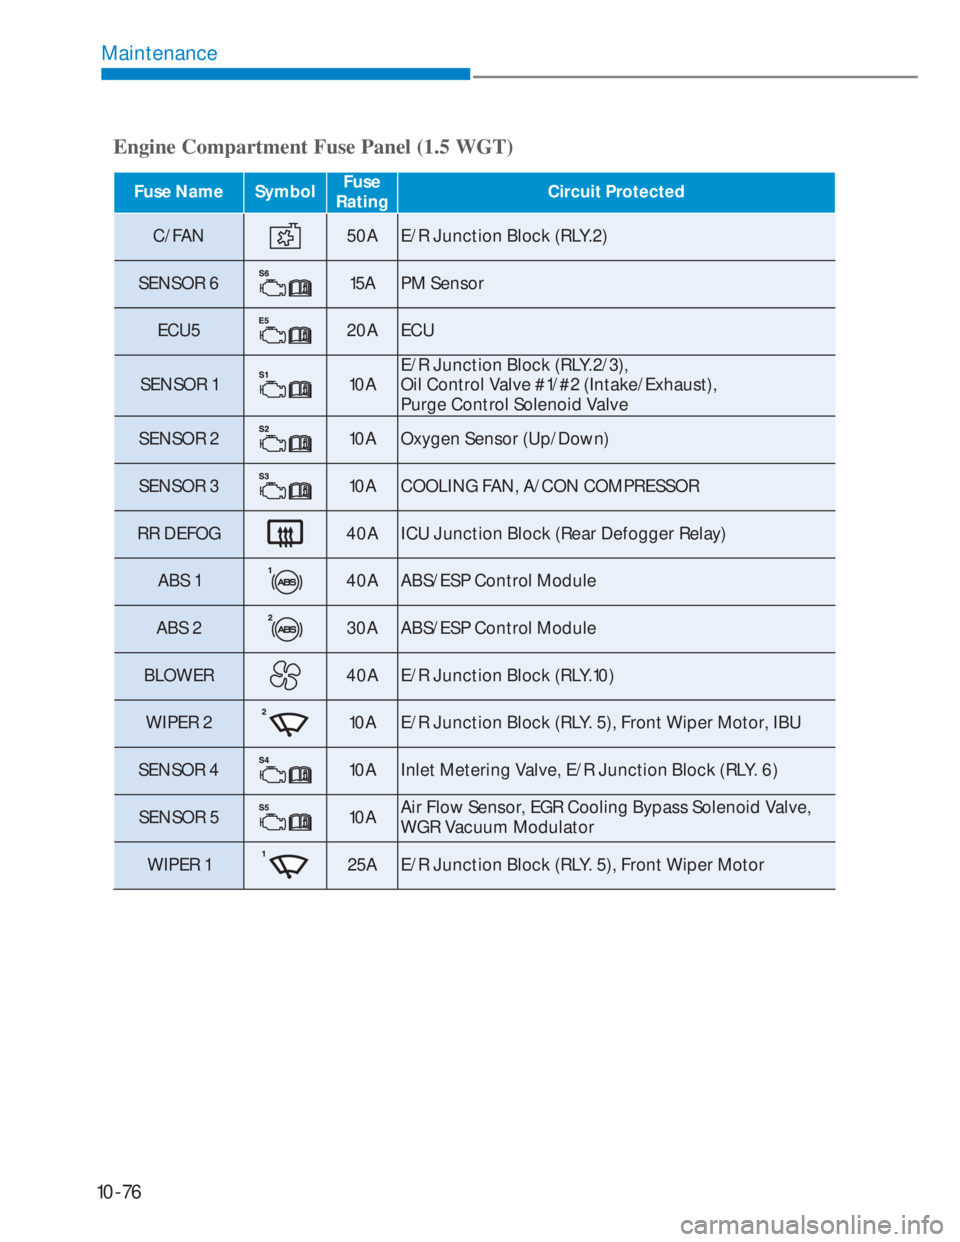
Engine Compartment Fuse Panel (1.5 WGT)
Fuse Name SymbolFuse
RatingCircuit Protected
C/FAN50A E/R Junction Block (RLY.2)
SENSOR 6
15A PM Sensor
ECU5
20A ECU
SENSOR 1
10AE/R Junction Block (RLY.2/3),
Oil Control Valve #1/#2 (Intake/Exhaust),
Purge Control Solenoid Valve
SENSOR 2
10A Oxygen Sensor (Up/Down)
SENSOR 3
10A COOLING FAN, A/CON COMPRESSOR
RR DEFOG
40A ICU Junction Block (Rear Defogger Relay)
ABS 1
40A ABS/ESP Control Module
ABS 2
30A ABS/ESP Control Module
BLOWER
40A E/R Junction Block (RLY.10)
WIPER 2
10A E/R Junction Block (RLY. 5), Front Wiper Motor, IBU
SENSOR 4
10A Inlet Metering Valve, E/R Junction Block (RLY. 6)
SENSOR 5
10AAir Flow Sensor, EGR Cooling Bypass Solenoid Valve,
WGR Vacuum Modulator
WIPER 1
25A E/R Junction Block (RLY. 5), Front Wiper Motor
Page 416 of 444
10-77
10
We recommend that you consult an
authorized HYUNDAI dealer to replace
most vehicle light bulbs. It is difficult
to replace vehicle light bulbs because
other parts of the vehicle must be
removed before you can get to the bulb.
This is especially true for removing the
headlight assembly to get to the bulb(s).
Removing/installing the headlight
assembly can result in damage to the
vehicle.
WARNING
Prior to replacing a light, depress the
foot brake, move the shift lever into the
N (Neutral, for Automatic transmission
vehicle) or neutral (for manual
transmission vehicle), apply the parking
brake, place the ignition switch in the
LOCK/OFF position, and take the key
with you when leaving the vehicle to
avoid sudden movement of the vehicle
and to prevent possible electric shock.
Be aware the bulbs may be hot and may
burn your fingers.
NOTICE
Be sure to replace the burned-out bulb
with one of the same wattage rating.
Otherwise, it may cause damage to the
fuse or electric wiring system.
i Information
The headlight and tail lamp lenses could
appear frosty if the vehicle is washed after
driving or the vehicle is driven at night
in wet weather. This condition is caused
by temperature difference between the
lamp inside and outside and, it does not
indicate a problem with your vehicle.
When moisture condenses in the lamp,
it will be removed after driving with the
headlight on. The removable level may
differ depending on lamp size, lamp
position and environmental condition.
However, if moisture is not removed, we
recommend that your vehicle is inspected
by an authorized HYUNDAI dealer.
LIGHT BULBS
Page 418 of 444
10-79
10
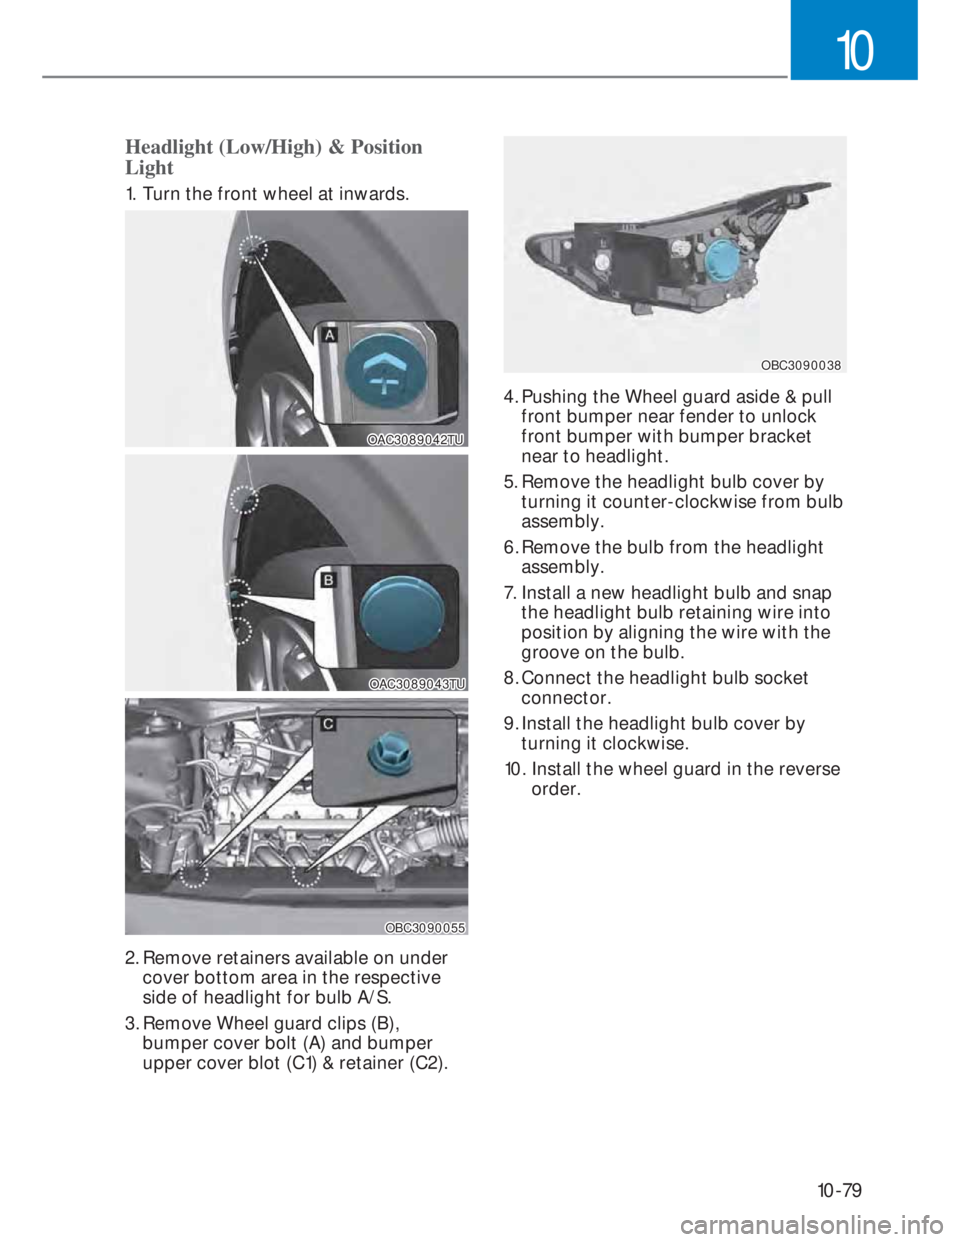
Headlight (Low/High) & Position
Light
1. Turn the front wheel at inwards.
OAC3089042TUOAC3089042TU
OAC3089043TUOAC3089043TU
OBC3090055OBC3090055
2. Remove retainers available on under
cover bottom area in the respective
side of headlight for bulb A/S.
3. Remove Wheel guard clips (B),
bumper cover bolt (A) and bumper
upper cover blot (C1) & retainer (C2).
OBC3090038OBC3090038
4. Pushing the Wheel guard aside & pull
front bumper near fender to unlock
front bumper with bumper bracket
near to headlight.
5. Remove the headlight bulb cover by
turning it counter-clockwise from bulb
assembly.
6. Remove the bulb from the headlight
assembly.
7. Install a new headlight bulb and snap
the headlight bulb retaining wire into
position by aligning the wire with the
groove on the bulb.
8. Connect the headlight bulb socket
connector.
9. Install the headlight bulb cover by
turning it clockwise.
10. Install the wheel guard in the reverse
order.
Page 420 of 444
10-81
10
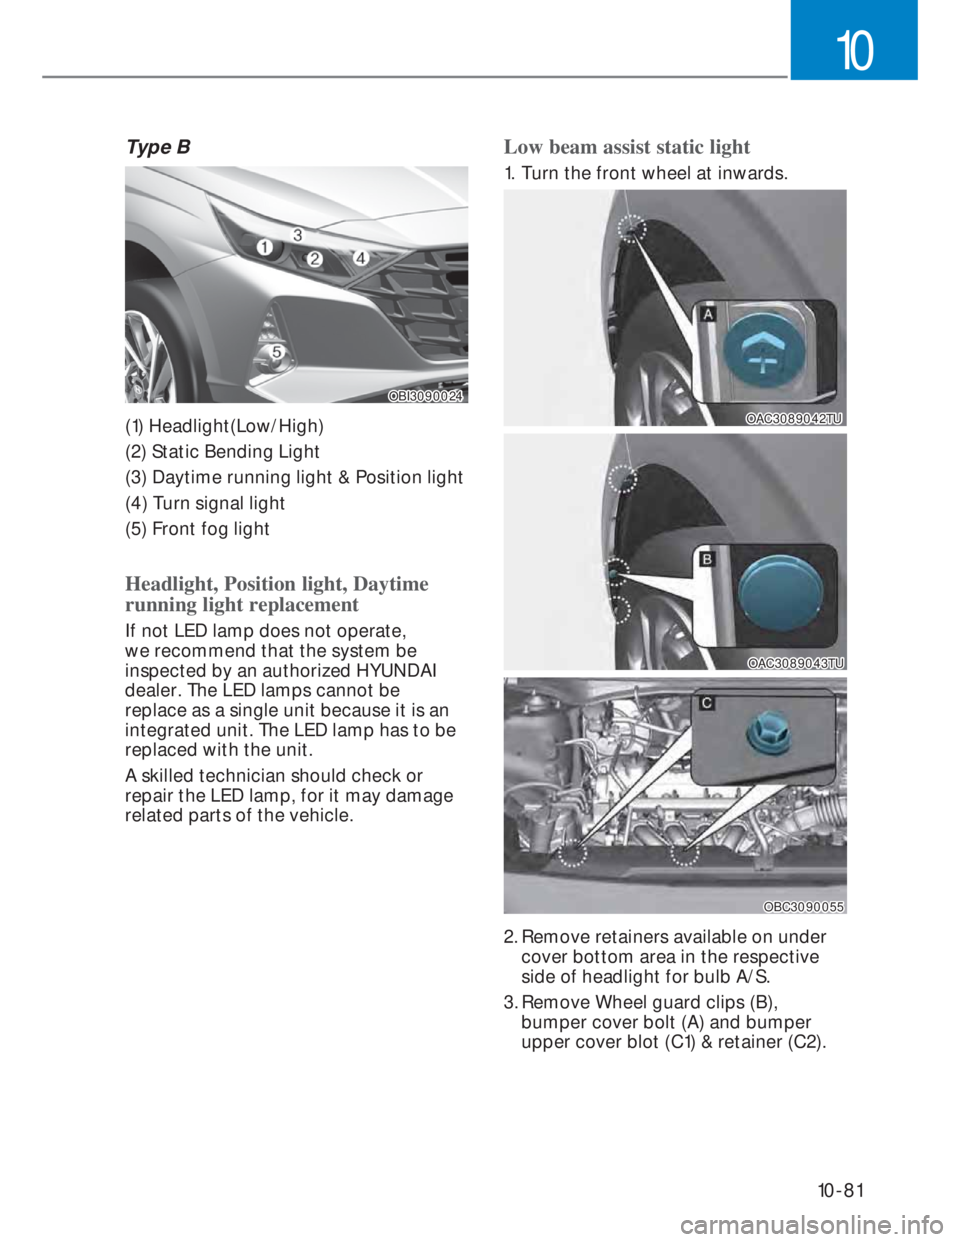
Type B
OBI3090024OBI3090024
(1) Headlight(Low/High)
(2) Static Bending Light
(3) Daytime running light & Position light
(4) Turn signal light
(5) Front fog light
Headlight, Position light, Daytime
running light replacement
If not LED lamp does not operate,
we recommend that the system be
inspected by an authorized HYUNDAI
dealer. The LED lamps cannot be
replace as a single unit because it is an
integrated unit. The LED lamp has to be
replaced with the unit.
A skilled technician should check or
repair the LED lamp, for it may damage
related parts of the vehicle.
Low beam assist static light
1. Turn the front wheel at inwards.
OAC3089042TUOAC3089042TU
OAC3089043TUOAC3089043TU
OBC3090055OBC3090055
2. Remove retainers available on under
cover bottom area in the respective
side of headlight for bulb A/S.
3. Remove Wheel guard clips (B),
bumper cover bolt (A) and bumper
upper cover blot (C1) & retainer (C2).
Page 424 of 444
10-85
10
Tail light & Back-up light
1. Open the tailgate and remove the
tailgate trim.
2. Loosen the retaining screw of the
tailgate lid cover and then remove the
cover.
3. Disconnect the connector and then
remove the bulbs by rotating them in
counter clock wise direction.
4. Replace with new bulbs into the
sockets and then fix it in their
positions respectively.
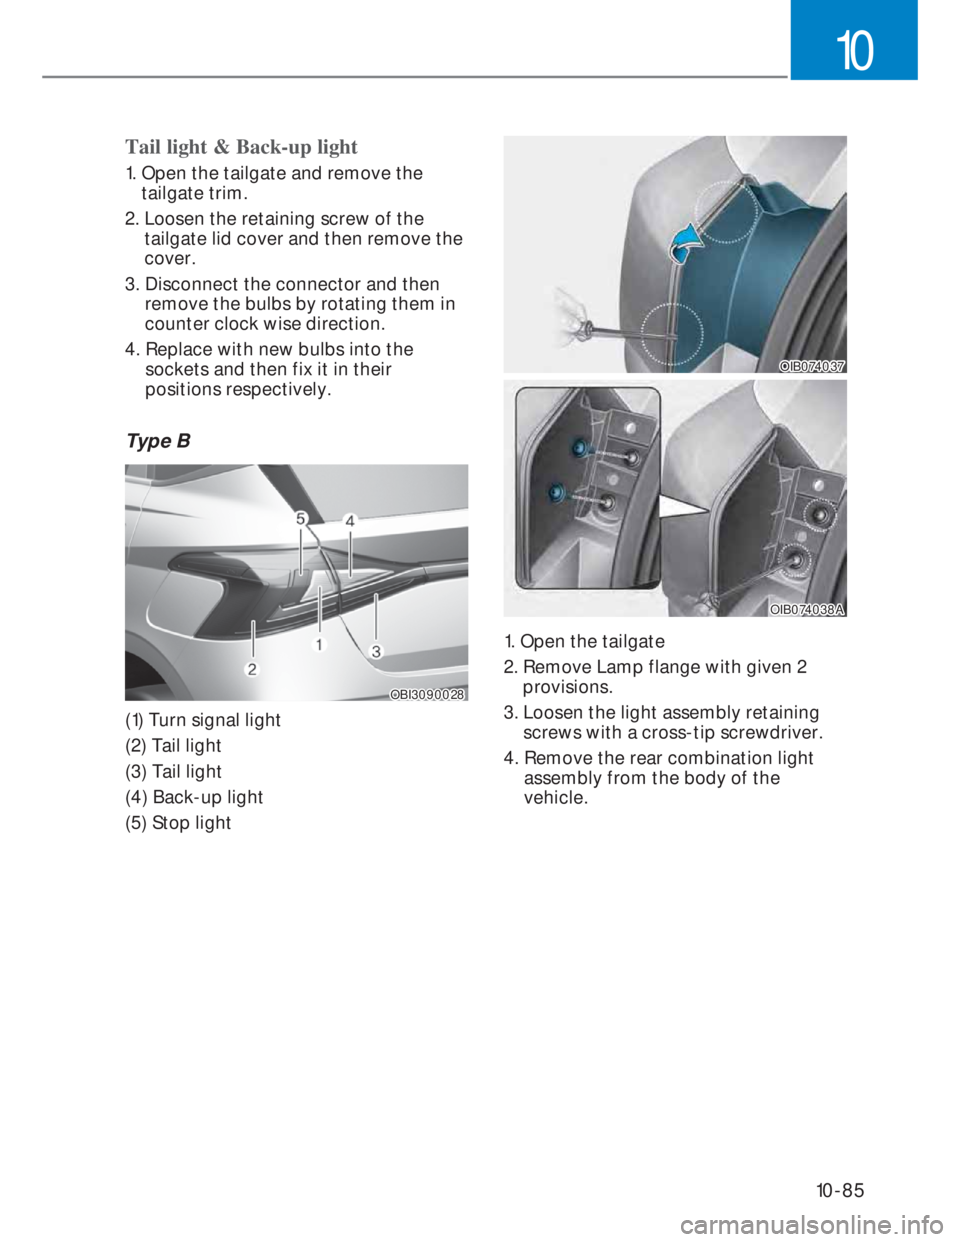
Type B
OBI3090028OBI3090028
(1) Turn signal light
(2) Tail light
(3) Tail light
(4) Back-up light
(5) Stop light
OIB074037OIB074037
OIB074038AOIB074038A
1. Open the tailgate
2. Remove Lamp flange with given 2
provisions.
3. Loosen the light assembly retaining
screws with a cross-tip screwdriver.
4. Remove the rear combination light
assembly from the body of the
vehicle.
Page 428 of 444
10-89
10
NOTICE
If you park your vehicle near a stainless
steel sign or glass facade building, the
vehicle’s exterior plastic parts such
as a bumper, spoiler, garnish, lamp
or outside rearview mirror might be
damaged due to sunlight reflected
from the sign or building. To prevent
damage of the exterior plastic parts,
you should avoid parking in areas
where light may be reflected or use a
car cover. (The exterior plastic parts
applied to your vehicle may vary.)
Exterior care
Exterior general caution
It is very important to follow the label
directions when using any chemical
cleaner or polish. Read all warning and
caution statements that appear on the
label.
High-pressure washing
• When using high-pressure washers,
make sure to maintain sufficient
distance from the vehicle.
Insufficient clearance or excessive
pressure can lead to component
damage or water penetration.
• Do not spray the camera, sensors or
its surrounding area directly with a
high pressure washer. Shock applied
from high pressure water may cause
the device to not operate normally.
• Do not bring the nozzle tip close to
boots (rubber or plastic covers) or
connectors as they may be damaged
if they come into contact with high
pressure water.
Finish maintenance
Washing
To help protect your vehicle’s finish
from rust and deterioration, wash it
thoroughly and frequently at least once
a month with lukewarm or cold water.
If you use your vehicle for off-road
driving, you should wash it after each
off-road trip. Pay special attention to the
removal of any accumulation of salt, dirt,
mud, and other foreign materials. Make
sure the drain holes in the lower edges
of the doors and rocker panels are kept
clear and clean.
Insects, tar, tree sap, bird droppings,
industrial pollution and similar deposits
can damage your vehicle’s finish if not
removed immediately.
Even prompt washing with plain water
may not completely remove all these
deposits. A mild soap, safe for use on
painted surfaces, may be used.
After washing, rinse the vehicle
thoroughly with lukewarm or cold water.
Do not allow soap to dry on the finish.
NOTICE
• Do not use strong soap, chemical
detergents or hot water, and do not
wash the vehicle in direct sunlight
or when the body of the vehicle is
warm.
• Be careful when washing the side
windows of your vehicle.
Especially, with high-pressure water,
water may leak through the windows
and wet the interior.
• To prevent damage to the plastic
parts and lamps, do not clean
with chemical solvents or strong
detergents.
APPEARANCE CARE