radio HYUNDAI I30 2011 User Guide
[x] Cancel search | Manufacturer: HYUNDAI, Model Year: 2011, Model line: I30, Model: HYUNDAI I30 2011Pages: 635, PDF Size: 40.66 MB
Page 208 of 635
Features of your vehicle
130
4
10. SET UP Button
Press this button to turn to the SOUND,
RDS option, clock setting, time display,
SCROLL, SDVC, temperature display
and adjustment mode.
If no action is taken for 5 seconds after
pressing the button, it will return to the
play mode.(After entering SET UP mode,
move between items using the left, right
and PUSH functions of the TUNE but-ton.)
The set up item changes from AUDIO ➟
RDS ➟ CLOCK ➟ TIME ➟ SCROLL ➟
SDVC ➟ TEMP ➟AUDIO...
The manual setting is a default for radio
time but if customer wants, the time
received from RDS station can be set for
radio time. In this case, the RDS time,
which is effected by the situation of RDS
station, can be different with actual time. ❈
TO SETUP TIME UPDATE
1. Press SETUP button.
2. Select RDS menu by rotating/pressing TUNE knob.
3. Select TIME menu by rotating/pressing TUNE knob.
4. Select Auto or Manual by rotating/ pressing TUNE knob.
5. Press SETUP button to exit SETUP mode.
11. TUNE/ENTER Button
Turn this button clockwise by one notch
to increase frequency by 0.05Mhz from
current frequency.
Turn this button counterclockwise by one
notch to decrease frequency by 0.05Mhz
from current frequency.
Press this button while holding SET UP
button to activate / inactivate the item to.
Select SET UP item using left and right
function of the Tune button. 12. PTY(FLDR) Button
Moves [PTY ] button when search-
ing PTY in RDS Broadcasting Program
Type selection.
Moves [PTY ] button when search- ing PTY in RDS Broadcasting Program
Type selection.
13. Preset Button
Push [1]~[6] buttons less than 0.8 second
to play the channel saved in each button.
Push preset button for 0.8 second or
longer to save current channel to the
respective button with a beep.
FDE ENG 4C (AUDIO).QXP 9/3/2010 4:49 PM Page 130
Page 213 of 635
4 135
Features of your vehicle
In case USB is connected to the multiple
terminal inside the console on the right
hand side of the driver’s seat. When USB
is connected, the ‘USB’ icon will be dis-
played on the top right corner of the dis-
play screen.
1.AUX Selection Button
If USB is connected, it switches to the
USB mode from the CD mode to play the
song files stored in the USB. If there are no CD and USB mode from
the Radio mode, it displays ‘NO MEDIA’.
2. Track Moving Button
Press the [SEEK ] button for lessthan 0.8 second to play from the begin-
ning of the song currently played.
Press the button for less than 0.8 sec- ond and press it again within 1 second
to move to and play the previous track.
Press the button for 0.8 second or
longer to play the song in reverse
direction in fast speed.
Press the [SEEK ] button for less
than 0.8 second to move to the next
track. Press the button for 0.8 second
or longer to play the song in forward
direction in fast speed. 3. INFO Button
Displays the information of the file cur-
rently played in the order of FILE NAME➟
TITLE ➟ARTIST ➟ALBUM ➟FOLDER ➟
TOTAL FILE ➟FILE NAME ➟… (Displays
no information if the file has no song
information.)
4. Folder moving Button
Moves [FLDR ] button child folder of
the current folder and displays the first
song in the folder. Press TUNE/ENTER
button to move to the folder displayed.
It will play the first song in the folder.
Moves [FLDR ] button parent folder and displays the first song in the folder.
Press TUNE/ENTER button to move to
the folder displayed. It will play the first
song in the folder.
5. TUNE/ENTER Button
Turn this button clockwise to display the
songs next to the currently played song.
Turn the button counterclockwise to dis-
play the songs before the currently
played song.
Press the button to skip to and play the selected song. 6. RANDOM Playback Button
Press the button for less than 0.8 second
to start or stop the random playback of
the songs in the current folder.
Press the button for more than 0.8 sec-
ond to randomly play the entire songs in
the USB device.
Press the button again to cancel the mode.
7. REPEAT Button
Press the button for less than 0.8 second
to repeat the song currently played.
Press the button for more than 0.8 sec- ond to repeat the entire songs in the USB
device.
8. SCAN Button
Plays 10 seconds of each song in the USB
device.
Press the button once again to cancel scanning.
FDE ENG 4C (AUDIO).QXP 9/3/2010 4:49 PM Page 135
Page 217 of 635
4 139
Features of your vehicle
In case the iPod exclusive cable is con-
nected to the multiple terminal inside the
console on the right hand side of the dri-
ver’s seat. When the iPod is connected,
the ‘iPod’ icon will be displayed on the top
right corner of the display screen.
1. iPod Selection Button
If iPod is connected, it switches to the
iPod mode from the CD mode to play the
song files stored in the iPod.
If there are no CD and AUX mode from
the Radio mode, it displays ‘NO MEDIA’.
2. Track Moving Button
Press the [SEEK ] button for less
than 0.8 second to play from the begin-
ning of the song currently played.
Press the button for less than 0.8 sec- ond and press it again within 1 second
to move to and play the previous track.
Press the button for 0.8 second or
longer to play the song in reverse
direction in fast speed. Press the [SEEK ] button for
less
than 0.8 second to move to the next
track. Press the button for 0.8 second
or longer to play the song in forward
direction in fast speed.
3. INFO Button
Displays the information of the file cur-
rently played in the order of FILE NAME➟ TITLE ➟ARTIST ➟ALBUM ➟FILE
NAME ➟…
(Displays no information if the file has no
song information.)
4. Category Selection Button
Moves to the upper category from cur-
rently played category of the iPod.
To move to (play) the category (song)
displayed, press TUNE/ENTER button.
You will be able to search through the
lower category of the selected category.
The order of iPod’s category is SONG,
ALBUMS, ARTISTS, GENRES, and
iPod. 5. TUNE/ENTER Button
When you turn the button clockwise, it
will display the songs (category) next to
the song currently played (category in
the same level).
Also, when you turn the button counter-
clockwise, it will display the songs (cate-
gory) before the song currently played
(category in the same level).
If you want to listen to the song displayed
in the song category, press the button,then it will skip to the selected song and
play.
6. RANDOM Playback Button
Press the button for less than 0.8 second
to activate or deactivate the random play-
back of the songs within the current cat-
egory.
Press the button for longer than 0.8 sec-
ond to randomly play all songs in the
entire album of the iPod.
Press the button once again to cancel the
mode.
7. REPEAT Button
Repeats the song currently played.
FDE ENG 4C (AUDIO).QXP 9/3/2010 4:49 PM Page 139
Page 219 of 635
4 141
Features of your vehicle
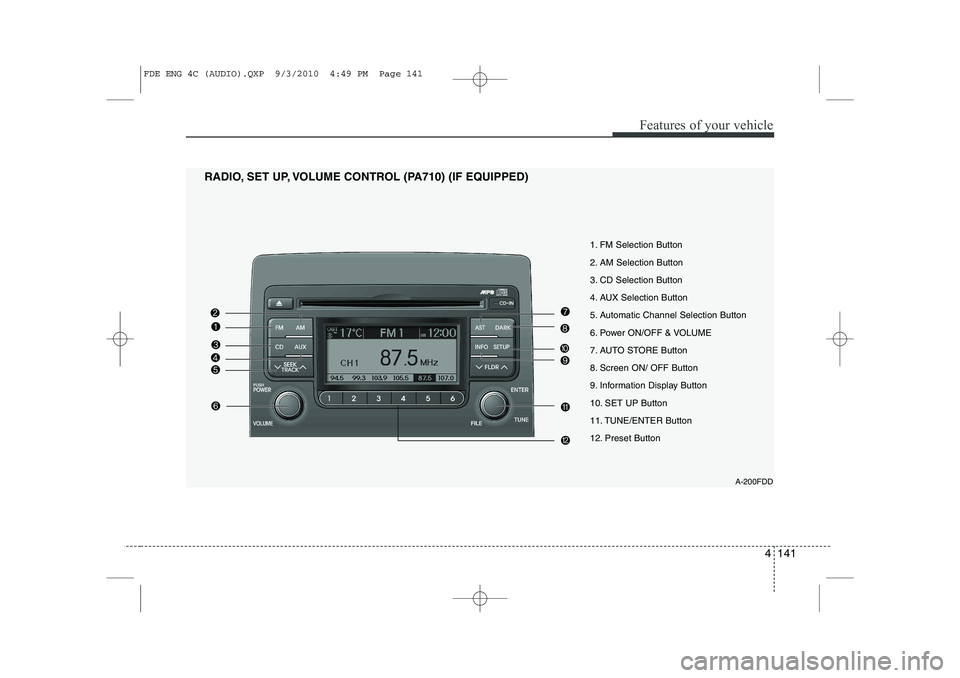
1. FM Selection Button
2. AM Selection Button
3. CD Selection Button
4. AUX Selection Button
5. Automatic Channel Selection Button
6. Power ON/OFF & VOLUME
7. AUTO STORE Button
8. Screen ON/ OFF Button
9. Information Display Button
10. SET UP Button
11. TUNE/ENTER Button
12. Preset Button
RADIO, SET UP, VOLUME CONTROL (PA710) (IF EQUIPPED)
A-200FDD
FDE ENG 4C (AUDIO).QXP 9/3/2010 4:49 PM Page 141
Page 225 of 635
4 147
Features of your vehicle
In case USB is connected to the multiple
terminal inside the console on the right
hand side of the driver’s seat. When USB
is connected, the ‘USB’ icon will be dis-
played on the top right corner of the dis-
play screen.
1. AUX Selection Button
If USB is not connected, it switches to the USB mode from the Radio and CD mode
to play the song files stored in the USB.
If AUX is not connected, it is invalid key.
2. Track Moving Button
Press the [SEEK ] button for lessthan 0.8 second to play from the begin-
ning of the song currently played.
Press the button for less than 0.8 sec- ond and press it again within 1 second
to move to and play the previous track.
Press the button for 0.8 second or
longer to play the song in reverse
direction in fast speed.
Press the [SEEK ] button b utton for
less than 0.8 second to move to the
next track.
Press the button for 0.8 second or
longer to play the song in forward
direction in fast speed. 3. INFO Button
Displays the information of the file cur-
rently played in the order of FILE NAME➟
TITLE ➟ARTIST ➟ALBUM ➟FOLDER ➟
TOTAL FILE ➟FILE NAME ➟… (Displays
no information if the file has no song
information.)
4. Folder moving Button
Moves [FLDR ] button child folder of
the current folder and displays the first
song in the folder. Press TUNE/ENTER
button to move to the folder displayed.
It will play the first song in the folder.
Moves [FLDR ] button parent folder and displays the first song in the folder.
Press TUNE/ENTER button to move to
the folder displayed. It will play the first
song in the folder.
5. TUNE/ENTER Button
Turn this button clockwise to display the
songs next to the currently played song.
Turn the button counterclockwise to dis-
play the songs before the currently
played song.
Press the button to skip to and play the selected song. 6. RANDOM Playback Button
Press the button for less than 0.8 second
to start or stop the random playback of
the songs in the current folder.
Press the button for more than 0.8 sec-
ond to randomly play the entire songs in
the USB device.
Press the button again to cancel the mode.
7. REPEAT Button
Press the button for less than 0.8 second
to repeat the song currently played.
Press the button for more than 0.8 sec- ond to repeat the entire songs in the USB
device.
8. SCAN Button
Plays 10 seconds of each song in the USB
device.
Press the button once again to cancel scanning.
FDE ENG 4C (AUDIO).QXP 9/3/2010 4:49 PM Page 147
Page 229 of 635
4 151
Features of your vehicle
In case the iPod exclusive cable is con-
nected to the multiple terminal inside the
consol on the right hand side of the dri-
ver’s seat. When the iPod is connected,
the ‘iPod’ icon will be displayed on the top
right corner of the display screen.
1. iPod Selection Button
If iPod is connected, it switches to the
iPod mode from the Radio and CD mode
to play the song files stored in the iPod.
If there are no CD and AUX mode from
the Radio mode, it displays ‘NO MEDIA’.
2. Track Moving Button
Press the [SEEK ] button for less
than 0.8 second to play from the begin-
ning of the song currently played.
Press the button for less than 0.8 sec- ond and press it again within 1 second
to move to and play the previous track.
Press the button for 0.8 second or
longer to play the song in reverse
direction in fast speed.
Press the [SEEK ] button for less
than 0.8 second to move to the next
track.
Press the button for 0.8 second or
longer to play the song in forward
direction in fast speed. 3. INFO Button
Displays the information of the file cur-
rently played in the order of FILE NAME➟
TITLE ➟ARTIST ➟ALBUM ➟FILE
NAME ➟…
(Displays no information if the file has no
song information.)
4. Category Selection Button
Moves to the upper category from cur-
rently played category of the iPod.
To move to (play) the category (song)
displayed, press TUNE/ENTER button.
You will be able to search through the
lower category of the selected category.
The order of iPod’s category is SONG,
ALBUMS, ARTISTS, GENRES, and
iPod.
5. TUNE/ENTER Button
When you turn the button clockwise, it
will display the songs (category) next to
the song currently played (category in
the same level).
Also, when you turn the button counter-
clockwise, it will display the songs (cate-
gory) before the song currently played
(category in the same level). If you want to listen to the song displayed
in the song category, press the button,then it will skip to the selected song and
play.
6. RANDOM Playback Button
Press the button for less than 0.8 second
to activate or deactivate the random play-
back of the songs within the current cat-
egory.
Press the button for longer than 0.8 sec-
ond to randomly play all songs in the
entire album of the iPod.
Press the button once again to cancel the
mode.
7. REPEAT Button
Repeats the song currently played.
FDE ENG 4C (AUDIO).QXP 9/3/2010 4:49 PM Page 151
Page 231 of 635
4 153
Features of your vehicle
A-300FDD
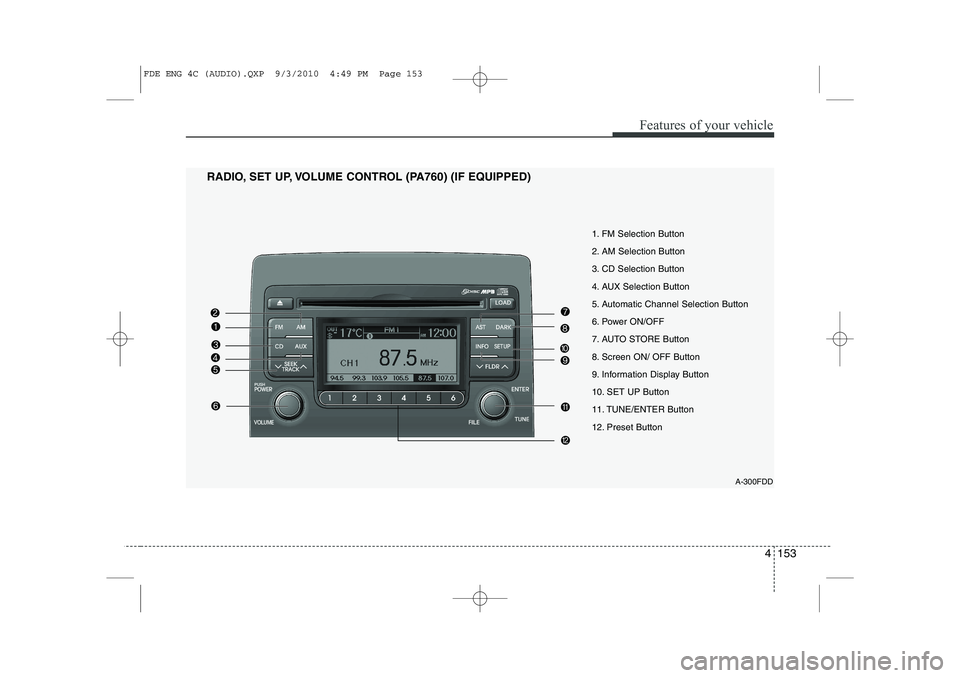
1. FM Selection Button
2. AM Selection Button
3. CD Selection Button
4. AUX Selection Button
5. Automatic Channel Selection Button
6. Power ON/OFF
7. AUTO STORE Button
8. Screen ON/ OFF Button
9. Information Display Button
10. SET UP Button
11. TUNE/ENTER Button
12. Preset Button
RADIO, SET UP, VOLUME CONTROL (PA760) (IF EQUIPPED)
FDE ENG 4C (AUDIO).QXP 9/3/2010 4:49 PM Page 153
Page 238 of 635
Features of your vehicle
160
4
In case USB is connected to the multiple
terminal inside the console on the right
hand side of the driver’s seat. When USB
is connected, the ‘USB’ icon will be dis-
played on the top right corner of the dis-
play screen.
1.AUX Selection Button
If USB is not connected, it switches to the USB mode from the Radio and CD mode
to play the song files stored in the USB.
If AUX is not connected, it is invalid key.
2. Track Moving Button
Press the [SEEK ] button for less
than 0.8 second to play from the begin-
ning of the song currently played.
Press the button for less than 0.8 sec- ond and press it again within 1 second
to move to and play the previous track.
Press the button for 0.8 second or
longer to play the song in reverse
direction in fast speed.
Press the [SEEK ] button b utton for
less than 0.8 second to move to the
next track.
Press the button for 0.8 second or
longer to play the song in forward
direction in fast speed. 3. INFO Button
Displays the information of the file cur-
rently played in the order of FILE NAME➟
TITLE ➟ARTIST ➟ALBUM ➟FOLDER ➟
TOTAL FILE ➟FILE NAME ➟… (Displays
no information if the file has no song
information.)
4. Folder moving Button
Moves [FLDR ] button child folder of
the current folder and displays the first
song in the folder. Press TUNE/ENTER
button to move to the folder displayed.
It will play the first song in the folder.
Moves [FLDR ] button parent folder and displays the first song in the folder.
Press TUNE/ENTER button to move to
the folder displayed. It will play the first
song in the folder.
5. TUNE/ENTER Button
Turn this button clockwise to display the
songs next to the currently played song.
Turn the button counterclockwise to dis-
play the songs before the currently
played song.
Press the button to skip to and play the selected song. 6. RANDOM Playback Button
Press the button for less than 0.8 second
to start or stop the random playback of
the songs in the current folder.
Press the button for more than 0.8 sec-
ond to randomly play the entire songs in
the USB device.
Press the button again to cancel the mode.
7. REPEAT Button
Press the button for less than 0.8 second
to repeat the song currently played.
Press the button for more than 0.8 sec- ond to repeat the entire songs in the USB
device.
8. SCAN Button
Plays 10 seconds of each song in the USB
device.
Press the button once again to cancel scanning.
FDE ENG 4C (AUDIO).QXP 9/3/2010 4:49 PM Page 160
Page 242 of 635
Features of your vehicle
164
4
In case the iPod exclusive cable is con-
nected to the multiple terminal inside the
console on the right hand side of the dri-
ver’s seat. When the iPod is connected,
the ‘iPod’ icon will be displayed on the top
right corner of the display screen.
1. iPod Selection Button
If iPod is connected, it switches to the
iPod mode from the Radio and CD mode
to play the song files stored in the iPod.
If there are no CD and AUX mode from
the Radio mode, it displays ‘NO MEDIA’.
2. Track Moving Button
Press the [SEEK ] b utton for less
than 0.8 second to play from the begin-
ning of the song currently played.
Press the button for less than 0.8 sec- ond and press it again within 1 second
to move to and play the previous track.
Press the button for 0.8 second or
longer to play the song in reverse
direction in fast speed.
Press the [SEEK ] button for less
than 0.8 second to move to the next
track.
Press the button for 0.8 second or
longer to play the song in forward
direction in fast speed. 3. INFO Button
Displays the information of the file cur-
rently played in the order of FILE NAME➟
TITLE ➟ARTIST ➟ALBUM ➟FILE
NAME ➟…
(Displays no information if the file has no
song information.)
4. Category Selection Button
Moves to the upper category from cur-
rently played category of the iPod.
To move to (play) the category (song)
displayed, press TUNE/ENTER button.
You will be able to search through the
lower category of the selected category.
The order of iPod’s category is SONG,
ALBUMS, ARTISTS, GENRES, and
iPod.
5. TUNE/ENTER Button
When you turn the button clockwise, it
will display the songs (category) next to
the song currently played (category in
the same level).
Also, when you turn the button counter-
clockwise, it will display the songs (cate-
gory) before the song currently played
(category in the same level). If you want to listen to the song displayed
in the song category, press the button,then it will skip to the selected song and
play.
6. RANDOM Playback Button
Press the button for less than 0.8 second
to activate or deactivate the random play-
back of the songs within the current cat-
egory.
Press the button for longer than 0.8 sec-
ond to randomly play all songs in the
entire album of the iPod.
Press the button once again to cancel the
mode.
7. REPEAT Button
Repeats the song currently played.
FDE ENG 4C (AUDIO).QXP 9/3/2010 4:49 PM Page 164
Page 302 of 635
What to do in an emergency
10
6
F060300AFD
Changing a tire with TPMS
If you have a flat tire, the Low Tire
Pressure and Position telltales will
come on. Have the flat tire repaired
by an authorized HYUNDAI dealer
as soon as possible or replace the
flat tire with the spare tire. Each wheel is equipped with a tire pressure sensor mounted inside the
tire behind the valve stem. You must
use TPMS specific wheels. It is rec-
ommended that you always have
your tires serviced by an authorized
HYUNDAI dealer. Even if you replace the low pressure
tire with the spare tire, the TPMS
malfunction indicator may turn on
and the Low Tire Pressure telltale
may turn off after restarting and
about 20 minutes of continuous driv-
ing before you have the low pressuretire repaired and replaced on the
vehicle.
However, if the low pressure tire is
not in the vehicle, the Low Tire
Pressure and Position telltales will go
off and the TPMS malfunction indica-
tor will go on after a few minutes
because the spare tire does not have
a sensor.
Once the low pressure tire is re- inflated to the recommended pres-
sure and installed on the vehicle, theTPMS malfunction indicator and the
low tire pressure and position tell-
tales will extinguish within a few min-
utes of driving.
If the indicators are not extinguished
after a few minutes of driving, please
visit an authorized HYUNDAI dealer.
CAUTION
The TPMS malfunction indica-
tor may be illuminated if thevehicle is moving around elec-tric power supply cables orradios transmitter such as at police stations, governmentand public offices, broadcast-ing stations, military installa- tions, airports, or transmittingtowers, etc. This can interferewith normal operation of the Tire Pressure MonitoringSystem (TPMS).
The TPMS malfunction indica- tor may be illuminated if snowchains are used or some sep-arate electronic devices suchas notebook computer, mobile charger, remote starter or nav-igation etc., are used in thevehicle. This can interfere with normal operation of the TirePressure Monitoring System(TPMS).
CAUTION
NEVER use a puncture-repair-
ing agent to repair and/or inflatea low pressure tire. The tire sealant can damage the tirepressure sensor. If used, youwill have to replace the tire pres-sure sensor.