change time HYUNDAI I30 2011 Owner's Manual
[x] Cancel search | Manufacturer: HYUNDAI, Model Year: 2011, Model line: I30, Model: HYUNDAI I30 2011Pages: 635, PDF Size: 40.66 MB
Page 546 of 635
Features of your vehicle
74
4
D230503AFD
Air conditioning (if equipped)
All HYUNDAI Air Conditioning Systems
are filled with environmentally friendly
R-134a refrigerant which does not dam-
age to the ozone layer.
1. Start the engine. Push the air condi-
tioning button.
2. Set the mode to the position.
3. Set the air intake control to the outside air or recirculated air position.
4. Adjust the fan speed control and tem- perature control to maintain maximum
comfort.
When maximum cooling is desired, set the temperature control to the extreme
left position then set the fan speedcontrol to the highest speed.
✽✽ NOTICE
When using the air conditioning sys- tem, monitor the temperature gauge
closely while driving up hills or in
heavy traffic when outside tempera-
tures are high. Air conditioning sys-
tem operation may cause engine over-
heating. Continue to use the blower
fan but turn the air conditioning sys-
tem off if the temperature gauge indi-
cates engine overheating.
When opening the windows in humid weather air conditioning may create
water droplets inside the vehicle.
Since excessive water droplets may
cause damage to electrical equipment,
air conditioning should only be run
with the windows closed.Air conditioning system operation tips
If the vehicle has been parked in directsunlight during hot weather, open the
windows for a short time to let the hot
air inside the vehicle escape.
To help reduce moisture inside of win- dows on rainy or humid days, decrease
the humidity inside the vehicle by oper-ating the air conditioning system.
During air conditioning system opera- tion, you may occasionally notice aslight change in engine speed as the
air conditioning compressor cycles.
This is a normal system operation
characteristic.
Use the air conditioning system every month if only for a few minutes to
ensure maximum system performance.
When using the air conditioning sys- tem, you may notice clear water drip-
ping (or even puddling) on the ground
under the passenger side of the vehi-
cle. This is a normal system operation
characteristic.
Operating the air conditioning system in the recirculated air position provides
maximum cooling, however, continual
operation in this mode may cause the
air inside the vehicle to become stale.
During cooling operation, you may occasionally notice a misty air flow
because of rapid cooling and humid air
intake. This is a normal system opera-
tion characteristics.
Page 547 of 635
475
Features of your vehicle
D230300AFD
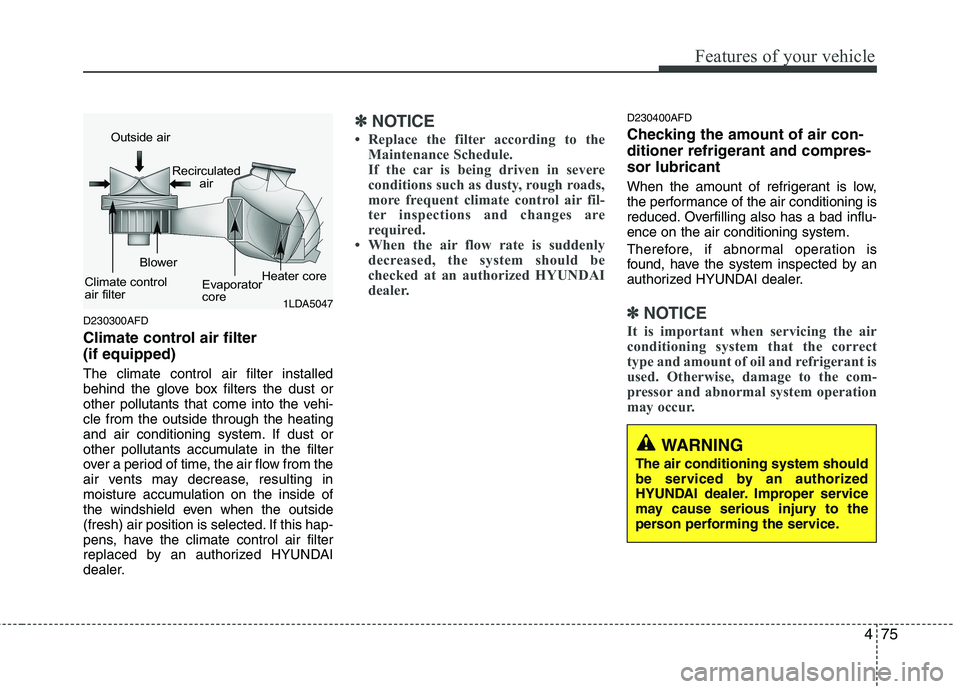
Climate control air filter (if equipped) The climate control air filter installed
behind the glove box filters the dust or
other pollutants that come into the vehi-cle from the outside through the heating
and air conditioning system. If dust or
other pollutants accumulate in the filter
over a period of time, the air flow from the
air vents may decrease, resulting in
moisture accumulation on the inside of
the windshield even when the outside
(fresh) air position is selected. If this hap-
pens, have the climate control air filter
replaced by an authorized HYUNDAI
dealer.
✽✽NOTICE
Replace the filter according to the Maintenance Schedule.
If the car is being driven in severe
conditions such as dusty, rough roads,
more frequent climate control air fil-
ter inspections and changes are
required.
When the air flow rate is suddenly
decreased, the system should be
checked at an authorized HYUNDAI
dealer.D230400AFD
Checking the amount of air con-
ditioner refrigerant and compres-sor lubricant
When the amount of refrigerant is low,
the performance of the air conditioning is
reduced. Overfilling also has a bad influ-ence on the air conditioning system.
Therefore, if abnormal operation is
found, have the system inspected by an
authorized HYUNDAI dealer.
✽✽ NOTICE
It is important when servicing the air
conditioning system that the correct
type and amount of oil and refrigerant is
used. Otherwise, damage to the com-
pressor and abnormal system operation
may occur. 1LDA5047
Outside air
Recirculatedair
Climate control
air filter Blower
Evaporator
coreHeater core
WARNING
The air conditioning system should
be serviced by an authorized
HYUNDAI dealer. Improper service
may cause serious injury to the
person performing the service.
Page 567 of 635
495
Features of your vehicle
D280601AUN
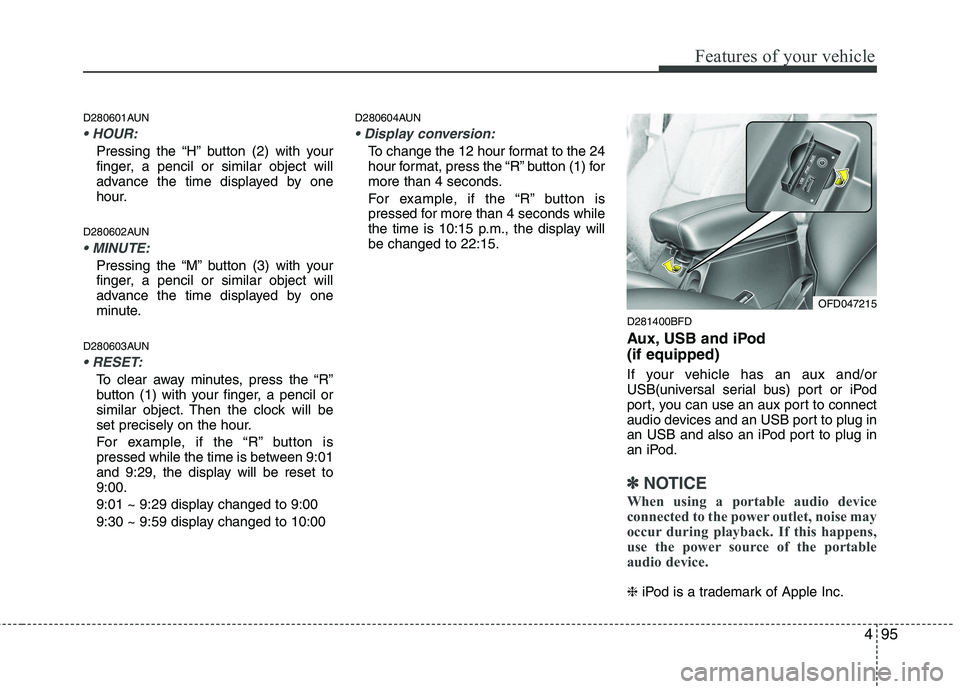
Pressing the “H” button (2) with your
finger, a pencil or similar object will
advance the time displayed by one
hour.
D280602AUN
Pressing the “M” button (3) with your
finger, a pencil or similar object will
advance the time displayed by one
minute.
D280603AUN
To clear away minutes, press the “R”
button (1) with your finger, a pencil or
similar object. Then the clock will be
set precisely on the hour.
For example, if the “R” button is
pressed while the time is between 9:01
and 9:29, the display will be reset to9:00.
9:01 ~ 9:29 display changed to 9:00
9:30 ~ 9:59 display changed to 10:00 D280604AUN
To change the 12 hour format to the 24
hour format, press the “R” button (1) for
more than 4 seconds.
For example, if the “R” button is
pressed for more than 4 seconds while
the time is 10:15 p.m., the display willbe changed to 22:15.
D281400BFD
Aux, USB and iPod (if equipped)
If your vehicle has an aux and/or
USB(universal serial bus) port or iPod
port, you can use an aux port to connect
audio devices and an USB port to plug in
an USB and also an iPod port to plug in
an iPod.
✽✽NOTICE
When using a portable audio device
connected to the power outlet, noise may
occur during playback. If this happens,
use the power source of the portable
audio device.
❈ iPod is a trademark of Apple Inc.
OFD047215
Page 585 of 635
4113
Features of your vehicle
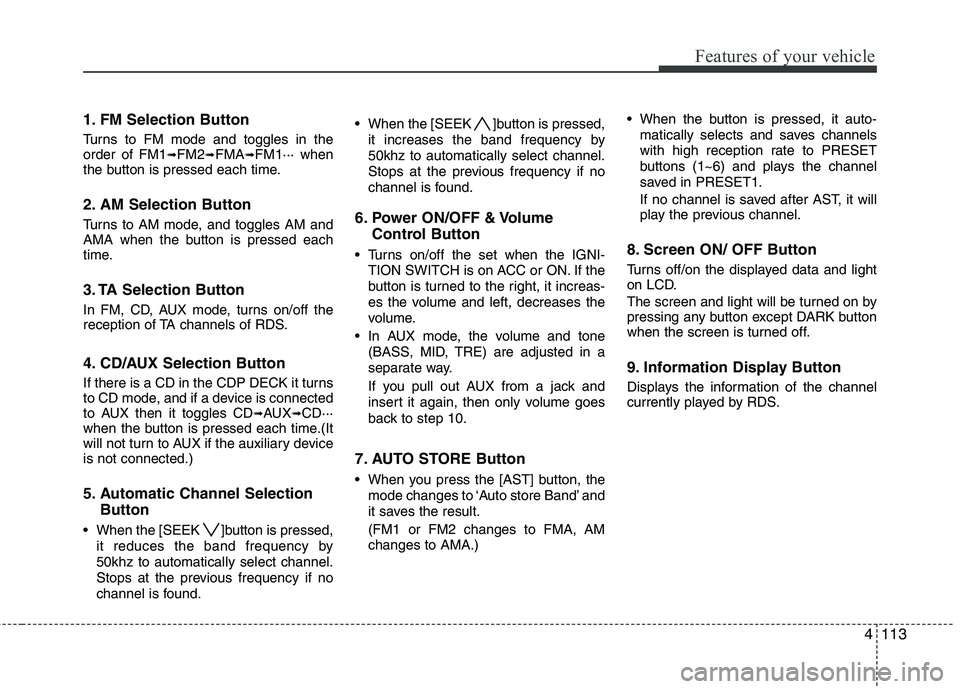
1. FM Selection Button
Turns to FM mode and toggles in the order of FM1➟FM2 ➟FMA ➟FM1··· when
the button is pressed each time.
2. AM Selection Button
Turns to AM mode, and toggles AM and
AMA when the button is pressed each
time.
3. TA Selection Button
In FM, CD, AUX mode, turns on/off the
reception of TA channels of RDS.
4. CD/AUX Selection Button
If there is a CD in the CDP DECK it turns
to CD mode, and if a device is connected
to AUX then it toggles CD ➟AUX ➟CD···
when the button is pressed each time.(It
will not turn to AUX if the auxiliary deviceis not connected.)
5. Automatic Channel Selection
Button
When the [SEEK ]button is pressed, it reduces the band frequency by 50khz to automatically select channel.
Stops at the previous frequency if no
channel is found. When the [SEEK ]button is pressed,
it increases the band frequency by50khz to automatically select channel.
Stops at the previous frequency if no
channel is found.
6. Power ON/OFF & Volume Control Button
Turns on/off the set when the IGNI- TION SWITCH is on ACC or ON. If the
button is turned to the right, it increas-
es the volume and left, decreases the
volume.
In AUX mode, the volume and tone (BASS, MID, TRE) are adjusted in a
separate way.
If you pull out AUX from a jack and
insert it again, then only volume goes
back to step 10.
7. AUTO STORE Button
When you press the [AST] button, the mode changes to ‘Auto store Band’ and
it saves the result. (FM1 or FM2 changes to FMA, AM changes to AMA.) When the button is pressed, it auto-
matically selects and saves channels
with high reception rate to PRESET
buttons (1~6) and plays the channel
saved in PRESET1.
If no channel is saved after AST, it will
play the previous channel.
8. Screen ON/ OFF Button
Turns off/on the displayed data and light
on LCD.
The screen and light will be turned on by
pressing any button except DARK button
when the screen is turned off.
9. Information Display Button
Displays the information of the channel
currently played by RDS.
Page 586 of 635
Features of your vehicle
114
4
10. SET UP Button
Press this button to turn to the SOUND,
RDS option, clock setting, time display,
SCROLL, SDVC, temperature display
and adjustment mode.
If no action is taken for 5 seconds after
pressing the button, it will return to the
play mode.(After entering SET UP mode,
move between items using the left, right
and PUSH functions of the TUNE but-ton.)
Type A
The set up item changes from SOUND ➟ RDS ➟CLOCK ➟TIME ➟SCROLL ➟SDV
C ➟ TEMP ➟SOUND...
Type B
The set up item changes from AUDIO ➟
RDS ➟CLOCK ➟TIME ➟SCROLL ➟SDVC
➟ TEMP ➟P.BASS ➟AUDIO
The manual setting is a default for radio
time but if customer wants, the time
received from RDS station can be set for
radio time. In this case, the RDS time,
which is effected by the situation of RDS
station, can be different with actual time. ❈
TO SETUP TIME UPDATE
1. Press SETUP button.
2. Select RDS menu by rotating/pressing TUNE knob.
3. Select TIME menu by rotating/pressing TUNE knob.
4. Select Auto or Manual by rotating/ pressing TUNE knob.
5. Press SETUP button to exit SETUP mode.
11. TUNE/ENTER Button
Turn this button clockwise by one notch
to increase frequency by 0.05Mhz from
current frequency.
Turn this button counterclockwise by one
notch to decrease frequency by 0.05Mhz
from current frequency.
Press this button while holding SET UP
button to activate / inactivate the item to.
Select SET UP item using left and right
function of the Tune button. 12. PTY(FLDR) button
Moves [PTY ] Button when search-
ing PTY in RDS Broadcasting Program
Type selection.
Moves [PTY ] button when search- ing PTY in RDS Broadcasting Program
Type selection.
13. Preset Button
Push [1]~[6] buttons less than 0.8 second
to play the channel saved in each button.
Push preset button for 0.8 second or
longer to save current channel to the
respective button with a beep.
Page 598 of 635
Features of your vehicle
126
4
1. FM Selection Button
Turns to FM mode and toggles in the order of FM1 ➟FM2 ➟FMA ➟FM1··· when
the button is pressed each time.
2. AM Selection Button
Turns to AM mode, and toggles AM and
AMA when the button is pressed each
time.
3. TA Selection Button
In FM, CD, AUX mode, turns on/off the
reception of TA channels of RDS.
4. CD/AUX Selection Button
If there is a CD in the CDP DECK it turns
to CD mode, and if a device is connected
to AUX then it toggles CD ➟AUX ➟CD···
when the button is pressed each time.(It
will not turn to AUX if the auxiliary deviceis not connected.)
5. Automatic Channel Selection
Button
When the [SEEK ]button is pressed, it reduces the band frequency by 50khz to automatically select channel.
Stops at the previous frequency if no
channel is found. When the [SEEK ]button is pressed,
it increases the band frequency by50khz to automatically select channel.
Stops at the previous frequency if no
channel is found.
6. Power ON/OFF & Volume Control Button
Turns on/off the set when the IGNI- TION SWITCH is on ACC or ON. If the
button is turned to the right, it increas-
es the volume and left, decreases the
volume.
In AUX mode, the volume and tone (BASS, MID, TRE) are adjusted in a
separate way.
If you pull out AUX from a jack and
insert it again, then only volume goes
back to step 10.
7. AUTO STORE Button
When you press the [AST] button, the mode changes to ‘Auto store Band’ and
it saves the result. (FM1 or FM2 changes to FMA, AM changes to AMA.) When the button is pressed, it auto-
matically selects and saves channels
with high reception rate to PRESET
buttons (1~6) and plays the channel
saved in PRESET1.
If no channel is saved after AST, it will
play the previous channel.
8. Screen ON/ OFF Button
Turns off/on the displayed data and light
on LCD.
The screen and light will be turned on by
pressing any button except DARK button
when the screen is turned off.
9. Information Display Button
Displays the information of the channel
currently played by RDS.
Page 599 of 635
4127
Features of your vehicle
10. SET UP Button
Press this button to turn to the SOUND,
RDS option, clock setting, time display,
SCROLL, SDVC, temperature display
and adjustment mode.
If no action is taken for 5 seconds after
pressing the button, it will return to the
play mode.(After entering SET UP mode,
move between items using the left, right
and PUSH functions of the TUNE but-ton.)
Type A
The set up item changes from SOUND ➟RDS ➟CLOCK ➟TIME ➟SCROLL ➟SDV
C ➟ TEMP ➟SOUND...
Type B
The set up item changes from AUDIO ➟
RDS ➟CLOCK ➟TIME ➟SCROLL ➟SDVC
➟ TEMP ➟AUDIO...
The manual setting is a default for radio
time but if customer wants, the time
received from RDS station can be set for
radio time. In this case, the RDS time,
which is effected by the situation of RDS
station, can be different with actual time. ❈
TO SETUP TIME UPDATE
1. Press SETUP button.
2. Select RDS menu by rotating/pressing TUNE knob.
3. Select TIME menu by rotating/pressing TUNE knob.
4. Select Auto or Manual by rotating/press- ing TUNE knob.
5. Press SETUP button to exit SETUP mode.
11. TUNE/ENTER Button
Turn this button clockwise by one notch
to increase frequency by 0.05Mhz from
current frequency.
Turn this button counterclockwise by one
notch to decrease frequency by 0.05Mhz
from current frequency.
Press this button while holding SET UP
button to activate / inactivate the item to.
Select SET UP item using left and right
function of the Tune button. 12. PTY(FLDR) Button
Moves [PTY ] button when search-
ing PTY in RDS Broadcasting Program
Type selection.
Moves [PTY ] button when search- ing PTY in RDS Broadcasting Program
Type selection.
13. Preset Button
Push [1]~[6] buttons less than 0.8 second
to play the channel saved in each button.
Push preset button for 0.8 second or
longer to save current channel to the
respective button with a beep.
Page 612 of 635
Features of your vehicle
140
4
10. SET UP Button
Press this button to turn to the SOUND,
clock setting, time display, SCROLL,
SDVC, temperature display and adjust-
ment mode.
If no action is taken for 5 seconds after
pressing the button, it will return to the
play mode.(After entering SET UP mode,
move between items using the left, right
and PUSH functions of the TUNE button.)
Type A
The set up item changes from SOUND ➟ CLOCK ➟TIME ➟SCROLL ➟SDVC ➟
TEMP ➟SOUND...
Type B
The set up item changes from AUDIO ➟
CLOCK ➟TIME ➟SCROLL ➟SDVC ➟TEMP
➟ P.BASS ➟AUDIO 11. TUNE/ENTER Button
Turn this button clockwise by one notch
to increase frequency by 0.05Mhz from
current frequency.
Turn this button counterclockwise by one
notch to decrease frequency by 0.05Mhz
from current frequency.
Press this button while holding SET UP
button to activate / inactivate the item to.
Select SET UP item using left and right
function of the Tune button.
12. Preset Button
Push [1]~[6] buttons less than 0.8 second
to play the channel saved in each button.
Push preset button for 0.8 second or
longer to save current channel to the
respective button with a beep.
Page 625 of 635
4153
Features of your vehicle
10. SET UP Button
Press this button to turn to the SOUND, ,
clock setting, time display, SCROLL,
SDVC, temperature display and adjust-
ment mode.
If no action is taken for 5 seconds after
pressing the button, it will return to the
play mode.(After entering SET UP mode,
move between items using the left, right
and PUSH functions of the TUNE button.)
Type A
The set up item changes from SOUND ➟CLOCK ➟TIME ➟SCROLL ➟SDVC ➟
TEMP ➟SOUND...
Type B
The set up item changes from AUDIO ➟
CLOCK ➟TIME ➟SCROLL ➟SDVC ➟TEMP
➟ AUDIO... 11. TUNE/ENTER Button
Turn this button clockwise by one notch
to increase frequency by 0.05Mhz from
current frequency.
Turn this button counterclockwise by one
notch to decrease frequency by 0.05Mhz
from current frequency.
Press this button while holding SET UP
button to activate / inactivate the item to.
Select SET UP item using left and right
function of the Tune button.
12. Preset Button
Push [1]~[6] buttons less than 0.8 second
to play the channel saved in each button.
Push preset button for 0.8 second or
longer to save current channel to the
respective button with a beep.