light HYUNDAI I30 2011 Owner's Manual
[x] Cancel search | Manufacturer: HYUNDAI, Model Year: 2011, Model line: I30, Model: HYUNDAI I30 2011Pages: 635, PDF Size: 40.66 MB
Page 97 of 635
419
Features of your vehicle
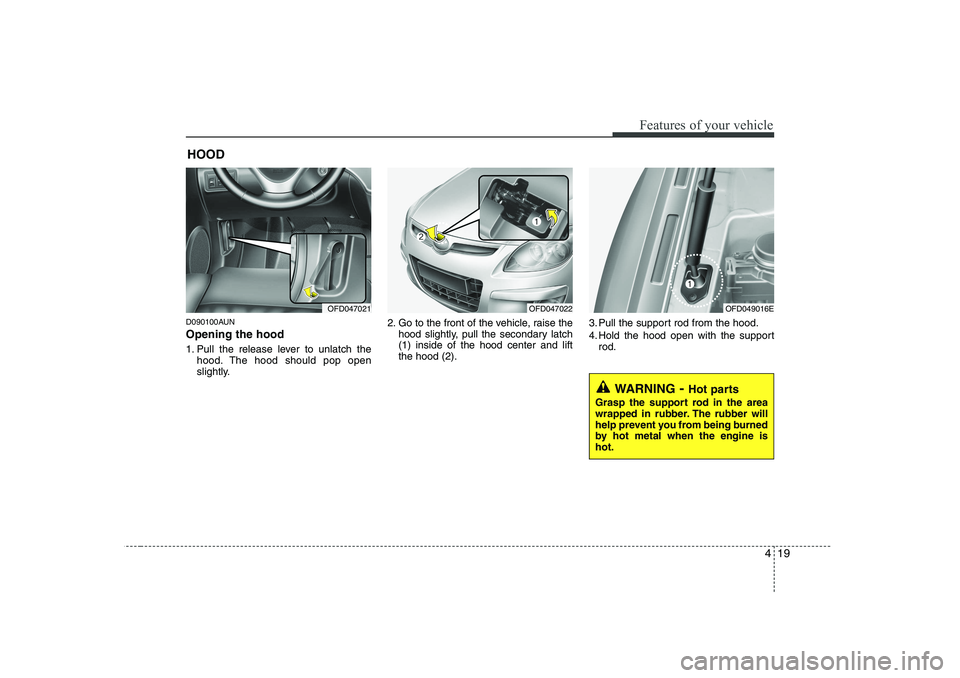
D090100AUN Opening the hood
1. Pull the release lever to unlatch thehood. The hood should pop open
slightly. 2. Go to the front of the vehicle, raise the
hood slightly, pull the secondary latch(1) inside of the hood center and liftthe hood (2). 3. Pull the support rod from the hood.
4. Hold the hood open with the support
rod.
HOOD
OFD047021OFD047022OFD049016E
WARNING
- Hot parts
Grasp the support rod in the area
wrapped in rubber. The rubber will
help prevent you from being burned
by hot metal when the engine ishot.
Page 99 of 635
421
Features of your vehicle
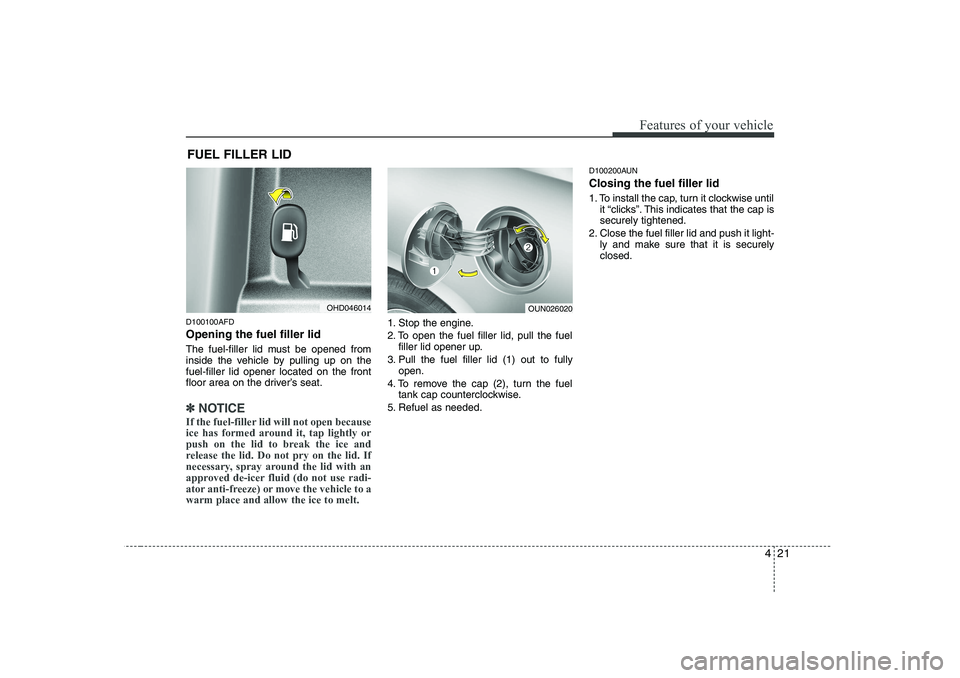
D100100AFD Opening the fuel filler lid
The fuel-filler lid must be opened from
inside the vehicle by pulling up on thefuel-filler lid opener located on the front
floor area on the driver’s seat.
✽✽NOTICE
If the fuel-filler lid will not open because
ice has formed around it, tap lightly or
push on the lid to break the ice and
release the lid. Do not pry on the lid. If
necessary, spray around the lid with an
approved de-icer fluid (do not use radi-
ator anti-freeze) or move the vehicle to awarm place and allow the ice to melt.
1. Stop the engine.
2. To open the fuel filler lid, pull the fuel filler lid opener up.
3. Pull the fuel filler lid (1) out to fully open.
4. To remove the cap (2), turn the fuel tank cap counterclockwise.
5. Refuel as needed. D100200AUN Closing the fuel filler lid
1. To install the cap, turn it clockwise until
it “clicks”. This indicates that the cap is securely tightened.
2. Close the fuel filler lid and push it light- ly and make sure that it is securelyclosed.
FUEL FILLER LID
OHD046014OUN026020
Page 101 of 635
423
Features of your vehicle
(Continued)Use only portable plastic fuel
containers designed to carry and
store gasoline.
Do not use cellular phones while refueling. Electric current and/or
electronic interference from cel-
lular phones can potentially
ignite fuel vapors causing a fire.
When refueling, always shut the engine off. Sparks produced byelectrical components related to
the engine can ignite fuel vapors
causing a fire. Once refueling is
complete, check to make sure thefiller cap and filler door are
securely closed, before starting
the engine.
DO NOT use matches or a lighter and DO NOT SMOKE or leave a lit
cigarette in your vehicle while at
a gas station especially during
refueling. Automotive fuel is
highly flammable and can, when
ignited, result in fire.
(Continued)(Continued)
If a fire breaks out during refuel-ing, leave the vicinity of the vehi-
cle, and immediately contact the
manager of the gas station and
then contact the local fire depart-
ment. Follow any safety instruc-
tions they provide.
CAUTION
Make sure to refuel your vehicle
according to the "Fuel require-
ments" suggested in section 1.
If the fuel filler cap requires replacement, use only a genuineHYUNDAI cap or the equivalentspecified for your vehicle. An
incorrect fuel filler cap can resultin a serious malfunction of the fuel system or emission controlsystem.
(Continued)
(Continued) Do not spill fuel on the exterior surfaces of the vehicle. Any typeof fuel spilled on painted surfacesmay damage the paint.
After refueling, make sure the fuel cap is installed securely to pre-vent fuel spillage in the event of an accident.
Page 105 of 635
427
Features of your vehicle
Resetting the sunroof
Whenever the vehicle battery is discon- nected or discharged, or related fuse is
blown, you must reset your sunroof sys-
tem as follows:
1. Turn the ignition switch to the ONposition and close the sunroof com-
pletely.
2. Release the control button.
3. Press and hold the close button until the sunroof tilts and slightly moves up
and down. Then, release the button. 4. Press and hold the close button until
the sunroof is operated as follows;
TILT DOWN →SLIDE OPEN →
SLIDE CLOSE
Then, release the control button.
When this is complete, the sunroof sys- tem is reset. ❈ For more detailed information, contact
an authorized HYUNDAI dealer.
CAUTION
If the sunroof is not reset when the
vehicle battery is disconnected or discharged, or related fuse isblown, the sunroof may operate improperly.
Page 106 of 635
Features of your vehicle
28
4
D130200AFD
Electric power steering
Power steering uses the motor to assist
you in steering the vehicle. If the engine
is off or if the power steering system
becomes inoperative, the vehicle may
still be steered, but it will require
increased steering effort.
The motor driven power steering is con-
trolled by power steering control unit
which sense the steering wheel torque,
steering wheel position and vehicle
speed to command the motor.
The steering wheel becomes heavier as
the vehicle’s speed increases and
becomes lighter as the vehicle’s speed
decreases for the better control of the
steering wheel.
Should you notice any change in the
effort required to steer during normal
vehicle operation, have the power steer-
ing checked by an authorized HYUNDAI
dealer.✽✽
NOTICE
The following symptoms may occur dur- ing normal vehicle operation:
Page 109 of 635
431
Features of your vehicle
D140100AUN
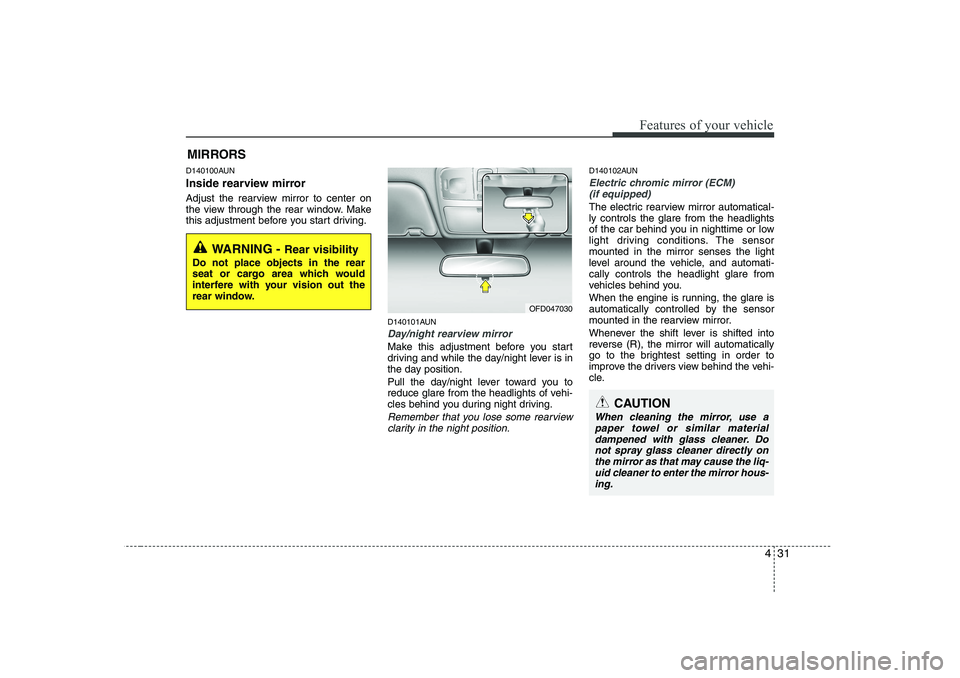
Inside rearview mirror
Adjust the rearview mirror to center on
the view through the rear window. Make
this adjustment before you start driving.D140101AUN
Day/night rearview mirror
Make this adjustment before you start
driving and while the day/night lever is in
the day position.
Pull the day/night lever toward you to
reduce glare from the headlights of vehi-
cles behind you during night driving.
Remember that you lose some rearviewclarity in the night position.
D140102AUN
Electric chromic mirror (ECM)(if equipped)
The electric rearview mirror automatical- ly controls the glare from the headlights
of the car behind you in nighttime or low
light driving conditions. The sensormounted in the mirror senses the light
level around the vehicle, and automati-cally controls the headlight glare from
vehicles behind you.
When the engine is running, the glare is
automatically controlled by the sensor
mounted in the rearview mirror.
Whenever the shift lever is shifted into
reverse (R), the mirror will automatically
go to the brightest setting in order to
improve the drivers view behind the vehi-
cle.
MIRRORS
WARNING -
Rear visibility
Do not place objects in the rear
seat or cargo area which would
interfere with your vision out the
rear window.
OFD047030
CAUTION
When cleaning the mirror, use a paper towel or similar materialdampened with glass cleaner. Do not spray glass cleaner directly on
the mirror as that may cause the liq- uid cleaner to enter the mirror hous-ing.
Page 110 of 635
Features of your vehicle
32
4
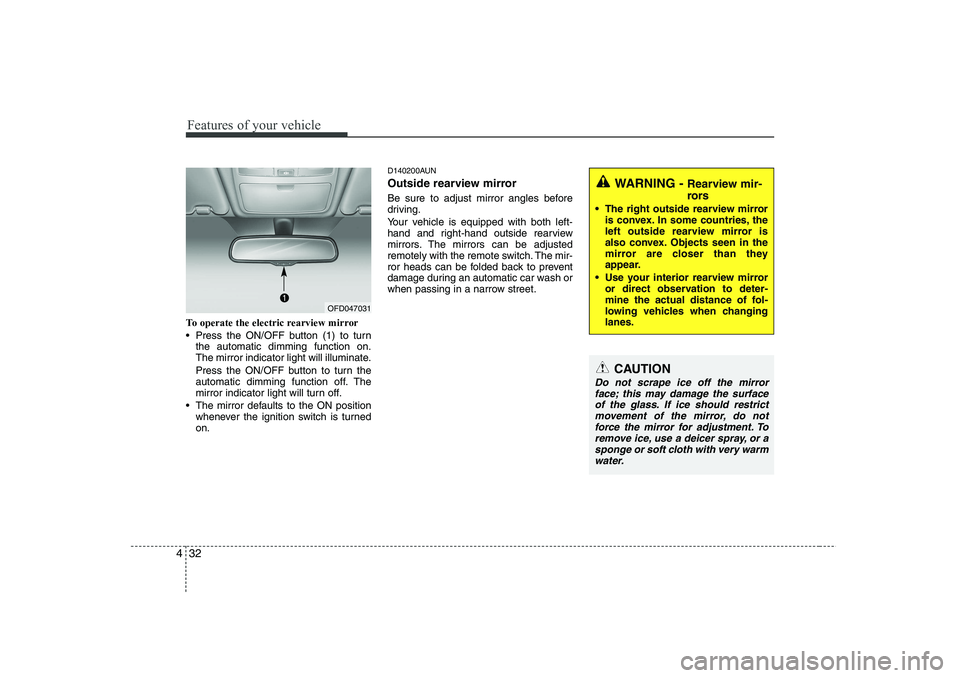
To operate the electric rearview mirror
Press the ON/OFF button (1) to turn
the automatic dimming function on.
The mirror indicator light will illuminate.
Press the ON/OFF button to turn the
automatic dimming function off. The
mirror indicator light will turn off.
The mirror defaults to the ON position whenever the ignition switch is turnedon. D140200AUN
Outside rearview mirror
Be sure to adjust mirror angles before
driving.
Your vehicle is equipped with both left-
hand and right-hand outside rearview
mirrors. The mirrors can be adjusted
remotely with the remote switch. The mir-
ror heads can be folded back to prevent
damage during an automatic car wash or
when passing in a narrow street.
WARNING -
Rearview mir-
rors
The right outside rearview mirror is convex. In some countries, the
left outside rearview mirror is
also convex. Objects seen in the
mirror are closer than they
appear.
Use your interior rearview mirror or direct observation to deter-
mine the actual distance of fol-
lowing vehicles when changinglanes.
CAUTION
Do not scrape ice off the mirror
face; this may damage the surface of the glass. If ice should restrictmovement of the mirror, do not force the mirror for adjustment. To
remove ice, use a deicer spray, or a sponge or soft cloth with very warmwater.
OFD047031
Page 113 of 635
435
Features of your vehicle
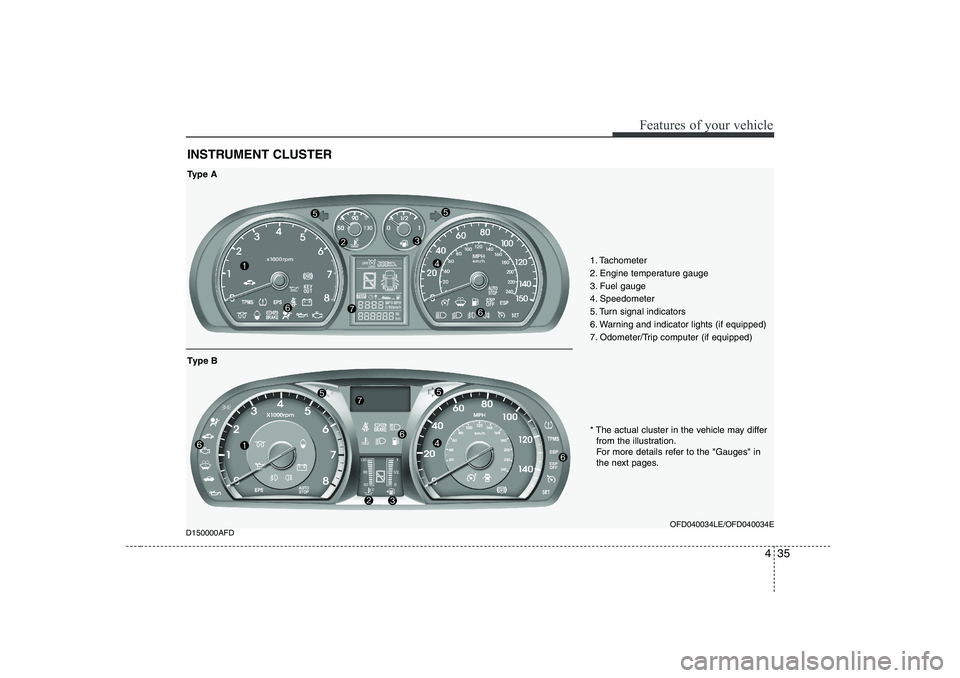
D150000AFDINSTRUMENT CLUSTER
1. Tachometer
2. Engine temperature gauge
3. Fuel gauge
4. Speedometer
5. Turn signal indicators
6. Warning and indicator lights (if equipped)
7. Odometer/Trip computer (if equipped)
OFD040034LE/OFD040034E
Type A
* The actual cluster in the vehicle may differfrom the illustration.
For more details refer to the "Gauges" in
the next pages.
Type B
Page 114 of 635
Features of your vehicle
36
4
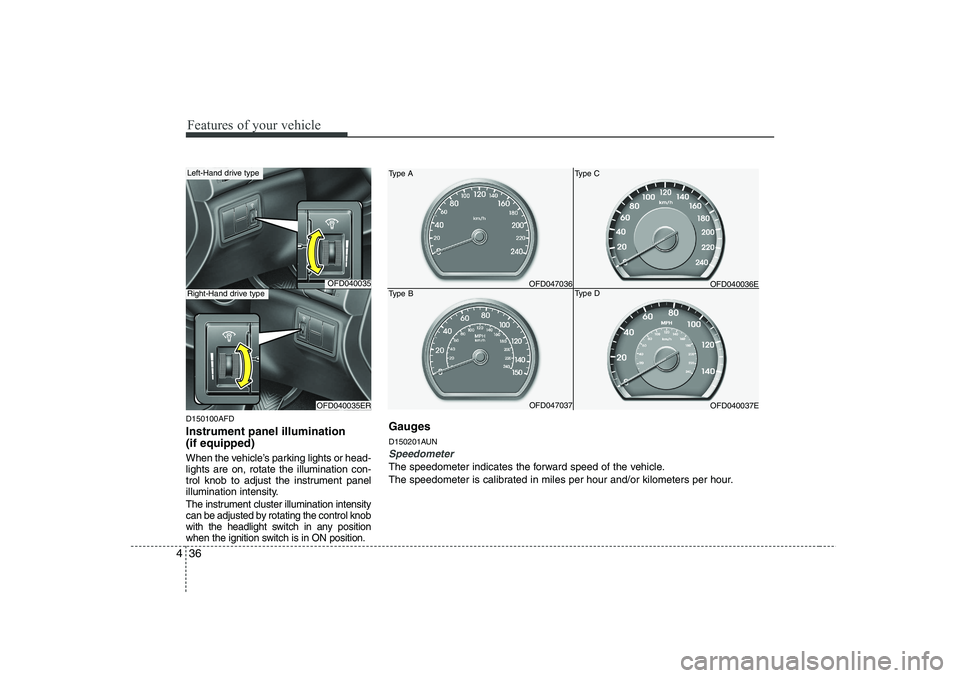
D150100AFD Instrument panel illumination (if equipped)
When the vehicle’s parking lights or head- lights are on, rotate the illumination con-
trol knob to adjust the instrument panel
illumination intensity.
The instrument cluster illumination intensity
can be adjusted by rotating the control knob
with the headlight switch in any position
when the ignition switch is in ON position.
OFD040035
OFD040035ER
Left-Hand drive type
Right-Hand drive typeOFD047036
Type A
Type B OFD047037OFD040036E
Type C
Type D OFD040037E
Gauges
D150201AUN
Speedometer
The speedometer indicates the forward speed of the vehicle.
The speedometer is calibrated in miles per hour and/or kilometers per hour.
Page 115 of 635
437
Features of your vehicle
D150202AFD
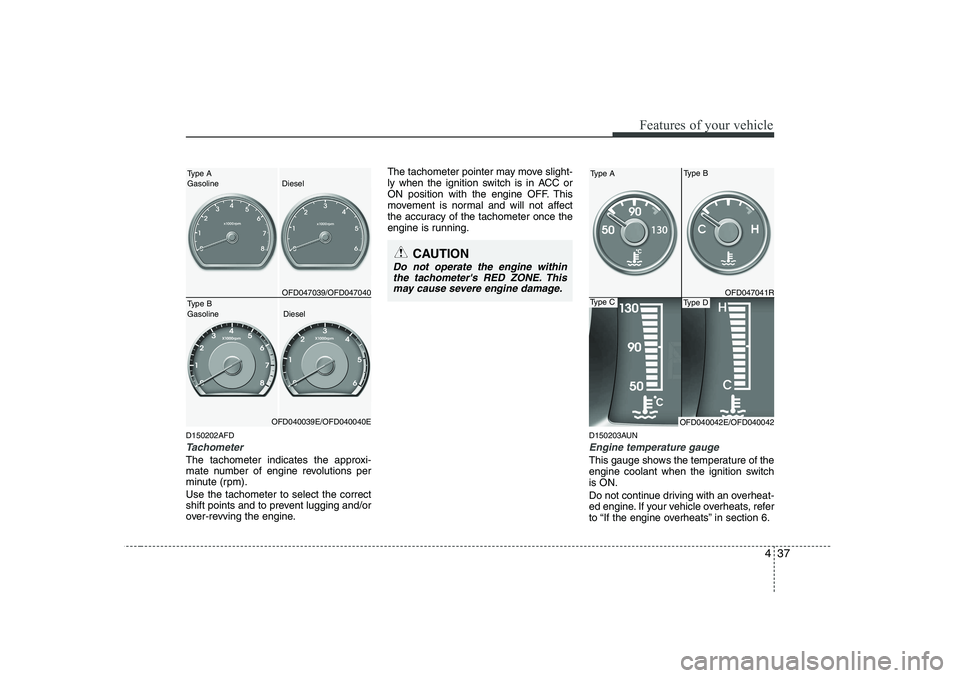
Tachometer
The tachometer indicates the approxi-
mate number of engine revolutions per
minute (rpm). Use the tachometer to select the correct
shift points and to prevent lugging and/or
over-revving the engine.The tachometer pointer may move slight-
ly when the ignition switch is in ACC or
ON position with the engine OFF. This
movement is normal and will not affect
the accuracy of the tachometer once the
engine is running.
D150203AUN
Engine temperature gauge
This gauge shows the temperature of the
engine coolant when the ignition switchis ON.
Do not continue driving with an overheat-
ed engine. If your vehicle overheats, refer
to “If the engine overheats” in section 6.
CAUTION
Do not operate the engine withinthe tachometer's RED ZONE. This may cause severe engine damage.
Type BType A Gasoline Diesel
OFD047039/OFD047040Type B Gasoline Diesel
OFD040039E/OFD040040E
Type A
OFD047041R
OFD040042E/OFD040042
Type DType C