fog HYUNDAI I30 2014 User Guide
[x] Cancel search | Manufacturer: HYUNDAI, Model Year: 2014, Model line: I30, Model: HYUNDAI I30 2014Pages: 635, PDF Size: 40.66 MB
Page 167 of 635
489
Features of your vehicle
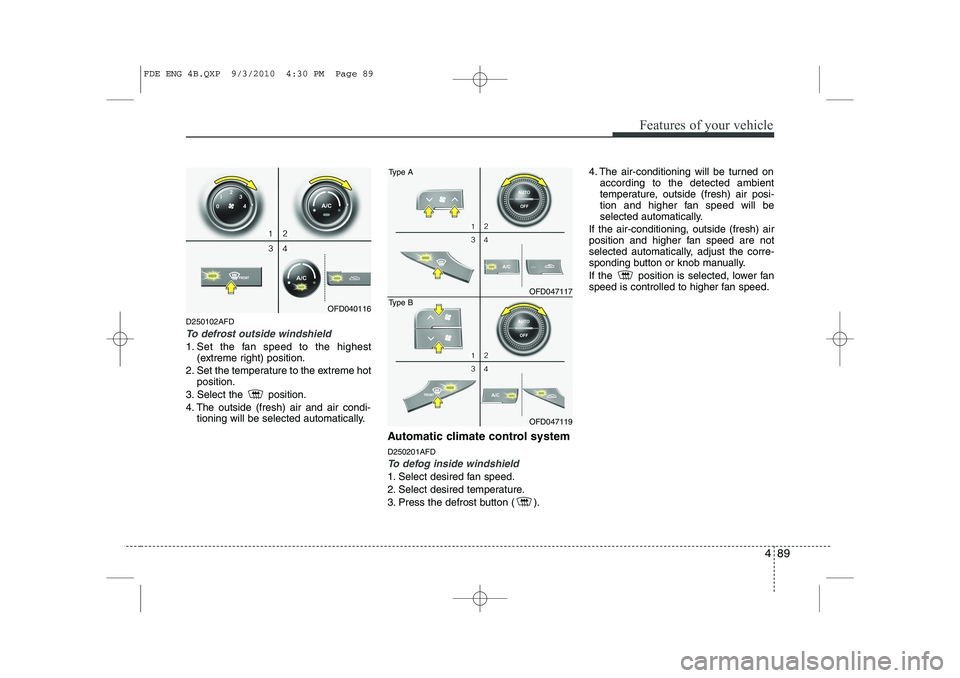
D250102AFD
To defrost outside windshield
1. Set the fan speed to the highest(extreme right) position.
2. Set the temperature to the extreme hot position.
3. Select the position.
4. The outside (fresh) air and air condi- tioning will be selected automatically.
Automatic climate control system D250201AFD
To defog inside windshield
1. Select desired fan speed.
2. Select desired temperature.
3. Press the defrost button ( ). 4. The air-conditioning will be turned on
according to the detected ambient
temperature, outside (fresh) air posi-
tion and higher fan speed will be
selected automatically.
If the air-conditioning, outside (fresh) air
position and higher fan speed are not
selected automatically, adjust the corre-
sponding button or knob manually.
If the position is selected, lower fan
speed is controlled to higher fan speed.
OFD040116
OFD047117
Type A
OFD047119
Type B
FDE ENG 4B.QXP 9/3/2010 4:30 PM Page 89
Page 168 of 635

Features of your vehicle
90
4
D250202AFD
To defrost outside windshield
1. Set fan speed to the highest position.
2. Set temperature to the extreme hot
(HI) position.
3. Press the defrost button ( ). 4. The air-conditioning will be turned on
according to the detected ambient
temperature and outside (fresh) air
position will be selected automatically.
If the position is selected, lower fan
speed is controlled to higher fan speed. D250300AUN
Defogging logic
To reduce the possibility of fogging up
the inside of the windshield, the air intakeor air conditioning are controlled auto-
matically according to certain conditions
such as or position. To cancel or
return the defogging logic, do the follow-
ings.
OFD047118
Type A
OFD047120
Type B
FDE ENG 4B.QXP 9/3/2010 4:31 PM Page 90
Page 169 of 635
491
Features of your vehicle
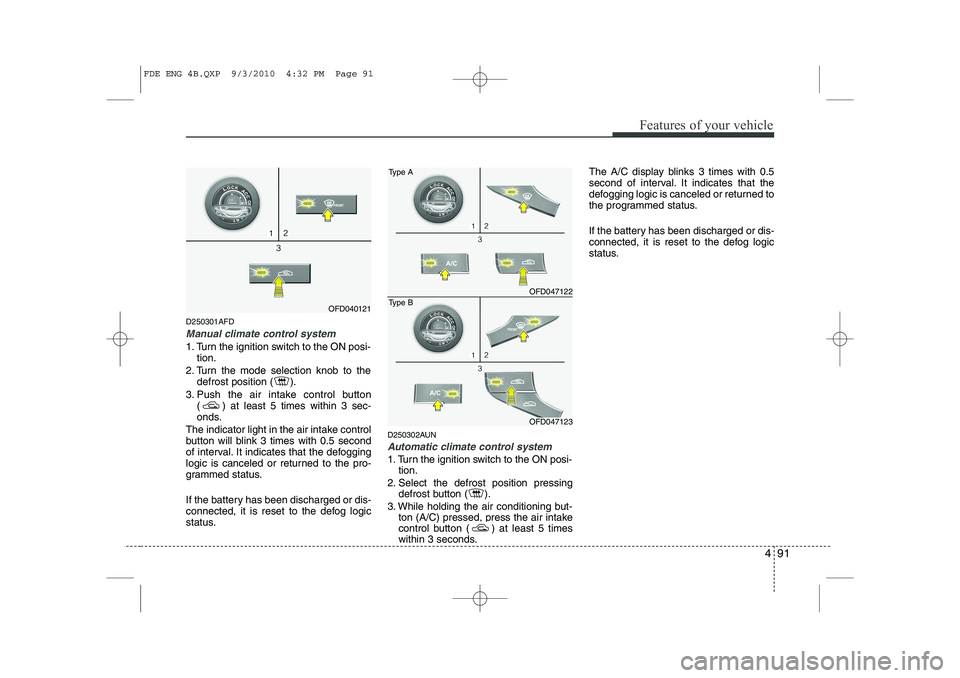
D250301AFD
Manual climate control system
1. Turn the ignition switch to the ON posi-tion.
2. Turn the mode selection knob to the defrost position ( ).
3. Push the air intake control button ( ) at least 5 times within 3 sec-
onds.
The indicator light in the air intake control
button will blink 3 times with 0.5 second
of interval. It indicates that the defogging
logic is canceled or returned to the pro-
grammed status.
If the battery has been discharged or dis-
connected, it is reset to the defog logic
status. D250302AUN
Automatic climate control system
1. Turn the ignition switch to the ON posi-
tion.
2. Select the defrost position pressing defrost button ( ).
3. While holding the air conditioning but- ton (A/C) pressed, press the air intake
control button ( ) at least 5 times
within 3 seconds. The A/C display blinks 3 times with 0.5
second of interval. It indicates that the
defogging logic is canceled or returned to
the programmed status.
If the battery has been discharged or dis-
connected, it is reset to the defog logic
status.
OFD040121
OFD047122
Type A
OFD047123
Type B
FDE ENG 4B.QXP 9/3/2010 4:32 PM Page 91
Page 375 of 635

Maintenance
58
7
Driver's side fuse panel
Description Fuse rating Protected component
START 10A Ignition lock switch, Antitheft alarm, Transaxle range switch
A/CON SW 10A A/C control module
HTD MIRR 10A Outside heated mirror motor
SEAT HTR 15A Seat warmer (switch, power)
A/CON 10A Blower relay, A/C control module, Sunroof control module, Rain sensor
FR FOG 10A Front fog lamp relay
FR WIPER 25A Front wiper relay
REAR WIPER 15A Rear wiper relay
DRL 15A Daytime running lamp unit
RR FOG 10A Rear fog lamp relay
P/WDW LH 25A Front and rear power window switch(LH)
CLOCK 10A Digital clock, Audio
C/LIGHTER 15A Power outlet
DR LOCK 20A Sunroof control module, Door unlock/lock relay
DEICER 15A Front windshield deicer
STOP 15A Stop lamp switch
ROOM LP 15A Trunk room lamp, Dome lamp, Map lamp, Digital clock
AUDIO 15A Audio
T/GATE 15A Tail gate unlock relay
SAFETY P/WDW RH 25A Front and rear safety power window switch (RH)
SAFETY P/WDW LH 25A Front and rear safety power window switch (LH)
P/WDW RH 25A Front & rear power window switch(RH)
FR P/OUTLET 15A Power outlet
T/SIG 10A Hazard switch, Turn signal
A/BAG IND 10A Airbag indicator(instrument cluster), SBR (passenger, rear)
Page 377 of 635
Maintenance
60
7
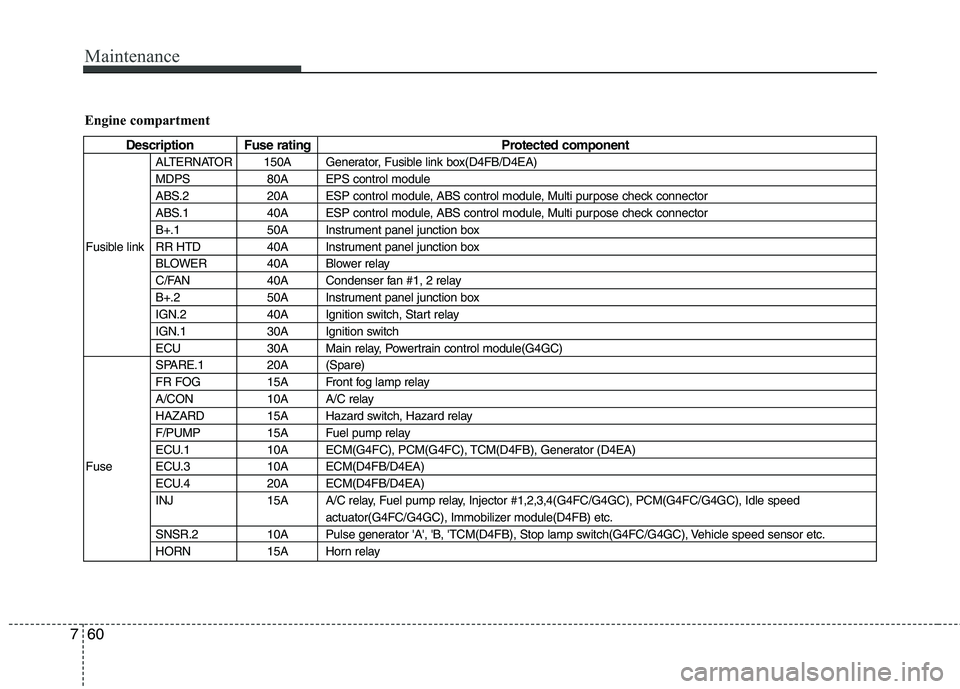
Engine compartment
Description Fuse rating Protected component
ALTERNATOR 150A Generator, Fusible link box(D4FB/D4EA)
MDPS 80A EPS control module
ABS.2 20A ESP control module, ABS control module, Multi purpose check connector
ABS.1 40A ESP control module, ABS control module, Multi purpose check connector
B+.1 50A Instrument panel junction box
Fusible link RR HTD 40A Instrument panel junction box BLOWER 40A Blower relay
C/FAN 40A Condenser fan #1, 2 relay
B+.2 50A Instrument panel junction box
IGN.2 40A Ignition switch, Start relay
IGN.1 30A Ignition switch
ECU 30A Main relay, Powertrain control module(G4GC)
SPARE.1 20A (Spare)
FR FOG 15A Front fog lamp relay
A/CON 10A A/C relay
HAZARD 15A Hazard switch, Hazard relay
F/PUMP 15A Fuel pump relay
ECU.1 10A ECM(G4FC), PCM(G4FC), TCM(D4FB), Generator (D4EA)
Fuse ECU.3 10A ECM(D4FB/D4EA) ECU.4 20A ECM(D4FB/D4EA)
INJ 15A A/C relay, Fuel pump relay, Injector #1,2,3,4(G4FC/G4GC), PCM(G4FC/G4GC), Idle speed actuator(G4FC/G4GC), Immobilizer module(D4FB) etc.
SNSR.2 10A Pulse generator 'A', 'B, 'TCM(D4FB), Stop lamp switch(G4FC/G4GC), Vehicle speed sensor etc.
HORN 15A Horn relay
Page 380 of 635

763
Maintenance
G220100AUN
Headlight, position light, turn sig-
nal light, front fog light bulbreplacement
(1) Headlight (High)
(2) Headlight (Low)
(3) Position light
(4) Front turn signal light
(5) Front fog light (if equipped)G220101AFD
Headlight bulb
OFD067021OHD076046
WARNING
- Halogen bulbs
Halogen bulbs contain pressur-
ized gas that will produce flying
pieces of glass if broken.
Always handle them carefully, and avoid scratches and abra-
sions. If the bulbs are lit, avoid
contact with liquids. Never touchthe glass with bare hands.
Residual oil may cause the bulb
to overheat and burst when lit. A
bulb should be operated onlywhen installed in a headlight.
(Continued)
(Continued)
If a bulb becomes damaged orcracked, replace it immediately
and carefully dispose of it.
Wear eye protection when chang- ing a bulb. Allow the bulb to cool
down before handling it.
Page 381 of 635

Maintenance
64
7
1. Open the hood.
2. Remove the headlight assembly by
loosening the headlight installation
bolts(3EA). (for replacement of low
beam bulb)
3. Remove the headlight bulb cover by turning it counterclockwise.
4. Disconnect the headlight bulb socket- connector.
5. Unsnap the headlight bulb retaining wire by depressing the end and push-
ing it upward.
6. Remove the bulb from the headlight assembly.
7. Install a new headlight bulb and snap the headlight bulb retaining wire into
position by aligning the wire with the
groove on the bulb. 8. Connect the headlight bulb socket-
connector.
9. Install the headlight bulb cover by turn- ing it clockwise.
10. Install the headlight assembly. (for low beam bulb)
✽✽NOTICE
If the headlight aiming adjustment is
necessary after the headlight assembly is
reinstalled, consult an authorized
HYUNDAI dealer.
G220102AFD
Turn signal light/position light, fog light bulb (if equipped)
Turn signal light/position light
1. Remove the headlight assembly by loosening the headlight installation bolts(3EA).
2. Replace the malfunctioned light bulb.
3. Install the headlight assembly.
Fog light bulb
1. Remove the fog light under cover by loosening the screw(2EA).
2. Replace the malfunctioned light bulb.
3. Install the fog light under cover. F220200AUN
Side repeater light bulb replace- ment (if equipped)
1. Remove the light assembly from the
vehicle by prying the lens and pulling
the assembly out.
2. Disconnect the bulb electrical connec- tor.
3. Separate the socket and the lens parts by turning the socket counterclockwise
until the tabs on the socket align with
the slots on the lens part.
OHD076035OFD077023
Page 382 of 635
765
Maintenance
4. Remove the bulb by pulling it straightout.
5. Insert a new bulb in the socket.
6. Reassemble the socket and the lens part.
7. Connect the bulb electrical connector.
8. Reinstall the light assembly to the body of the vehicle.
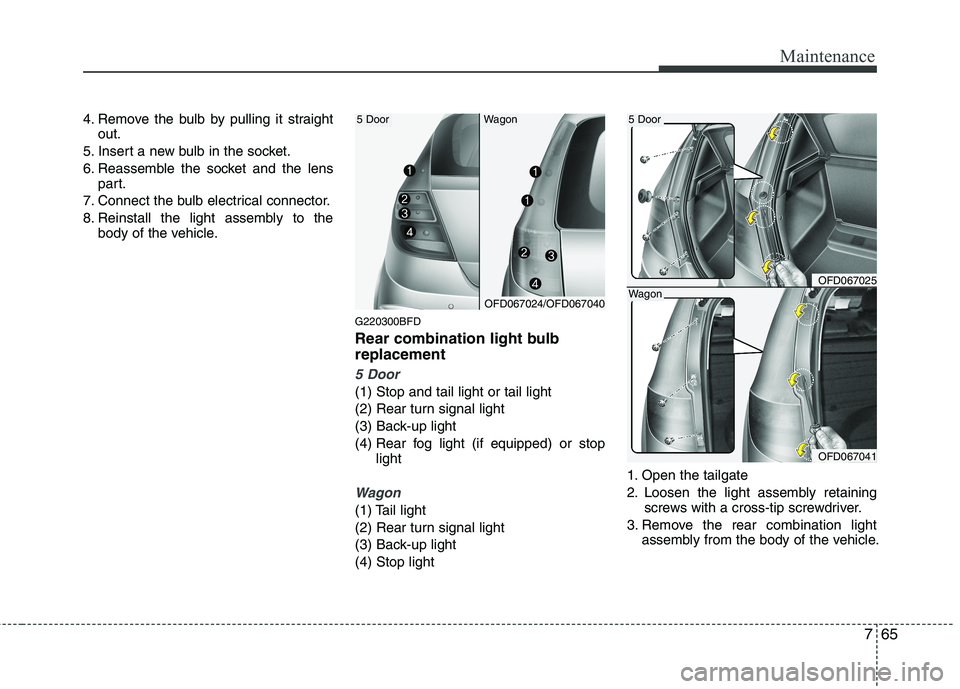
G220300BFD
Rear combination light bulb replacement
5 Door
(1) Stop and tail light or tail light
(2) Rear turn signal light
(3) Back-up light
(4) Rear fog light (if equipped) or stoplight
Wagon
(1) Tail light
(2) Rear turn signal light
(3) Back-up light(4) Stop light 1. Open the tailgate
2. Loosen the light assembly retaining
screws with a cross-tip screwdriver.
3. Remove the rear combination light assembly from the body of the vehicle.
OFD067024/OFD067040
OFD067025
OFD067041
5 Door5 Door
Wagon
Wagon
Page 390 of 635

773
Maintenance
Interior care
G230201BUN
Interior general precautions
Prevent caustic solutions such as per- fume and cosmetic oil from contacting
the dashboard because they may cause
damage or discoloration. If they do con-tact the dashboard, wipe them off imme-
diately. See the instructions that follow for
the proper way to clean vinyl.G230202AUN
Cleaning the upholstery and interior
trim
Vinyl
Remove dust and loose dirt from vinyl
with a whisk broom or vacuum cleaner.
Clean vinyl surfaces with a vinyl cleaner.
Fabric
Remove dust and loose dirt from fabric
with a whisk broom or vacuum cleaner.Clean with a mild soap solution recom-
mended for upholstery or carpets.
Remove fresh spots immediately with a
fabric spot cleaner. If fresh spots do not
receive immediate attention, the fabriccan be stained and its color can be
affected. Also, its fire-resistant properties
can be reduced if the material is not
properly maintained. G230203AUN
Cleaning the lap/shoulder belt web-
bing
Clean the belt webbing with any mild
soap solution recommended for cleaning
upholstery or carpet. Follow the instruc-
tions provided with the soap. Do not
bleach or re-dye the webbing because
this may weaken it.
G230204AUN
Cleaning the interior window glass
If the interior glass surfaces of the vehi-
cle become fogged (that is, covered with
an oily, greasy or waxy film), they should
be cleaned with glass cleaner. Follow the
directions on the glass cleaner container.CAUTION
Never allow water or other liquids
to come in contact withelectrical/electronic componentsinside the vehicle as this may dam-age them.
CAUTION
Using anything but recommended cleaners and procedures may affectthe fabric’s appearance and fire-resistant properties.
CAUTION
Do not scrape or scratch the inside
of the rear window. This may result in damage to the rear windowdefroster grid.CAUTION
When cleaning leather products (steering wheel, seats etc.), useneutral detergents or low alcohol
content solutions. If you use highalcohol content solutions oracid/alkaline detergents, the color of the leather may fade or the sur-
face may get stripped off.
Page 399 of 635
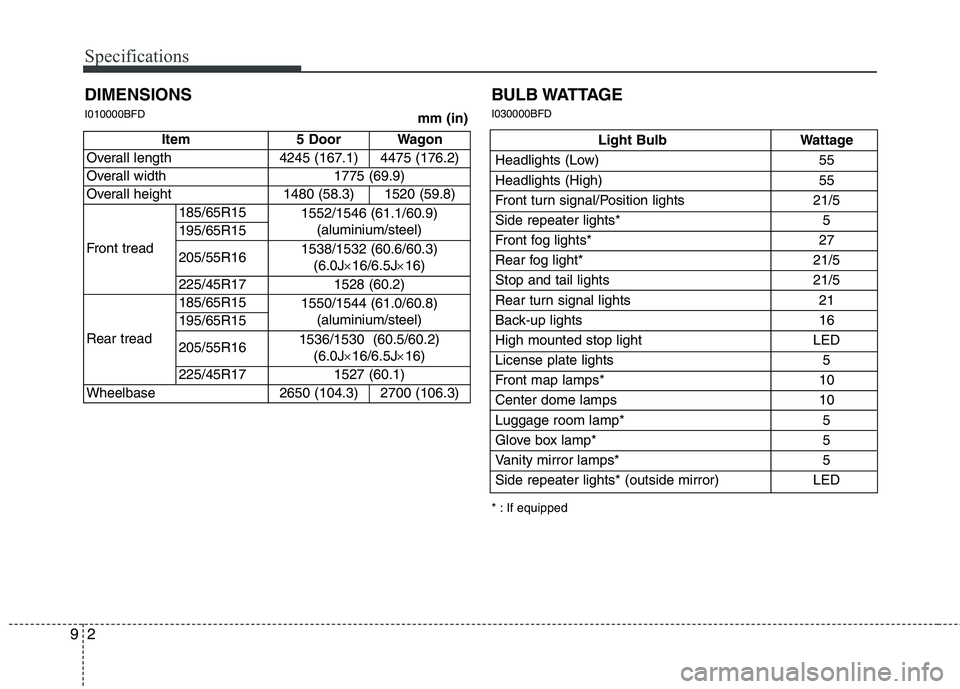
Specifications
2
9
DIMENSIONS I010000BFD
Light Bulb Wattage
Headlights (Low) 55
Headlights (High) 55
Front turn signal/Position lights 21/5
Side repeater lights* 5
Front fog lights* 27
Rear fog light* 21/5
Stop and tail lights 21/5
Rear turn signal lights 21
Back-up lights 16
High mounted stop light LED
License plate lights 5
Front map lamps* 10
Center dome lamps 10
Luggage room lamp* 5
Glove box lamp* 5
Vanity mirror lamps* 5
Side repeater lights* (outside mirror) LED
BULB WATTAGE I030000BFD
* : If equipped
mm (in)
Item 5 Door Wagon
Overall length 4245 (167.1) 4475 (176.2)
Overall width 1775 (69.9)
Overall height 1480 (58.3) 1520 (59.8)
Front tread 185/65R15
1552/1546 (61.1/60.9)
(aluminium/steel)
195/65R15 205/55R16 1538/1532 (60.6/60.3)
(6.0J ×16/6.5J ×16)
225/45R17 1528 (60.2)
Rear tread 185/65R15
1550/1544 (61.0/60.8)
(aluminium/steel)
195/65R15205/55R16 1536/1530 (60.5/60.2)
(6.0J ×16/6.5J ×16)
225/45R17 1527 (60.1)
Wheelbase 2650 (104.3) 2700 (106.3)