clock HYUNDAI I30 2015 Owner's Manual
[x] Cancel search | Manufacturer: HYUNDAI, Model Year: 2015, Model line: I30, Model: HYUNDAI I30 2015Pages: 635, PDF Size: 40.66 MB
Page 233 of 635
4 155
Features of your vehicle
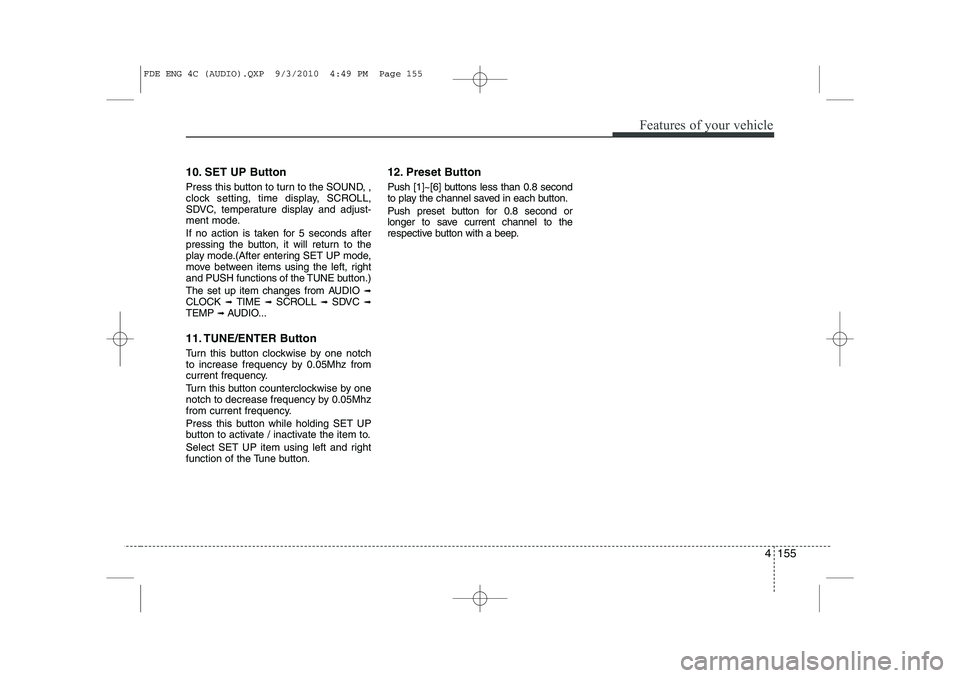
10. SET UP Button
Press this button to turn to the SOUND, ,
clock setting, time display, SCROLL,
SDVC, temperature display and adjust-
ment mode.
If no action is taken for 5 seconds after
pressing the button, it will return to the
play mode.(After entering SET UP mode,
move between items using the left, right
and PUSH functions of the TUNE button.)
The set up item changes from AUDIO ➟
CLOCK ➟ TIME ➟ SCROLL ➟ SDVC ➟
TEMP ➟ AUDIO...
11. TUNE/ENTER Button
Turn this button clockwise by one notch
to increase frequency by 0.05Mhz from
current frequency.
Turn this button counterclockwise by one
notch to decrease frequency by 0.05Mhz
from current frequency.
Press this button while holding SET UP
button to activate / inactivate the item to.
Select SET UP item using left and right
function of the Tune button. 12. Preset Button
Push [1]~[6] buttons less than 0.8 second
to play the channel saved in each button.
Push preset button for 0.8 second or
longer to save current channel to the
respective button with a beep.
FDE ENG 4C (AUDIO).QXP 9/3/2010 4:49 PM Page 155
Page 235 of 635
4 157
Features of your vehicle
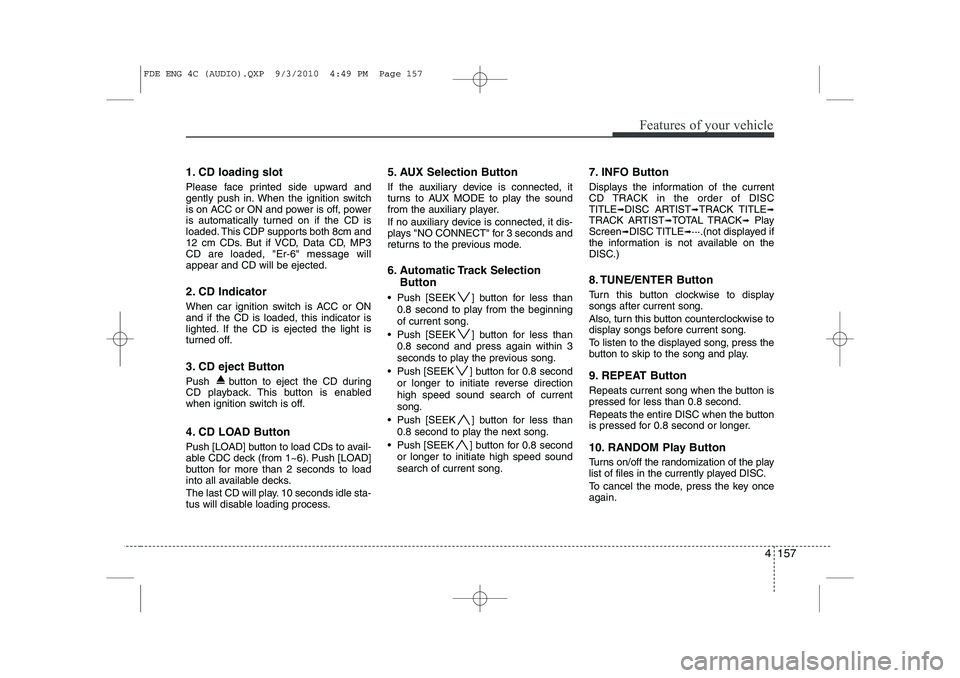
1. CD loading slot
Please face printed side upward and
gently push in. When the ignition switch
is on ACC or ON and power is off, power
is automatically turned on if the CD is
loaded. This CDP supports both 8cm and
12 cm CDs. But if VCD, Data CD, MP3CD are loaded, "Er-6" message willappear and CD will be ejected.
2. CD Indicator
When car ignition switch is ACC or ON and if the CD is loaded, this indicator is
lighted. If the CD is ejected the light is
turned off.
3. CD eject Button
Push button to eject the CD during
CD playback. This button is enabled
when ignition switch is off.
4. CD LOAD Button
Push [LOAD] button to load CDs to avail-
able CDC deck (from 1~6). Push [LOAD]
button for more than 2 seconds to load
into all available decks.
The last CD will play. 10 seconds idle sta-
tus will disable loading process.5. AUX Selection Button
If the auxiliary device is connected, it
turns to AUX MODE to play the sound
from the auxiliary player.
If no auxiliary device is connected, it dis-
plays "NO CONNECT" for 3 seconds and
returns to the previous mode.
6. Automatic Track Selection
Button
Push [SEEK ] button for less than 0.8 second to play from the beginning of current song.
Push [SEEK ] button for less than 0.8 second and press again within 3
seconds to play the previous song.
Push [SEEK ] button for 0.8 second or longer to initiate reverse directionhigh speed sound search of currentsong.
Push [SEEK ] button for less than 0.8 second to play the next song.
Push [SEEK ] button for 0.8 second or longer to initiate high speed soundsearch of current song. 7. INFO Button
Displays the information of the current
CD TRACK in the order of DISCTITLE
➟DISC ARTIST ➟TRACK TITLE ➟
TRACK ARTIST ➟TOTAL TRACK ➟Play
Screen ➟DISC TITLE ➟···.(not displayed if
the information is not available on the
DISC.)
8. TUNE/ENTER Button
Turn this button clockwise to display songs after current song.
Also, turn this button counterclockwise to
display songs before current song.
To listen to the displayed song, press the
button to skip to the song and play.
9. REPEAT Button
Repeats current song when the button is
pressed for less than 0.8 second.
Repeats the entire DISC when the button
is pressed for 0.8 second or longer.
10. RANDOM Play Button
Turns on/off the randomization of the play
list of files in the currently played DISC.
To cancel the mode, press the key once again.
FDE ENG 4C (AUDIO).QXP 9/3/2010 4:49 PM Page 157
Page 238 of 635
Features of your vehicle
160
4
In case USB is connected to the multiple
terminal inside the console on the right
hand side of the driver’s seat. When USB
is connected, the ‘USB’ icon will be dis-
played on the top right corner of the dis-
play screen.
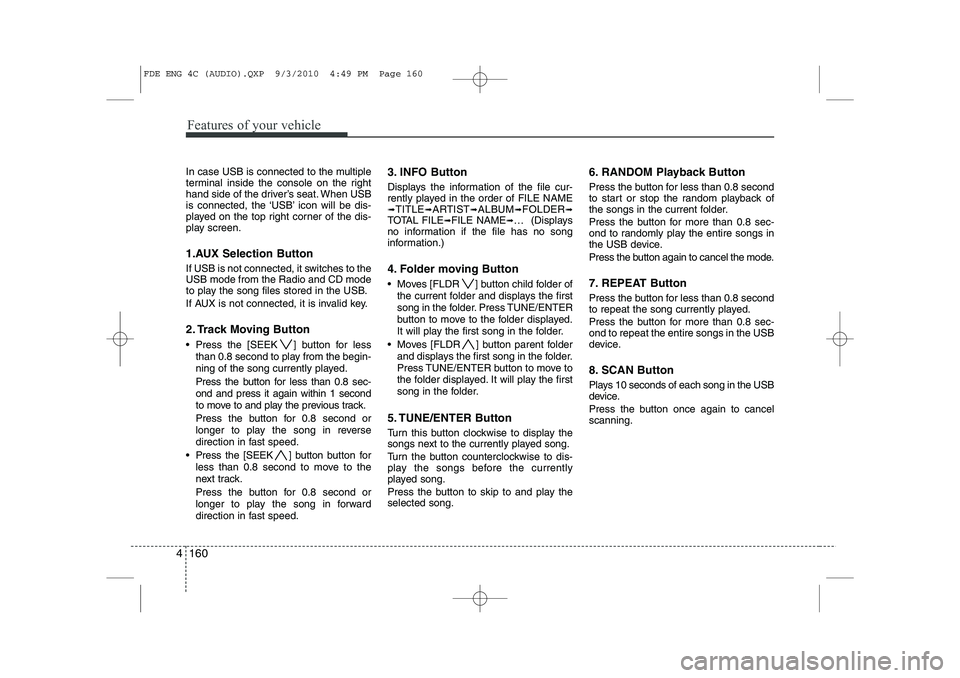
1.AUX Selection Button
If USB is not connected, it switches to the USB mode from the Radio and CD mode
to play the song files stored in the USB.
If AUX is not connected, it is invalid key.
2. Track Moving Button
Press the [SEEK ] button for less
than 0.8 second to play from the begin-
ning of the song currently played.
Press the button for less than 0.8 sec- ond and press it again within 1 second
to move to and play the previous track.
Press the button for 0.8 second or
longer to play the song in reverse
direction in fast speed.
Press the [SEEK ] button b utton for
less than 0.8 second to move to the
next track.
Press the button for 0.8 second or
longer to play the song in forward
direction in fast speed. 3. INFO Button
Displays the information of the file cur-
rently played in the order of FILE NAME➟
TITLE ➟ARTIST ➟ALBUM ➟FOLDER ➟
TOTAL FILE ➟FILE NAME ➟… (Displays
no information if the file has no song
information.)
4. Folder moving Button
Moves [FLDR ] button child folder of
the current folder and displays the first
song in the folder. Press TUNE/ENTER
button to move to the folder displayed.
It will play the first song in the folder.
Moves [FLDR ] button parent folder and displays the first song in the folder.
Press TUNE/ENTER button to move to
the folder displayed. It will play the first
song in the folder.
5. TUNE/ENTER Button
Turn this button clockwise to display the
songs next to the currently played song.
Turn the button counterclockwise to dis-
play the songs before the currently
played song.
Press the button to skip to and play the selected song. 6. RANDOM Playback Button
Press the button for less than 0.8 second
to start or stop the random playback of
the songs in the current folder.
Press the button for more than 0.8 sec-
ond to randomly play the entire songs in
the USB device.
Press the button again to cancel the mode.
7. REPEAT Button
Press the button for less than 0.8 second
to repeat the song currently played.
Press the button for more than 0.8 sec- ond to repeat the entire songs in the USB
device.
8. SCAN Button
Plays 10 seconds of each song in the USB
device.
Press the button once again to cancel scanning.
FDE ENG 4C (AUDIO).QXP 9/3/2010 4:49 PM Page 160
Page 242 of 635
Features of your vehicle
164
4
In case the iPod exclusive cable is con-
nected to the multiple terminal inside the
console on the right hand side of the dri-
ver’s seat. When the iPod is connected,
the ‘iPod’ icon will be displayed on the top
right corner of the display screen.
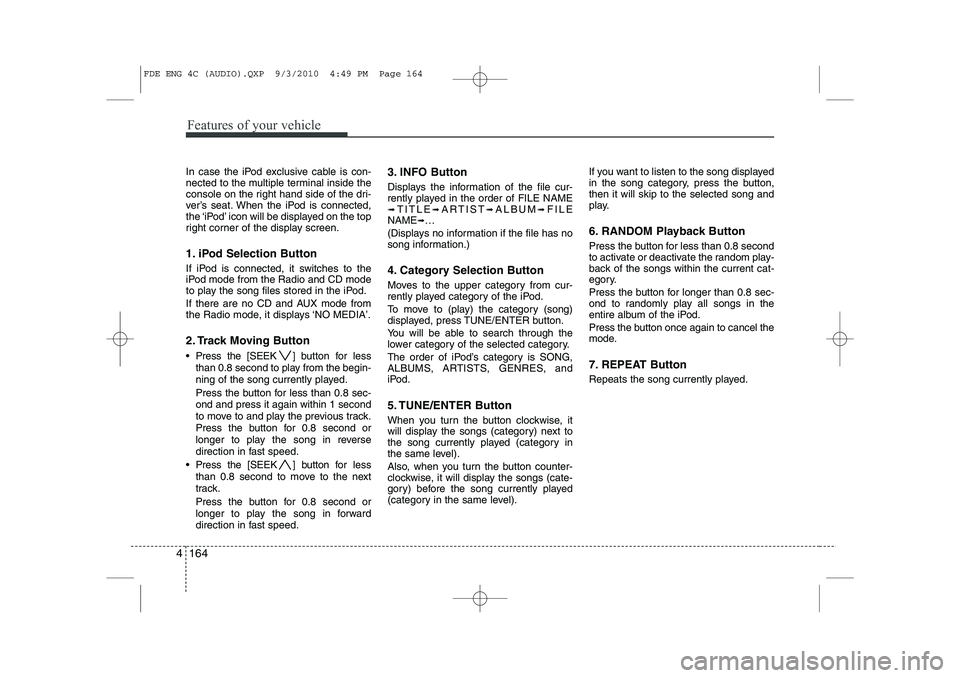
1. iPod Selection Button
If iPod is connected, it switches to the
iPod mode from the Radio and CD mode
to play the song files stored in the iPod.
If there are no CD and AUX mode from
the Radio mode, it displays ‘NO MEDIA’.
2. Track Moving Button
Press the [SEEK ] b utton for less
than 0.8 second to play from the begin-
ning of the song currently played.
Press the button for less than 0.8 sec- ond and press it again within 1 second
to move to and play the previous track.
Press the button for 0.8 second or
longer to play the song in reverse
direction in fast speed.
Press the [SEEK ] button for less
than 0.8 second to move to the next
track.
Press the button for 0.8 second or
longer to play the song in forward
direction in fast speed. 3. INFO Button
Displays the information of the file cur-
rently played in the order of FILE NAME➟
TITLE ➟ARTIST ➟ALBUM ➟FILE
NAME ➟…
(Displays no information if the file has no
song information.)
4. Category Selection Button
Moves to the upper category from cur-
rently played category of the iPod.
To move to (play) the category (song)
displayed, press TUNE/ENTER button.
You will be able to search through the
lower category of the selected category.
The order of iPod’s category is SONG,
ALBUMS, ARTISTS, GENRES, and
iPod.
5. TUNE/ENTER Button
When you turn the button clockwise, it
will display the songs (category) next to
the song currently played (category in
the same level).
Also, when you turn the button counter-
clockwise, it will display the songs (cate-
gory) before the song currently played
(category in the same level). If you want to listen to the song displayed
in the song category, press the button,then it will skip to the selected song and
play.
6. RANDOM Playback Button
Press the button for less than 0.8 second
to activate or deactivate the random play-
back of the songs within the current cat-
egory.
Press the button for longer than 0.8 sec-
ond to randomly play all songs in the
entire album of the iPod.
Press the button once again to cancel the
mode.
7. REPEAT Button
Repeats the song currently played.
FDE ENG 4C (AUDIO).QXP 9/3/2010 4:49 PM Page 164
Page 305 of 635
613
What to do in an emergency
F070200AFD
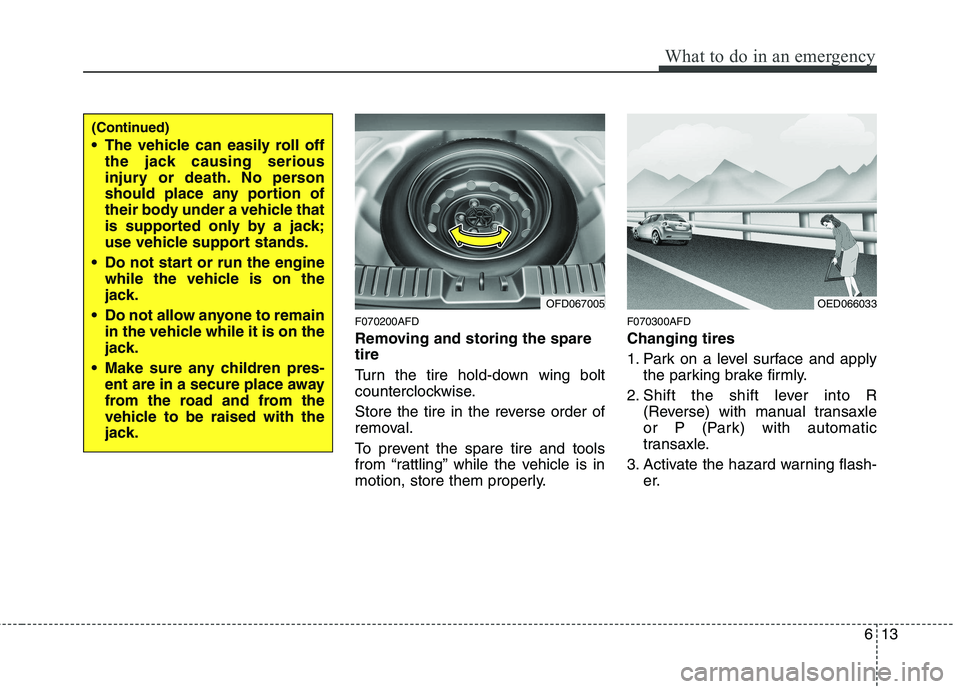
Removing and storing the spare tire
Turn the tire hold-down wing bolt
counterclockwise.
Store the tire in the reverse order of
removal.
To prevent the spare tire and tools
from “rattling” while the vehicle is in
motion, store them properly.F070300AFD Changing tires
1. Park on a level surface and apply
the parking brake firmly.
2. Shift the shift lever into R (Reverse) with manual transaxle
or P (Park) with automatic
transaxle.
3. Activate the hazard warning flash- er.
OFD067005
(Continued)
The vehicle can easily roll offthe jack causing serious
injury or death. No person
should place any portion of
their body under a vehicle that
is supported only by a jack;
use vehicle support stands.
Do not start or run the engine while the vehicle is on the
jack.
Do not allow anyone to remain in the vehicle while it is on the
jack.
Make sure any children pres- ent are in a secure place away
from the road and from the
vehicle to be raised with the
jack.
OED066033
Page 306 of 635
What to do in an emergency
14
6
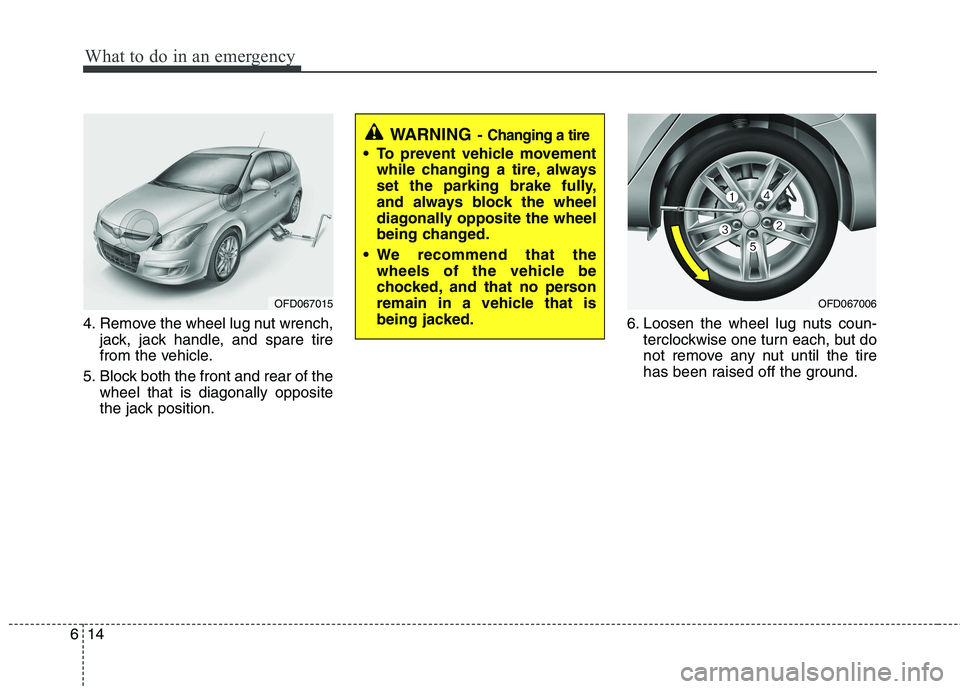
4. Remove the wheel lug nut wrench,
jack, jack handle, and spare tire
from the vehicle.
5. Block both the front and rear of the wheel that is diagonally opposite
the jack position. 6. Loosen the wheel lug nuts coun-
terclockwise one turn each, but do
not remove any nut until the tire
has been raised off the ground.
OFD067015OFD067006
WARNING - Changing a tire
To prevent vehicle movement
while changing a tire, always
set the parking brake fully,
and always block the wheel
diagonally opposite the wheel
being changed.
We recommend that the wheels of the vehicle be
chocked, and that no person
remain in a vehicle that is
being jacked.
Page 307 of 635
615
What to do in an emergency
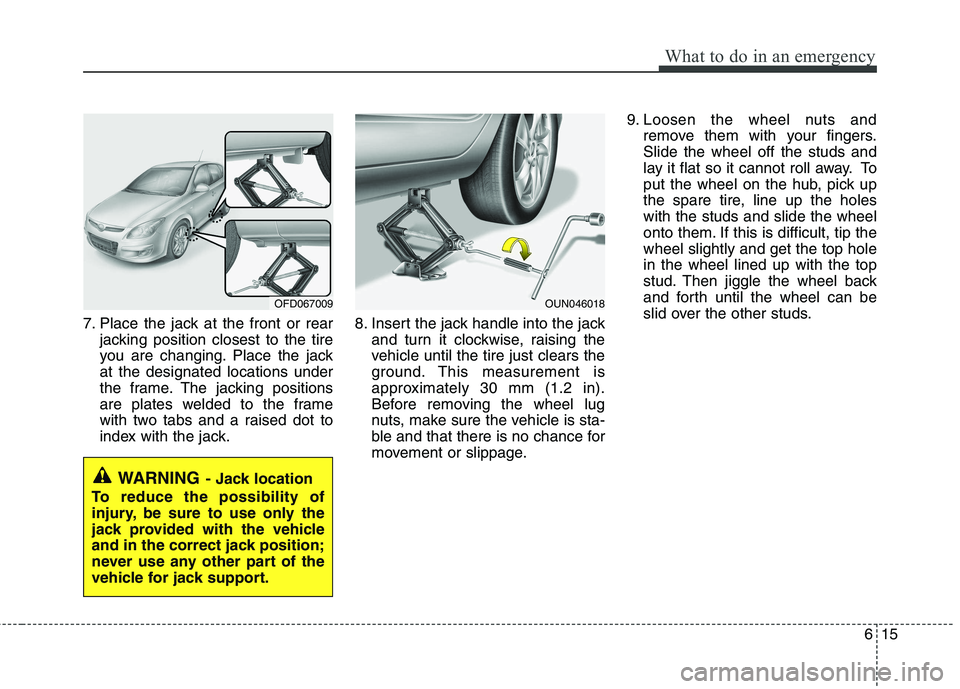
7. Place the jack at the front or rearjacking position closest to the tire
you are changing. Place the jackat the designated locations under
the frame. The jacking positions
are plates welded to the frame
with two tabs and a raised dot to
index with the jack. 8. Insert the jack handle into the jack
and turn it clockwise, raising the
vehicle until the tire just clears the
ground. This measurement is
approximately 30 mm (1.2 in).
Before removing the wheel lug
nuts, make sure the vehicle is sta-
ble and that there is no chance for
movement or slippage. 9. Loosen the wheel nuts and
remove them with your fingers.Slide the wheel off the studs and
lay it flat so it cannot roll away. To
put the wheel on the hub, pick up
the spare tire, line up the holeswith the studs and slide the wheel
onto them. If this is difficult, tip thewheel slightly and get the top holein the wheel lined up with the top
stud. Then jiggle the wheel back
and forth until the wheel can be
slid over the other studs.
WARNING - Jack location
To reduce the possibility of
injury, be sure to use only the
jack provided with the vehicle
and in the correct jack position;
never use any other part of the
vehicle for jack support.
OFD067009OUN046018
Page 308 of 635
What to do in an emergency
16
6
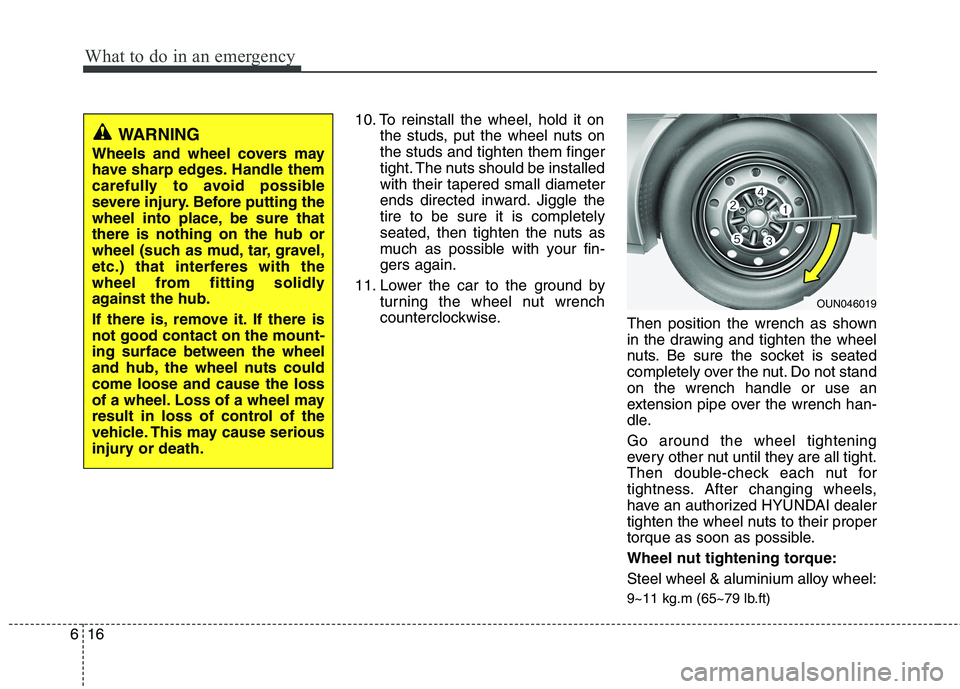
10. To reinstall the wheel, hold it on
the studs, put the wheel nuts on the studs and tighten them finger
tight. The nuts should be installedwith their tapered small diameter
ends directed inward. Jiggle thetire to be sure it is completely
seated, then tighten the nuts as
much as possible with your fin-gers again.
11. Lower the car to the ground by turning the wheel nut wrench
counterclockwise. Then position the wrench as shown
in the drawing and tighten the wheel
nuts. Be sure the socket is seated
completely over the nut. Do not standon the wrench handle or use an
extension pipe over the wrench han-
dle. Go around the wheel tightening
every other nut until they are all tight.
Then double-check each nut for
tightness. After changing wheels,
have an authorized HYUNDAI dealer
tighten the wheel nuts to their proper
torque as soon as possible.
Wheel nut tightening torque:
Steel wheel & aluminium alloy wheel:
9~11 kg.m (65~79 lb.ft)
OUN046019
WARNING
Wheels and wheel covers may
have sharp edges. Handle them
carefully to avoid possible
severe injury. Before putting the
wheel into place, be sure thatthere is nothing on the hub or
wheel (such as mud, tar, gravel,
etc.) that interferes with the
wheel from fitting solidly
against the hub.
If there is, remove it. If there is not good contact on the mount-ing surface between the wheel
and hub, the wheel nuts couldcome loose and cause the loss
of a wheel. Loss of a wheel may
result in loss of control of the
vehicle. This may cause serious
injury or death.
Page 313 of 635
621
What to do in an emergency
When towing your vehicle in an emer- gency without wheel dollies :
1. Set the ignition switch in the ACC posi-tion.
2. Place the transaxle shift lever in N (Neutral).
3. Release the parking brake.
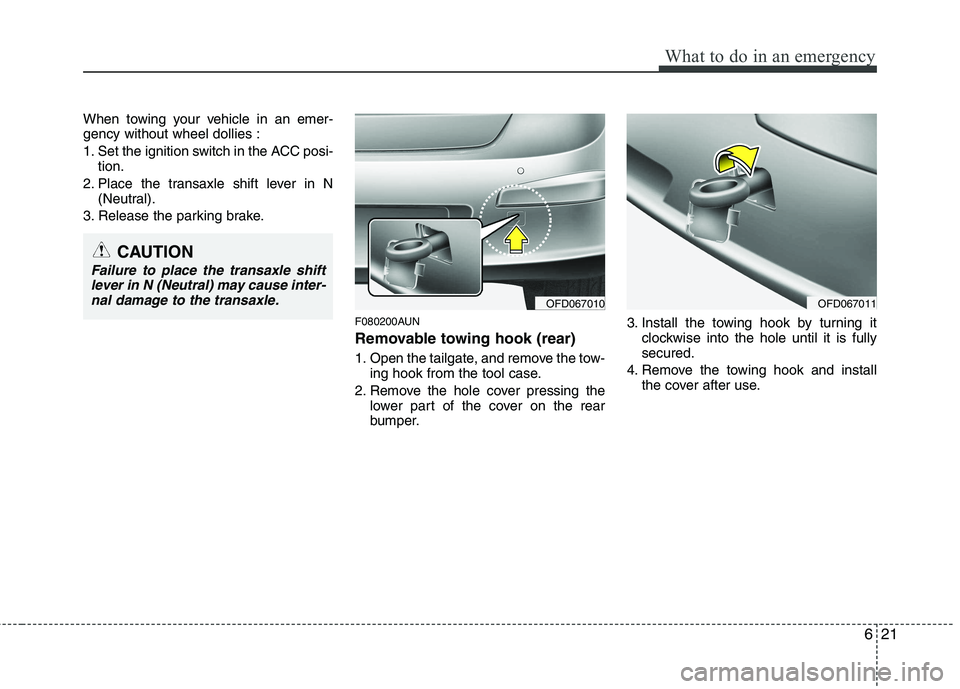
F080200AUN
Removable towing hook (rear)
1. Open the tailgate, and remove the tow-ing hook from the tool case.
2. Remove the hole cover pressing the lower part of the cover on the rear
bumper. 3. Install the towing hook by turning it
clockwise into the hole until it is fullysecured.
4. Remove the towing hook and install the cover after use.
CAUTION
Failure to place the transaxle shift
lever in N (Neutral) may cause inter-
nal damage to the transaxle.
OFD067010OFD067011
Page 342 of 635
725
Maintenance
ENGINE COOLANT
G060200AFD Changing the engine oil and filter
Have engine oil and filter changed by an
authorized HYUNDAI dealer according tothe Maintenance Schedule at the begin-ning of this section. G070000AFD The high-pressure cooling system has a
reservoir filled with year-round antifreeze
coolant. The reservoir is filled at the fac-
tory.
Check the antifreeze protection and
coolant concentration level at least once
a year, at the beginning of the winter sea-
son, and before traveling to a colder cli-
mate. G070100AFD
Checking the coolant level
WARNING
- Removing
radiator cap
Never attempt to remove the radi- ator cap while the engine is oper-
ating or hot. Doing so might leadto cooling system and engine
damage and could result in seri-
ous personal injury from escap-ing hot coolant or steam.
(Continued)
WARNING
Used engine oil may cause irrita- tion or cancer of the skin if left in
contact with the skin for prolonged
periods of time. Used engine oil
contains chemicals that have
caused cancer in laboratory ani-
mals. Always protect your skin by
washing your hands thoroughlywith soap and warm water as soon
as possible after handling used oil.
(Continued)
Turn the engine off and wait until it cools down. Use extreme care
when removing the radiator cap.
Wrap a thick towel around it, and
turn it counterclockwise slowly to
the first stop. Step back while the
pressure is released from the
cooling system. When you aresure all the pressure has been
released, press down on the cap,
using a thick towel, and continue
turning counterclockwise to
remove it.
Even if the engine is not operat- ing, do not remove the radiatorcap or the drain plug while the
engine and radiator are hot. Hot
coolant and steam may still blow
out under pressure, causing seri-
ous injury.