reset HYUNDAI I30 2015 Owner's Manual
[x] Cancel search | Manufacturer: HYUNDAI, Model Year: 2015, Model line: I30, Model: HYUNDAI I30 2015Pages: 635, PDF Size: 40.66 MB
Page 221 of 635
4 143
Features of your vehicle
10. SET UP Button
Press this button to turn to the SOUND,
clock setting, time display, SCROLL,
SDVC, temperature display and adjust-
ment mode.
If no action is taken for 5 seconds after
pressing the button, it will return to the
play mode.(After entering SET UP mode,
move between items using the left, right
and PUSH functions of the TUNE button.)
The set up item changes from AUDIO ➟
CLOCK ➟ TIME ➟ SCROLL ➟ SDVC ➟
TEMP ➟ P.BASS ➟ AUDIO...
11. TUNE/ENTER Button
Turn this button clockwise by one notch
to increase frequency by 0.05Mhz from
current frequency.
Turn this button counterclockwise by one
notch to decrease frequency by 0.05Mhz
from current frequency.
Press this button while holding SET UP
button to activate / inactivate the item to.
Select SET UP item using left and right
function of the Tune button. 12. Preset Button
Push [1]~[6] buttons less than 0.8 second
to play the channel saved in each button.
Push preset button for 0.8 second or
longer to save current channel to the
respective button with a beep.
FDE ENG 4C (AUDIO).QXP 9/3/2010 4:49 PM Page 143
Page 231 of 635
4 153
Features of your vehicle
A-300FDD
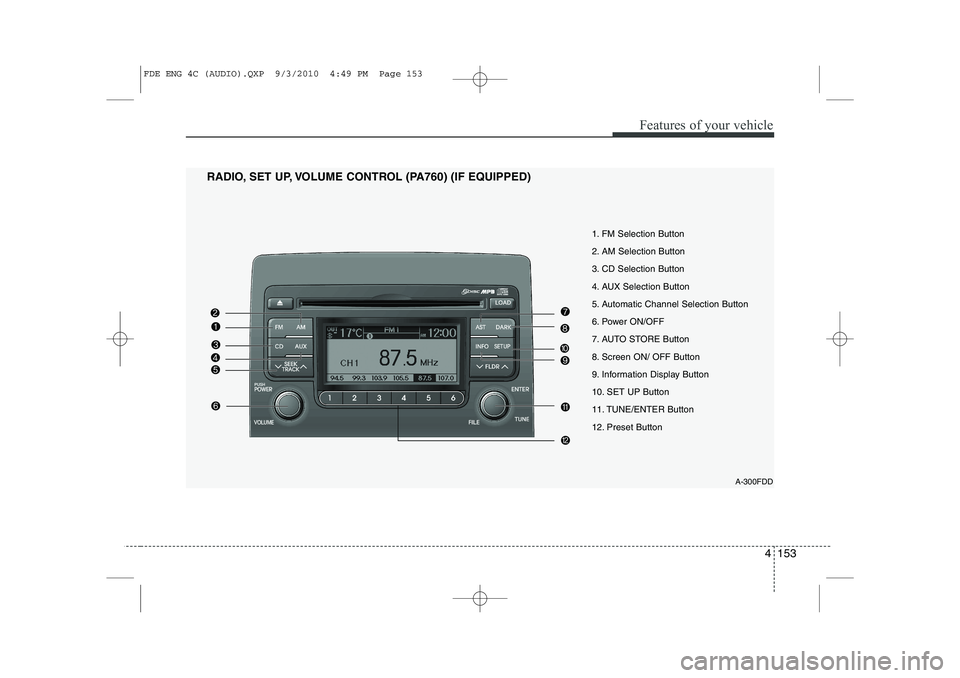
1. FM Selection Button
2. AM Selection Button
3. CD Selection Button
4. AUX Selection Button
5. Automatic Channel Selection Button
6. Power ON/OFF
7. AUTO STORE Button
8. Screen ON/ OFF Button
9. Information Display Button
10. SET UP Button
11. TUNE/ENTER Button
12. Preset Button
RADIO, SET UP, VOLUME CONTROL (PA760) (IF EQUIPPED)
FDE ENG 4C (AUDIO).QXP 9/3/2010 4:49 PM Page 153
Page 232 of 635
Features of your vehicle
154
4
1. FM Selection Button
Turns to FM mode and toggles FM1 and
FM2 when the button is pressed each
time.
2. AM Selection Button
Turns to AM mode, and toggles in the order of AM1 ➟AM2 ➟AM1··· when the
button is pressed each time.
3. CD Selection Button
If there is a cd in the CDP DECK it plays
the CD.
Press CD button to automatically insert CD when the disc is ejected from the
deck by pressing CD EJECT.
4. AUX Selection Button
If the auxiliary device is connected, it
turns to AUX MODE to play the sound
from the auxiliary player.
If no Disc and auxiliary device is connected,
it displays “NO Media” for 5 seconds and
returns to the previous mode. 5. Automatic Channel Selection
Button
When the [SEEK ]button is pressed, it reduces the band frequency by 100khz to automatically select channel.
Stops at the previous frequency if no
channel is found.
When the [SEEK ]button is pressed, it increases the band frequency by100khz to automatically select channel.
Stops at the previous frequency if no
channel is found.
6. Power ON/OFF & Volume Control Button
Turns on/off the set when the IGNI- TION SWITCH is on ACC or ON. If the
button is turned to the right, it increas-
es the volume and left, decreases the
volume.
In AUX mode, the volume and tone (BASS, MID, TRE) are adjusted in a
separate way.
If you pull out AUX from a jack and
insert it again, then only volume goes
back to 10-step. 7. AUTO STORE Button
When the button is pressed, it automati-
cally selects and saves channels with
high reception rate to PRESET buttons
(1~6) and plays the channel saved inPRESET1.
If no channel is saved after AST, it will
play the previous channel.
8. Screen ON/ OFF Button
Turns off/on the displayed data and light
on LCD.
The screen and light will be turned on by
pressing any button except DARK button
when the screen is turned off.
9. Information Display Button
Displays the information of the channel
currently played.
FDE ENG 4C (AUDIO).QXP 9/3/2010 4:49 PM Page 154
Page 233 of 635
4 155
Features of your vehicle
10. SET UP Button
Press this button to turn to the SOUND, ,
clock setting, time display, SCROLL,
SDVC, temperature display and adjust-
ment mode.
If no action is taken for 5 seconds after
pressing the button, it will return to the
play mode.(After entering SET UP mode,
move between items using the left, right
and PUSH functions of the TUNE button.)
The set up item changes from AUDIO ➟
CLOCK ➟ TIME ➟ SCROLL ➟ SDVC ➟
TEMP ➟ AUDIO...
11. TUNE/ENTER Button
Turn this button clockwise by one notch
to increase frequency by 0.05Mhz from
current frequency.
Turn this button counterclockwise by one
notch to decrease frequency by 0.05Mhz
from current frequency.
Press this button while holding SET UP
button to activate / inactivate the item to.
Select SET UP item using left and right
function of the Tune button. 12. Preset Button
Push [1]~[6] buttons less than 0.8 second
to play the channel saved in each button.
Push preset button for 0.8 second or
longer to save current channel to the
respective button with a beep.
FDE ENG 4C (AUDIO).QXP 9/3/2010 4:49 PM Page 155
Page 272 of 635
529
Driving your vehicle
E090400AUN
To temporarily accelerate with the
cruise control on:
If you want to speed up temporarily when
the cruise control is on, depress the
accelerator pedal. Increased speed will
not interfere with cruise control operationor change the set speed.
To return to the set speed, take your foot
off the accelerator.E090500AFD
To cancel cruise control, do one
of the following:
Press the brake pedal.
Press the clutch pedal with a manualtransaxle.
Shift into N (Neutral) with an automatic transaxle.
Press the CANCEL switch located on the steering wheel.
Decrease the vehicle speed lower than the memory speed by 15 km/h (9 mph).
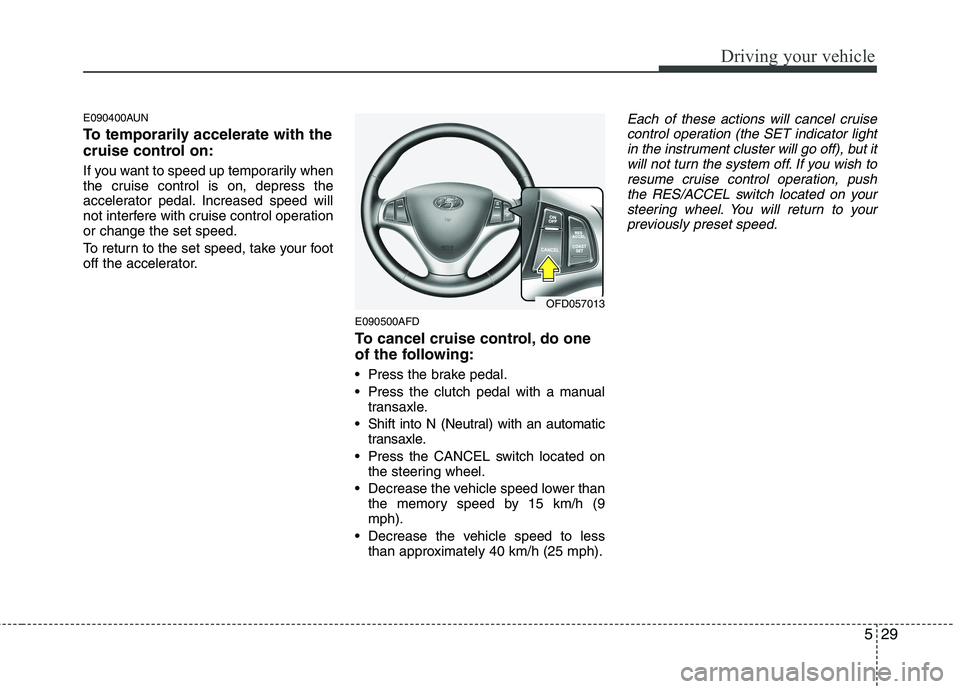
Decrease the vehicle speed to less than approximately 40 km/h (25 mph).Each of these actions will cancel cruise
control operation (the SET indicator light in the instrument cluster will go off), but itwill not turn the system off. If you wish to
resume cruise control operation, pushthe RES/ACCEL switch located on yoursteering wheel. You will return to your
previously preset speed.
OFD057013
Page 359 of 635
Maintenance
42
7
G130300AUN Reset items
Items should be reset after the battery
has been discharged or the battery hasbeen disconnected.
Auto up/down window (See section 4)
Sunroof (See section 4)
Trip computer (See section 4)
Climate control system
(See section 4)
Clock (See section 4)
Audio (See section 4)(Continued)
Before performing maintenance or recharging the battery, turn off all accessories and stop the
engine.
The negative battery cable must be removed first and installed
last when the battery is discon-nected.WARNING - Recharging
battery
When recharging the battery,
observe the following precautions:
The battery must be removed from the vehicle and placed in an area with good ventilation.
Do not allow cigarettes, sparks, or flame near the battery.
Watch the battery during charg- ing, and stop or reduce the charg-
ing rate if the battery cells begin
gassing (boiling) violently or if
the temperature of the electrolyte
of any cell exceeds 49°C (120°F).
Wear eye protection when check- ing the battery during charging.
Disconnect the battery charger in the following order.
1. Turn off the battery charger main switch.
2. Unhook the negative clamp from the negative battery terminal.
3. Unhook the positive clamp from the positive battery terminal.
(Continued)
Page 364 of 635
747
Maintenance
G200500AUN Wheel alignment and tire balance
The wheels on your vehicle were aligned and balanced carefully at the
factory to give you the longest tire life
and best overall performance.
In most cases, you will not need to
have your wheels aligned again.
However, if you notice unusual tire
wear or your vehicle pulling one way
or the other, the alignment may needto be reset.
If you notice your vehicle vibrating
when driving on a smooth road, your
wheels may need to be rebalanced.G200600BFD Tire replacement
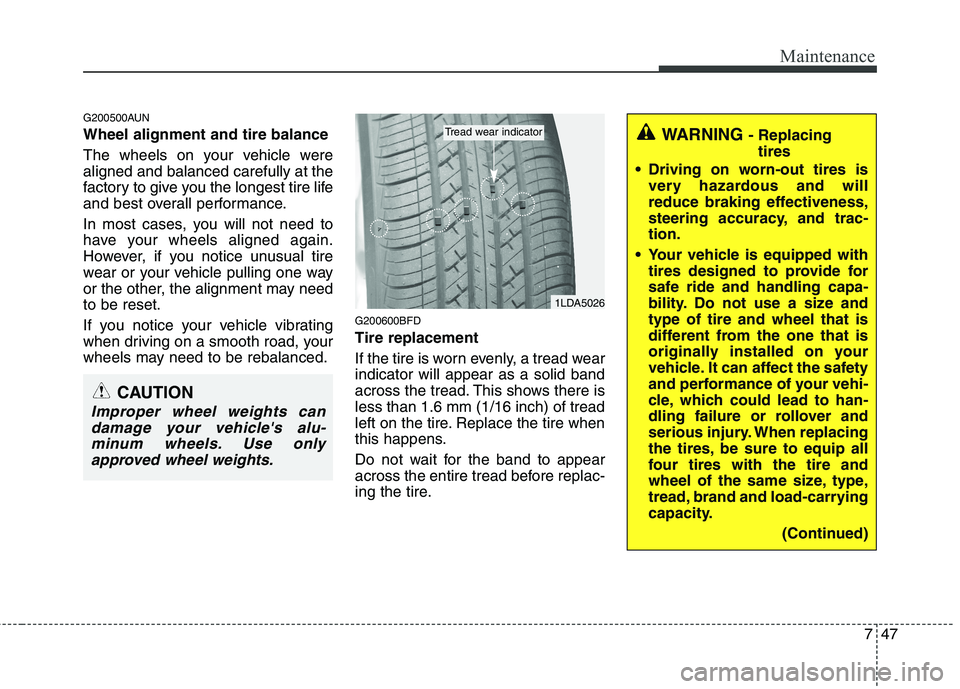
If the tire is worn evenly, a tread wear indicator will appear as a solid band
across the tread. This shows there isless than 1.6 mm (1/16 inch) of tread
left on the tire. Replace the tire when
this happens.
Do not wait for the band to appear
across the entire tread before replac-
ing the tire.
CAUTION
Improper wheel weights can
damage your vehicle's alu-minum wheels. Use only approved wheel weights.
1LDA5026
Tread wear indicatorWARNING - Replacing
tires
Driving on worn-out tires is very hazardous and will
reduce braking effectiveness,
steering accuracy, and trac-tion.
Your vehicle is equipped with tires designed to provide for
safe ride and handling capa-
bility. Do not use a size andtype of tire and wheel that is
different from the one that is
originally installed on your
vehicle. It can affect the safety
and performance of your vehi-
cle, which could lead to han-
dling failure or rollover and
serious injury. When replacing
the tires, be sure to equip all
four tires with the tire and
wheel of the same size, type,
tread, brand and load-carrying
capacity.
(Continued)
Page 372 of 635
755
Maintenance
G210101AUN
Memory fuse
Your vehicle is equipped with the memo-
ry fuse to prevent battery discharge if
your vehicle is parked without being
operated for prolonged periods. Use the
following procedures before parking the
vehicle for prolonged periods.
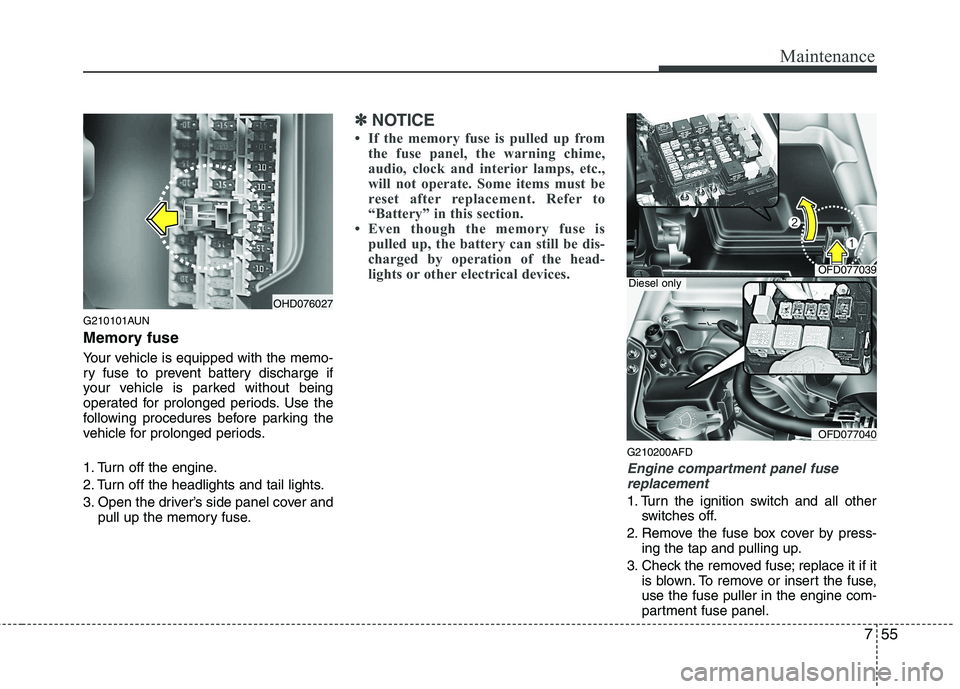
1. Turn off the engine.
2. Turn off the headlights and tail lights.
3. Open the driver’s side panel cover andpull up the memory fuse.
✽✽ NOTICE
If the memory fuse is pulled up from the fuse panel, the warning chime,
audio, clock and interior lamps, etc.,
will not operate. Some items must be
reset after replacement. Refer to
“Battery” in this section.
Even though the memory fuse is
pulled up, the battery can still be dis-
charged by operation of the head-
lights or other electrical devices.
G210200AFD
Engine compartment panel fuse
replacement
1. Turn the ignition switch and all other switches off.
2. Remove the fuse box cover by press- ing the tap and pulling up.
3. Check the removed fuse; replace it if it is blown. To remove or insert the fuse, use the fuse puller in the engine com-
partment fuse panel.
OHD076027
OFD077039
OFD077040
Diesel only
Page 488 of 635
Features of your vehicle
16
4
D080103AUN
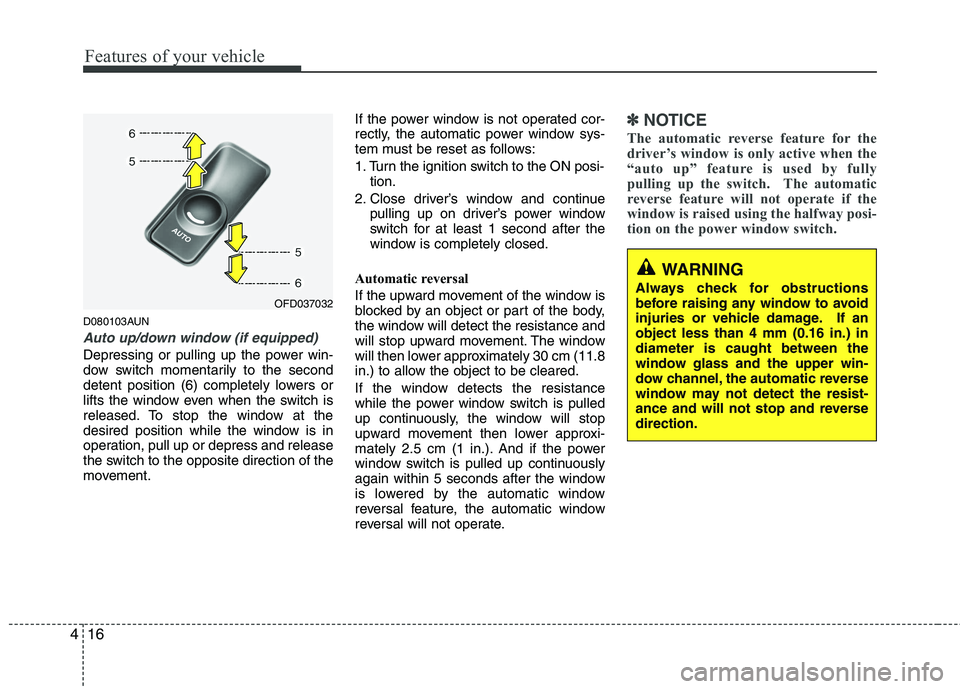
Auto up/down window (if equipped)
Depressing or pulling up the power win-
dow switch momentarily to the second
detent position (6) completely lowers or
lifts the window even when the switch is
released. To stop the window at the
desired position while the window is in
operation, pull up or depress and release
the switch to the opposite direction of the
movement. If the power window is not operated cor-
rectly, the automatic power window sys-
tem must be reset as follows:
1. Turn the ignition switch to the ON posi-
tion.
2. Close driver’s window and continue pulling up on driver’s power window
switch for at least 1 second after the
window is completely closed.
Automatic reversal
If the upward movement of the window is
blocked by an object or part of the body,
the window will detect the resistance and
will stop upward movement. The window
will then lower approximately 30 cm (11.8
in.) to allow the object to be cleared.
If the window detects the resistance
while the power window switch is pulled
up continuously, the window will stop
upward movement then lower approxi-
mately 2.5 cm (1 in.). And if the power
window switch is pulled up continuously
again within 5 seconds after the window
is lowered by the automatic window
reversal feature, the automatic window
reversal will not operate.
✽✽ NOTICE
The automatic reverse feature for the
driver’s window is only active when the
“auto up” feature is used by fully
pulling up the switch. The automatic
reverse feature will not operate if the
window is raised using the halfway posi-
tion on the power window switch.
WARNING
Always check for obstructions
before raising any window to avoid
injuries or vehicle damage. If anobject less than 4 mm (0.16 in.) indiameter is caught between the
window glass and the upper win-
dow channel, the automatic reverse
window may not detect the resist-
ance and will not stop and reversedirection.
OFD037032
Page 499 of 635
427
Features of your vehicle
D110500AFD
Resetting the sunroof
Whenever the vehicle battery is discon- nected or discharged, or related fuse is
blown, you must reset your sunroof sys-
tem as follows:
1. Turn the ignition switch to the ONposition and close the sunroof com-
pletely.
2. Release the control button.
3. Press and hold the close button until the sunroof tilts and slightly moves up
and down. Then, release the button.
4. Press and hold the close button until the sunroof is operated as follows;
TILT DOWN �SLIDE OPEN �
SLIDE CLOSE
Then, release the control button.
When this is complete, the sunroof sys- tem is reset. ❈
For more detailed information, contact
an authorized HYUNDAI dealer.
CAUTION
If the sunroof is not reset when the
vehicle battery is disconnected ordischarged, or related fuse isblown, the sunroof may operate improperly.