tailgate HYUNDAI I30 2019 Owner's Manual
[x] Cancel search | Manufacturer: HYUNDAI, Model Year: 2019, Model line: I30, Model: HYUNDAI I30 2019Pages: 659, PDF Size: 17.14 MB
Page 353 of 659
5-49
Driving your vehicle
5
If you continuously notice a noise
or burning smell when the EPB is
used for emergency braking, we
recommend that the system be
checked by an authorized HYUNDAI
dealer.
When the EPB (Electronic Parking
Brake) does not release
If the EPB does not release normal-
ly, we recommend that you contact
an authorized HYUNDAI dealer by
loading the vehicle on a flatbed tow
truck and have the system checked.
AUTO HOLD (if equipped)
The Auto Hold maintains the vehicle
in a standstill even though the brake
pedal is not depressed after the driv-
er brings the vehicle to a complete
stop by depressing the brake pedal.
To apply :
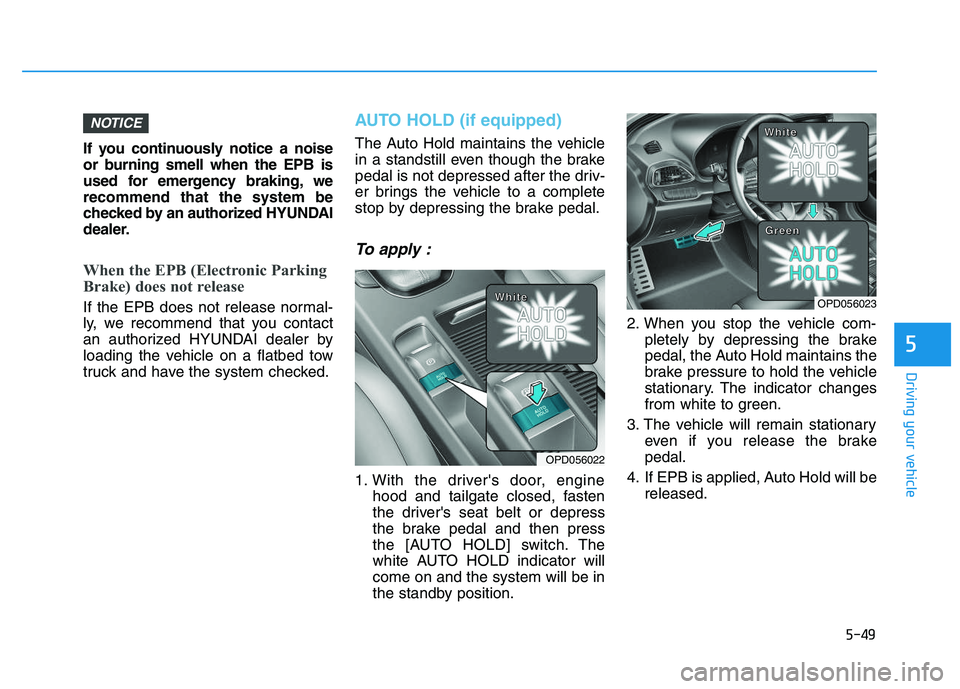
1. With the driver's door, enginehood and tailgate closed, fasten
the driver's seat belt or depress
the brake pedal and then press
the [AUTO HOLD] switch. The
white AUTO HOLD indicator will
come on and the system will be in
the standby position. 2. When you stop the vehicle com-
pletely by depressing the brake
pedal, the Auto Hold maintains the
brake pressure to hold the vehicle
stationary. The indicator changes
from white to green.
3. The vehicle will remain stationary even if you release the brake
pedal.
4. If EPB is applied, Auto Hold will be released.
NOTICE
OPD056022
W
W
W
W
h
h
h
h
i
i
i
i
t
t
t
t
e
e
e
eOPD056023
W
W
W
W
h
h
h
h
i
i
i
i
t
t
t
t
e
e
e
e
G
G
G
G
r
r
r
r
e
e
e
e
e
e
e
e
n
n
n
n
Page 510 of 659
6-40
What to do in an emergency
When towing your vehicle in an
emergency without wheel dollies:
1. Place the ignition switch in the ACC position.
2. Place the shift lever in N (Neutral).
3. Release the parking brake.
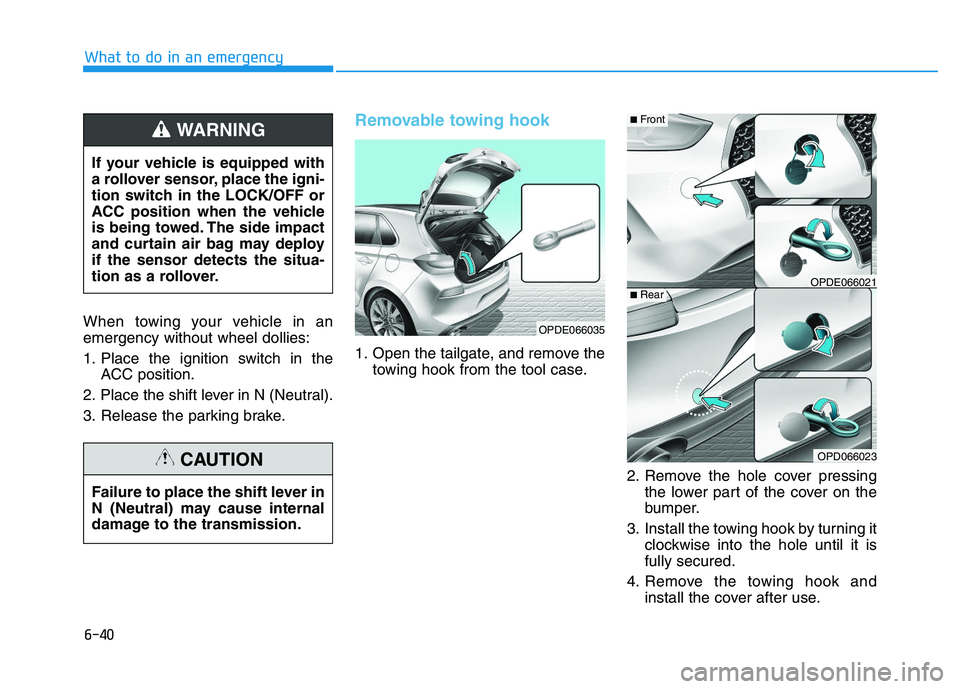
Removable towing hook
1. Open the tailgate, and remove the towing hook from the tool case.
2. Remove the hole cover pressingthe lower part of the cover on the
bumper.
3. Install the towing hook by turning it clockwise into the hole until it is
fully secured.
4. Remove the towing hook and install the cover after use.
Failure to place the shift lever in
N (Neutral) may cause internal
damage to the transmission.
CAUTION
OPDE066035
OPDE066021
OPD066023
■Front
■Rear
If your vehicle is equipped with
a rollover sensor, place the igni-
tion switch in the LOCK/OFF or
ACC position when the vehicle
is being towed. The side impact
and curtain air bag may deploy
if the sensor detects the situa-
tion as a rollover.
WARNING
Page 580 of 659
7-67
7
Maintenance
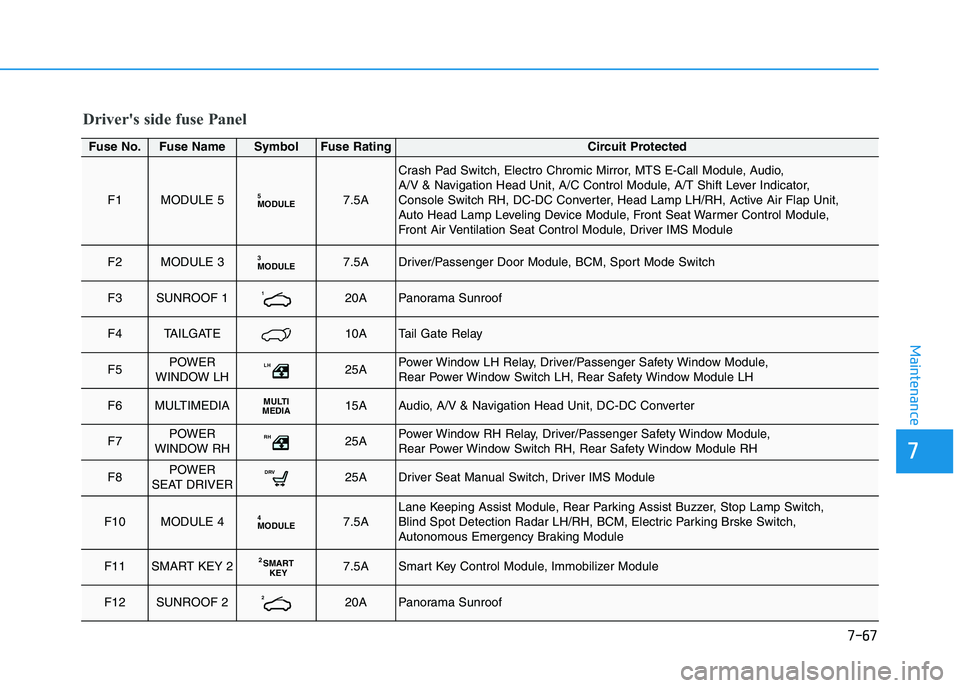
Driver's side fuse Panel
Fuse No.Fuse NameSymbolFuse RatingCircuit Protected
F1MODULE 5MODULE57.5A
Crash Pad Switch, Electro Chromic Mirror, MTS E-Call Module, Audio,
A/V & Navigation Head Unit, A/C Control Module, A/T Shift Lever Indicator,
Console Switch RH, DC-DC Converter, Head Lamp LH/RH, Active Air Flap Unit,
Auto Head Lamp Leveling Device Module, Front Seat Warmer Control Module,
Front Air Ventilation Seat Control Module, Driver IMS Module
F2MODULE 3MODULE37.5ADriver/Passenger Door Module, BCM, Sport Mode Switch
F3SUNROOF 1120APanorama Sunroof
F4TAILGATE10ATail Gate Relay
F5POWER
WINDOW LHLH25APower Window LH Relay, Driver/Passenger Safety Window Module,
Rear Power Window Switch LH, Rear Safety Window Module LH
F6MULTIMEDIAMULTI
MEDIA15AAudio, A/V & Navigation Head Unit, DC-DC Converter
F7POWER
WINDOW RHRH25APower Window RH Relay, Driver/Passenger Safety Window Module,
Rear Power Window Switch RH, Rear Safety Window Module RH
F8POWER
SEAT DRIVERDRV25ADriver Seat Manual Switch, Driver IMS Module
F10MODULE 4MODULE47.5ALane Keeping Assist Module, Rear Parking Assist Buzzer, Stop Lamp Switch,
Blind Spot Detection Radar LH/RH, BCM, Electric Parking Brske Switch,
Autonomous Emergency Braking Module
F11SMART KEY 2S MART
KEY27.5ASmart Key Control Module, Immobilizer Module
F12SUNROOF 2220APanorama Sunroof
Page 611 of 659
7-98
Maintenance
Rear combination lamp bulb
replacement
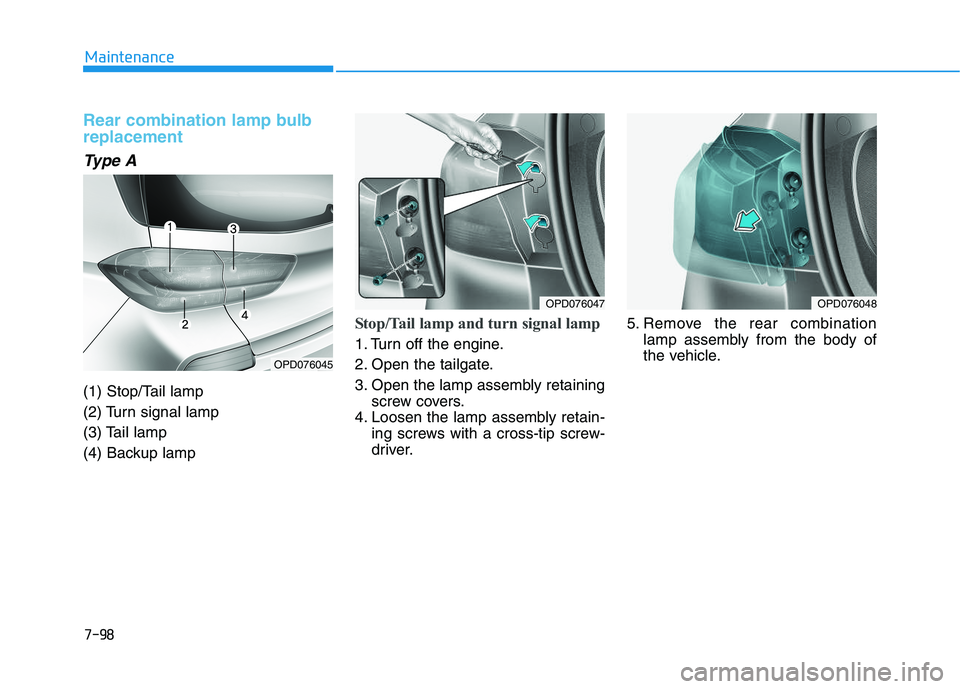
Type A
(1) Stop/Tail lamp
(2) Turn signal lamp
(3) Tail lamp
(4) Backup lamp
Stop/Tail lamp and turn signal lamp
1. Turn off the engine.
2. Open the tailgate.
3. Open the lamp assembly retainingscrew covers.
4. Loosen the lamp assembly retain- ing screws with a cross-tip screw-
driver. 5. Remove the rear combination
lamp assembly from the body of
the vehicle.
OPD076048
OPD076045
OPD076047
Page 612 of 659
7-99
7
Maintenance
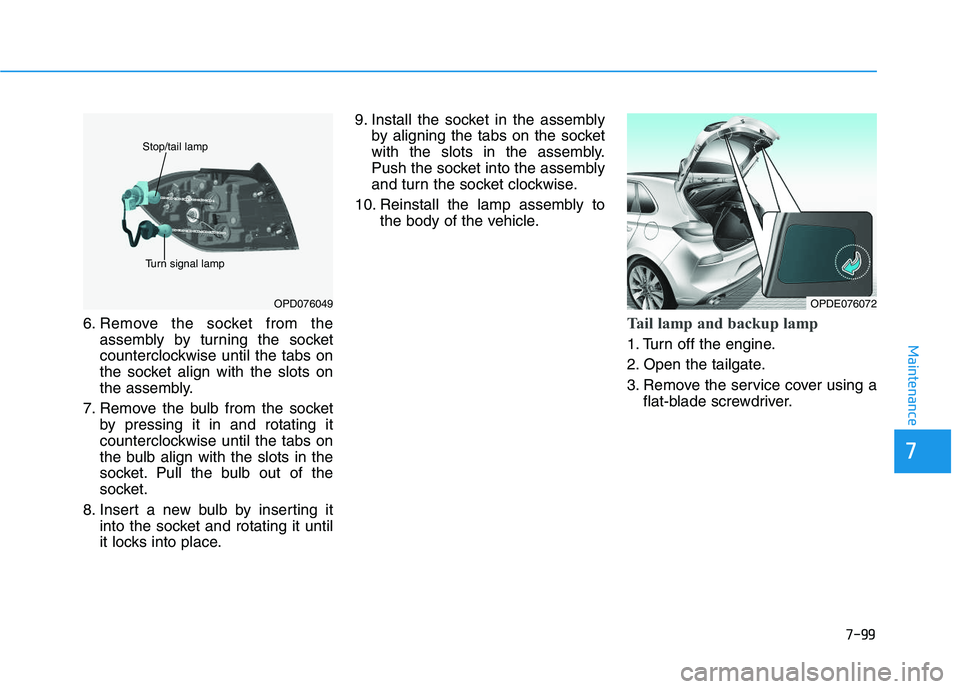
6. Remove the socket from theassembly by turning the socket
counterclockwise until the tabs on
the socket align with the slots on
the assembly.
7. Remove the bulb from the socket by pressing it in and rotating it
counterclockwise until the tabs on
the bulb align with the slots in the
socket. Pull the bulb out of the
socket.
8. Insert a new bulb by inserting it into the socket and rotating it until
it locks into place. 9. Install the socket in the assembly
by aligning the tabs on the socket
with the slots in the assembly.
Push the socket into the assembly
and turn the socket clockwise.
10. Reinstall the lamp assembly to the body of the vehicle.Tail lamp and backup lamp
1. Turn off the engine.
2. Open the tailgate.
3. Remove the service cover using aflat-blade screwdriver.
OPD076049
Stop/tail lamp
Turn signal lamp
OPDE076072
Page 613 of 659
7-100
Maintenance
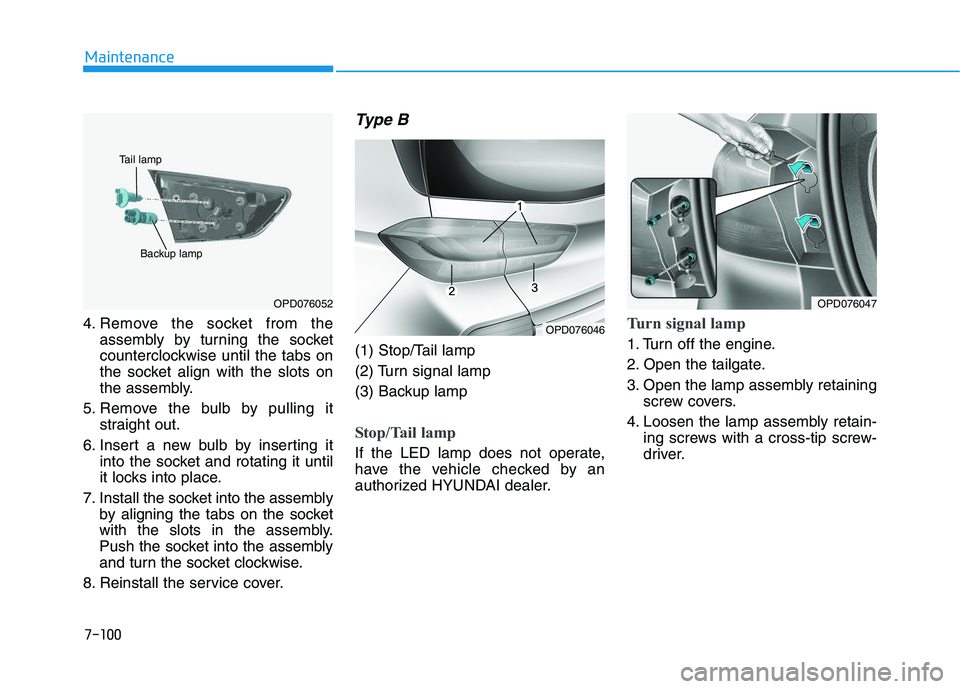
4. Remove the socket from the assembly by turning the socket
counterclockwise until the tabs on
the socket align with the slots on
the assembly.
5. Remove the bulb by pulling it straight out.
6. Insert a new bulb by inserting it into the socket and rotating it until
it locks into place.
7. Install the socket into the assembly by aligning the tabs on the socket
with the slots in the assembly.
Push the socket into the assembly
and turn the socket clockwise.
8. Reinstall the service cover.
Type B
(1) Stop/Tail lamp
(2) Turn signal lamp
(3) Backup lamp
Stop/Tail lamp
If the LED lamp does not operate,
have the vehicle checked by an
authorized HYUNDAI dealer.
Turn signal lamp
1. Turn off the engine.
2. Open the tailgate.
3. Open the lamp assembly retaining screw covers.
4. Loosen the lamp assembly retain- ing screws with a cross-tip screw-
driver.
OPD076046
OPD076052
Backup lamp
Tail lamp
OPD076047
Page 614 of 659
7-101
7
Maintenance
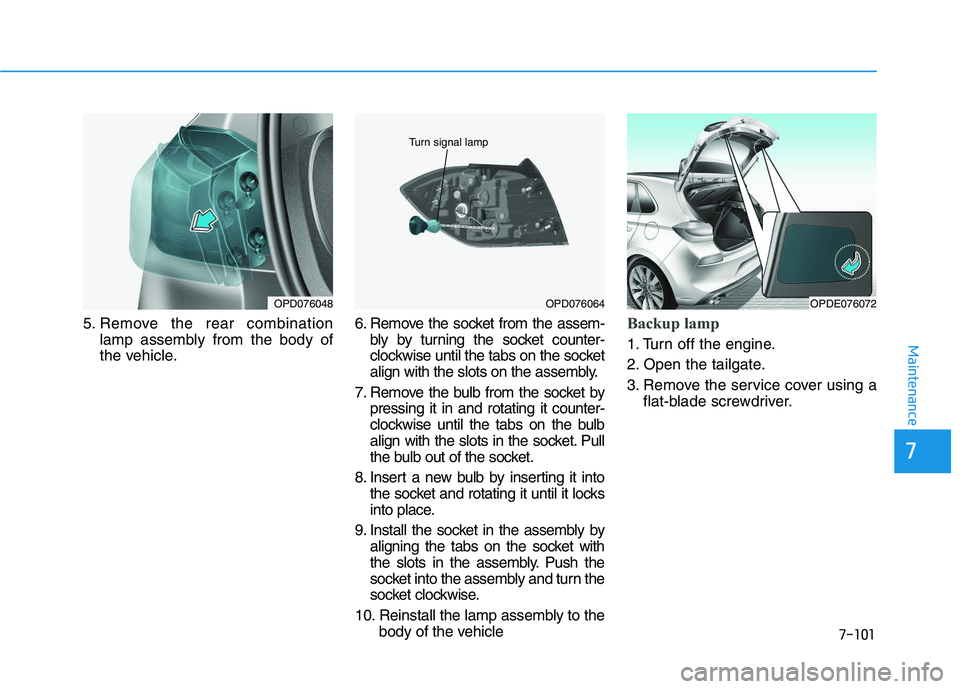
5. Remove the rear combinationlamp assembly from the body of
the vehicle. 6. Remove the socket from the assem-
bly by turning the socket counter-
clockwise until the tabs on the socket
align with the slots on the assembly.
7. Remove the bulb from the socket by pressing it in and rotating it counter-
clockwise until the tabs on the bulb
align with the slots in the socket. Pull
the bulb out of the socket.
8. Insert a new bulb by inserting it into the socket and rotating it until it locks
into place.
9. Install the socket in the assembly by aligning the tabs on the socket with
the slots in the assembly. Push the
socket into the assembly and turn the
socket clockwise.
10. Reinstall the lamp assembly to the body of the vehicleBackup lamp
1. Turn off the engine.
2. Open the tailgate.
3. Remove the service cover using aflat-blade screwdriver.
OPD076048OPD076064
Turn signal lamp
OPDE076072
Page 617 of 659
7-104
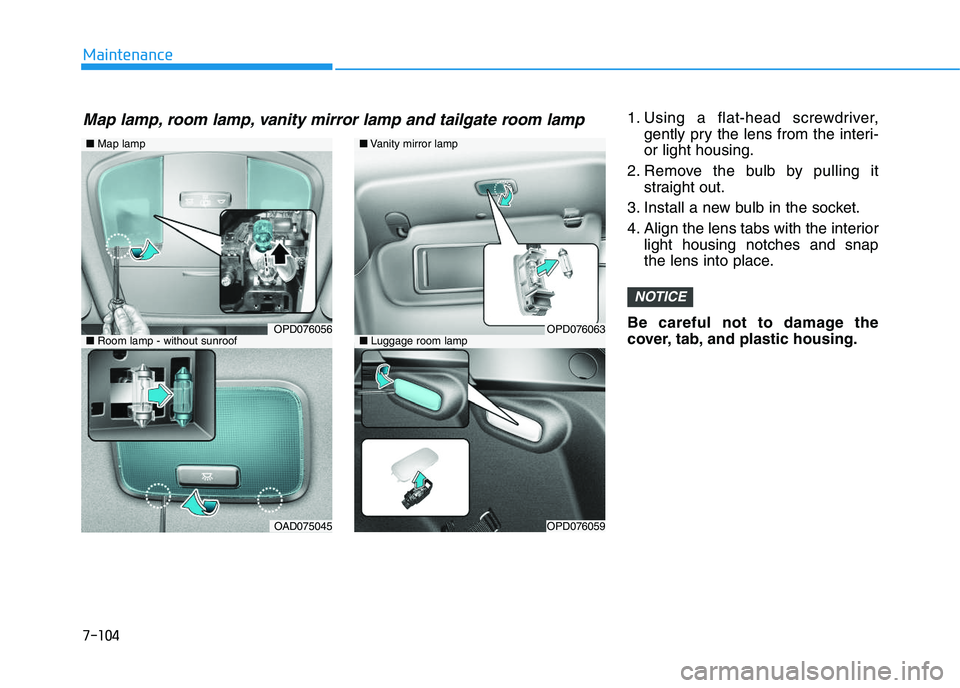
Maintenance1. Using a flat-head screwdriver,gently pry the lens from the interi-
or light housing.
2. Remove the bulb by pulling it straight out.
3. Install a new bulb in the socket.
4. Align the lens tabs with the interior light housing notches and snap
the lens into place.
Be careful not to damage the
cover, tab, and plastic housing.
NOTICE
■ Map lamp
OPD076056
OAD075045
■Vanity mirror lamp
■ Luggage room lampOPD076063
OPD076059
■Room lamp - without sunroof
Map lamp, room lamp, vanity mirror lamp and tailgate room lamp