display HYUNDAI I30 2022 User Guide
[x] Cancel search | Manufacturer: HYUNDAI, Model Year: 2022, Model line: I30, Model: HYUNDAI I30 2022Pages: 659, PDF Size: 17.14 MB
Page 147 of 659
3-145
Convenient features of your vehicle
To charge a cellular phone
The wireless cellular phone charging
system charges only the Qi-enabled
cellular phones ( ). Read the label
on the cellular phone accessory
cover or visit your cellular phone
manufacturer’s website to check
whether your cellular phone supports
the Qi technology.
The wireless charging process starts
when you put a Qi-enabled cellular
phone on the wireless charging unit.
1. Remove other items, including thesmart key, from the wireless charg-
ing unit. If not, the wireless charg-
ing process may be interrupted.
2. The indicator illuminates in orange during the charging process. The
indicator color changes to green,
when the charging process is
completed.
3. You can turn ON or OFF the wire- less charging function in the User
Settings mode on the instrument
cluster. (For further information,
refer to the “LCD Modes” in this
chapter.) Slightly change the cellular phone
position, when the cellular phone is
not being charged. Make sure that
the indicator illuminates in orange.
The indicator color may not change
to green in accordance with the cel-
lular phone type, even though the
charging process is completed. The
indicator blinks in orange for 10 sec-
onds when there is a malfunction
with the wireless charging system.
In this case, temporarily stop the
charging process, and re-attempt to
wirelessly charge your cellular phone
again.
The system warns you with a mes-
sage on the LCD display when you do
not take out the cellular phone from
the wireless charging unit with the
front door open and the Engine
Start/Stop button in the OFF position.
The wireless cellular phone
charging system may not sup-
port certain cellular phones,
which are not verified for the Qi
specification ( ).
(Continued)(Continued)
Locate your cell phone well in the
middle of the wireless cellular
phone charging system. Even
when your cell phone locates
slightly to one side, the charging
speed may decrease.
The wireless charging process may temporarily stop, when a
smart key function operates (i.e.
starting the engine, opening the
doors, closing the doors).
For certain cell phones, the indi- cator color may not change to
green, even when the wireless
charging process is properly
completed.
The wireless charging process may temporarily stop, when tempera-
ture abnormally increases inside
the wireless cellular phone charg-
ing system. The wireless charging
process restarts, when tempera-
ture falls to a proper level.
The wireless charging process may temporarily stop when there
is any metallic item, such as a
coin, between the wireless cellu-
lar phone charging system and a
cellular phone.
NOTICE
3
Page 148 of 659
![HYUNDAI I30 2022 User Guide 3-146
Clock
Vehicles with Audio system
Select the [SETUP/CLOCK ] button on
the audio system ➟Select [Date/Time].
Set time: Set the time displayed on
the audio screen.
Time format: Choose between 1 HYUNDAI I30 2022 User Guide 3-146
Clock
Vehicles with Audio system
Select the [SETUP/CLOCK ] button on
the audio system ➟Select [Date/Time].
Set time: Set the time displayed on
the audio screen.
Time format: Choose between 1](/img/35/56145/w960_56145-147.png)
3-146
Clock
Vehicles with Audio system
Select the [SETUP/CLOCK ] button on
the audio system ➟Select [Date/Time].
Set time: Set the time displayed on
the audio screen.
Time format: Choose between 12- hour and 24-hour time formats.
Vehicles with Navigation system
Select the Settings menu on the
Navigation system ➟Select
[Date/Time].
GPS time: Displays time according to the received GNSS time.
24-hour: Switches to 12 hour or 24 hour.
For more details, please refer to
the separate manual that was sup-
plied with your vehicle.
Clothes hanger (if equipped)
These hangers are not designed to
hold large or heavy items.
Convenient features of your vehicle
Do not adjust the clock while
driving. You may lose your steer-
ing control and cause severe
personal injury or accidents.
WARNING
OPD046411
■ Type A
■Type BOPDE046050
Do not hang other objects such
as hangers or hard objects
except clothes. Also, do not put
heavy, sharp or breakable
objects in the clothe pockets. In
an accident or when the curtain
air bag is inflated, it may cause
vehicle damage or personal
injury.
WARNING
Page 164 of 659

3-14
Convenient features of your vehicle
Auto door lock/unlock features
Impact sensing door unlocksystem (if equipped)
All doors will be automatically
unlocked when an impact causes the
air bags to deploy.
Speed sensing door lock system(if equipped)
All doors will be automatically locked
when vehicle speed exceeds 15
km/h (9 mph).
You can activate or deactivate the
Auto Door Lock/Unlock features from
the User Settings mode on the LCD
display. For more details, refer to
"LCD Display" in this chapter.
Leaving your vehicle unlocked
increases the potential risk to
you or others from someone
hiding in your vehicle.
To secure your vehicle, while
depressing the brake, move the
shift lever to the P (Park) posi-
tion (for automatic transmis-
sion/dual clutch transmission)
or first gear or R (Reverse, for
manual transmission), engage
the parking brake, and place the
ignition switch in the LOCK/OFF
position, close all windows,
lock all doors, and always take
the key with you.
WARNING
Opening a door when something
is approaching may cause dam-
age or injury. Be careful when
opening doors and watch for
vehicles, motorcycles, bicycles
or pedestrians approaching the
vehicle in the path of the door.
WARNING
Page 167 of 659
3-17
Convenient features of your vehicle
3
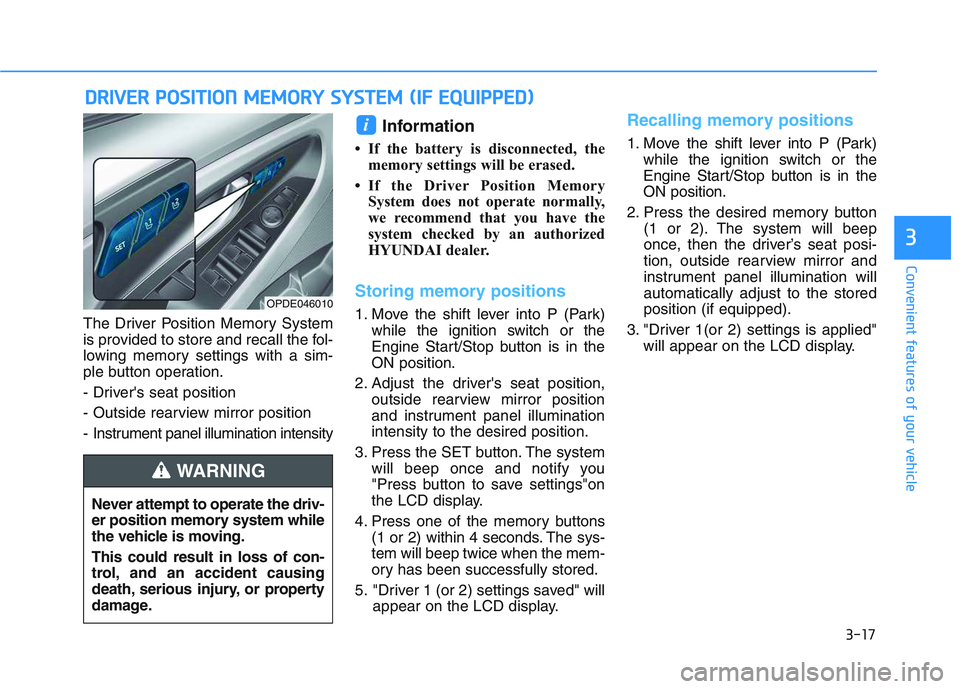
The Driver Position Memory System
is provided to store and recall the fol-
lowing memory settings with a sim-
ple button operation.
- Driver's seat position
- Outside rearview mirror position
- Instrument panel illumination intensity
Information
• If the battery is disconnected, thememory settings will be erased.
• If the Driver Position Memory System does not operate normally,
we recommend that you have the
system checked by an authorized
HYUNDAI dealer.
Storing memory positions
1. Move the shift lever into P (Park) while the ignition switch or the
Engine Start/Stop button is in the
ON position.
2. Adjust the driver's seat position, outside rearview mirror position
and instrument panel illumination
intensity to the desired position.
3. Press the SET button. The system will beep once and notify you
"Press button to save settings"on
the LCD display.
4. Press one of the memory buttons (1 or 2) within 4 seconds. The sys-
tem will beep twice when the mem-
ory has been successfully stored.
5. "Driver 1 (or 2) settings saved" will appear on the LCD display.
Recalling memory positions
1. Move the shift lever into P (Park)while the ignition switch or the
Engine Start/Stop button is in the
ON position.
2. Press the desired memory button (1 or 2). The system will beep
once, then the driver’s seat posi-
tion, outside rearview mirror and
instrument panel illumination will
automatically adjust to the stored
position (if equipped).
3. "Driver 1(or 2) settings is applied" will appear on the LCD display.
i
D
D R
R I
I V
V E
E R
R
P
P O
O S
S I
I T
T I
I O
O N
N
M
M E
E M
M O
O R
R Y
Y
S
S Y
Y S
S T
T E
E M
M
(
( I
I F
F
E
E Q
Q U
U I
I P
P P
P E
E D
D )
)
OPDE046010
Never attempt to operate the driv-
er position memory system while
the vehicle is moving.
This could result in loss of con-
trol, and an accident causing
death, serious injury, or property
damage.
WARNING
Page 168 of 659
3-18
Convenient features of your vehicle
Information
• While recalling the "1" memoryposition, pressing the SET or 1 but-
ton temporarily stops the adjust-
ment of the recalled memory posi-
tion. Pressing the 2 button recalls
the "2" memory position.
• While recalling the "2" memory position, pressing the SET or 2 but-
ton temporarily stops the adjust-
ment of the recalled memory posi-
tion. Pressing the 1 button recalls
the "1" memory position.
• While recalling the stored positions, pressing one of the control buttons
for the driver's seat, outside
rearview mirror, or instrument
panel illumination will cause the
movement of that component to stop
and move in the direction that the
control button is pressed.
Easy access function
(if equipped)
The system will move the driver's
seat automatically as follows:
The shift lever is in P (Park)
Without smart key system
- It will move the driver’s seat rear-ward when the ignition key is
removed and the driver’s door is
opened.
- It will move the driver’s seat forward when the ignition key is inserted.
With smart key system - It will move the driver’s seat rear-ward when the Engine Start/Stop
button is in the OFF position and
the driver’s door is opened.
- It will move the driver’s seat for- ward when the vehicle is turned
ON or the driver’s door is closed
with the smart key with you.
You can activate or deactivate the
Easy Access Function from the User
Settings mode on the LCD display.
For more details, refer to "LCD
Display" in this chapter.
i
Driver should be cautious when
using this function to assure no
injury to passenger or child on
the back seat. In case of emer-
gency the driver has to stop
movement of front seat (when
easy access feature is activat-
ed) by pressing SET button or
any of the driver seat control
switches.
CAUTION
Page 193 of 659
3-43
Convenient features of your vehicle
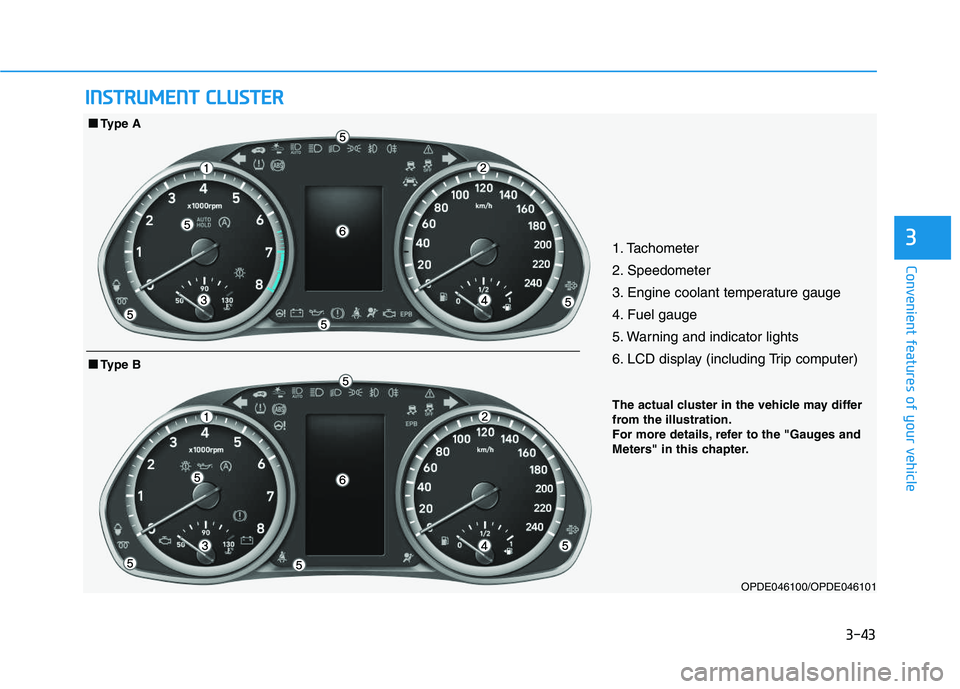
31. Tachometer
2. Speedometer
3. Engine coolant temperature gauge
4. Fuel gauge
5. Warning and indicator lights
6. LCD display (including Trip computer)
OPDE046100/OPDE046101
■
■
Type B
■
■
Type A
I
I N
N S
S T
T R
R U
U M
M E
E N
N T
T
C
C L
L U
U S
S T
T E
E R
R
The actual cluster in the vehicle may differ
from the illustration.
For more details, refer to the "Gauges and
Meters" in this chapter.
Page 194 of 659
3-44
Convenient features of your vehicle
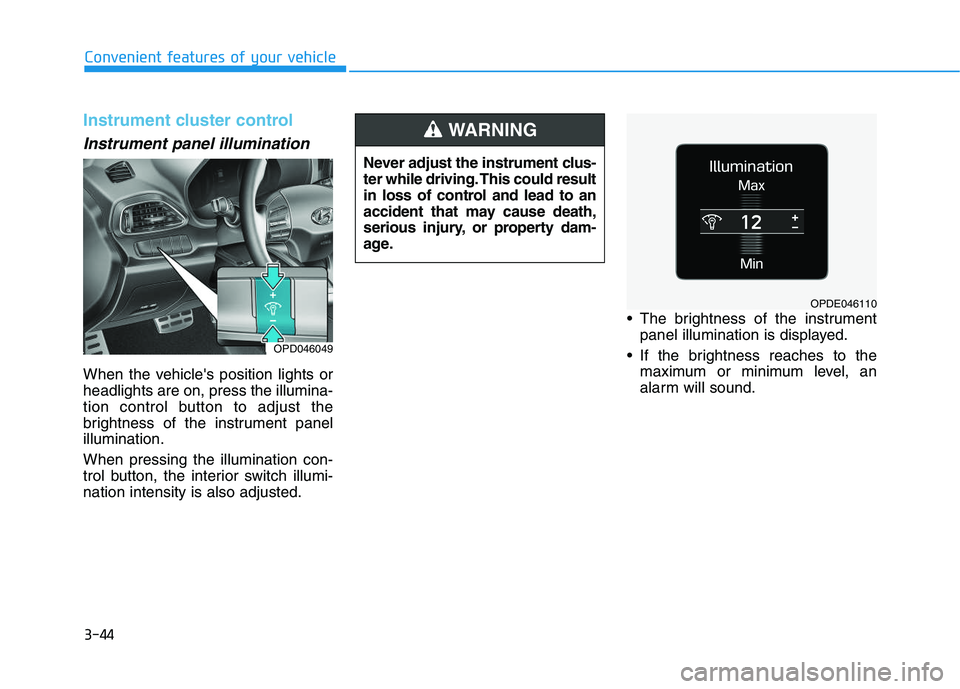
Instrument cluster control
Instrument panel illumination
When the vehicle's position lights or
headlights are on, press the illumina-
tion control button to adjust the
brightness of the instrument panel
illumination.
When pressing the illumination con-
trol button, the interior switch illumi-
nation intensity is also adjusted. The brightness of the instrument
panel illumination is displayed.
If the brightness reaches to the maximum or minimum level, an
alarm will sound.
Never adjust the instrument clus-
ter while driving. This could result
in loss of control and lead to an
accident that may cause death,
serious injury, or property dam-
age.
WARNING
OPDE046110
OPD046049
Page 198 of 659

3-48
Convenient features of your vehicle
Distance to empty
The distance to empty is the esti-mated distance the vehicle can be
driven with the remaining fuel.
If the estimated distance is below 1 km (1 mi.), the trip computer will
display “---” as distance to empty.
Information
• If the vehicle is not on level groundor the battery power has been inter-
rupted, the distance to empty func-
tion may not operate correctly.
• The distance to empty may differ from the actual driving distance as
it is an estimate of the available
driving distance.
• The trip computer may not register additional fuel if less than 6 liters
(1.6 gallons) of fuel are added to the
vehicle.
• The distance to empty may vary sig- nificantly based on driving condi-
tions, driving habits, and condition
of the vehicle.
Transmission shift indicator
Manual transmission shift indi-cator (if equipped)
This indicator informs which gear is
desired while driving to save fuel.
Shifting up : ▲
2, ▲
3, ▲
4, ▲
5, ▲
6
Shifting down : ▼1,
▼2,
▼3,
▼4,
▼5
i
OPD046138
OPDE046142
Page 199 of 659

3-49
Convenient features of your vehicle
3
For example: Indicates that shifting up to the3rd gear is desired (currently
the shift lever is in the 2nd or
1st gear).
: Indicates that shifting down to the 3rd gear is desired (current-
ly the shift lever is in the 4th,
5th, or 6th gear).
When the system is not working prop-
erly, the indicator is not displayed.Automatic transmission shift indicator (if equipped)
This indicator displays which automat-
ic transmission shift lever is selected.
Reverse : R
Neutral : N
Manual shift mode : 1, 2, 3, 4, 5, 6
Dual clutch transmission shiftindicator (if equipped)
This indicator displays which shift
lever is selected.
Reverse : R
Neutral : N
Manual shift mode : D1, D2, D3, D4,
D5, D6, D7
OTL045132OTL045132
Page 200 of 659

3-50
Convenient features of your vehicle
Shift Indicator Pop-up (if equipped)
The pop-up that indicates the current
gear position is displayed in the clus-
ter for about 2 seconds when shifting
into other positions (P/R/N/D).
Automatic transmission shift indi-cator / Dual clutch transmissionshift indicator (for Europe,if equipped)
In the manual shift mode, this indica-
tor informs which gear is desired
while driving to save fuel.
Automatic transmission shift indi-
cator
- Shifting up : ▲
2, ▲
3, ▲
4, ▲
5, ▲
6
- Shifting down : ▼1,
▼2,
▼3,
▼4,
▼5 Dual clutch transmission shift indi-
cator
- Shifting up : ▲
2, ▲
3, ▲
4, ▲
5,
▲ 6 ▲
7
- Shifting down : ▼1,
▼2,
▼3,
▼4,
▼ 5,
▼6
For example : Indicates that shifting up to the3rd gear is desired (currently
the shift lever is in the 2nd or
1st gear).
: Indicates that shifting down to the 3rd gear is desired (current-
ly the shift lever is in the 4th,
5th, or 6th gear).
When the system is not working
properly, the indicator is not dis-
played.
OTL045134
OPDE046142