check engine light HYUNDAI I40 2012 Workshop Manual
[x] Cancel search | Manufacturer: HYUNDAI, Model Year: 2012, Model line: I40, Model: HYUNDAI I40 2012Pages: 534, PDF Size: 11.05 MB
Page 455 of 534
Downloaded from www.Manualslib.com manuals search engine Maintenance
50
7
FUEL FILTER (FOR DIESEL)
Draining water from fuel filter
The fuel filter for diesel engine plays an
important role of separating water from
fuel and accumulating the water in its
bottom.
If water accumulates in the fuel filter, the
warning light comes on when the ignition
switch is in the ON position.
If this warning light illuminates,
take your car to an authorized
HYUNDAI dealer and have
drain the water and checked
the system.
Extracting air from the fuel filter
If you drive until you have no fuel left or if
you replace the fuel filter, be sure to
extract air from the fuel system as it
makes it difficult to start the engine.
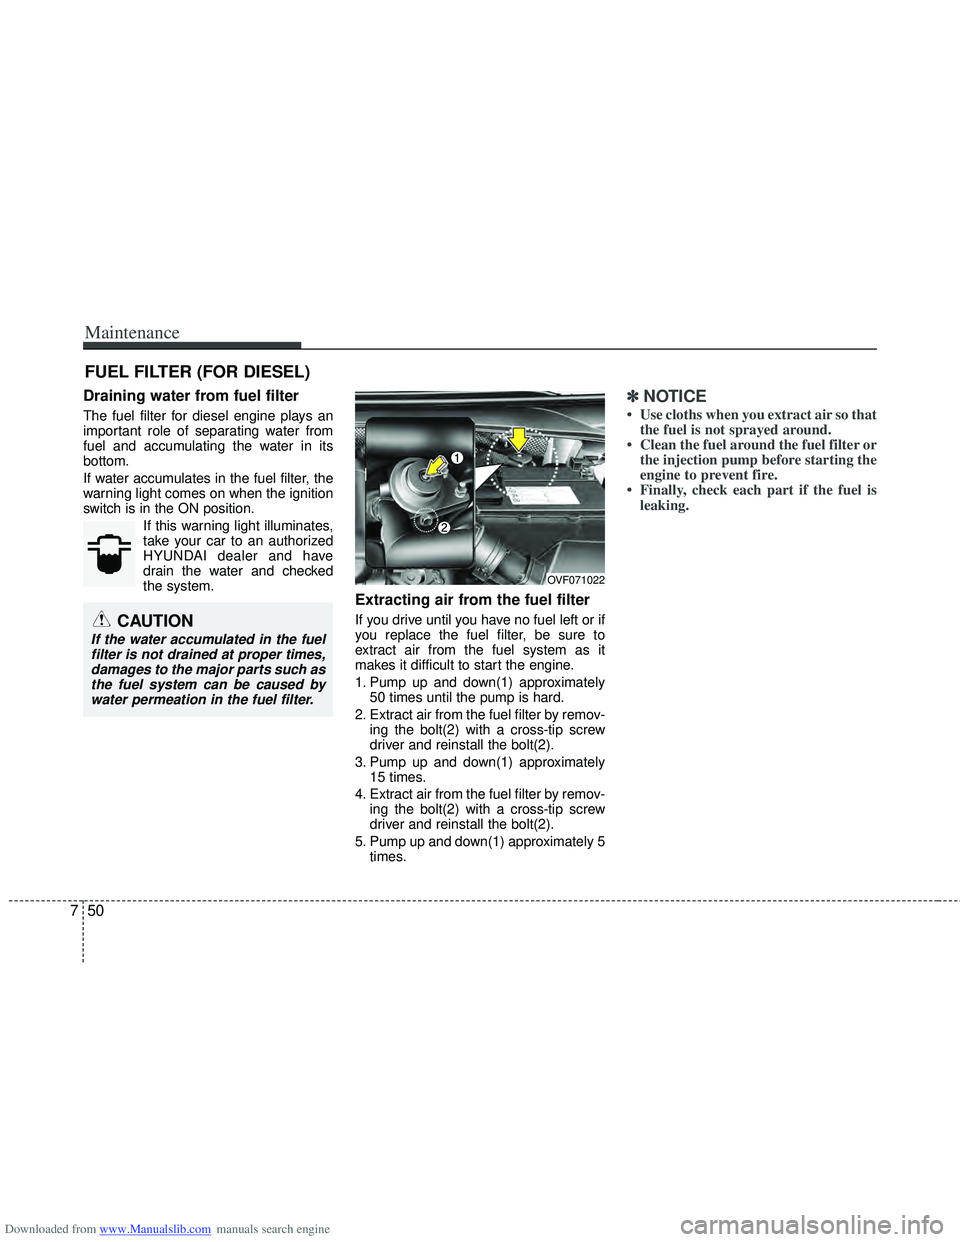
1. Pump up and down(1) approximately50 times until the pump is hard.
2. Extract air from the fuel filter by remov- ing the bolt(2) with a cross-tip screw
driver and reinstall the bolt(2).
3. Pump up and down(1) approximately 15 times.
4. Extract air from the fuel filter by remov- ing the bolt(2) with a cross-tip screw
driver and reinstall the bolt(2).
5. Pump up and down(1) approximately 5 times.
✽ ✽NOTICE
• Use cloths when you extract air so that
the fuel is not sprayed around.
• Clean the fuel around the fuel filter or the injection pump before starting the
engine to prevent fire.
• Finally, check each part if the fuel is leaking.
CAUTION
If the water accumulated in the fuel
filter is not drained at proper times, damages to the major parts such asthe fuel system can be caused bywater permeation in the fuel filter.
OVF071022
Page 464 of 534
Downloaded from www.Manualslib.com manuals search engine 759
Maintenance
Battery recharging
Your vehicle has a maintenance-free,
calcium-based battery.
If the battery becomes discharged in ashort time (because, for example, the
headlights or interior lights were left on
while the vehicle was not in use),
recharge it by slow charging (trickle)
for 10 hours.
If the battery gradually discharges because of high electric load while the
vehicle is being used, recharge it at 20-
30A for two hours.
(Continued)
The battery contains lead.
Do not dispose of it after
use. Please return the bat-
tery to an authorized
HYUNDAI dealer to be recy-
cled.
When lifting a plastic-cased bat- tery, excessive pressure on the
case may cause battery acid to
leak, resulting in personal injury.
Lift with a battery carrier or with
your hands on opposite corners.
Never attempt to recharge the battery when the battery cables
are connected.
The electrical ignition system works with high voltage. Never
touch these components with the
engine running or the ignition
switched on.
Failure to follow the above warn-
ings can result in serious bodily
injury or death.WARNING- Recharging battery
When recharging the battery,
observe the following precautions:
The battery must be removed
from the vehicle and placed in an
area with good ventilation.
Do not allow cigarettes, sparks, or flame near the battery.
Watch the battery during charg- ing, and stop or reduce the charg-
ing rate if the battery cells begin
gassing (boiling) violently or if
the temperature of the electrolyte
of any cell exceeds 49°C (120°F).
Wear eye protection when check- ing the battery during charging.
(Continued)
CAUTION
If you use unauthorized electronicdevices, the battery may be dis-charged. Never use unauthorizeddevices.
Page 472 of 534
Downloaded from www.Manualslib.com manuals search engine 767
Maintenance
Tire traction
Tire traction can be reduced if you
drive on worn tires, tires that are
improperly inflated or on slippery
road surfaces. Tires should be
replaced when tread wear indicators
appear. To reduce the possibility of
losing control, slow down whenever
there is rain, snow or ice on the road.
Tire maintenance
In addition to proper inflation, correct
wheel alignment helps to decrease
tire wear. If you find a tire is worn
unevenly, have your dealer check the
wheel alignment.
When you have new tires installed,
make sure they are balanced. This
will increase vehicle ride comfort and
tire life. Additionally, a tire should
always be rebalanced if it is removed
from the wheel.Tire sidewall labeling
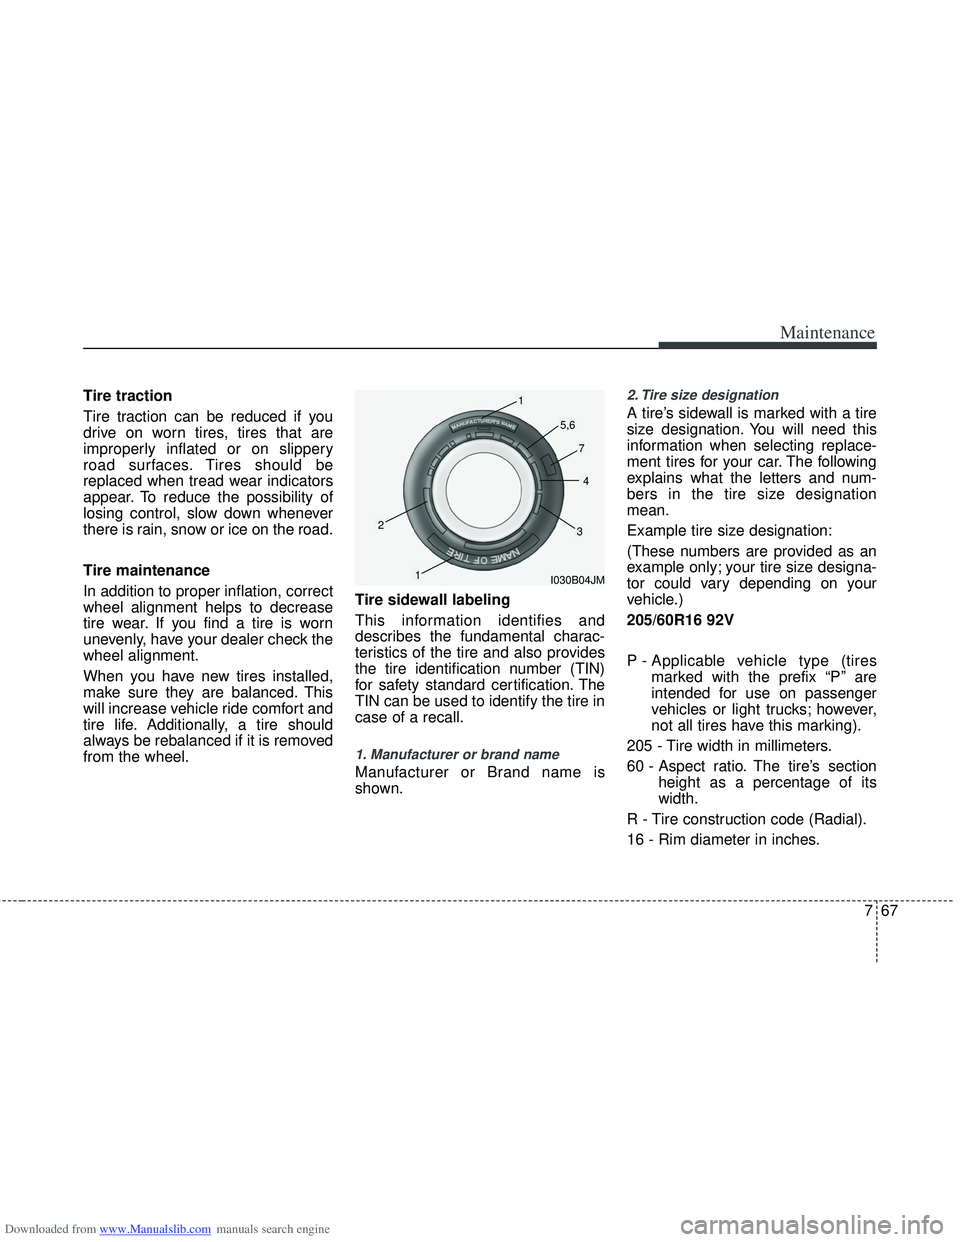
This information identifies and
describes the fundamental charac-
teristics of the tire and also provides
the tire identification number (TIN)
for safety standard certification. The
TIN can be used to identify the tire in
case of a recall.
1. Manufacturer or brand name
Manufacturer or Brand name is
shown.
2. Tire size designation
A tire’s sidewall is marked with a tire
size designation. You will need this
information when selecting replace-
ment tires for your car. The following
explains what the letters and num-
bers in the tire size designation
mean.
Example tire size designation:
(These numbers are provided as an
example only; your tire size designa-
tor could vary depending on your
vehicle.)
205/60R16 92V
P - Applicable vehicle type (tires
marked with the prefix “P’’ are
intended for use on passenger
vehicles or light trucks; however,
not all tires have this marking).
205 - Tire width in millimeters.
60 - Aspect ratio. The tire’s section height as a percentage of its
width.
R - Tire construction code (Radial).
16 - Rim diameter in inches.
I030B04JM
1
1
23
4
5,6
7
Page 476 of 534
Downloaded from www.Manualslib.com manuals search engine 771
Maintenance
FUSES
A vehicle’s electrical system is protected
from electrical overload damage by
fuses.
This vehicle has 3 (or 4) fuse panels, one
located in the driver’s side panel bolster,
the other in the engine compartment
near the battery.
If any of your vehicle’s lights, acces-
sories, or controls do not work, check the
appropriate circuit fuse. If a fuse has
blown, the element inside the fuse will be
melted.
If the electrical system does not work,
first check the driver’s side fuse panel.
Always replace a blown fuse with one of
the same rating.
If the replacement fuse blows, this indi-
cates an electrical problem. Avoid using
the system involved and immediately
consult an authorized HYUNDAI dealer.
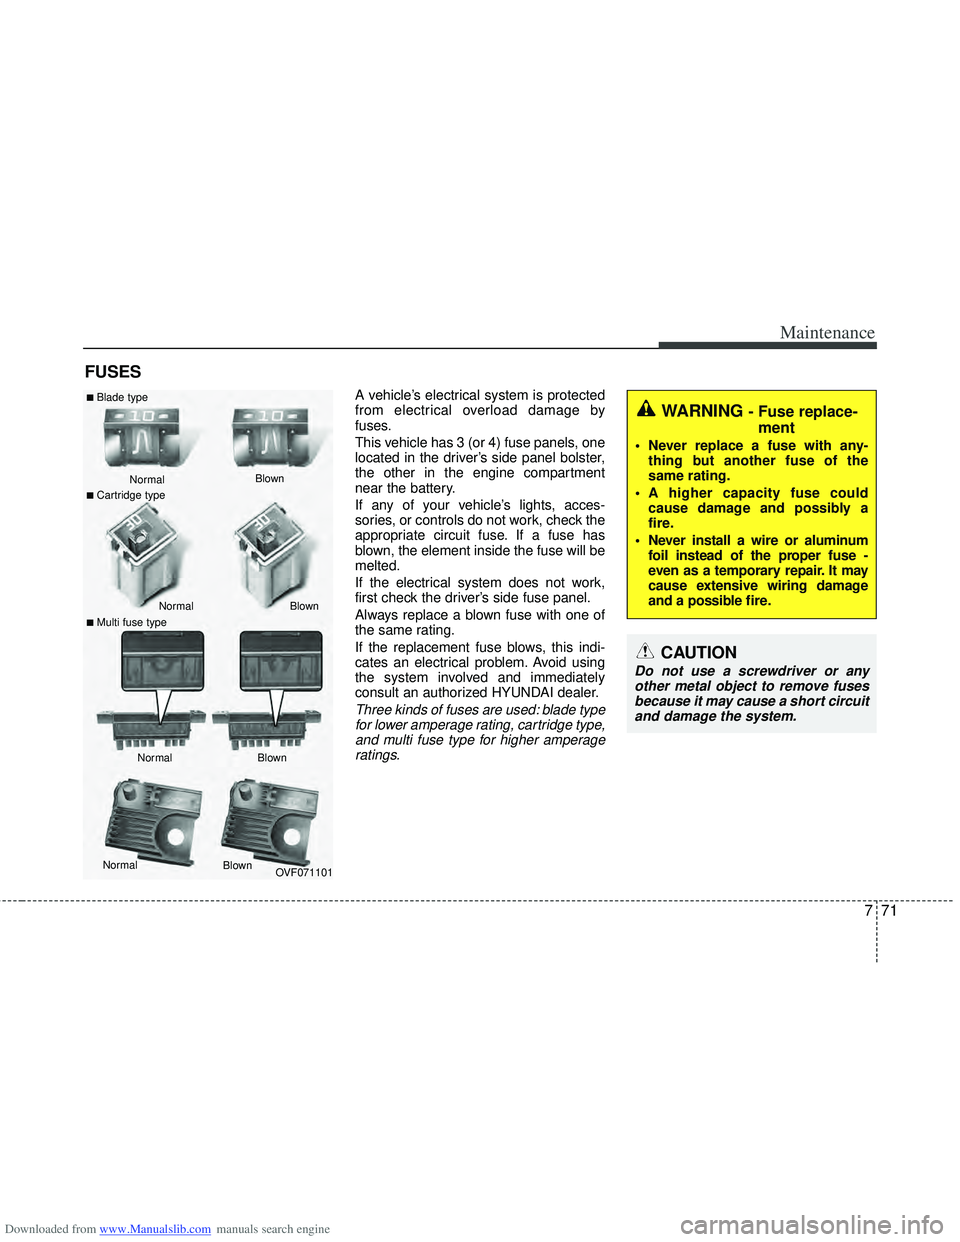
Three kinds of fuses are used: blade typefor lower amperage rating, cartridge type,and multi fuse type for higher amperageratings.
WARNING - Fuse replace- ment
Never replace a fuse with any-
thing but another fuse of the
same rating.
A higher capacity fuse could cause damage and possibly a
fire.
Never install a wire or aluminum foil instead of the proper fuse -
even as a temporary repair. It may
cause extensive wiring damage
and a possible fire.
CAUTION
Do not use a screwdriver or anyother metal object to remove fusesbecause it may cause a short circuit and damage the system.
OVF071101
Normal
Normal
■Blade type
■Cartridge type
■Multi fuse type Blown
Blown
Normal Blown
Normal Blown
Page 477 of 534
Downloaded from www.Manualslib.com manuals search engine Maintenance
72
7
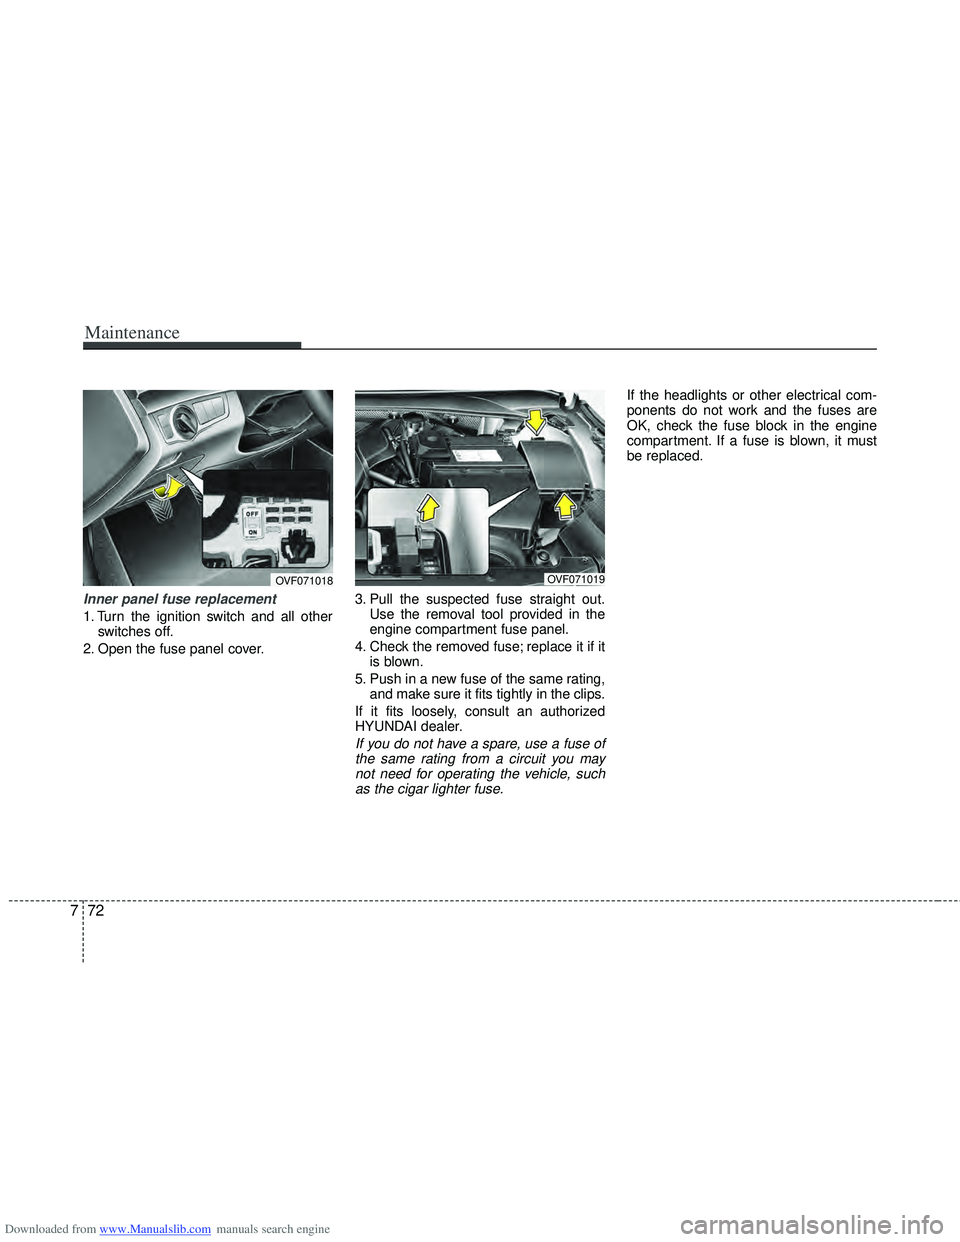
Inner panel fuse replacement
1. Turn the ignition switch and all other
switches off.
2. Open the fuse panel cover. 3. Pull the suspected fuse straight out.
Use the removal tool provided in the
engine compartment fuse panel.
4. Check the removed fuse; replace it if it is blown.
5. Push in a new fuse of the same rating, and make sure it fits tightly in the clips.
If it fits loosely, consult an authorized
HYUNDAI dealer.
If you do not have a spare, use a fuse of the same rating from a circuit you maynot need for operating the vehicle, such as the cigar lighter fuse.
If the headlights or other electrical com-
ponents do not work and the fuses are
OK, check the fuse block in the engine
compartment. If a fuse is blown, it must
be replaced.
OVF071018OVF071019
Page 490 of 534
Downloaded from www.Manualslib.com manuals search engine 785
Maintenance
LIGHT BULBS
Use only the bulbs of the specifiedwattage.
✽
✽ NOTICE
After driving in heavy rain or washing
the vehicle, headlight and taillight lenses
could appear frosty. This condition is
caused by the temperature difference
between the lamp inside and outside.
This is similar to the condensation on
your windows inside your vehicle during
rain and doesn’t indicate a problem with
your vehicle. If the water leaks into the
lamp bulb circuitry, have the vehicle
checked by an authorized HYUNDAI
dealer.
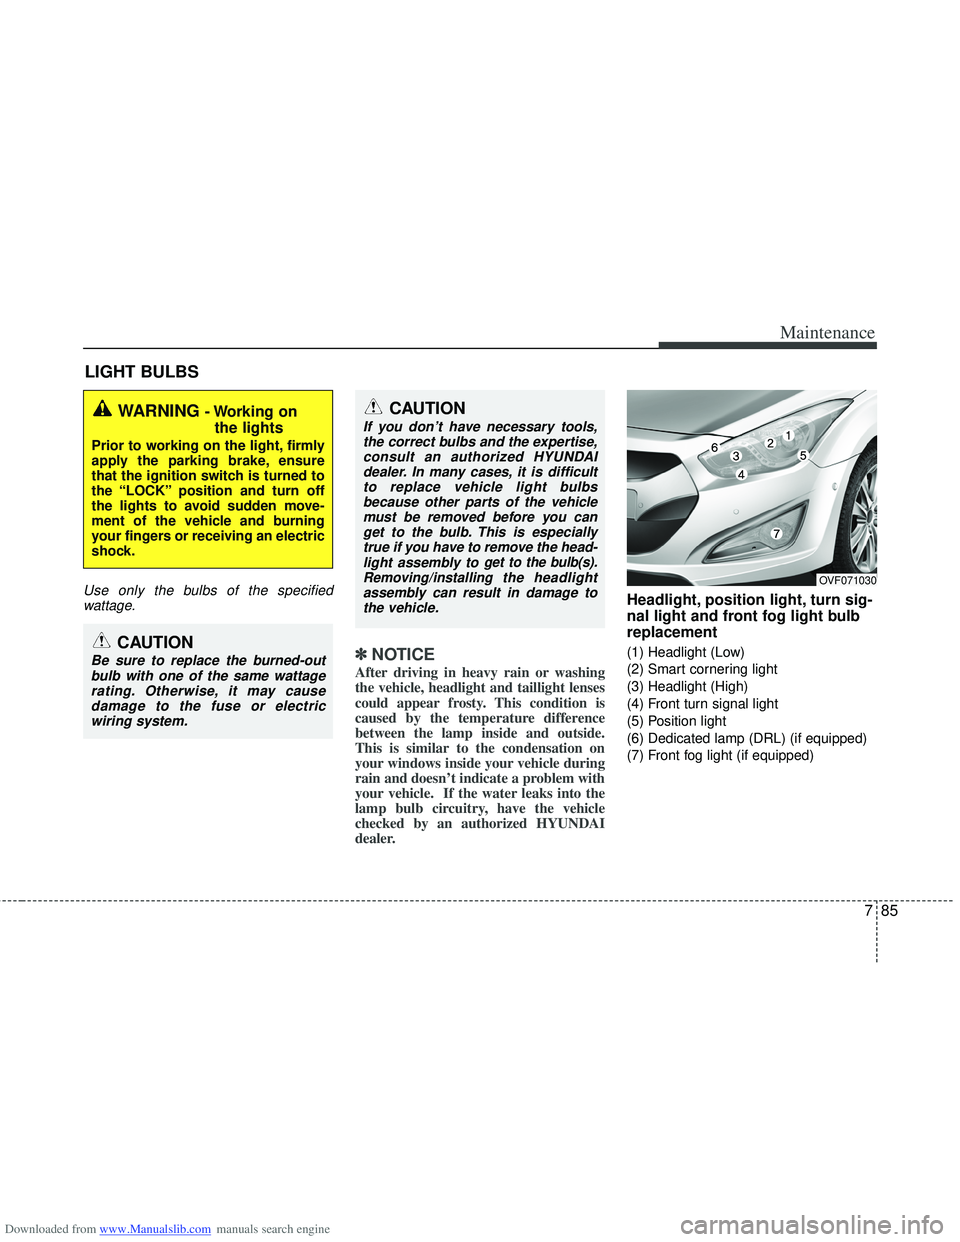
Headlight, position light, turn sig-
nal light and front fog light bulb
replacement
(1) Headlight (Low)
(2) Smart cornering light
(3) Headlight (High)
(4) Front turn signal light
(5) Position light
(6) Dedicated lamp (DRL) (if equipped)
(7) Front fog light (if equipped)
WARNING - Working on
the lights
Prior to working on the light, firmly
apply the parking brake, ensure
that the ignition switch is turned to
the “LOCK” position and turn off
the lights to avoid sudden move-
ment of the vehicle and burning
your fingers or receiving an electric
shock.
CAUTION
Be sure to replace the burned-out
bulb with one of the same wattagerating. Otherwise, it may causedamage to the fuse or electric wiring system.
CAUTION
If you don’t have necessary tools,the correct bulbs and the expertise,consult an authorized HYUNDAIdealer. In many cases, it is difficultto replace vehicle light bulbs because other parts of the vehiclemust be removed before you canget to the bulb. This is especiallytrue if you have to remove the head-light assembly to
get to the bulb(s).
Removing/installingthe headlight
assembly can result in damage to the vehicle.OVF071030
Page 493 of 534
Downloaded from www.Manualslib.com manuals search engine Maintenance
88
7
Headlight (HID type), position light
and dedicated lamp
If the light bulb does not operate, have
the vehicle checked by an authorized
HYUNDAI dealer.
✽ ✽ NOTICE
HID lamps have superior performance
vs. halogen bulbs. HID lamps are esti-
mated by the manufacturer to last twice
as long or longer than halogen bulbs
depending on their frequency of use.
They will probably require replacement
at some point in the life of the vehicle.
Cycling the headlamps on and off more
than typical use will shorten HID lamps
life. HID lamps do not fail in the same
manner as halogen incandescent lamps.
If a headlamp goes out after a period of
operation but will immediately relight
when the headlamp switch is cycled it is
likely the HID lamp needs to be
replaced. HID lighting components are
more complex than conventional halo-
gen bulbs thus have higher replacement
cost.
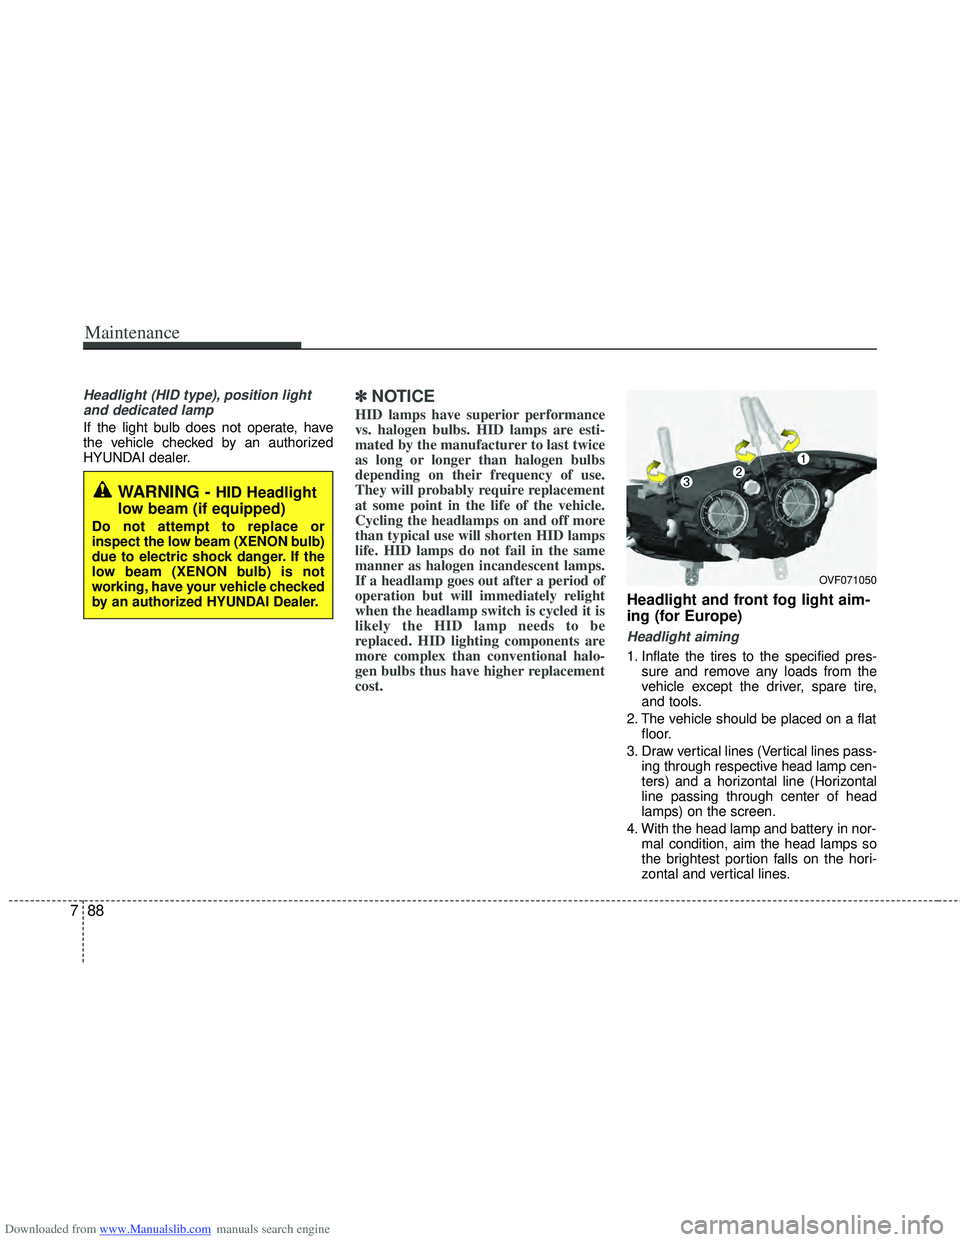
Headlight and front fog light aim-
ing (for Europe)
Headlight aiming
1. Inflate the tires to the specified pres-
sure and remove any loads from the
vehicle except the driver, spare tire,
and tools.
2. The vehicle should be placed on a flat floor.
3. Draw vertical lines (Vertical lines pass- ing through respective head lamp cen-
ters) and a horizontal line (Horizontal
line passing through center of head
lamps) on the screen.
4. With the head lamp and battery in nor- mal condition, aim the head lamps so
the brightest portion falls on the hori-
zontal and vertical lines.
WARNING - HID Headlight
low beam (if equipped)
Do not attempt to replace or
inspect the low beam (XENON bulb)
due to electric shock danger. If the
low beam (XENON bulb) is not
working, have your vehicle checked
by an authorized HYUNDAI Dealer.
OVF071050
Page 499 of 534
Downloaded from www.Manualslib.com manuals search engine Maintenance
94
7
Side repeater light bulb replace-
ment
If the light bulb does not operate, have
the vehicle checked by an authorized
HYUNDAI dealer.
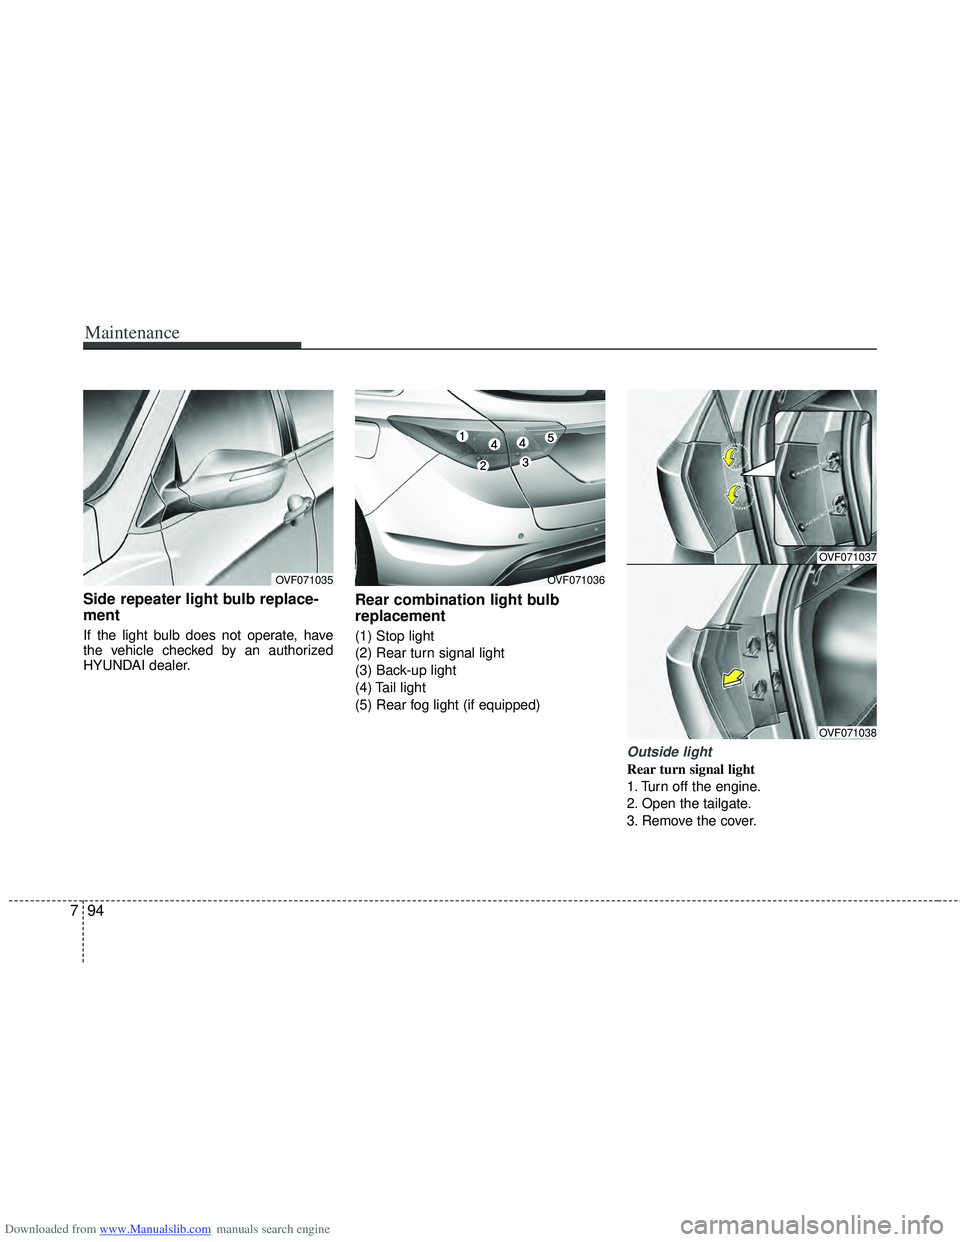
Rear combination light bulb
replacement
(1) Stop light
(2) Rear turn signal light
(3) Back-up light
(4) Tail light
(5) Rear fog light (if equipped)
Outside light
Rear turn signal light
1. Turn off the engine.
2. Open the tailgate.
3. Remove the cover.
OVF071036
OVF071037
OVF071038
OVF071035
Page 502 of 534
Downloaded from www.Manualslib.com manuals search engine 797
Maintenance
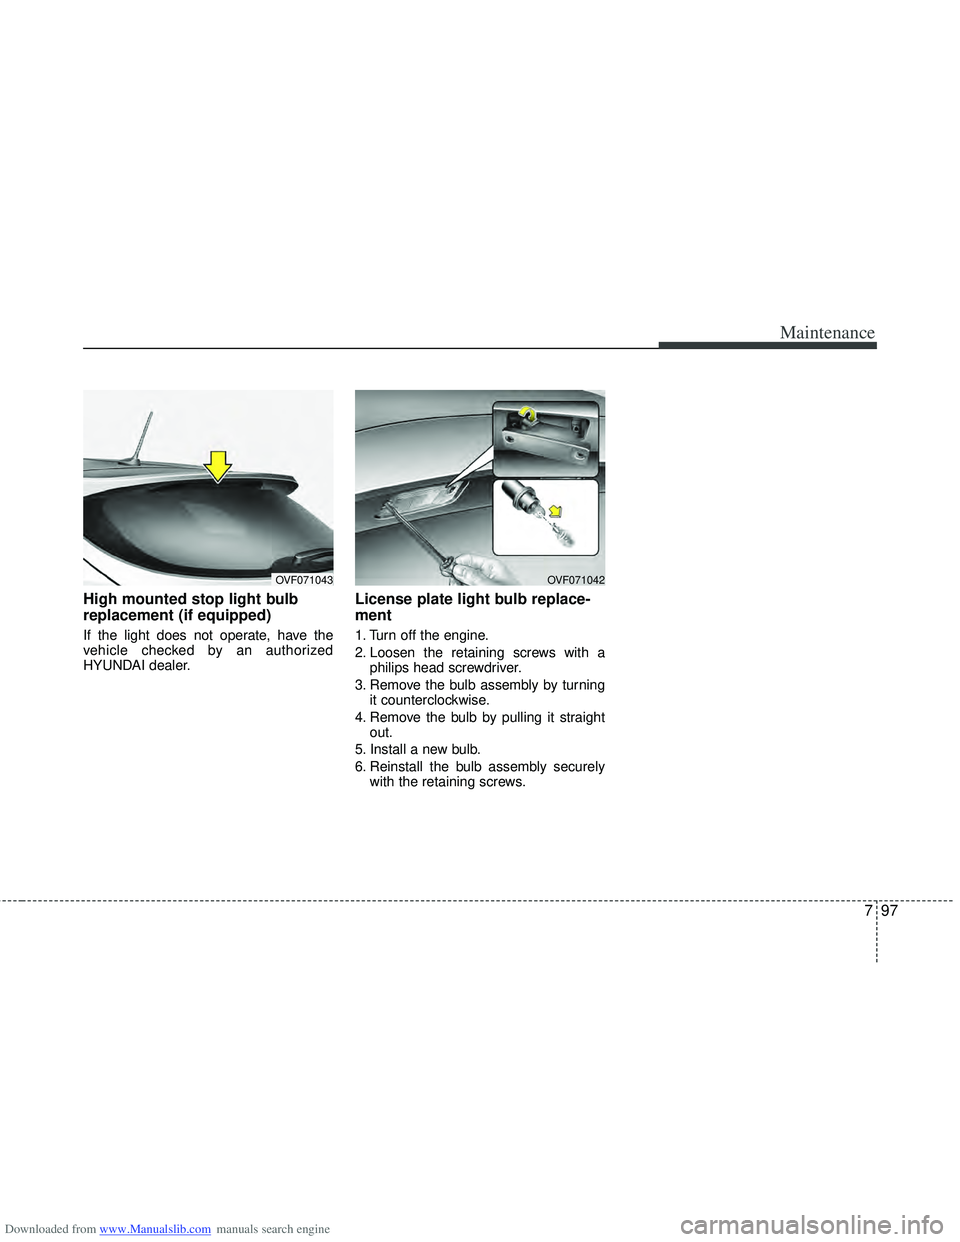
High mounted stop light bulb
replacement (if equipped)
If the light does not operate, have the
vehicle checked by an authorized
HYUNDAI dealer.
License plate light bulb replace-
ment
1. Turn off the engine.
2. Loosen the retaining screws with aphilips head screwdriver.
3. Remove the bulb assembly by turning it counterclockwise.
4. Remove the bulb by pulling it straight out.
5. Install a new bulb.
6. Reinstall the bulb assembly securely with the retaining screws.
OVF071043OVF071042
Page 503 of 534
Downloaded from www.Manualslib.com manuals search engine Maintenance
98
7
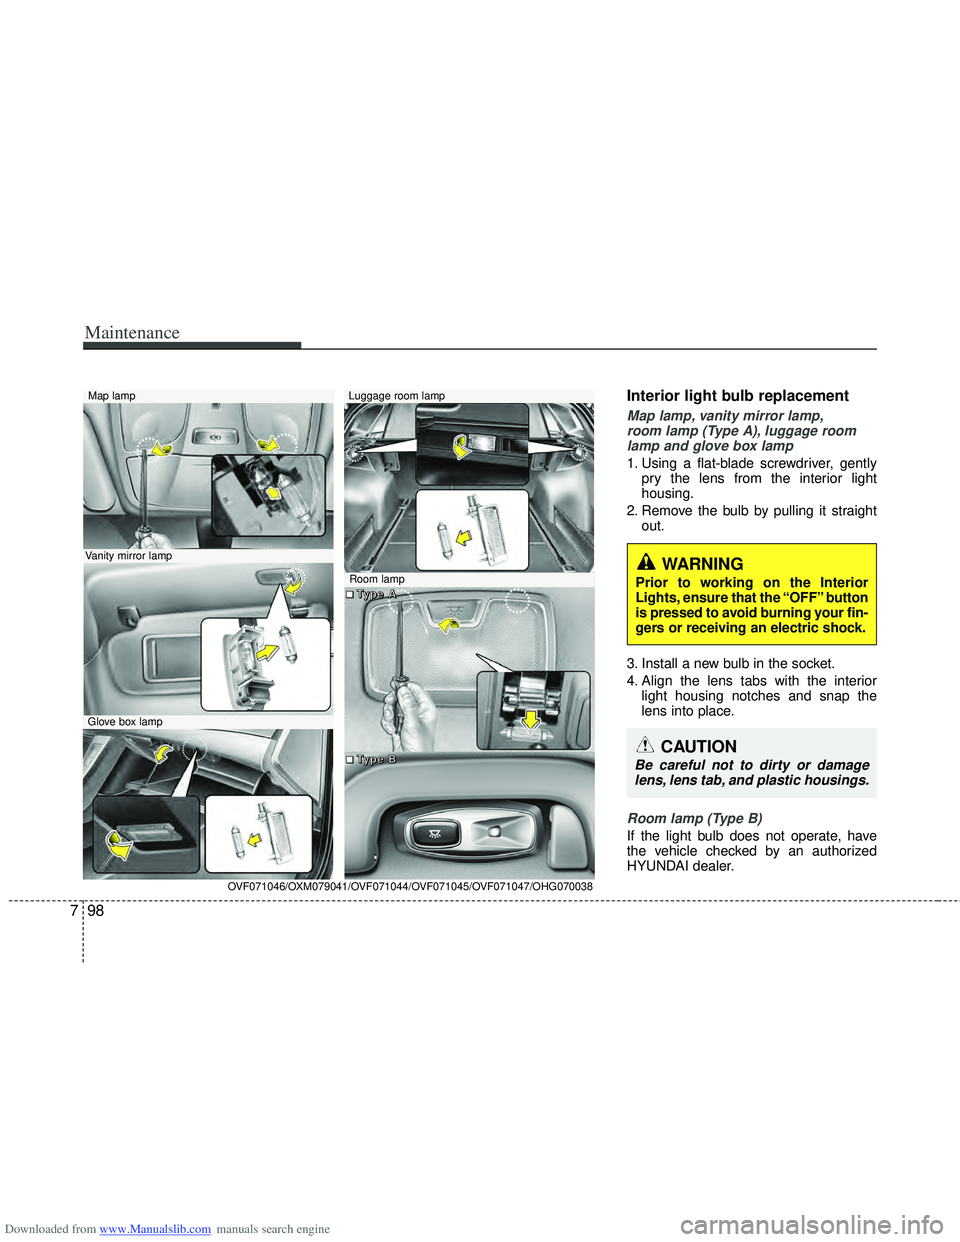
Interior light bulb replacement
Map lamp, vanity mirror lamp,
room lamp (Type A), luggage room lamp and glove box lamp
1. Using a flat-blade screwdriver, gently pry the lens from the interior light
housing.
2. Remove the bulb by pulling it straight out.
3. Install a new bulb in the socket.
4. Align the lens tabs with the interior light housing notches and snap the
lens into place.
Room lamp (Type B)
If the light bulb does not operate, have
the vehicle checked by an authorized
HYUNDAI dealer.
WARNING
Prior to working on the Interior
Lights, ensure that the “OFF” button
is pressed to avoid burning your fin-
gers or receiving an electric shock.
CAUTION
Be careful not to dirty or damagelens, lens tab, and plastic housings.
Map lamp
Glove box lamp
Luggage room lamp
Vanity mirror lamp
Room lamp
OVF071046/OXM079041/OVF071044/OVF071045/OVF071047/OHG070038
■
■
■
■T
T
T
T
y
y
y
y
p
p
p
p
e
e
e
e
A
A
A
A
■
■
■
■T
T
T
T
y
y
y
y
p
p
p
p
e
e
e
e
B
B
B
B