remove HYUNDAI I40 2015 Owners Manual
[x] Cancel search | Manufacturer: HYUNDAI, Model Year: 2015, Model line: I40, Model: HYUNDAI I40 2015Pages: 534, PDF Size: 11.05 MB
Page 32 of 534
Downloaded from www.Manualslib.com manuals search engine Safety system of your vehicle
83
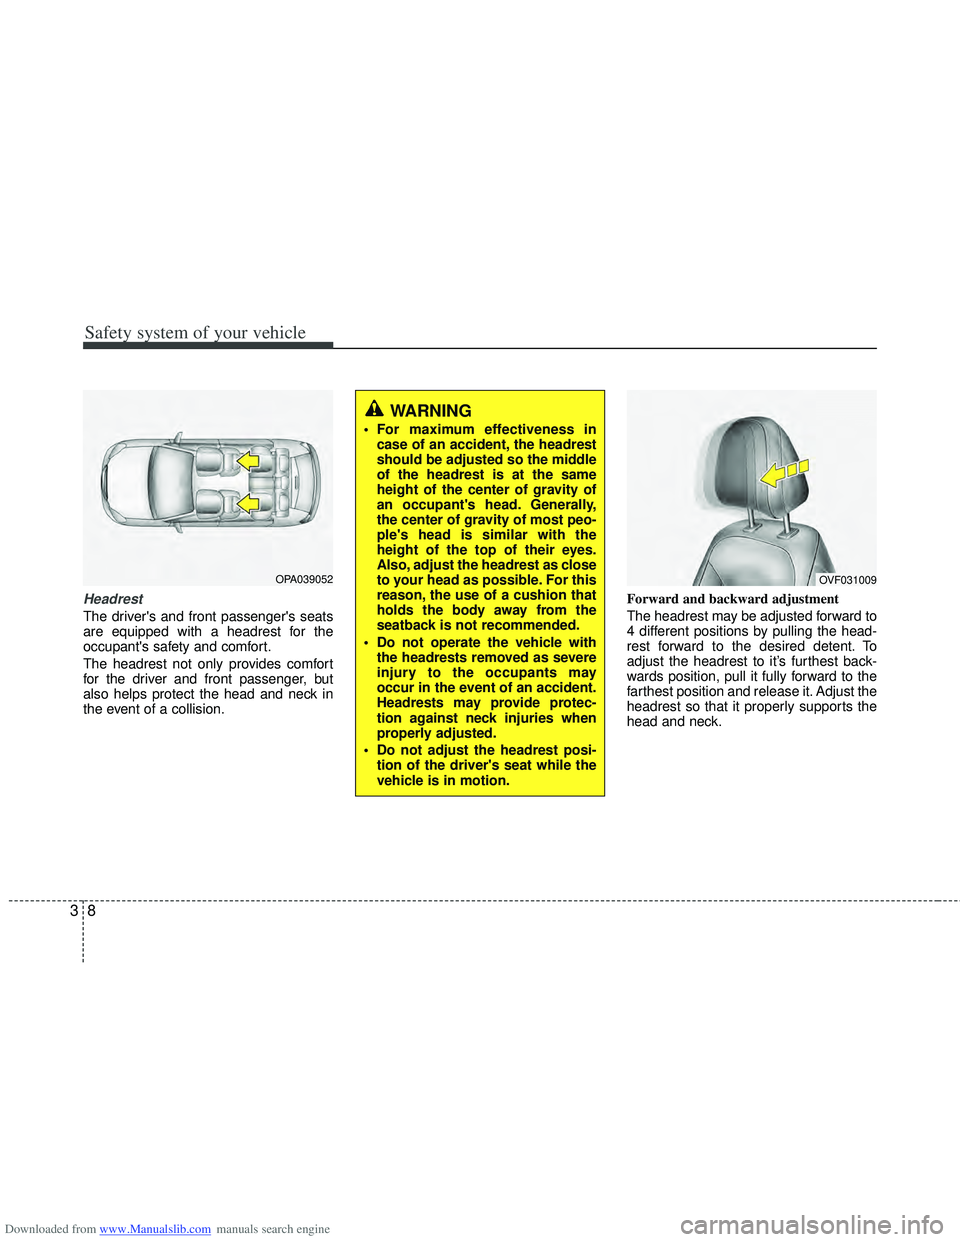
Headrest
The driver's and front passenger's seats
are equipped with a headrest for the
occupant's safety and comfort.
The headrest not only provides comfort
for the driver and front passenger, but
also helps protect the head and neck in
the event of a collision.Forward and backward adjustment
The headrest may be adjusted forward to
4 different positions by pulling the head-
rest forward to the desired detent. To
adjust the headrest to it’s furthest back-
wards position, pull it fully forward to the
farthest position and release it. Adjust the
headrest so that it properly supports the
head and neck.
OPA039052
WARNING
For maximum effectiveness in
case of an accident, the headrest
should be adjusted so the middle
of the headrest is at the same
height of the center of gravity of
an occupant's head. Generally,
the center of gravity of most peo-
ple's head is similar with the
height of the top of their eyes.
Also, adjust the headrest as close
to your head as possible. For this
reason, the use of a cushion that
holds the body away from the
seatback is not recommended.
Do not operate the vehicle with the headrests removed as severe
injury to the occupants may
occur in the event of an accident.
Headrests may provide protec-
tion against neck injuries when
properly adjusted.
Do not adjust the headrest posi- tion of the driver's seat while the
vehicle is in motion.
OVF031009
Page 33 of 534
Downloaded from www.Manualslib.com manuals search engine 39
Safety system of your vehicle
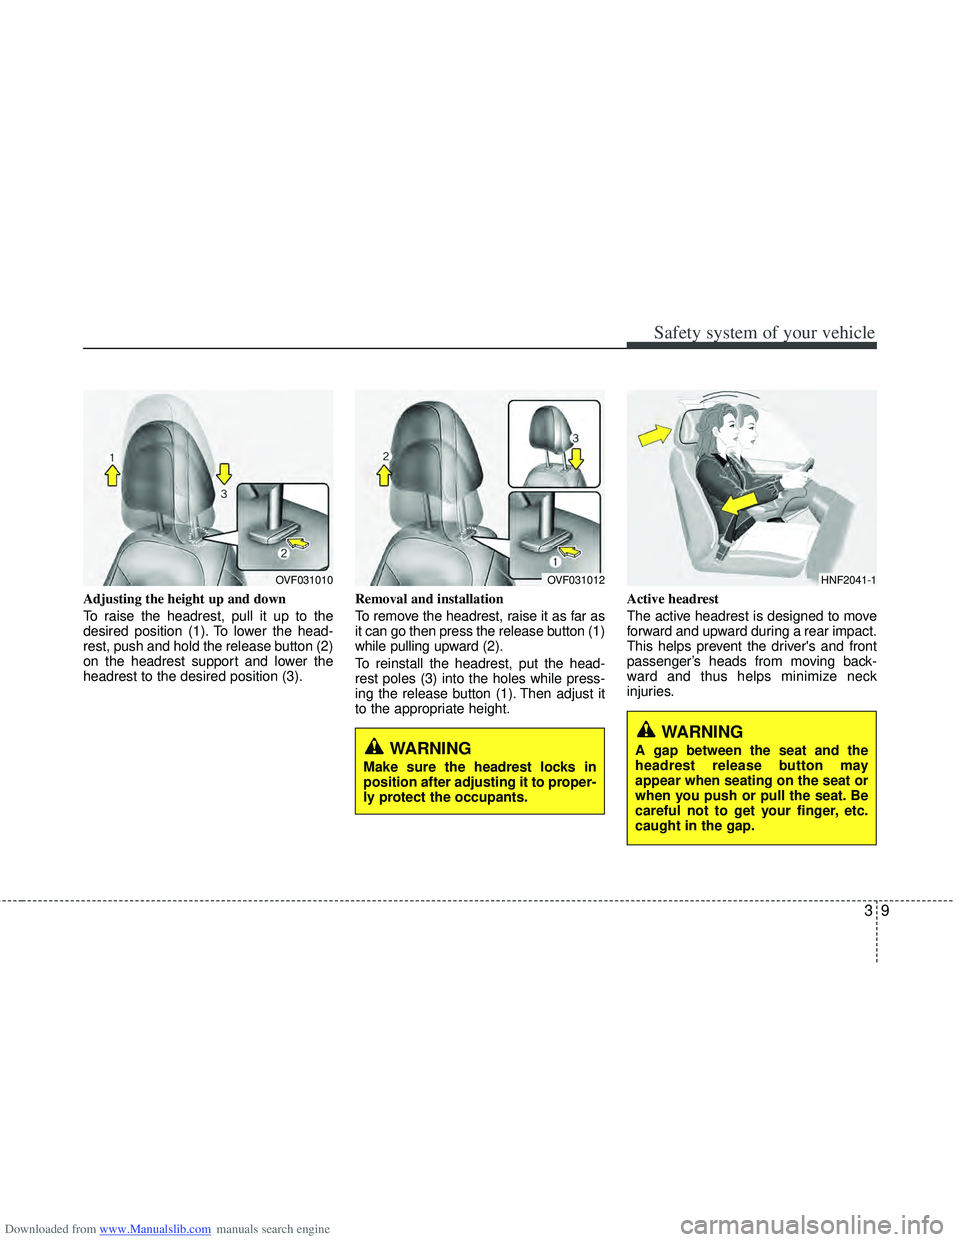
Adjusting the height up and down
To raise the headrest, pull it up to the
desired position (1). To lower the head-
rest, push and hold the release button (2)
on the headrest support and lower the
headrest to the desired position (3).Removal and installation
To remove the headrest, raise it as far as
it can go then press the release button (1)
while pulling upward (2).
To reinstall the headrest, put the head-
rest poles (3) into the holes while press-
ing the release button (1). Then adjust it
to the appropriate height.Active headrest
The active headrest is designed to move
forward and upward during a rear impact.
This helps prevent the driver's and front
passenger’s heads from moving back-
ward and thus helps minimize neck
injuries.
OVF031010OVF031012
WARNING
Make sure the headrest locks in
position after adjusting it to proper-
ly protect the occupants.
HNF2041-1
WARNING
A gap between the seat and the
headrest release button may
appear when seating on the seat or
when you push or pull the seat. Be
careful not to get your finger, etc.
caught in the gap.
Page 37 of 534
Downloaded from www.Manualslib.com manuals search engine 313
Safety system of your vehicle
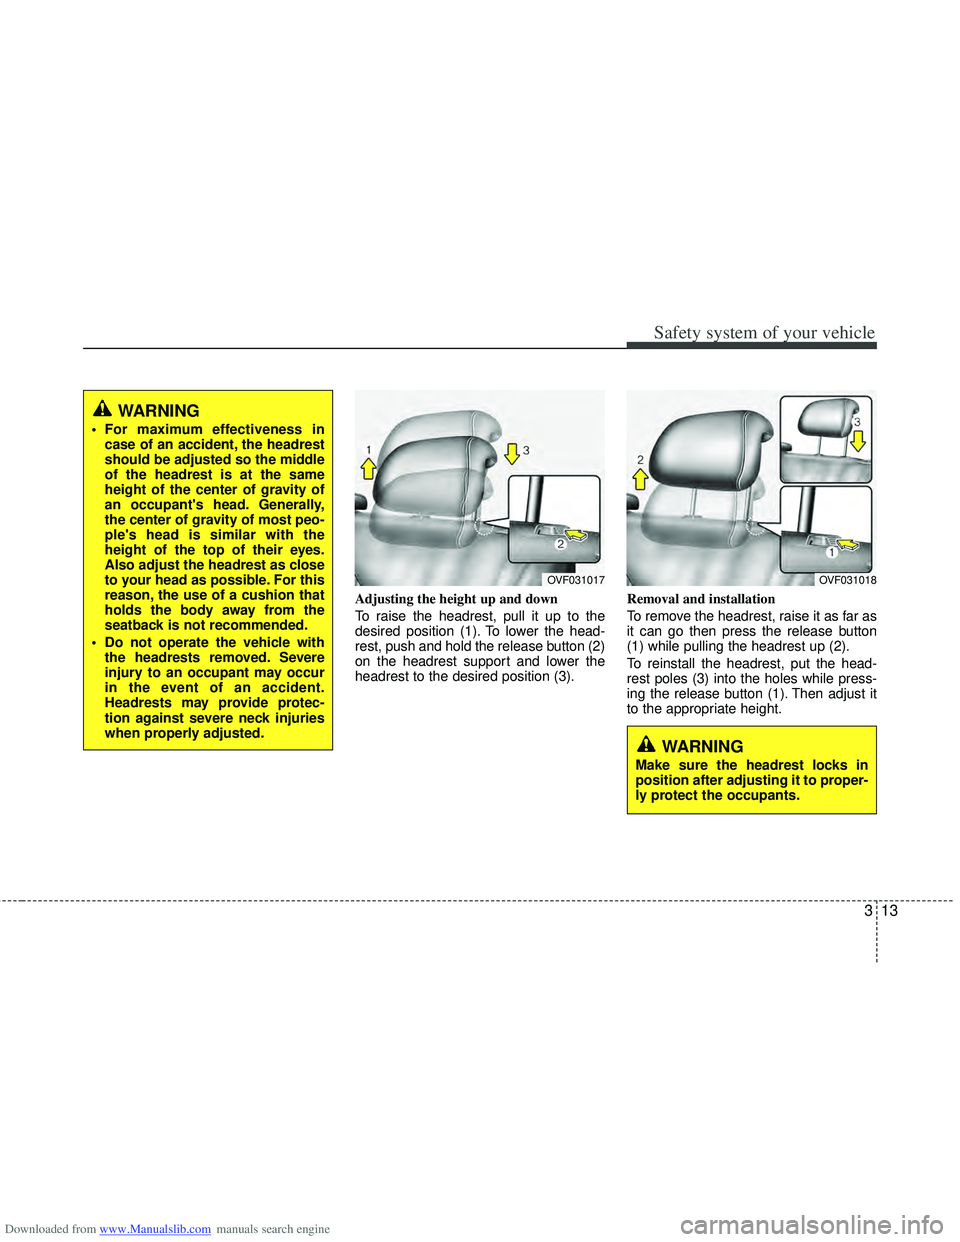
Adjusting the height up and down
To raise the headrest, pull it up to the
desired position (1). To lower the head-
rest, push and hold the release button (2)
on the headrest support and lower the
headrest to the desired position (3).Removal and installation
To remove the headrest, raise it as far as
it can go then press the release button
(1) while pulling the headrest up (2).
To reinstall the headrest, put the head-
rest poles (3) into the holes while press-
ing the release button (1). Then adjust it
to the appropriate height.
OVF031017
WARNING
For maximum effectiveness in
case of an accident, the headrest
should be adjusted so the middle
of the headrest is at the same
height of the center of gravity of
an occupant's head. Generally,
the center of gravity of most peo-
ple's head is similar with the
height of the top of their eyes.
Also adjust the headrest as close
to your head as possible. For this
reason, the use of a cushion that
holds the body away from the
seatback is not recommended.
Do not operate the vehicle with the headrests removed. Severe
injury to an occupant may occur
in the event of an accident.
Headrests may provide protec-
tion against severe neck injuries
when properly adjusted.
OVF031018
WARNING
Make sure the headrest locks in
position after adjusting it to proper-
ly protect the occupants.
Page 43 of 534
Downloaded from www.Manualslib.com manuals search engine 319
Safety system of your vehicle
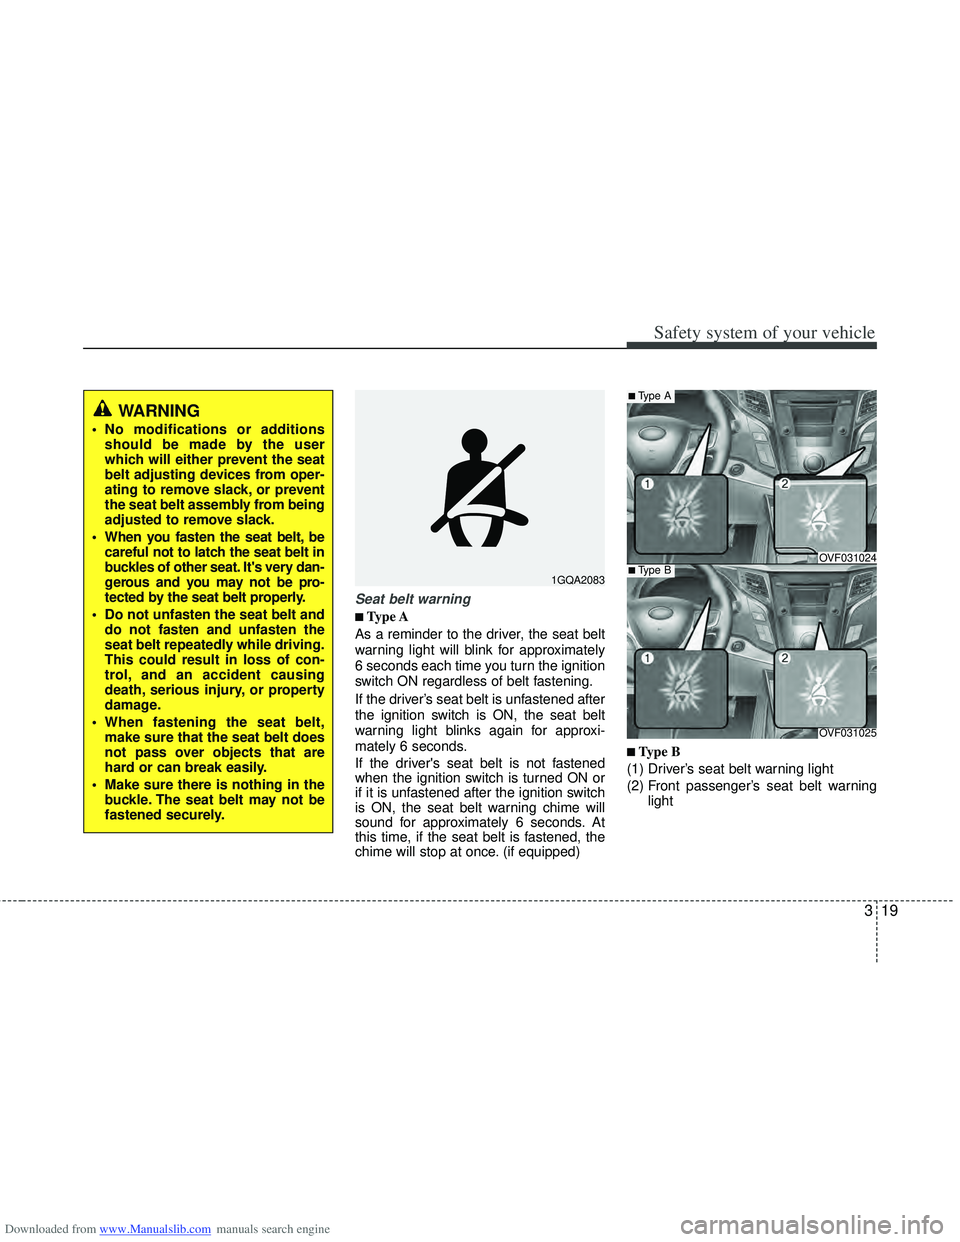
Seat belt warning
■
■Type A
As a reminder to the driver, the seat belt
warning light will blink for approximately
6 seconds each time you turn the ignition
switch ON regardless of belt fastening.
If the driver’s seat belt is unfastened after
the ignition switch is ON, the seat belt
warning light blinks again for approxi-
mately 6 seconds.
If the driver's seat belt is not fastened
when the ignition switch is turned ON or
if it is unfastened after the ignition switch
is ON, the seat belt warning chime will
sound for approximately 6 seconds. At
this time, if the seat belt is fastened, the
chime will stop at once. (if equipped)
■ ■Type B
(1) Driver’s seat belt warning light
(2) Front passenger’s seat belt warning light
1GQA2083
WARNING
No modifications or additionsshould be made by the user
which will either prevent the seat
belt adjusting devices from oper-
ating to remove slack, or prevent
the seat belt assembly from being
adjusted to remove slack.
When you fasten the seat belt, be careful not to latch the seat belt in
buckles of other seat. It's very dan-
gerous and you may not be pro-
tected by the seat belt properly.
Do not unfasten the seat belt and do not fasten and unfasten the
seat belt repeatedly while driving.
This could result in loss of con-
trol, and an accident causing
death, serious injury, or property
damage.
When fastening the seat belt, make sure that the seat belt does
not pass over objects that are
hard or can break easily.
Make sure there is nothing in the buckle. The seat belt may not be
fastened securely.
OVF031025
■Type A
■Type BOVF031024
Page 71 of 534
Downloaded from www.Manualslib.com manuals search engine 347
Safety system of your vehicle
WARNING
If an air bag deploys, there maybe a loud noise followed by a fine
dust released in the vehicle.
These conditions are normal and
are not hazardous - the air bags
are packed in this fine powder.
The dust generated during air
bag deployment may cause skin
or eye irritation as well as aggra-
vate asthma for some persons.
Always wash all exposed skin
areas thoroughly with lukewarm
water and a mild soap after an
accident in which the air bags
were deployed.
(Continued)
(Continued)
The SRS can function only whenthe ignition key is in the ON posi-
tion. If the SRS air bag warning
light does not illuminate, or con-
tinuously remains on after illumi-
nating for about 6 seconds when
the ignition key is turned to the
ON position, or after the engine is
started, comes on while driving,
the SRS is not working properly.
If this occurs, have your vehicle
immediately inspected by an
authorized HYUNDAI dealer.
Before you replace a fuse or dis- connect a battery terminal, turn
the ignition switch to the LOCK
position and remove the ignition
key. Never remove or replace the
air bag related fuse(s) when the
ignition switch is in the ON posi-
tion. Failure to heed this warning
will cause the SRS air bag warn-
ing light to illuminate.
B240B05L
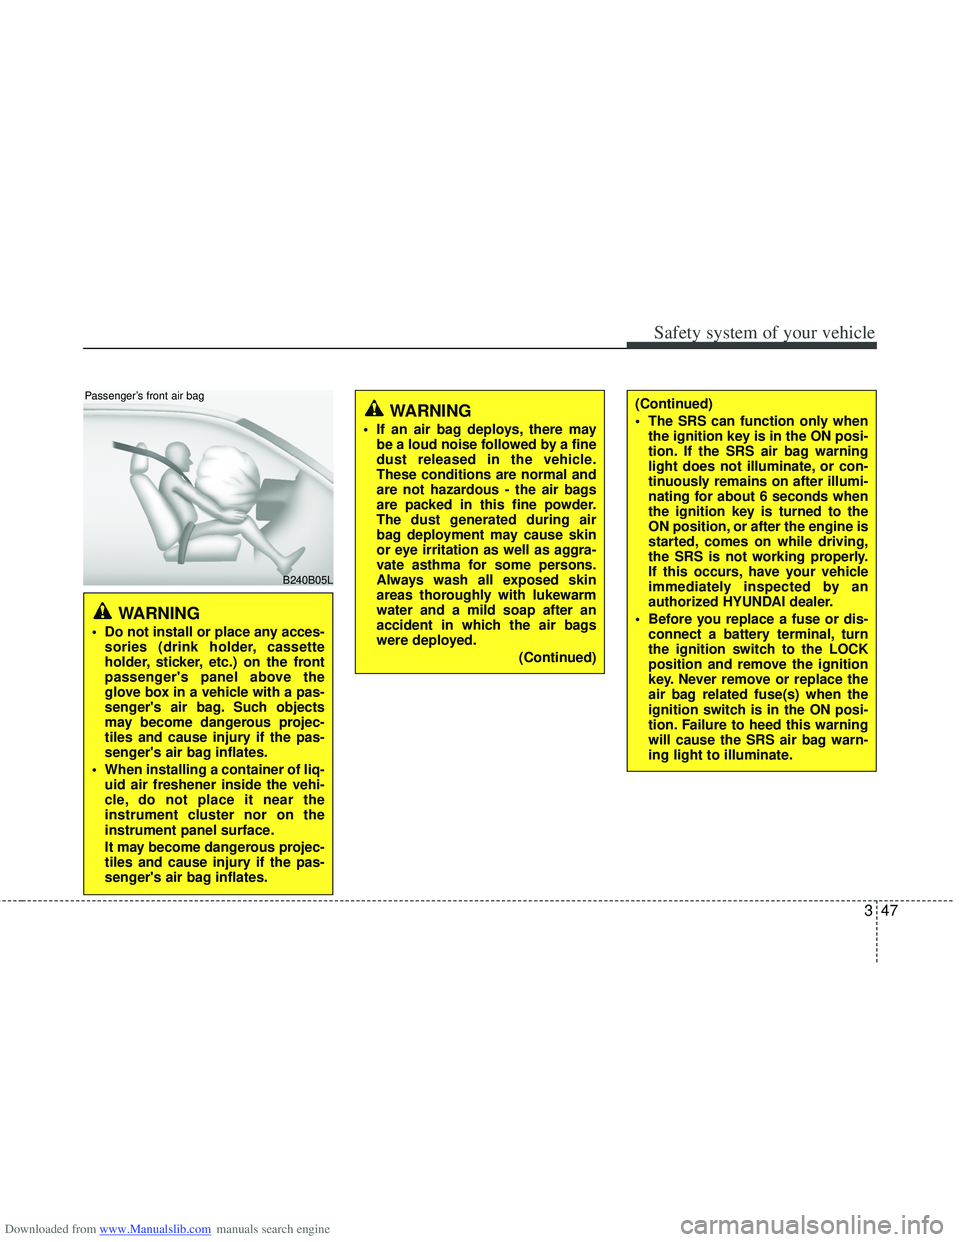
Passenger’s front air bag
WARNING
Do not install or place any acces-
sories (drink holder, cassette
holder, sticker, etc.) on the front
passenger's panel above the
glove box in a vehicle with a pas-
senger's air bag. Such objects
may become dangerous projec-
tiles and cause injury if the pas-
senger's air bag inflates.
When installing a container of liq- uid air freshener inside the vehi-
cle, do not place it near the
instrument cluster nor on the
instrument panel surface.
It may become dangerous projec-
tiles and cause injury if the pas-
senger's air bag inflates.
Page 74 of 534
Downloaded from www.Manualslib.com manuals search engine Safety system of your vehicle
50
3
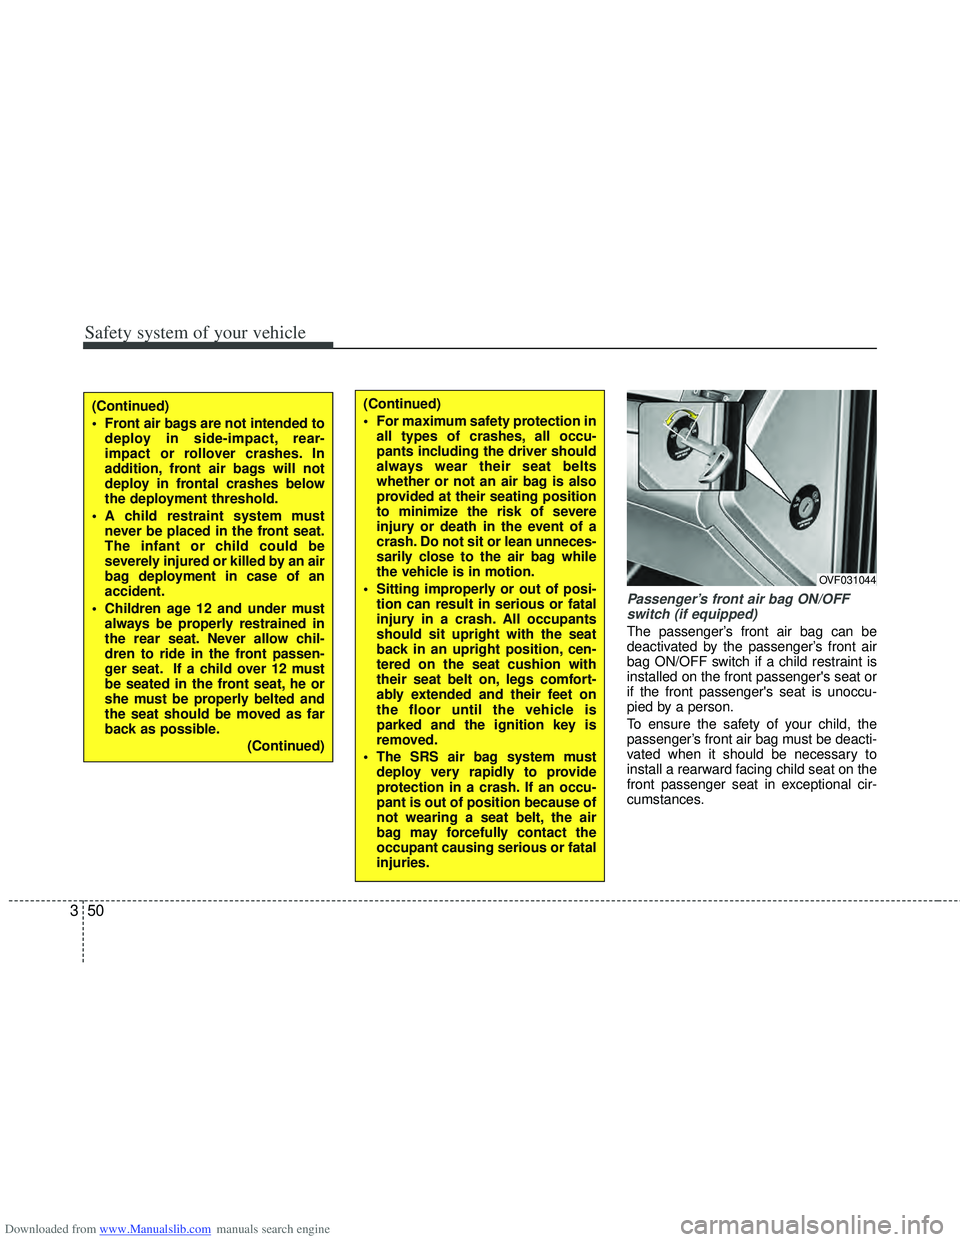
Passenger’s front air bag ON/OFF
switch (if equipped)
The passenger’s front air bag can be
deactivated by the passenger’s front air
bag ON/OFF switch if a child restraint is
installed on the front passenger's seat or
if the front passenger's seat is unoccu-
pied by a person.
To ensure the safety of your child, the
passenger’s front air bag must be deacti-
vated when it should be necessary to
install a rearward facing child seat on the
front passenger seat in exceptional cir-
cumstances.
OVF031044
(Continued)
For maximum safety protection in all types of crashes, all occu-
pants including the driver should
always wear their seat belts
whether or not an air bag is also
provided at their seating position
to minimize the risk of severe
injury or death in the event of a
crash. Do not sit or lean unneces-
sarily close to the air bag while
the vehicle is in motion.
Sitting improperly or out of posi- tion can result in serious or fatal
injury in a crash. All occupants
should sit upright with the seat
back in an upright position, cen-
tered on the seat cushion with
their seat belt on, legs comfort-
ably extended and their feet on
the floor until the vehicle is
parked and the ignition key is
removed.
The SRS air bag system must deploy very rapidly to provide
protection in a crash. If an occu-
pant is out of position because of
not wearing a seat belt, the air
bag may forcefully contact the
occupant causing serious or fatal
injuries.(Continued)
Front air bags are not intended todeploy in side-impact, rear-
impact or rollover crashes. In
addition, front air bags will not
deploy in frontal crashes below
the deployment threshold.
A child restraint system must never be placed in the front seat.
The infant or child could be
severely injured or killed by an air
bag deployment in case of an
accident.
Children age 12 and under must always be properly restrained in
the rear seat. Never allow chil-
dren to ride in the front passen-
ger seat. If a child over 12 must
be seated in the front seat, he or
she must be properly belted and
the seat should be moved as far
back as possible.
(Continued)
Page 90 of 534
Downloaded from www.Manualslib.com manuals search engine 43
Features of your vehicle
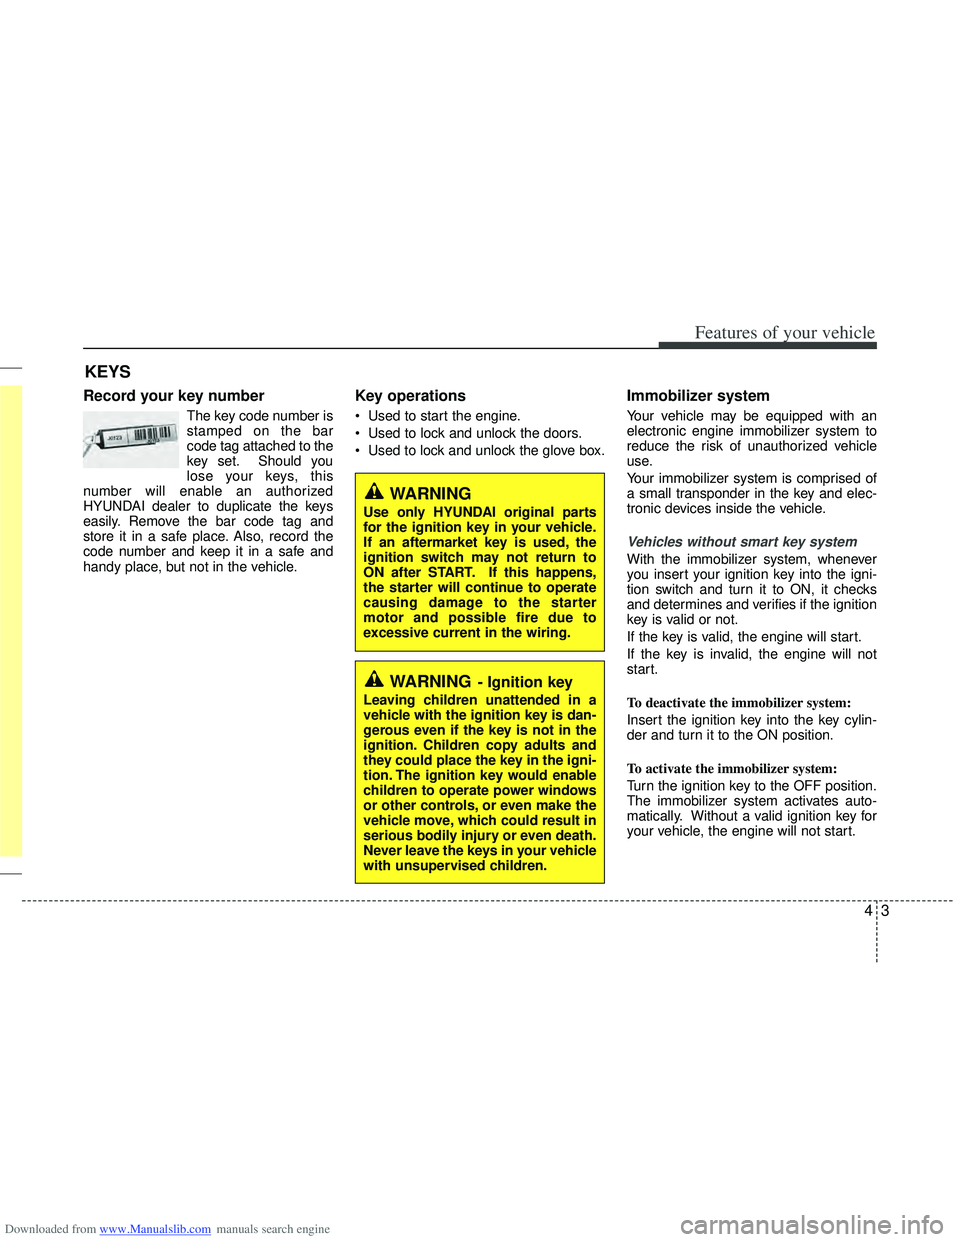
Record your key number
The key code number is
stamped on the bar
code tag attached to the
key set. Should you
lose your keys, this
number will enable an authorized
HYUNDAI dealer to duplicate the keys
easily. Remove the bar code tag and
store it in a safe place. Also, record the
code number and keep it in a safe and
handy place, but not in the vehicle.
Key operations
• Used to start the engine.
Used to lock and unlock the doors.
Used to lock and unlock the glove box.
Immobilizer system
Your vehicle may be equipped with an
electronic engine immobilizer system to
reduce the risk of unauthorized vehicle
use.
Your immobilizer system is comprised of
a small transponder in the key and elec-
tronic devices inside the vehicle.
Vehicles without smart key system
With the immobilizer system, whenever
you insert your ignition key into the igni-
tion switch and turn it to ON, it checks
and determines and verifies if the ignition
key is valid or not.
If the key is valid, the engine will start.
If the key is invalid, the engine will not
start.
To deactivate the immobilizer system:
Insert the ignition key into the key cylin-
der and turn it to the ON position.
To activate the immobilizer system:
Turn the ignition key to the OFF position.
The immobilizer system activates auto-
matically. Without a valid ignition key for
your vehicle, the engine will not start.
KEYS
WARNING- Ignition key
Leaving children unattended in a
vehicle with the ignition key is dan-
gerous even if the key is not in the
ignition. Children copy adults and
they could place the key in the igni-
tion. The ignition key would enable
children to operate power windows
or other controls, or even make the
vehicle move, which could result in
serious bodily injury or even death.
Never leave the keys in your vehicle
with unsupervised children.
WARNING
Use only HYUNDAI original parts
for the ignition key in your vehicle.
If an aftermarket key is used, the
ignition switch may not return to
ON after START. If this happens,
the starter will continue to operate
causing damage to the starter
motor and possible fire due to
excessive current in the wiring.
Page 92 of 534
Downloaded from www.Manualslib.com manuals search engine 45
Features of your vehicle
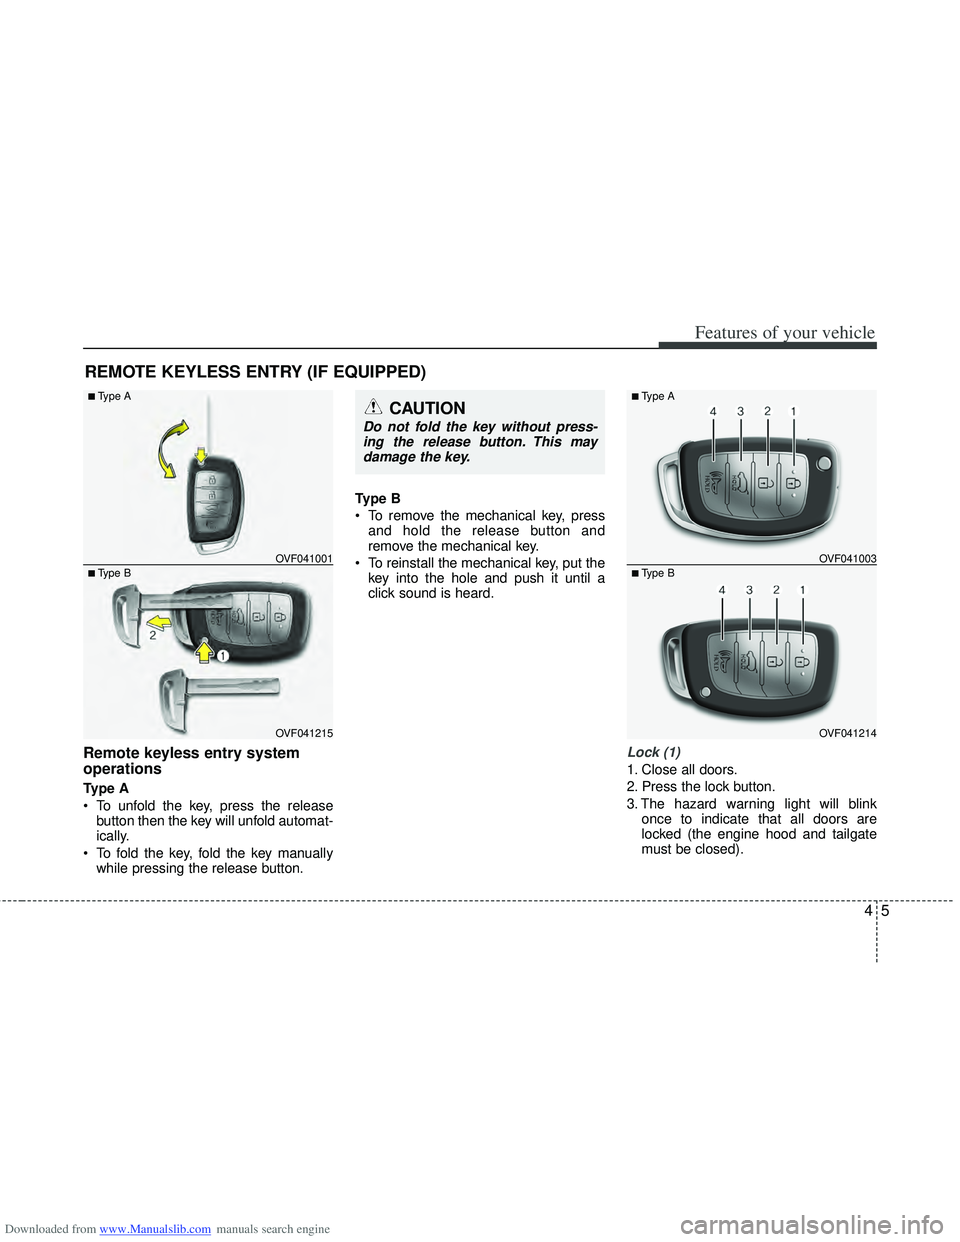
Remote keyless entry system
operations
Type A
To unfold the key, press the releasebutton then the key will unfold automat-
ically.
To fold the key, fold the key manually while pressing the release button. Type B
To remove the mechanical key, press
and hold the release button and
remove the mechanical key.
To reinstall the mechanical key, put the key into the hole and push it until a
click sound is heard.
Lock (1)
1. Close all doors.
2. Press the lock button.
3. The hazard warning light will blink once to indicate that all doors are
locked (the engine hood and tailgate
must be closed).
REMOTE KEYLESS ENTRY (IF EQUIPPED)
OVF041215
■Type B OVF041001
■Type ACAUTION
Do not fold the key without press-
ing the release button. This maydamage the key.
OVF041214
■Type B OVF041003
■Type A
Page 98 of 534
Downloaded from www.Manualslib.com manuals search engine 411
Features of your vehicle
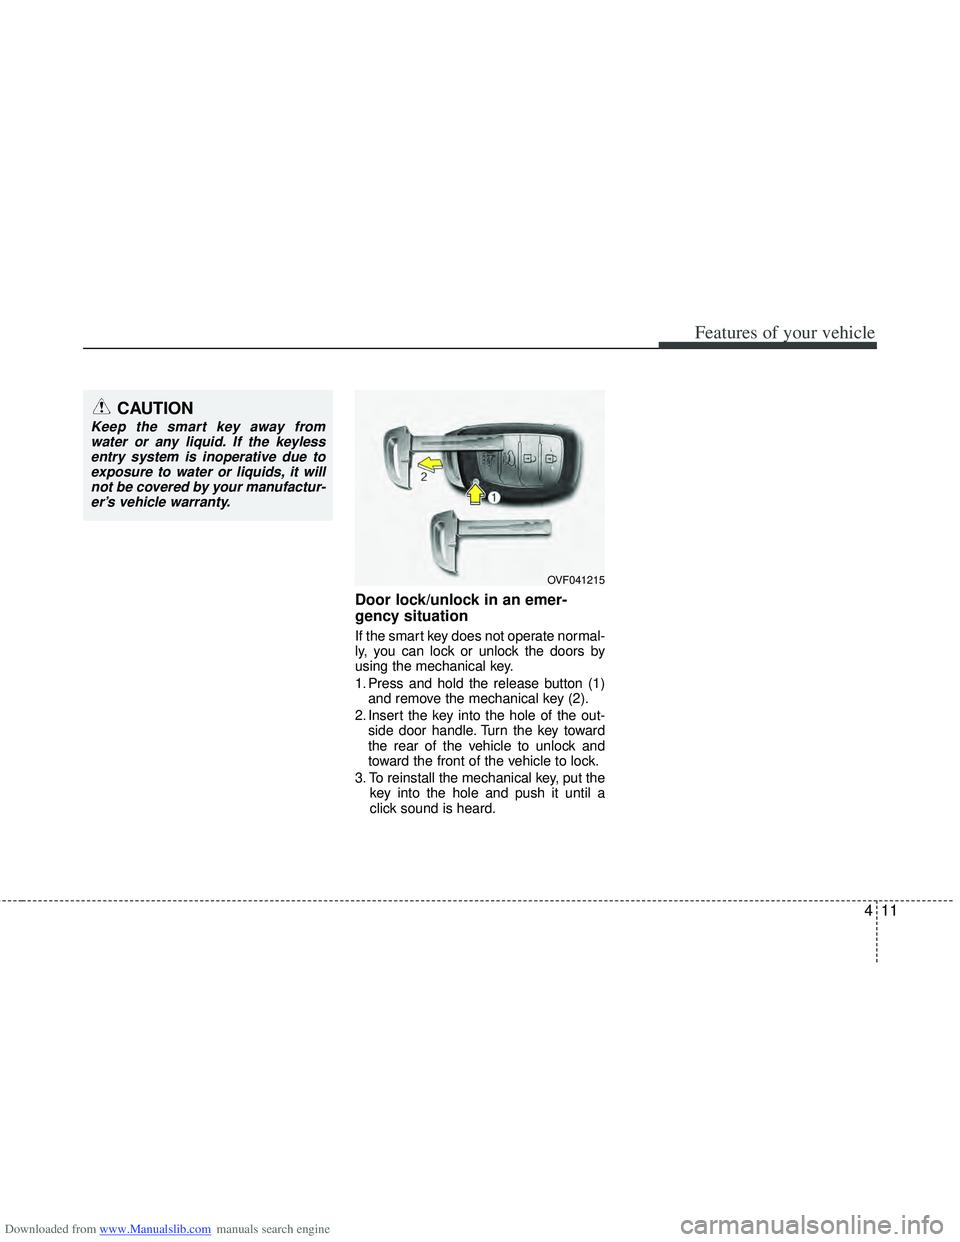
Door lock/unlock in an emer-
gency situation
If the smart key does not operate normal-
ly, you can lock or unlock the doors by
using the mechanical key.
1. Press and hold the release button (1)and remove the mechanical key (2).
2. Insert the key into the hole of the out- side door handle. Turn the key toward
the rear of the vehicle to unlock and
toward the front of the vehicle to lock.
3. To reinstall the mechanical key, put the key into the hole and push it until a
click sound is heard.
CAUTION
Keep the smart key away fromwater or any liquid. If the keylessentry system is inoperative due toexposure to water or liquids, it willnot be covered by your manufactur- er’s vehicle warranty.
OVF041215
Page 100 of 534
Downloaded from www.Manualslib.com manuals search engine 413
Features of your vehicle
button on the smart key.
After completion of the steps above,
the hazard warning lights will operate
once to indicate that the system is
armed.
If any door, tailgate or engine hood
remains open, the hazard warning
lights won't operate and theft-alarm
will not arm. After this, if all doors, tail-
gate and engine hood are closed, the
hazard warning lights will blink once.Using the transmitter
Park the vehicle and stop the engine.
Arm the system as described below.
1. Turn off the engine and remove the ignition key from the ignition switch.
2. Make sure that all doors, the engine hood and tailgate are closed and
latched.
3. Lock the doors by pressing the lock button on the transmitter.
After completion of the steps above,
the hazard warning lights will blink
once to indicate that the system is
armed.
If any door, tailgate or engine hood
remains opened, the hazard warning
lights will not operate and theft-alarm
will not arm. After this, if all doors, tail-
gate and engine hood are closed, the
hazard warning lights will blink once.
Do not arm the system until all pas- sengers have left the vehicle. If the
system is armed while a passen-
ger(s) remains in the vehicle, the
alarm may be activated when the
remaining passenger(s) leave the
vehicle. If any door, tailgate lid or
engine hood is opened within 30
seconds after entering the armed
stage, the system is disarmed to
prevent unnecessary alarm.
Theft-alarm stage
The alarm will be activated if any of the
following occurs while the system is
armed.
A front or rear door is opened withoutusing transmitter or smart key.
The tailgate is opened without using transmitter or smart key.
The engine hood is opened.
The siren will sound and the hazard
warning lights will blink continuously for
27 seconds, unless the system is dis-
armed. To turn off the system, unlock the
doors with the transmitter or smart key.