reset HYUNDAI I40 2016 User Guide
[x] Cancel search | Manufacturer: HYUNDAI, Model Year: 2016, Model line: I40, Model: HYUNDAI I40 2016Pages: 534, PDF Size: 11.05 MB
Page 222 of 534
Downloaded from www.Manualslib.com manuals search engine 4135
Features of your vehicle
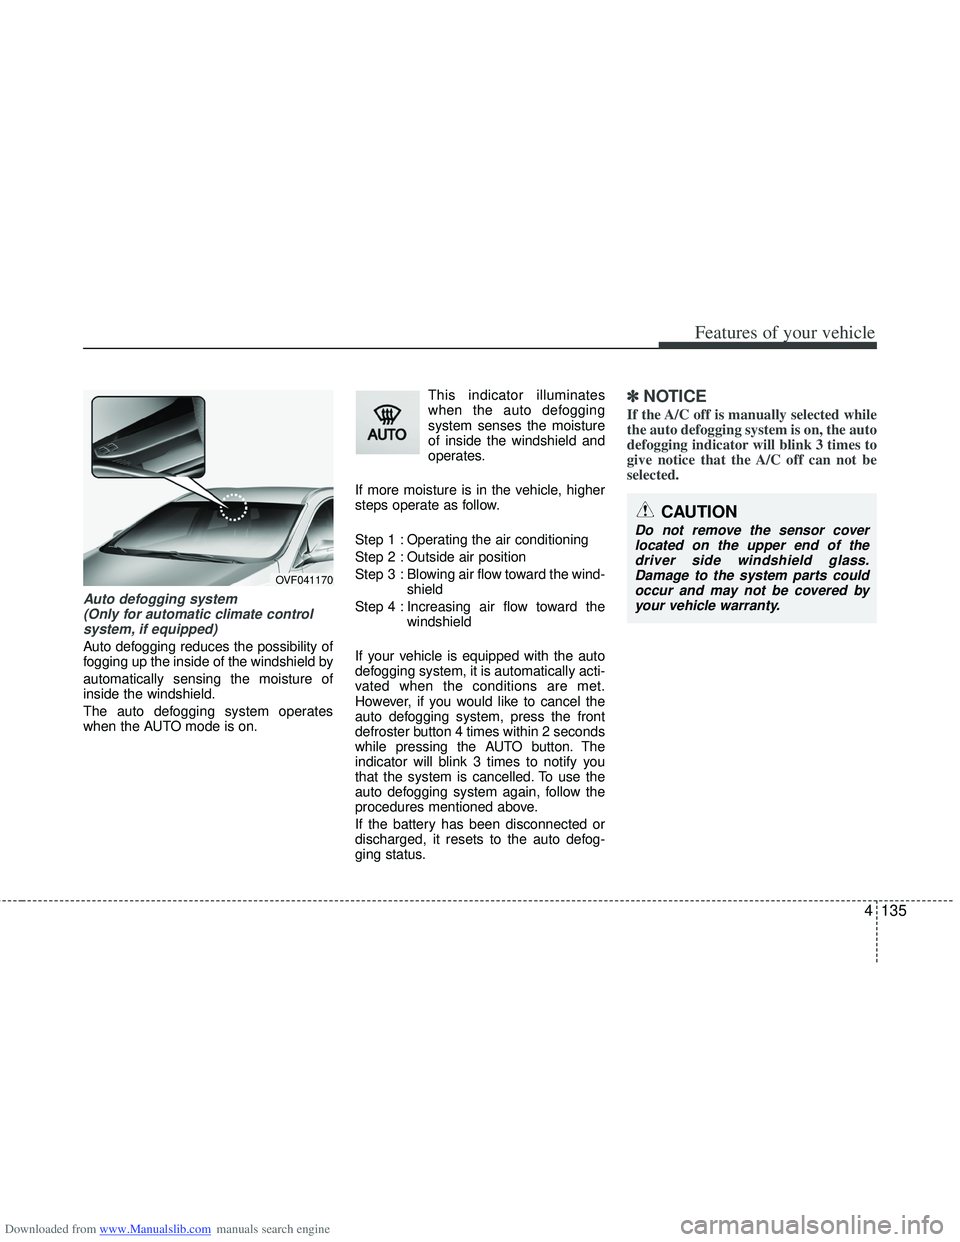
Auto defogging system (Only for automatic climate controlsystem, if equipped)
Auto defogging reduces the possibility of
fogging up the inside of the windshield by
automatically sensing the moisture of
inside the windshield.
The auto defogging system operates
when the AUTO mode is on. This indicator illuminates
when the auto defogging
system senses the moisture
of inside the windshield and
operates.
If more moisture is in the vehicle, higher
steps operate as follow.
Step 1 : Operating the air conditioning
Step 2 : Outside air position
Step 3 : Blowing air flow toward the wind- shield
Step 4 : Increasing air flow toward the windshield
If your vehicle is equipped with the auto
defogging system, it is automatically acti-
vated when the conditions are met.
However, if you would like to cancel the
auto defogging system, press the front
defroster button 4 times within 2 seconds
while pressing the AUTO button. The
indicator will blink 3 times to notify you
that the system is cancelled. To use the
auto defogging system again, follow the
procedures mentioned above.
If the battery has been disconnected or
discharged, it resets to the auto defog-
ging status.
✽ ✽ NOTICE
If the A/C off is manually selected while
the auto defogging system is on, the auto
defogging indicator will blink 3 times to
give notice that the A/C off can not be
selected.
OVF041170
CAUTION
Do not remove the sensor cover
located on the upper end of thedriver side windshield glass. Damage to the system parts couldoccur and may not be covered byyour vehicle warranty.
Page 241 of 534
Downloaded from www.Manualslib.com manuals search engine Features of your vehicle
154
4
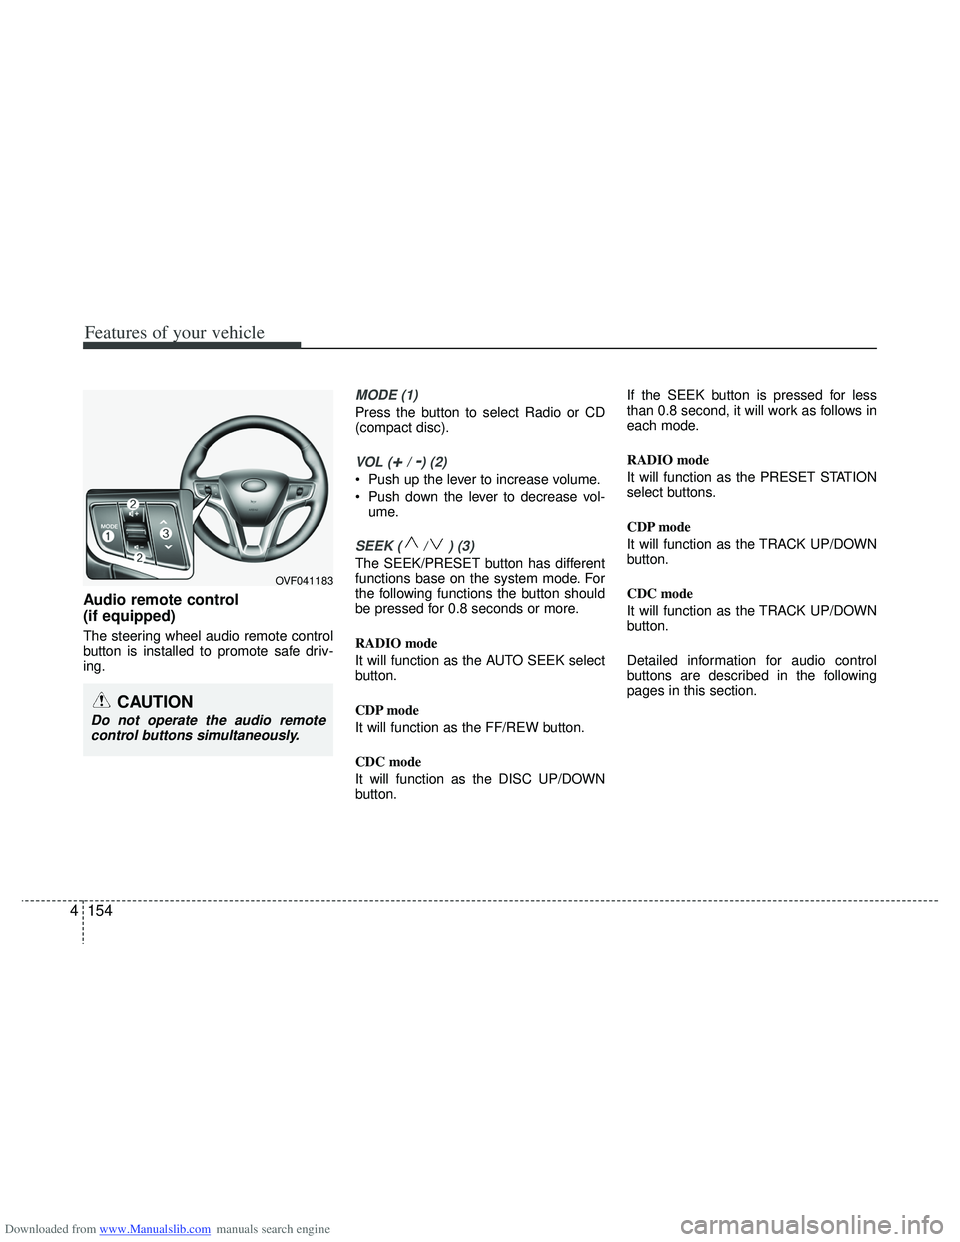
Audio remote control
(if equipped)
The steering wheel audio remote control
button is installed to promote safe driv-
ing.
MODE (1)
Press the button to select Radio or CD
(compact disc).
VOL (+/ -) (2)
• Push up the lever to increase volume.
Push down the lever to decrease vol-
ume.
SEEK ( / ) (3)
The SEEK/PRESET button has different
functions base on the system mode. For
the following functions the button should
be pressed for 0.8 seconds or more.
RADIO mode
It will function as the AUTO SEEK select
button.
CDP mode
It will function as the FF/REW button.
CDC mode
It will function as the DISC UP/DOWN
button. If the SEEK button is pressed for less
than 0.8 second, it will work as follows in
each mode.
RADIO mode
It will function as the PRESET STATION
select buttons.
CDP mode
It will function as the TRACK UP/DOWN
button.
CDC mode
It will function as the TRACK UP/DOWN
button.
Detailed information for audio control
buttons are described in the following
pages in this section.
CAUTION
Do not operate the audio remote
control buttons simultaneously.
OVF041183
Page 246 of 534
Downloaded from www.Manualslib.com manuals search engine 4159
Features of your vehicle
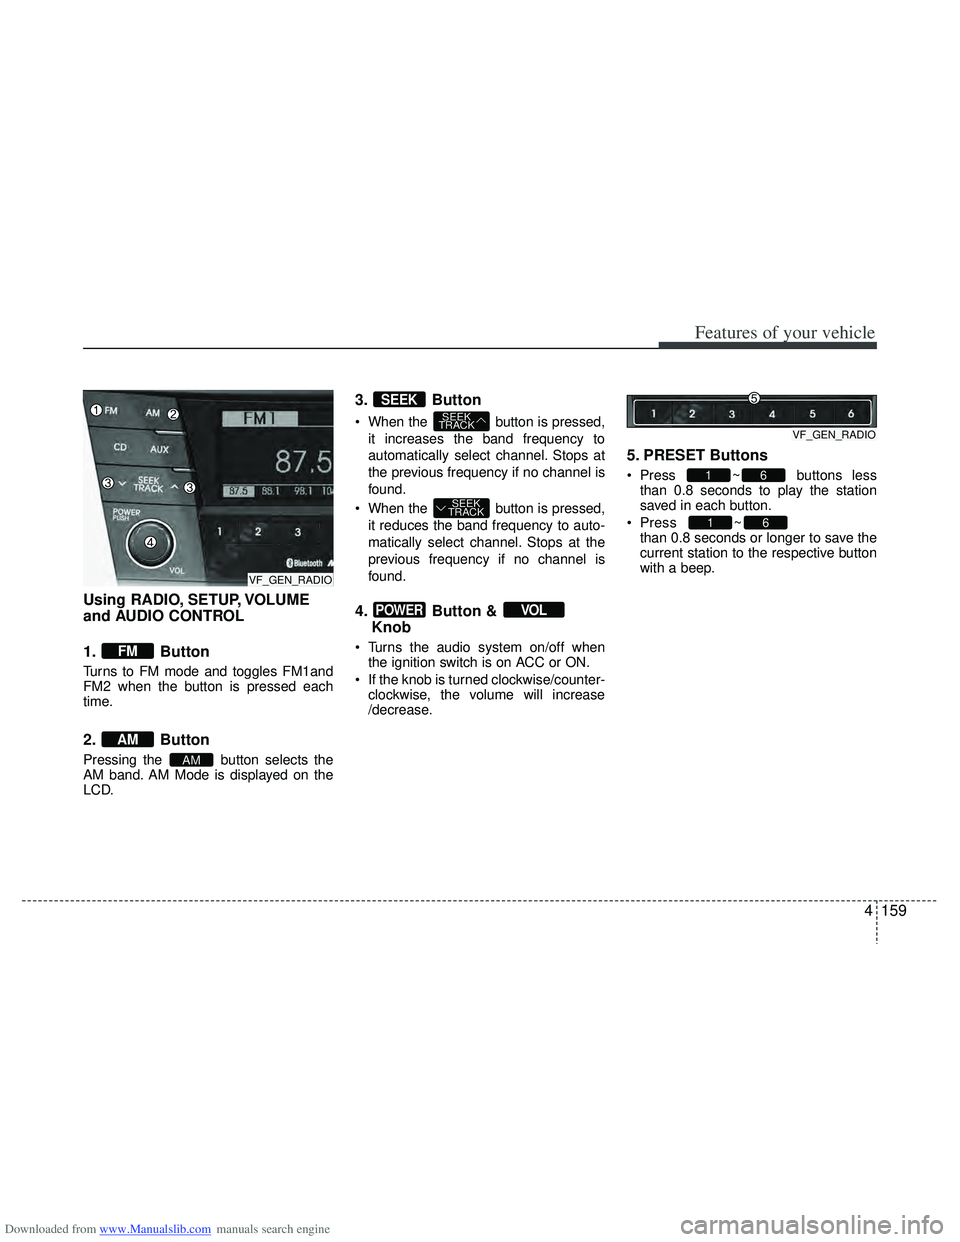
Using RADIO, SETUP, VOLUME
and AUDIO CONTROL
1. Button
Turns to FM mode and toggles FM1and
FM2 when the button is pressed each
time.
2. Button
Pressing the button selects the
AM band. AM Mode is displayed on the
LCD.
3. Button
When the button is pressed,it increases the band frequency to
automatically select channel. Stops at
the previous frequency if no channel is
found.
When the button is pressed, it reduces the band frequency to auto-
matically select channel. Stops at the
previous frequency if no channel is
found.
4. Button & Knob
Turns the audio system on/off when
the ignition switch is on ACC or ON.
If the knob is turned clockwise/counter- clockwise, the volume will increase
/decrease.
5. PRESET Buttons
Press ~ buttons lessthan 0.8 seconds to play the station
saved in each button.
Press ~
button more
than 0.8 seconds or longer to save the
current station to the respective button
with a beep.
61
61
VOLPOWER
SEEK
TRACK
SEEK
TRACK
SEEK
AM
AM
FM
VF_GEN_RADIOVF_GEN_RADIO
VF_GEN_RADIO
Page 247 of 534
Downloaded from www.Manualslib.com manuals search engine Features of your vehicle
160
4
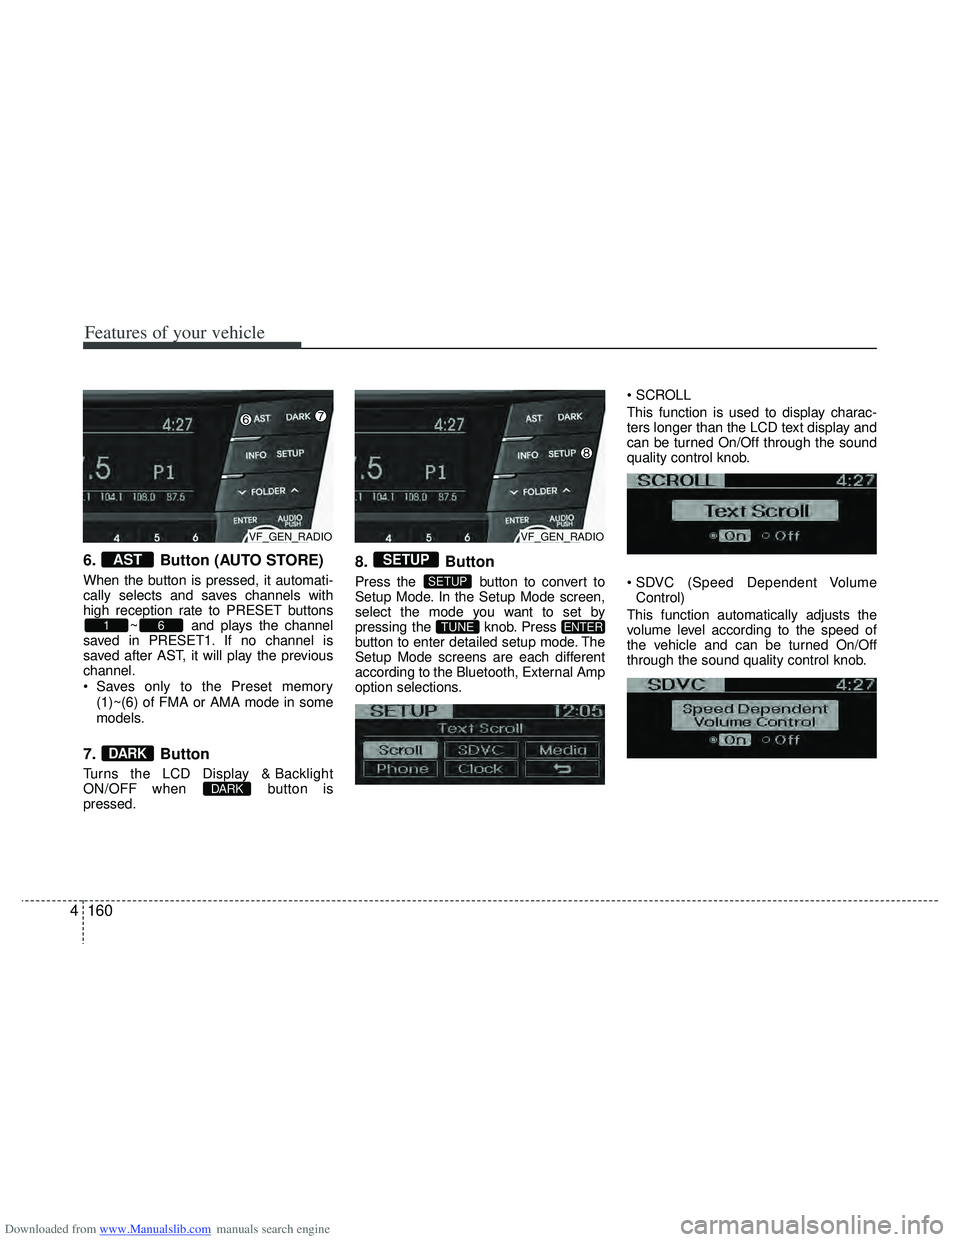
6. Button (AUTO STORE)
When the button is pressed, it automati-
cally selects and saves channels with
high reception rate to PRESET buttons
~ and plays the channel
saved in PRESET1. If no channel is
saved after AST, it will play the previous
channel.
Saves only to the Preset memory
(1)~(6) of FMA or AMA mode in some
models.
7. Button
Turns the LCD Display & Backlight
ON/OFF when button is
pressed.
8. Button
Press the button to convert to
Setup Mode. In the Setup Mode screen,
select the mode you want to set by
pressing the knob. Press
button to enter detailed setup mode. The
Setup Mode screens are each different
according to the Bluetooth, External Amp
option selections.
This function is used to display charac-
ters longer than the LCD text display and
can be turned On/Off through the sound
quality control knob.
Control)
This function automatically adjusts the
volume level according to the speed of
the vehicle and can be turned On/Off
through the sound quality control knob.
ENTERTUNE
SETUP
SETUP
DARK
DARK
61
AST
VF_GEN_RADIOVF_GEN_RADIO
Page 251 of 534
Downloaded from www.Manualslib.com manuals search engine Features of your vehicle
164
4
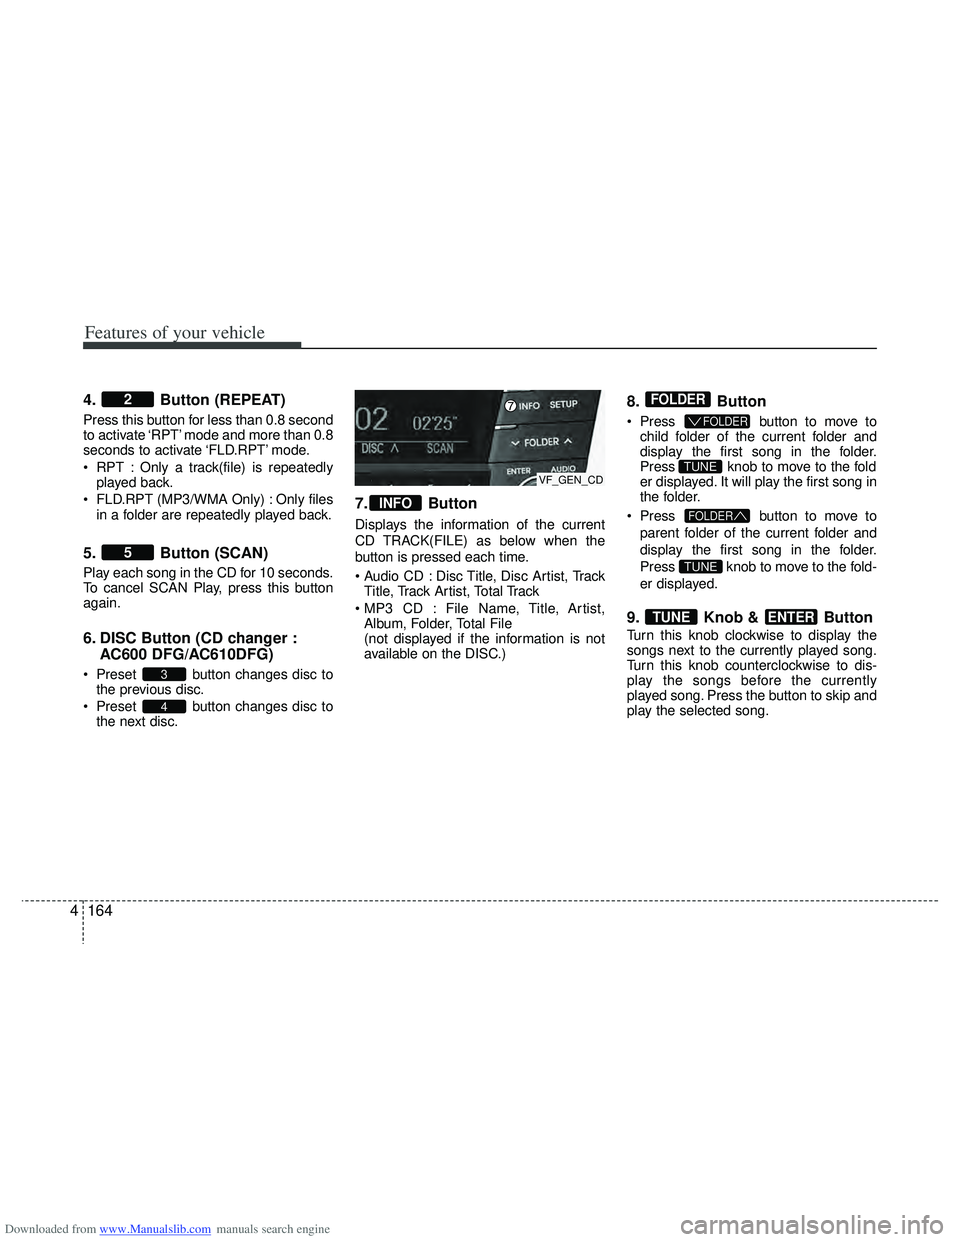
4. Button (REPEAT)
Press this button for less than 0.8 second
to activate ‘RPT’ mode and more than 0.8
seconds to activate ‘FLD.RPT’ mode.
RPT : Only a track(file) is repeatedly
played back.
FLD.RPT (MP3/WMA Only) : Only files in a folder are repeatedly played back.
5. Button (SCAN)
Play each song in the CD for 10 seconds.
To cancel SCAN Play, press this button
again.
6. DISC Button (CD changer : AC600 DFG/AC610DFG)
Preset button changes disc to
the previous disc.
Preset button changes disc to the next disc.
7. Button
Displays the information of the current
CD TRACK(FILE) as below when the
button is pressed each time.
Disc Title, Disc Artist, TrackTitle, Track Artist, Total Track
File Name, Title, Artist, Album, Folder, Total File
(not displayed if the information is not
available on the DISC.)
8. Button
Press button to move to
child folder of the current folder and
display the first song in the folder.
Press knob to move to the fold
er displayed. It will play the first song in
the folder.
Press button to move to
parent folder of the current folder and
display the first song in the folder.
Press knob to move to the fold-
er displayed.
9. Knob & Button
Turn this knob clockwise to display the
songs next to the currently played song.
Turn this knob counterclockwise to dis-
play the songs before the currently
played song. Press the button to skip and
play the selected song.
ENTERTUNE
TUNE
FOLDER
TUNE
FOLDER
FOLDER
INFO
4
3
5
2
VF_GEN_CD
Page 260 of 534
Downloaded from www.Manualslib.com manuals search engine 4173
Features of your vehicle
✽
✽NOTICE FOR USING THE
iPod DEVICE
• Some iPod models might not support
the communication protocol and the
files will not be played.
Supported iPod models:
- iPod Mini
- iPod 4th (Photo) ~ 6th(Classic) gen-eration
- iPod Nano 1st~4th generation
- iPod Touch 1st~2nd generation
• The order of search or playback of songs in the iPod can be different
from the order searched in the audio
system.
• If the iPod disabled due to its own malfunction, reset the iPod. (Reset:
Refer to iPod manual)
• An iPod may not operate normally on low battery.
• Some iPod devices, such as the iPhone, can be connected through the
Bluetooth
®interface. The device must
have audio Bluetooth®capability
(such as for stereo headphone
Bluetooth
®). The device can play, but
it will not be controlled by the audio
system.
CAUTION IN USING THE
iPod DEVICE
The HYUNDAI iPod Power Cable
is needed in order to operate iPodwith the audio buttons on theaudio system. The USB cable pro- vided by Apple may cause mal-function and should not be used for HYUNDAI vehicles.
❋ ❋ The HYUNDAI iPod Power
Cable may be purchasedthrough your HYUNDAIDealership.
When connecting iPod with the iPod Power Cable, insert the con-nector to the multimedia socket completely. If not inserted com-pletely, communications betweeniPod and audio may be interrupt- ed.
When adjusting the sound effects of the iPod and the audio system,the sound effects of both devices will overlap and might reduce ordistort the quality of the sound.
(Continued)
(Continued) Deactivate (turn off) the equalizer function of an iPod when adjust-ing the audio system’s volume,and turn off the equalizer of the audio system when using theequalizer of an iPod.
When the iPod cable is connect- ed, the system can be switched toAUX mode even without iPoddevice and may cause noise.Disconnect the iPod cable whenyou are not using the iPod device.
When not using iPod with car audio, detach the iPod cable fromiPod. Otherwise, iPod may remain in accessory mode, and may notwork properly.
(Continued)
Page 269 of 534
Downloaded from www.Manualslib.com manuals search engine Features of your vehicle
182
4
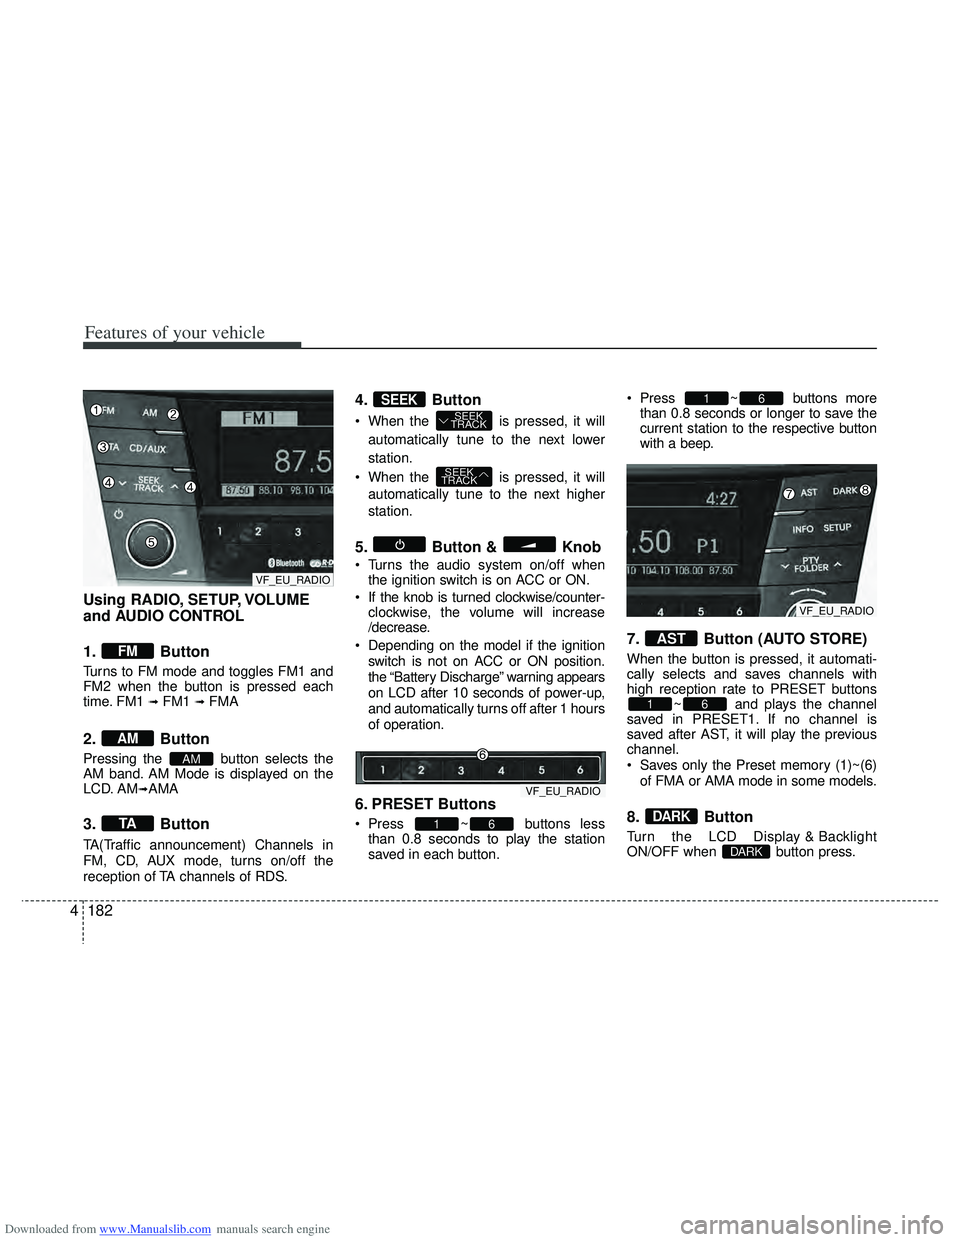
Using RADIO, SETUP, VOLUME
and AUDIO CONTROL
1. Button
Turns to FM mode and toggles FM1 and
FM2 when the button is pressed each
time. FM1
\b FM1 \b FMA
2. Button
Pressing the button selects the
AM band. AM Mode is displayed on the
LCD. AM
\bAMA
3. Button
TA(Traffic announcement) Channels in
FM, CD, AUX mode, turns on/off the
reception of TA channels of RDS.
4. Button
When the is pressed, it will
automatically tune to the next lower
station.
When the is pressed, it will automatically tune to the next higher
station.
5. Button & Knob
Turns the audio system on/off whenthe ignition switch is on ACC or ON.
If the knob is turned clockwise/counter- clockwise, the volume will increase
/decrease.
Depending on the model if the ignition switch is not on ACC or ON position.
the “Battery Discharge” warning appears
on LCD after 10 seconds of power-up,
and automatically turns off after 1 hours
of operation.
6. PRESET Buttons
Press ~ buttons lessthan 0.8 seconds to play the station
saved in each button. Press ~ buttons more
than 0.8 seconds or longer to save the
current station to the respective button
with a beep.
7. Button (AUTO STORE)
When the button is pressed, it automati-
cally selects and saves channels with
high reception rate to PRESET buttons ~ and plays the channel
saved in PRESET1. If no channel is
saved after AST, it will play the previous
channel.
Saves only the Preset memory (1)~(6)
of FMA or AMA mode in some models.
8. Button
Turn the LCD Display & Backlight
ON/OFF when button press.DARK
DARK
61
AST
61
61
SEEK
TRACK
SEEK
TRACKSEEK
TA
AM
AM
FM
VF_EU_RADIO
VF_EU_RADIO
VF_EU_RADIO
Page 273 of 534
Downloaded from www.Manualslib.com manuals search engine Features of your vehicle
186
4
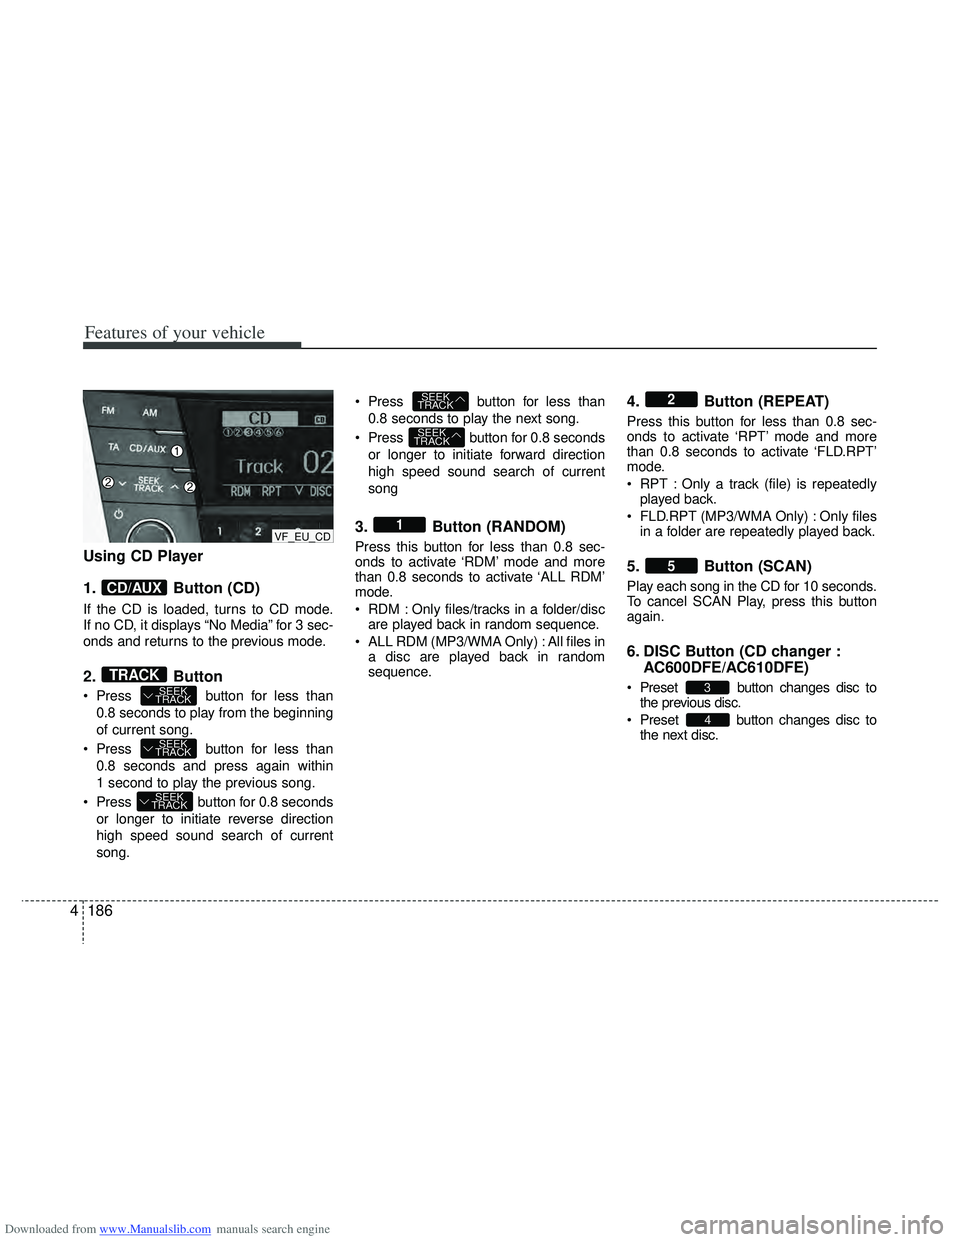
Using CD Player
1. Button (CD)
If the CD is loaded, turns to CD mode.
If no CD, it displays “No Media” for 3 sec-
onds and returns to the previous mode.
2. Button
Press button for less than
0.8 seconds to play from the beginning
of current song.
Press button for less than 0.8 seconds and press again within
1 second to play the previous song.
Press button for 0.8 seconds or longer to initiate reverse direction
high speed sound search of current
song. Press button for less than
0.8 seconds to play the next song.
Press button for 0.8 seconds or longer to initiate forward direction
high speed sound search of current
song
3. Button (RANDOM)
Press this button for less than 0.8 sec-
onds to activate ‘RDM’ mode and more
than 0.8 seconds to activate ‘ALL RDM’
mode.
RDM : Only files/tracks in a folder/discare played back in random sequence.
ALL RDM (MP3/WMA Only) : All files in a disc are played back in random
sequence.
4. Button (REPEAT)
Press this button for less than 0.8 sec-
onds to activate ‘RPT’ mode and more
than 0.8 seconds to activate ‘FLD.RPT’
mode.
RPT : Only a track (file) is repeatedlyplayed back.
FLD.RPT (MP3/WMA Only) : Only files in a folder are repeatedly played back.
5. Button (SCAN)
Play each song in the CD for 10 seconds.
To cancel SCAN Play, press this button
again.
6. DISC Button (CD changer : AC600DFE/AC610DFE)
Preset button changes disc to
the previous disc.
Preset button changes disc to the next disc.
4
3
5
2
1
SEEK
TRACK
SEEK
TRACK
SEEK
TRACK
SEEK
TRACK
SEEK
TRACKTRACK
CD/AUX
VF_EU_CD
Page 282 of 534
Downloaded from www.Manualslib.com manuals search engine 4195
Features of your vehicle
✽
✽NOTICE FOR USING THE
iPod DEVICE
• Some iPod models might not sup-
port the communication protocol
and the files will not be played.
Supported iPod models:
- iPod Mini
- iPod 4th(Photo) ~ 6th(Classic)
generation
- iPod Nano 1st~4th generation
- iPod Touch 1st~2nd generation
• The order of search or playback of songs in the iPod can be different
from the order searched in the
audio system.
• If the iPod disabled due to its own malfunction, reset the iPod. (Reset:
Refer to iPod manual)
• An iPod may not operate normally on low battery.
• Some iPod devices, such as the iPhone, can be connected through the
Bluetooth
®interface. The device
must have audio Bluetooth®capabili-
ty (such as for stereo headphone
Bluetooth
®). The device can play, but
it will not be controlled by the audio
system.
CAUTION IN USING THE
iPod DEVICE
The Hyundai iPod Power Cable is
needed in order to operate iPodwith the audio buttons on theaudio system. The USB cable pro-vided by Apple may cause mal-function and should not be usedfor Hyundai vehicles.
❋ The Hyundai iPod Power Cablemay be purchased through yourHyundai Dealership.
When connecting iPod with the iPod Power Cable, insert the con-nector to the multimedia socket completely. If not inserted com-pletely, communications betweeniPod and audio may be interrupted.
When adjusting the sound effects of the iPod and the audio system, thesound effects of both devices willoverlap and might reduce or distort the quality of the sound.
Deactivate (turn off) the equalizer function of an iPod when adjust-ing the audio system’s volume,and turn off the equalizer of theaudio system when using theequalizer of an iPod.
(Continued)
(Continued) When the iPod cable is connected, the system can be switched to AUXmode even without iPod deviceand may cause noise. D isconnect
the iPod cable when you are not using the iPod device.
When not using iPod with car audio, detach the iPod cable fromiPod. Otherwise, iPod may remainin accessory mode, and may notwork properly.
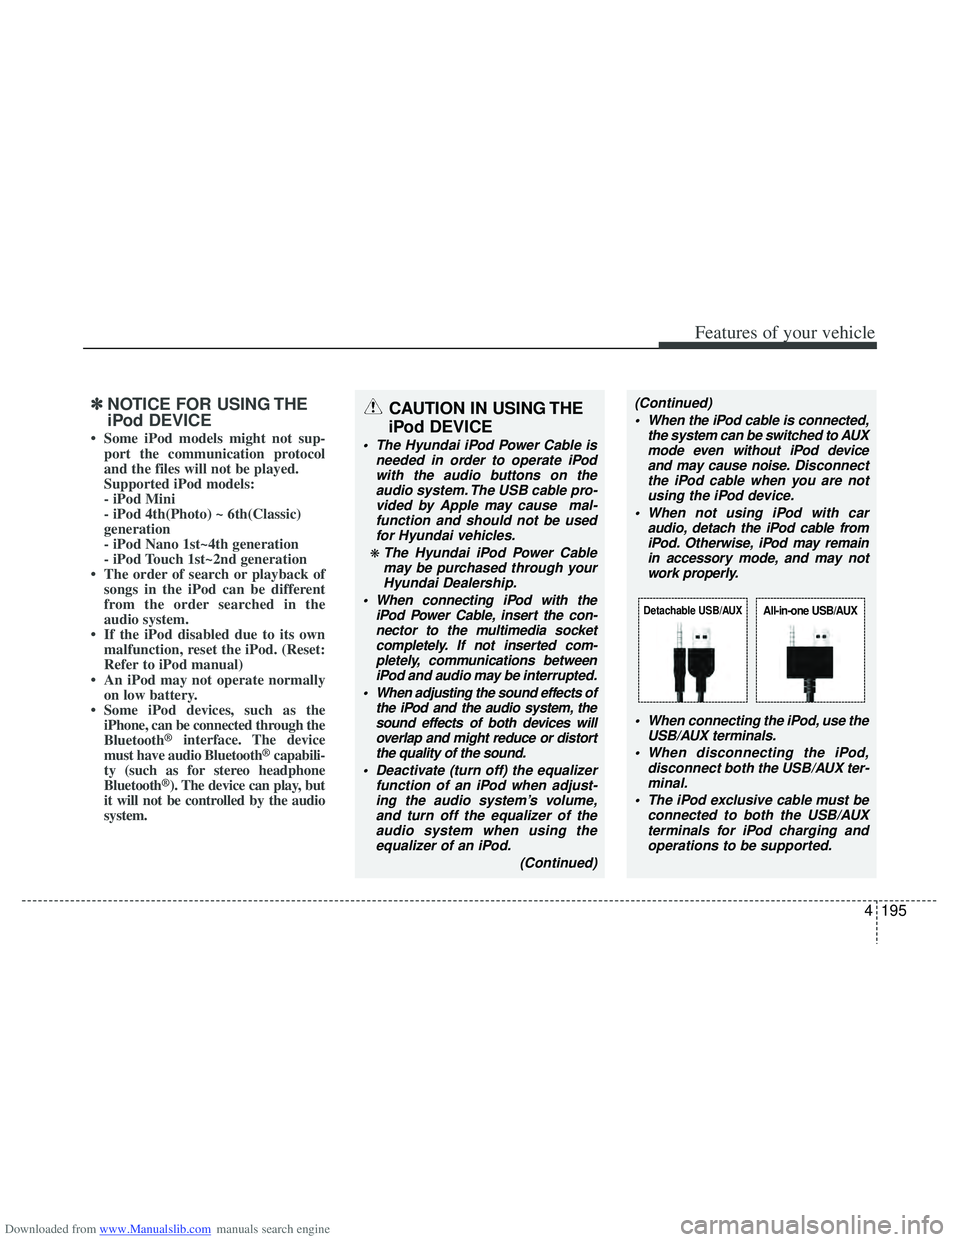
When connecting the iPod, use theUSB/AUX terminals.
When disconnecting the iPod, disconnect both the USB/AUX ter-minal.
The iPod exclusive cable must be connected to both the USB/AUXterminals for iPod charging and operations to be supported.
Detachable USB/AUXAll-in-one USB/AUX
Page 344 of 534
Downloaded from www.Manualslib.com manuals search engine 551
Driving your vehicle
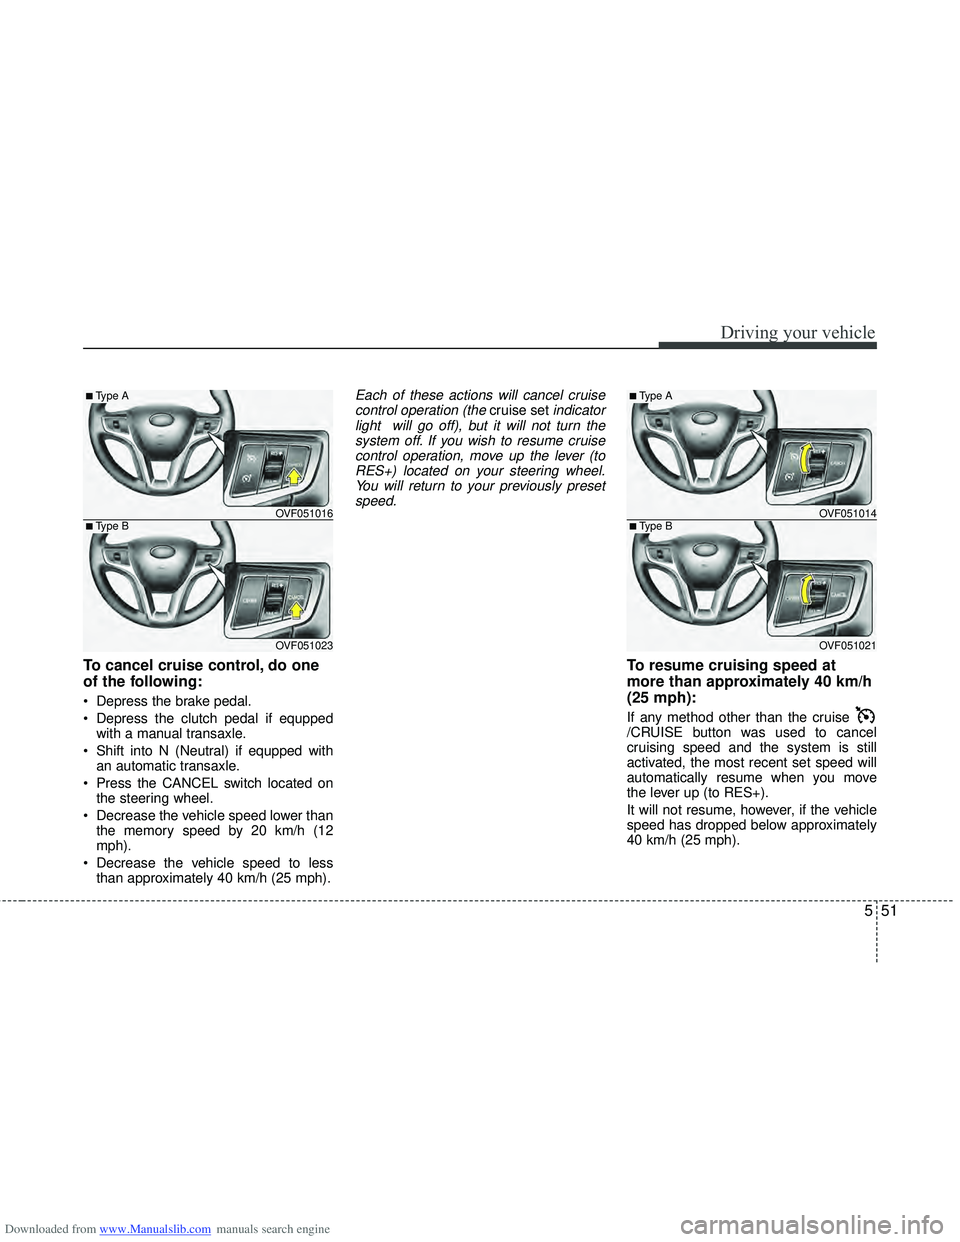
To cancel cruise control, do one
of the following:
Depress the brake pedal.
Depress the clutch pedal if equppedwith a manual transaxle.
Shift into N (Neutral) if equpped with an automatic transaxle.
Press the CANCEL switch located on the steering wheel.
Decrease the vehicle speed lower than the memory speed by 20 km/h (12
mph).
Decrease the vehicle speed to less than approximately 40 km/h (25 mph).
Each of these actions will cancel cruisecontrol operation (the cruise setindicator
light will go off), but it will not turn the system off. If you wish to resume cruisecontrol operation, move up the lever (toRES+) located on your steering wheel.You will return to your previously preset speed.
To resume cruising speed at
more than approximately 40 km/h
(25 mph):
If any method other than the cruise
/CRUISE button was used to cancel
cruising speed and the system is still
activated, the most recent set speed will
automatically resume when you move
the lever up (to RES+).
It will not resume, however, if the vehicle
speed has dropped below approximately
40 km/h (25 mph).
OVF051016
OVF051023
■Type B
■Type A
OVF051014
OVF051021
■Type B
■Type A