instrument panel HYUNDAI I800 2015 User Guide
[x] Cancel search | Manufacturer: HYUNDAI, Model Year: 2015, Model line: I800, Model: HYUNDAI I800 2015Pages: 339, PDF Size: 7.25 MB
Page 97 of 339
Features of your vehicle
26 4
✽NOTICE
If the power steering drive belt breaks
or if the power steering pump malfunc-
tions, the steering effort will greatly
increase.
✽NOTICE
If the vehicle is parked for extended
periods outside in cold weather (below
-10°C/14°F), the power steering may
require increased effort when the engine
is first started. This is caused by
increased fluid viscosity due to the cold
weather and does not indicate a mal-
function.
When this happens, increase the engine
RPM by depressing accelerator until the
RPM reaches 1,500 rpm then release or
let the engine idle for two or three min-
utes to warm up the fluid.
D130300AUN-UK
Adjustable steering column
The adjustable steering column permits
adjustment of the rake of the steering
wheel for the convenience of the driver.
The position of the steering wheel should
be adjusted for maximum comfort and
control whilst permitting a clear view of
the instrument panel.
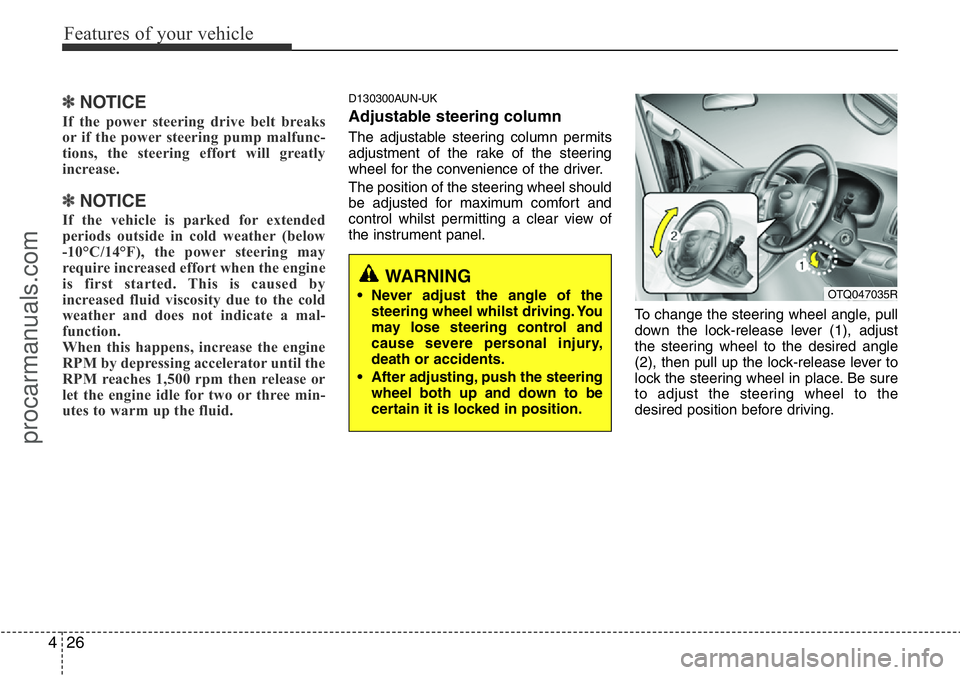
To change the steering wheel angle, pull
down the lock-release lever (1), adjust
the steering wheel to the desired angle
(2), then pull up the lock-release lever to
lock the steering wheel in place. Be sure
to adjust the steering wheel to the
desired position before driving.
WARNING
• Never adjust the angle of the
steering wheel whilst driving. You
may lose steering control and
cause severe personal injury,
death or accidents.
• After adjusting, push the steering
wheel both up and down to be
certain it is locked in position.OTQ047035R
procarmanuals.com
Page 104 of 339
433
Features of your vehicle
Instrument Cluster Control
D150100AEN-EE
Instrument panel illumination
(if equipped)
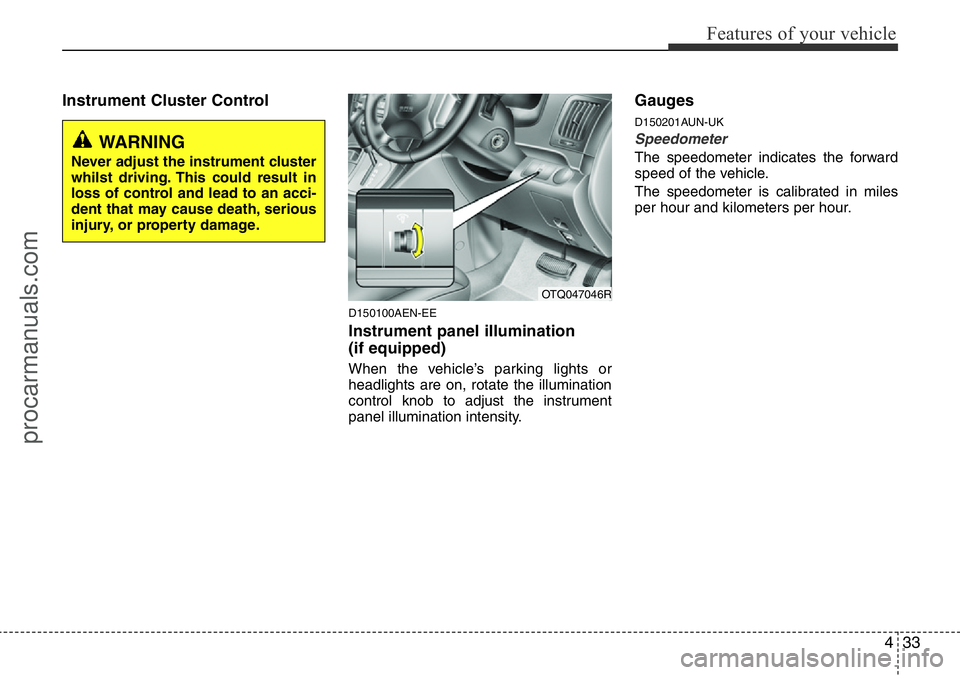
When the vehicle’s parking lights or
headlights are on, rotate the illumination
control knob to adjust the instrument
panel illumination intensity.
Gauges
D150201AUN-UK
Speedometer
The speedometer indicates the forward
speed of the vehicle.
The speedometer is calibrated in miles
per hour and kilometers per hour.
OTQ047046R
WARNING
Never adjust the instrument cluster
whilst driving. This could result in
loss of control and lead to an acci-
dent that may cause death, serious
injury, or property damage.
procarmanuals.com
Page 121 of 339
Features of your vehicle
50 4
D190400ATQ
Lighting control
The light switch has a Headlight and a
Parking light position.
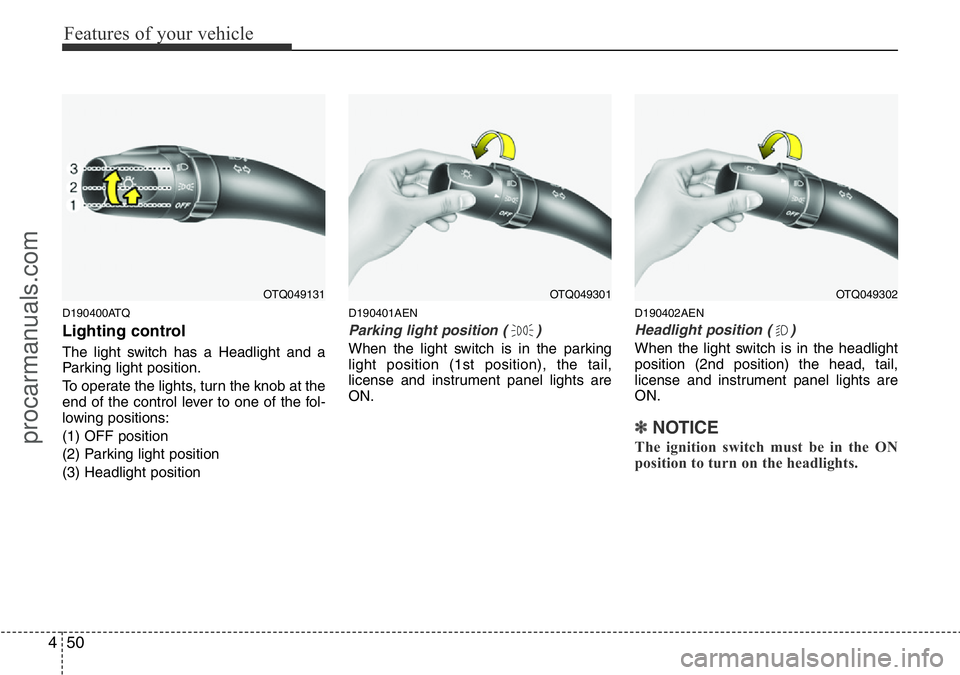
To operate the lights, turn the knob at the
end of the control lever to one of the fol-
lowing positions:
(1) OFF position
(2) Parking light position
(3) Headlight position
D190401AEN
Parking light position ( )
When the light switch is in the parking
light position (1st position), the tail,
license and instrument panel lights are
ON.
D190402AEN
Headlight position ( )
When the light switch is in the headlight
position (2nd position) the head, tail,
license and instrument panel lights are
ON.
✽NOTICE
The ignition switch must be in the ON
position to turn on the headlights.
OTQ049131OTQ049301OTQ049302
procarmanuals.com
Page 130 of 339
459
Features of your vehicle
➃MOOD : Push the switch to turn the
mood lamp on when the
room lamp is off. Once the
mood lamp is on, each time
you press the button the
colour of the light will change.
The mood lamp will turn off
when the button is pressed
again after the last colour or
when the mood lamp button
is pressed for approximately
4 seconds or when the
ROOM, DOOR or DIMMER
button is pressed.
➄DIMMER : Whenever you push this
button when the room lamp
is turned on, the brightness
of the room lamp will
change within 3 level.
D220000AUN-UK
✽NOTICE
If you want to defrost and defog on the
front windscreen, refer to “Windscreen
Defrosting and Defogging” in this sec-
tion.
D220100AUN-UK
Rear window defroster
The defroster heats the window to
remove frost, fog and thin ice from the
rear window, whilst engine is running.
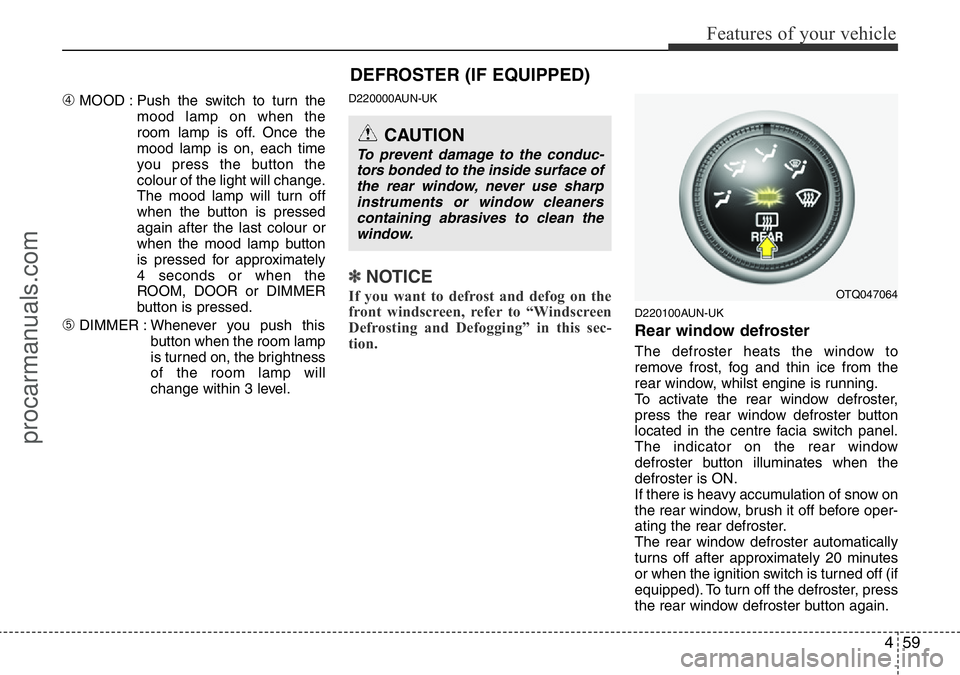
To activate the rear window defroster,
press the rear window defroster button
located in the centre facia switch panel.
The indicator on the rear window
defroster button illuminates when the
defroster is ON.
If there is heavy accumulation of snow on
the rear window, brush it off before oper-
ating the rear defroster.
The rear window defroster automatically
turns off after approximately 20 minutes
or when the ignition switch is turned off (if
equipped). To turn off the defroster, press
the rear window defroster button again.
OTQ047064
CAUTION
To prevent damage to the conduc-
tors bonded to the inside surface of
the rear window, never use sharp
instruments or window cleaners
containing abrasives to clean the
window.
DEFROSTER (IF EQUIPPED)
procarmanuals.com
Page 134 of 339
463
Features of your vehicle
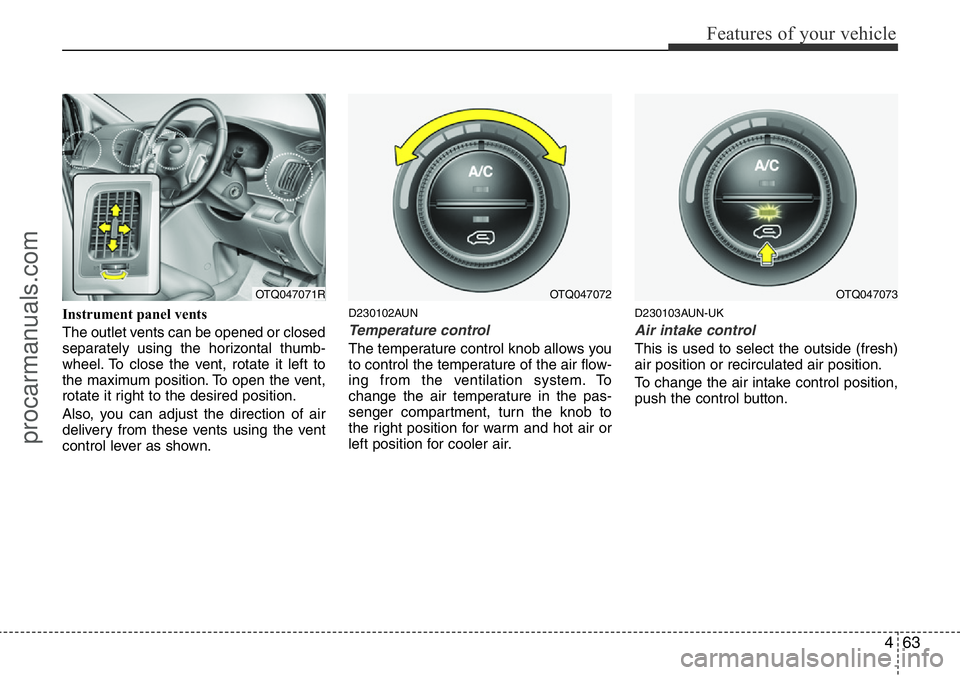
Instrument panel vents
The outlet vents can be opened or closed
separately using the horizontal thumb-
wheel. To close the vent, rotate it left to
the maximum position. To open the vent,
rotate it right to the desired position.
Also, you can adjust the direction of air
delivery from these vents using the vent
control lever as shown.D230102AUN
Temperature control
The temperature control knob allows you
to control the temperature of the air flow-
ing from the ventilation system. To
change the air temperature in the pas-
senger compartment, turn the knob to
the right position for warm and hot air or
left position for cooler air.
D230103AUN-UK
Air intake control
This is used to select the outside (fresh)
air position or recirculated air position.
To change the air intake control position,
push the control button.
OTQ047072OTQ047071ROTQ047073
procarmanuals.com
Page 206 of 339
Driving your vehicle
16 5
The transmission will not shift to 4th gear
until the O/D system button is pressed
again to release the switch.
When driving down a sloping road with
the transmission in O/D (4th), you can
decrease the vehicle speed without using
the brakes by pressing the O/D button.
When the ignition is switched OFF, O/D
OFF mode is automatically cancelled.
O/D OFF Indicator
This indicator light illuminates in the
instrument panel when the O/D mode is
cancelled.
E060102BTQ-UK
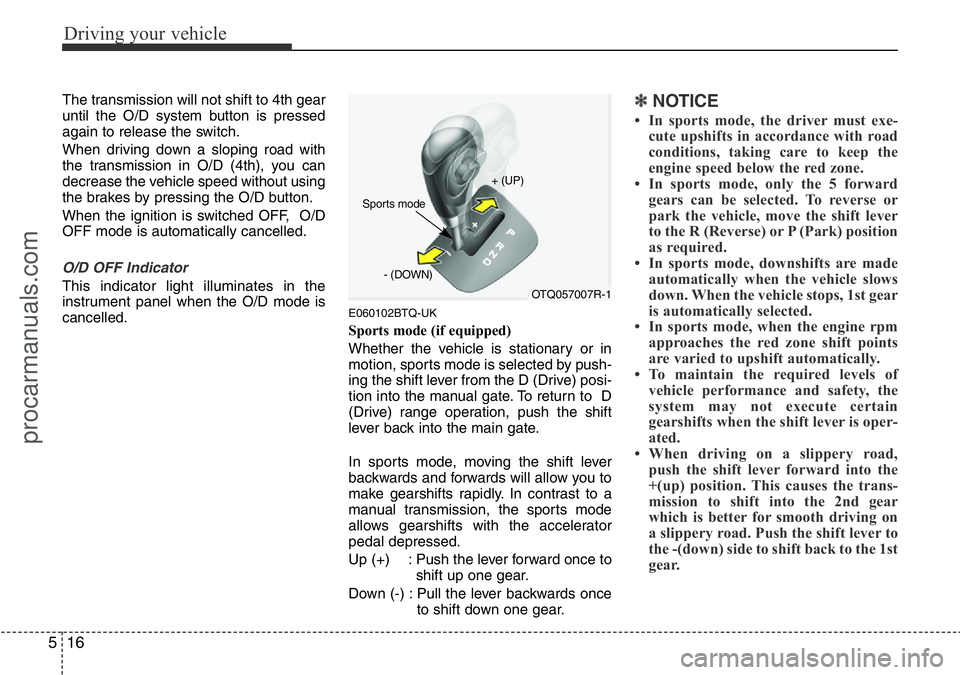
Sports mode (if equipped)
Whether the vehicle is stationary or in
motion, sports mode is selected by push-
ing the shift lever from the D (Drive) posi-
tion into the manual gate. To return to D
(Drive) range operation, push the shift
lever back into the main gate.
In sports mode, moving the shift lever
backwards and forwards will allow you to
make gearshifts rapidly. In contrast to a
manual transmission, the sports mode
allows gearshifts with the accelerator
pedal depressed.
Up (+) : Push the lever forward once to
shift up one gear.
Down (-) : Pull the lever backwards once
to shift down one gear.
✽NOTICE
• In sports mode, the driver must exe-
cute upshifts in accordance with road
conditions, taking care to keep the
engine speed below the red zone.
• In sports mode, only the 5 forward
gears can be selected. To reverse or
park the vehicle, move the shift lever
to the R (Reverse) or P (Park) position
as required.
• In sports mode, downshifts are made
automatically when the vehicle slows
down. When the vehicle stops, 1st gear
is automatically selected.
• In sports mode, when the engine rpm
approaches the red zone shift points
are varied to upshift automatically.
• To maintain the required levels of
vehicle performance and safety, the
system may not execute certain
gearshifts when the shift lever is oper-
ated.
• When driving on a slippery road,
push the shift lever forward into the
+(up) position. This causes the trans-
mission to shift into the 2nd gear
which is better for smooth driving on
a slippery road. Push the shift lever to
the -(down) side to shift back to the 1st
gear.
OTQ057007R-1 + (UP)
- (DOWN)
Sports mode
procarmanuals.com
Page 233 of 339
543
Driving your vehicle
E140400AUN-UK
Driving with a trailer
Towing a trailer requires a certain
amount of experience. Before setting out
for the open road, you must get to know
your trailer. Acquaint yourself with the
feel of handling and braking with the
added weight of the trailer. And always
keep in mind that the vehicle you are
driving is now a good deal longer and not
nearly so responsive as your vehicle is
by itself.
Before you start, check the trailer towbar
and platform, safety cables, electrical
connector(s), lights, tyres and mirror
adjustment. If the trailer has electric
brakes, start your vehicle and trailer mov-
ing and then apply the trailer brake con-
troller by hand to be sure the brakes are
working. This lets you check your electri-
cal connection at the same time.
During your trip, check occasionally to be
sure that the load is secure, and that the
lights and any trailer brakes are still work-
ing.
E140401AUN
Following distance
Stay at least twice as far behind the vehi-
cle ahead as you would when driving
your vehicle without a trailer. This can
help you avoid situations that require
heavy braking and sudden turns.
E140402AUN
Passing
You’ll need more passing distance up
ahead when you’re towing a trailer. And,
because of the increased vehicle length,
you’ll need to go much farther beyond the
passed vehicle before you can return to
your lane.
E140403AUN-UK
Reversing
Hold the bottom of the steering wheel
with one hand. Then, to move the trailer
to the left, just move your hand to the left.
To move the trailer to the right, move your
hand to the right. Always reverse slowly
and, if possible, have someone guide
you.
E140404AUN-UK
Making turns
When you’re turning with a trailer, make
wider turns than normal. Do this so your
trailer won’t strike soft shoulders, kerbs,
road signs, trees, or other objects. Avoid
jerky or sudden manoeuvres. Signal well
in advance.
E140405AFD-UK
Turn signals when towing a trailer
When you tow a trailer, your vehicle has
to have a different turn signal flasher and
extra wiring. The green arrows on your
instrument panel will flash whenever you
signal a turn or lane change. Properly
connected, the trailer lights will also flash
to alert other drivers you’re about to turn,
change lanes, or stop.
When towing a trailer, the green arrows
on your instrument panel will flash for
turns even if the bulbs on the trailer are
burned out. Thus, you may think drivers
behind you are seeing your signals
when, in fact, they are not. It’s important
to check occasionally to be sure the trail-
er bulbs are still working. You must also
check the lights every time you discon-
nect and then reconnect the wires.
Do not connect a trailer lighting system
directly to your vehicle’s lighting system.
Use only an approved trailer wiring har-
ness.
A HYUNDAI authorised repairer can
assist you in installing the wiring harness.
WARNING
Failure to use an approved trailer
wiring harness could result in dam-
age to the vehicle electrical system
and/or personal injury.
procarmanuals.com
Page 305 of 339
743
Maintenance
G210100AFD-UK
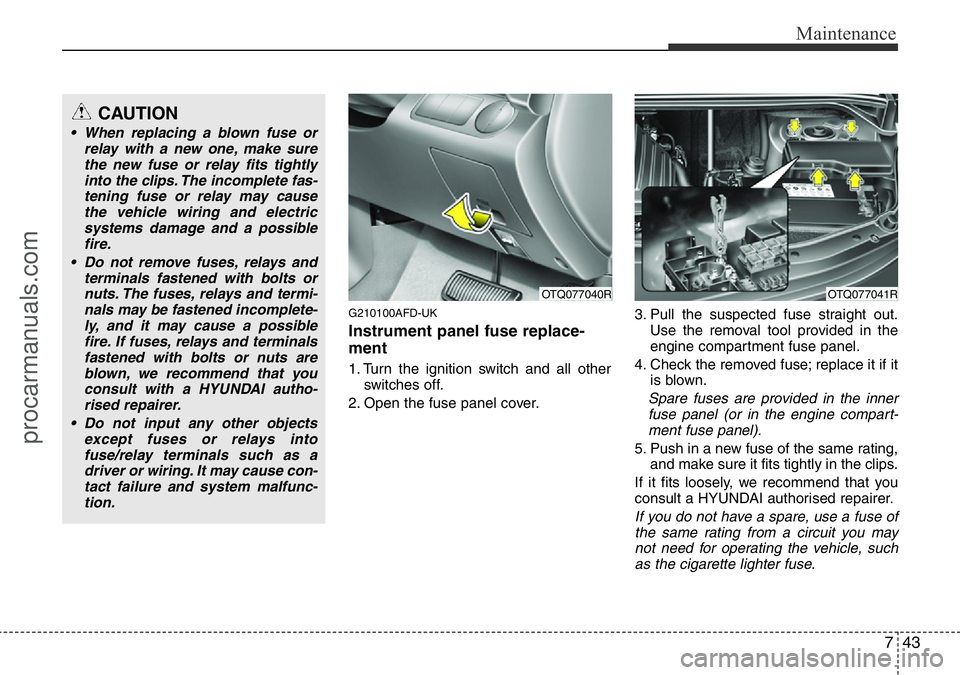
Instrument panel fuse replace-
ment
1. Turn the ignition switch and all other
switches off.
2. Open the fuse panel cover.3. Pull the suspected fuse straight out.
Use the removal tool provided in the
engine compartment fuse panel.
4. Check the removed fuse; replace it if it
is blown.
Spare fuses are provided in the inner
fuse panel (or in the engine compart-
ment fuse panel).
5. Push in a new fuse of the same rating,
and make sure it fits tightly in the clips.
If it fits loosely, we recommend that you
consult a HYUNDAI authorised repairer.
If you do not have a spare, use a fuse of
the same rating from a circuit you may
not need for operating the vehicle, such
as the cigarette lighter fuse.
OTQ077041ROTQ077040R
CAUTION
• When replacing a blown fuse or
relay with a new one, make sure
the new fuse or relay fits tightly
into the clips. The incomplete fas-
tening fuse or relay may cause
the vehicle wiring and electric
systems damage and a possible
fire.
• Do not remove fuses, relays and
terminals fastened with bolts or
nuts. The fuses, relays and termi-
nals may be fastened incomplete-
ly, and it may cause a possible
fire. If fuses, relays and terminals
fastened with bolts or nuts are
blown, we recommend that you
consult with a HYUNDAI autho-
rised repairer.
• Do not input any other objects
except fuses or relays into
fuse/relay terminals such as a
driver or wiring. It may cause con-
tact failure and system malfunc-
tion.
procarmanuals.com
Page 308 of 339
Maintenance
46 7
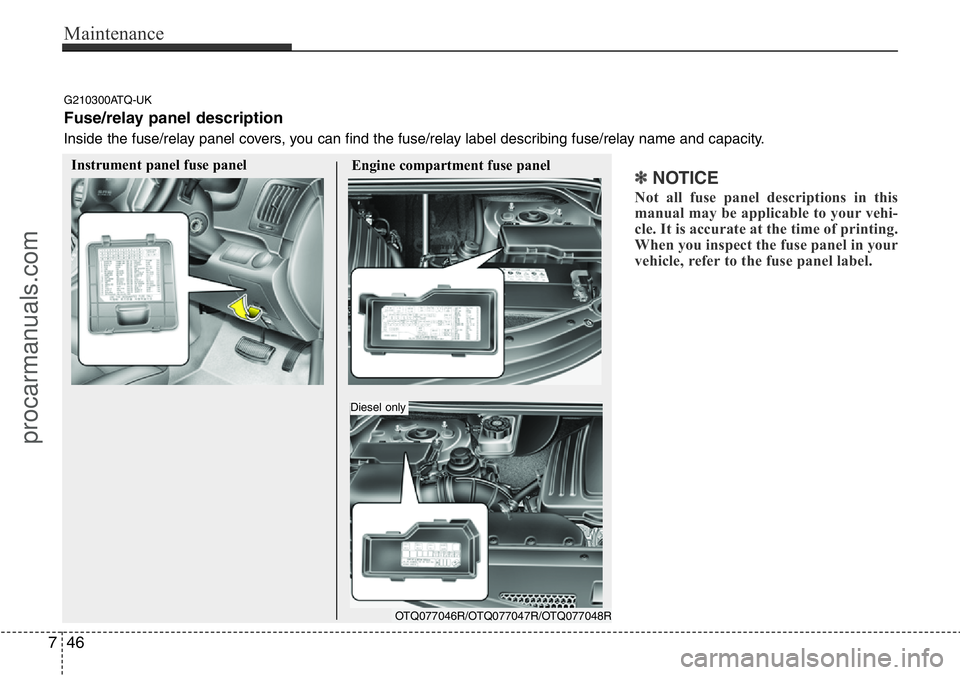
✽NOTICE
Not all fuse panel descriptions in this
manual may be applicable to your vehi-
cle. It is accurate at the time of printing.
When you inspect the fuse panel in your
vehicle, refer to the fuse panel label.
Instrument panel fuse panel
Engine compartment fuse panel
OTQ077046R/OTQ077047R/OTQ077048R G210300ATQ-UK
Fuse/relay panel description
Inside the fuse/relay panel covers, you can find the fuse/relay label describing fuse/relay name and capacity.
Diesel only
procarmanuals.com
Page 309 of 339
747
Maintenance
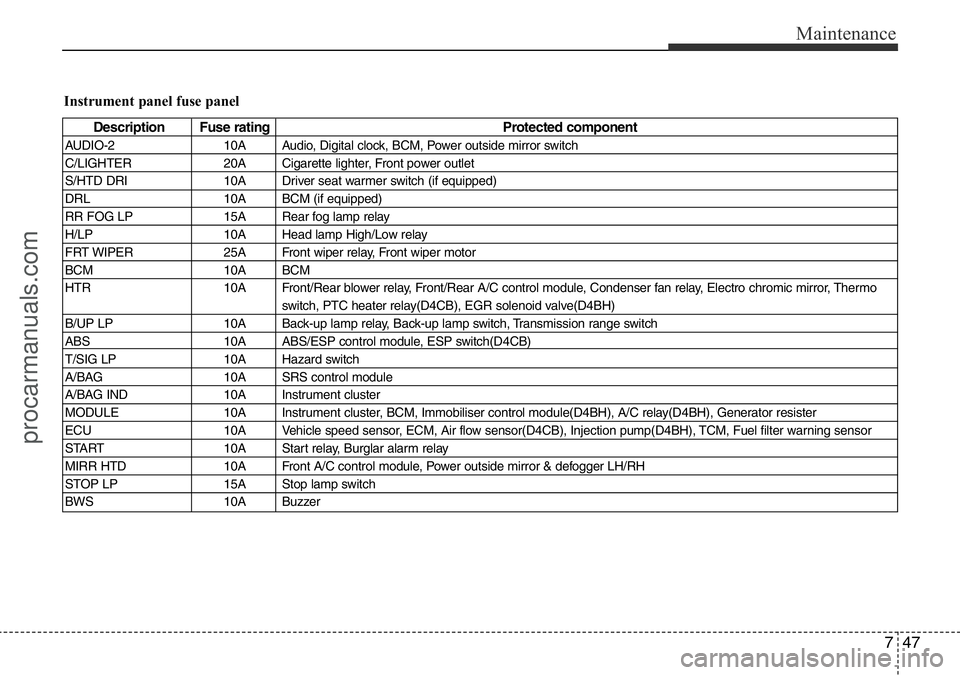
Instrument panel fuse panel
Description Fuse rating Protected component
AUDIO-2 10A Audio, Digital clock, BCM, Power outside mirror switch
C/LIGHTER 20A Cigarette lighter, Front power outlet
S/HTD DRI 10A Driver seat warmer switch (if equipped)
DRL 10A BCM (if equipped)
RR FOG LP 15A Rear fog lamp relay
H/LP 10A Head lamp High/Low relay
FRT WIPER 25A Front wiper relay, Front wiper motor
BCM 10A BCM
HTR 10A Front/Rear blower relay, Front/Rear A/C control module, Condenser fan relay, Electro chromic mirror, Thermo
switch, PTC heater relay(D4CB), EGR solenoid valve(D4BH)
B/UP LP 10A Back-up lamp relay, Back-up lamp switch, Transmission range switch
ABS 10A ABS/ESP control module, ESP switch(D4CB)
T/SIG LP 10A Hazard switch
A/BAG 10A SRS control module
A/BAG IND 10A Instrument cluster
MODULE 10A Instrument cluster, BCM, Immobiliser control module(D4BH), A/C relay(D4BH), Generator resister
ECU 10A Vehicle speed sensor, ECM, Air flow sensor(D4CB), Injection pump(D4BH), TCM, Fuel filter warning sensor
START 10A Start relay, Burglar alarm relay
MIRR HTD 10A Front A/C control module, Power outside mirror & defogger LH/RH
STOP LP 15A Stop lamp switch
BWS 10A Buzzer
procarmanuals.com