turn signal bulb HYUNDAI IONIQ 2020 Owners Manual
[x] Cancel search | Manufacturer: HYUNDAI, Model Year: 2020, Model line: IONIQ, Model: HYUNDAI IONIQ 2020Pages: 561, PDF Size: 24.5 MB
Page 161 of 561
3-76
Convenient features of your vehicle
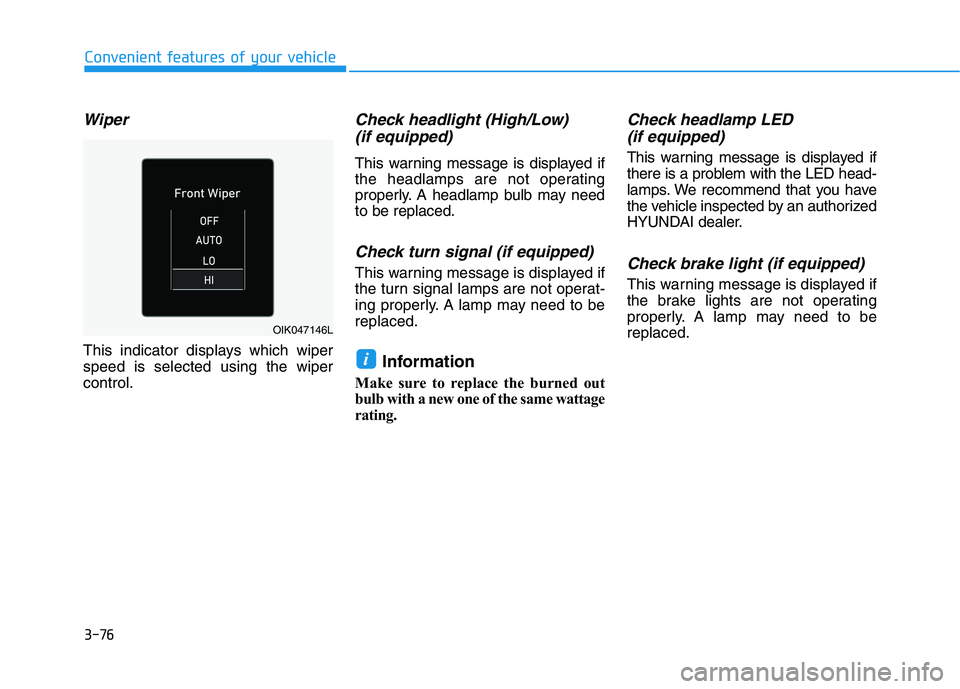
Wiper
This indicator displays which wiper
speed is selected using the wiper
control.
Check headlight (High/Low)
(if equipped)
This warning message is displayed if
the headlamps are not operating
properly. A headlamp bulb may need
to be replaced.
Check turn signal (if equipped)
This warning message is displayed if
the turn signal lamps are not operat-
ing properly. A lamp may need to be
replaced.
Information
Make sure to replace the burned out
bulb with a new one of the same wattage
rating.
Check headlamp LED
(if equipped)
This warning message is displayed if
there is a problem with the LED head-
lamps. We recommend that you have
the vehicle inspected by an authorized
HYUNDAI dealer.
Check brake light (if equipped)
This warning message is displayed if
the brake lights are not operating
properly. A lamp may need to be
replaced.
i
OIK047146L
Page 192 of 561
3-107
Convenient features of your vehicle
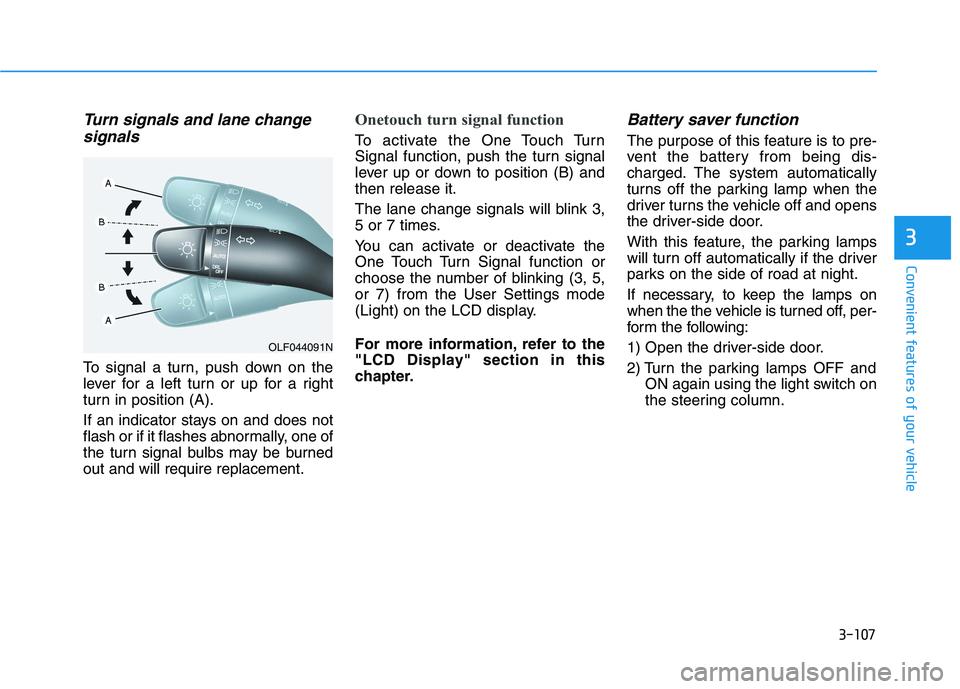
Turn signals and lane change
signals
To signal a turn, push down on the
lever for a left turn or up for a right
turn in position (A).
If an indicator stays on and does not
flash or if it flashes abnormally, one of
the turn signal bulbs may be burned
out and will require replacement.
Onetouch turn signal function
To activate the One Touch Turn
Signal function, push the turn signal
lever up or down to position (B) and
then release it.
The lane change signals will blink 3,
5 or 7 times.
You can activate or deactivate the
One Touch Turn Signal function or
choose the number of blinking (3, 5,
or 7) from the User Settings mode
(Light) on the LCD display.
For more information, refer to the
"LCD Display" section in this
chapter.
Battery saver function
The purpose of this feature is to pre-
vent the battery from being dis-
charged. The system automatically
turns off the parking lamp when the
driver turns the vehicle off and opens
the driver-side door.
With this feature, the parking lamps
will turn off automatically if the driver
parks on the side of road at night.
If necessary, to keep the lamps on
when the the vehicle is turned off, per-
form the following:
1) Open the driver-side door.
2) Turn the parking lamps OFF and
ON again using the light switch on
the steering column.
3
OLF044091N
Page 408 of 561
7
Fuses ......................................................................7-39
Instrument Panel Fuse Replacement..........................7-40
Motor Compartment Panel Fuse Replacement ........7-42
Fuse/Relay Panel Description ......................................7-43
Light Bulbs ............................................................7-52
Headlamp, Parking Lamp, Turn Signal Lamp and
Side Marker ......................................................................7-53
Daytime Running Light (DRL).......................................7-57
Side Repeater Lamp Replacement ..............................7-58
Rear Combination Light Bulb Replacement ..............7-58
High Mounted Stop Light Replacement ....................7-60
License Plate Light Bulb Replacement ......................7-61
Interior Light Bulb Replacement .................................7-61
Appearance Care..................................................7-63
Exterior Care ....................................................................7-63
Interior Care .....................................................................7-69
California Perchlorate Notice.............................7-72
Page 459 of 561
7-53
7
Maintenance
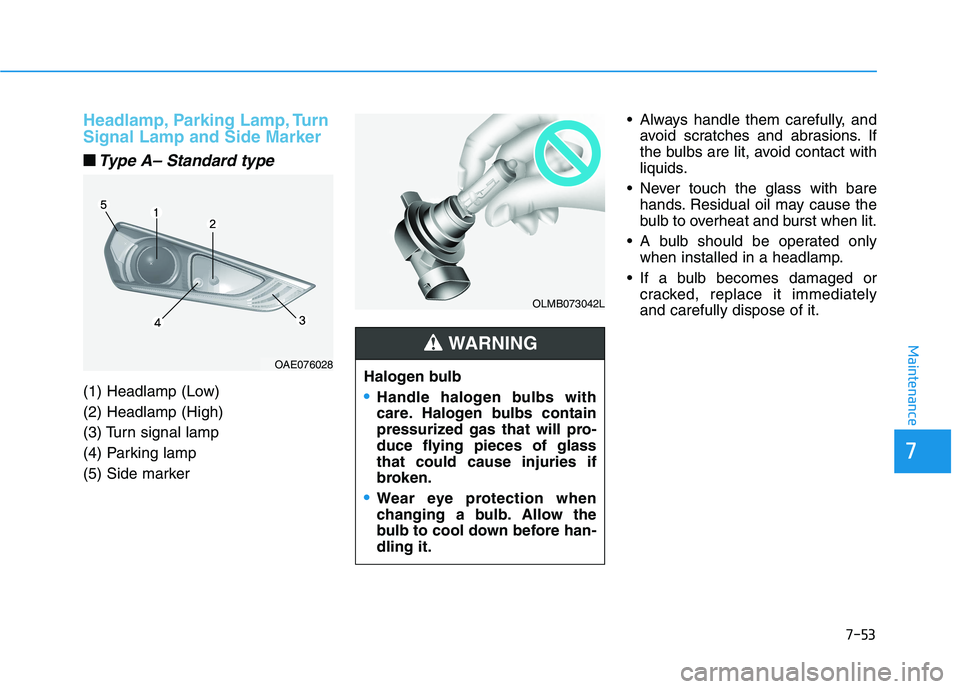
Headlamp, Parking Lamp, Turn
Signal Lamp and Side Marker
■ ■Type A– Standard type
(1) Headlamp (Low)
(2) Headlamp (High)
(3) Turn signal lamp
(4) Parking lamp
(5) Side marker Always handle them carefully, and
avoid scratches and abrasions. If
the bulbs are lit, avoid contact with
liquids.
Never touch the glass with bare
hands. Residual oil may cause the
bulb to overheat and burst when lit.
A bulb should be operated only
when installed in a headlamp.
If a bulb becomes damaged or
cracked, replace it immediately
and carefully dispose of it.
OLMB073042L
Halogen bulb
Handle halogen bulbs with
care. Halogen bulbs contain
pressurized gas that will pro-
duce flying pieces of glass
that could cause injuries if
broken.
Wear eye protection when
changing a bulb. Allow the
bulb to cool down before han-
dling it.
WARNING
OAE076028
Page 460 of 561
7-54
Maintenance
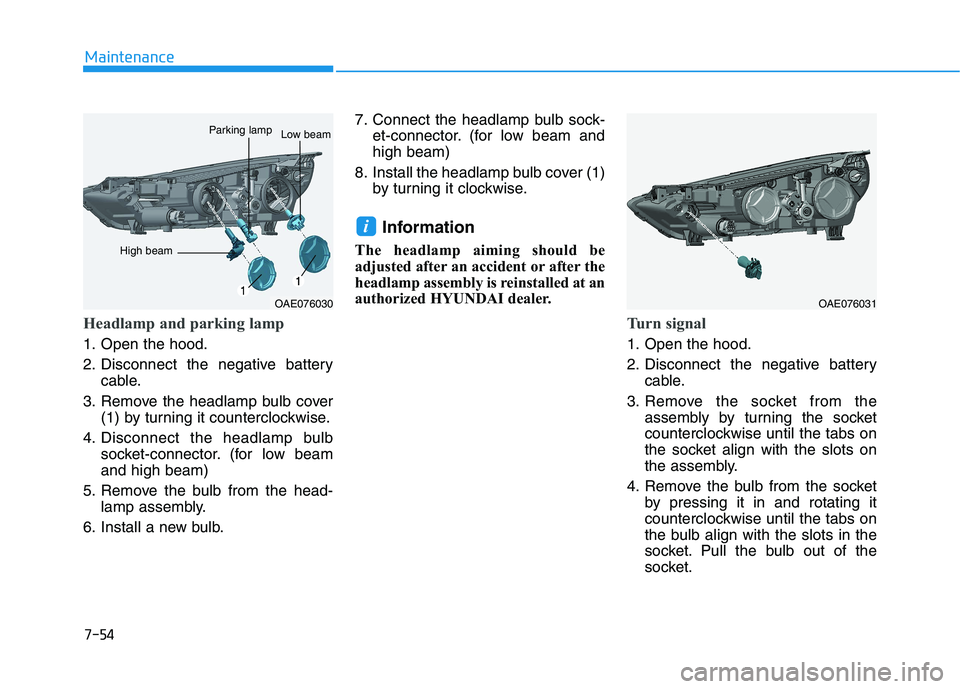
Headlamp and parking lamp
1. Open the hood.
2. Disconnect the negative battery
cable.
3. Remove the headlamp bulb cover
(1) by turning it counterclockwise.
4. Disconnect the headlamp bulb
socket-connector. (for low beam
and high beam)
5. Remove the bulb from the head-
lamp assembly.
6. Install a new bulb.7. Connect the headlamp bulb sock-
et-connector. (for low beam and
high beam)
8. Install the headlamp bulb cover (1)
by turning it clockwise.
Information
The headlamp aiming should be
adjusted after an accident or after the
headlamp assembly is reinstalled at an
authorized HYUNDAI dealer.
Turn signal
1. Open the hood.
2. Disconnect the negative battery
cable.
3. Remove the socket from the
assembly by turning the socket
counterclockwise until the tabs on
the socket align with the slots on
the assembly.
4. Remove the bulb from the socket
by pressing it in and rotating it
counterclockwise until the tabs on
the bulb align with the slots in the
socket. Pull the bulb out of the
socket.
i
OAE076030
Parking lampLow beam
OAE076031
High beam
Page 461 of 561
7-55
7
Maintenance
5. Install a new bulb by inserting it
into the socket and rotating it until
it locks into place.
6. Install the socket in the assembly
by aligning the tabs on the socket
with the slots in the assembly.
7. Push the socket into the assembly
and turn the socket clockwise.Side marker
1. Open the hood.
2. Disconnect the negative battery
cable.
3. Remove the socket from the
assembly by turning the socket
counterclockwise until the tabs on
the socket align with the slots on
the assembly.
4. Remove the bulb from the socket
by pulling out the bulb.
5. Insert a new bulb.
■ ■
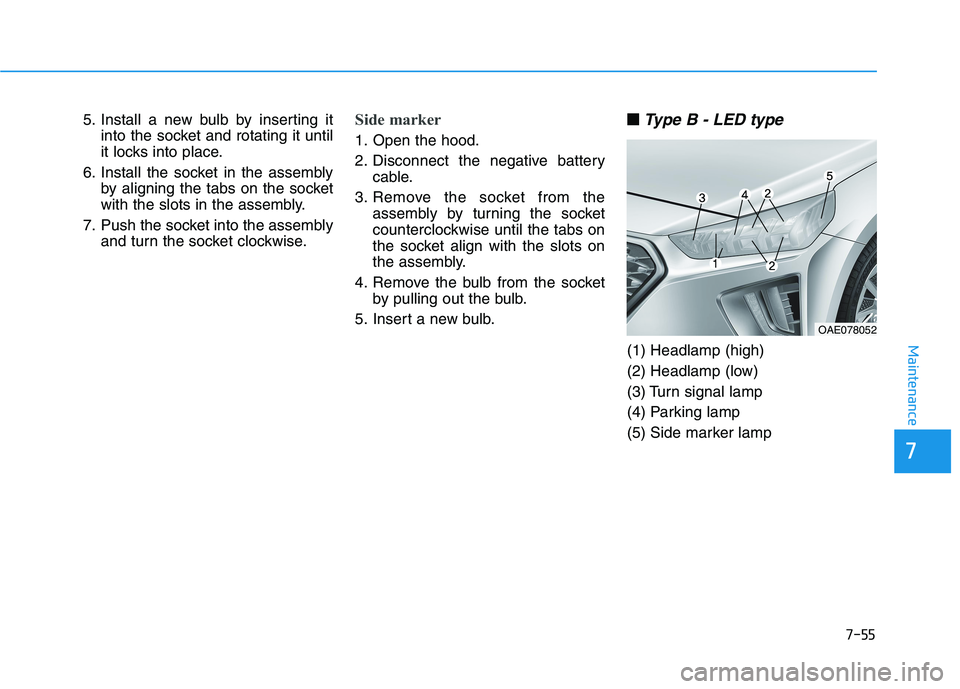
Type B - LED type
(1) Headlamp (high)
(2) Headlamp (low)
(3) Turn signal lamp
(4) Parking lamp
(5) Side marker lamp
OAE078052
Page 463 of 561
7-57
7
Maintenance
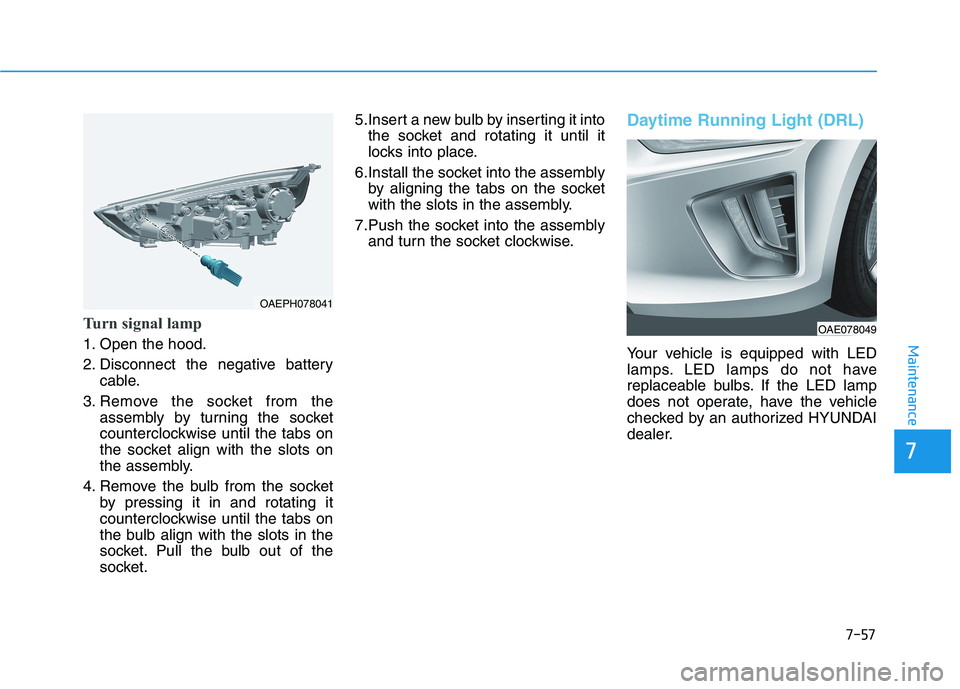
Turn signal lamp
1. Open the hood.
2. Disconnect the negative battery
cable.
3. Remove the socket from the
assembly by turning the socket
counterclockwise until the tabs on
the socket align with the slots on
the assembly.
4. Remove the bulb from the socket
by pressing it in and rotating it
counterclockwise until the tabs on
the bulb align with the slots in the
socket. Pull the bulb out of the
socket.5.Insert a new bulb by inserting it into
the socket and rotating it until it
locks into place.
6.Install the socket into the assembly
by aligning the tabs on the socket
with the slots in the assembly.
7.Push the socket into the assembly
and turn the socket clockwise.
Daytime Running Light (DRL)
Your vehicle is equipped with LED
lamps. LED lamps do not have
replaceable bulbs. If the LED lamp
does not operate, have the vehicle
checked by an authorized HYUNDAI
dealer.
OAE078049
OAEPH078041
Page 464 of 561
7-58
Maintenance
Side Repeater Lamp
Replacement
Your vehicle is equipped with LED
lamps. LED lamps do not have
replaceable bulbs. If the LED lamp
does not operate, have the vehicle
checked by an authorized HYUNDAI
dealer.
Rear Combination Light Bulb
Replacement
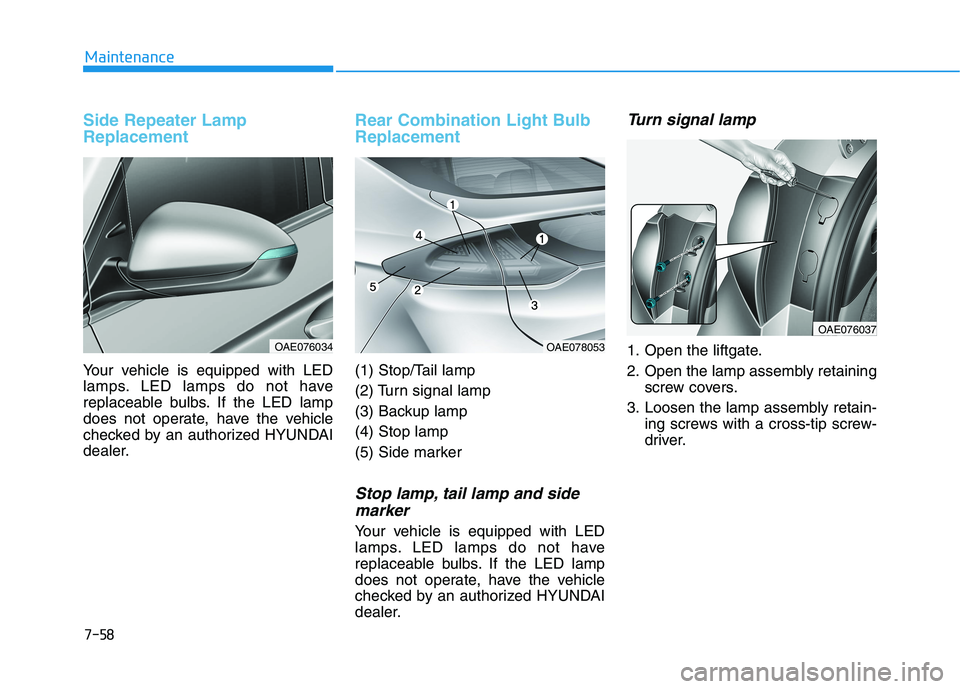
(1) Stop/Tail lamp
(2) Turn signal lamp
(3) Backup lamp
(4) Stop lamp
(5) Side marker
Stop lamp, tail lamp and side
marker
Your vehicle is equipped with LED
lamps. LED lamps do not have
replaceable bulbs. If the LED lamp
does not operate, have the vehicle
checked by an authorized HYUNDAI
dealer.
Turn signal lamp
1. Open the liftgate.
2. Open the lamp assembly retaining
screw covers.
3. Loosen the lamp assembly retain-
ing screws with a cross-tip screw-
driver.OAE078053OAE076034
OAE076037
Page 465 of 561
7-59
7
Maintenance
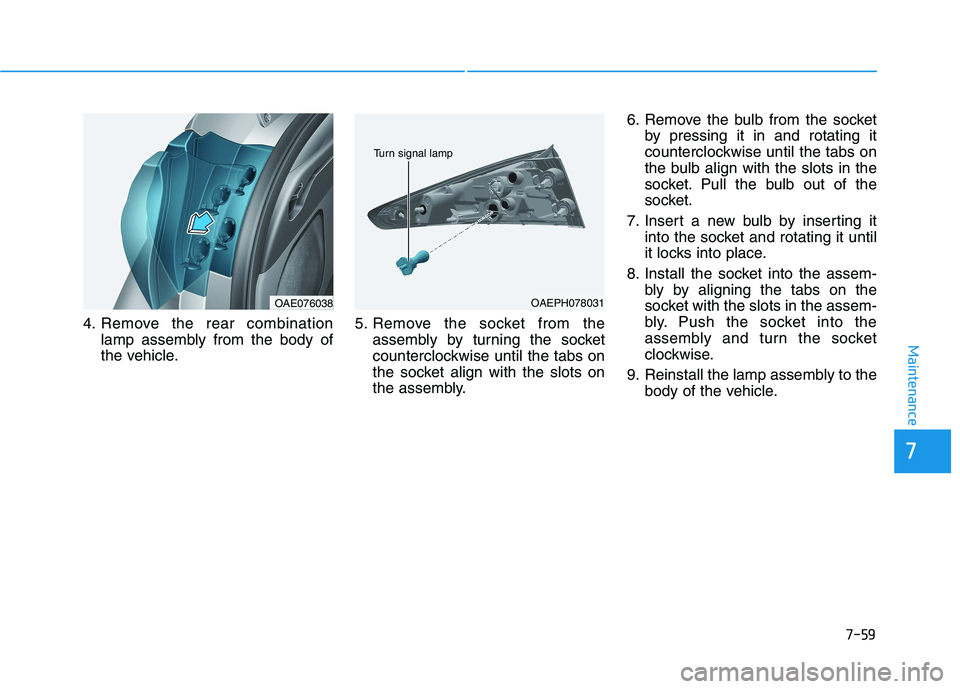
4. Remove the rear combination
lamp assembly from the body of
the vehicle.5. Remove the socket from the
assembly by turning the socket
counterclockwise until the tabs on
the socket align with the slots on
the assembly.6. Remove the bulb from the socket
by pressing it in and rotating it
counterclockwise until the tabs on
the bulb align with the slots in the
socket. Pull the bulb out of the
socket.
7. Insert a new bulb by inserting it
into the socket and rotating it until
it locks into place.
8. Install the socket into the assem-
bly by aligning the tabs on the
socket with the slots in the assem-
bly. Push the socket into the
assembly and turn the socket
clockwise.
9. Reinstall the lamp assembly to the
body of the vehicle.
OAEPH078031
Turn signal lamp
OAE076038
Page 481 of 561
8-3
88
Specifications, Consumer information and Reporting safety defectsB BU
UL
LB
B
W
WA
AT
TT
TA
AG
GE
E
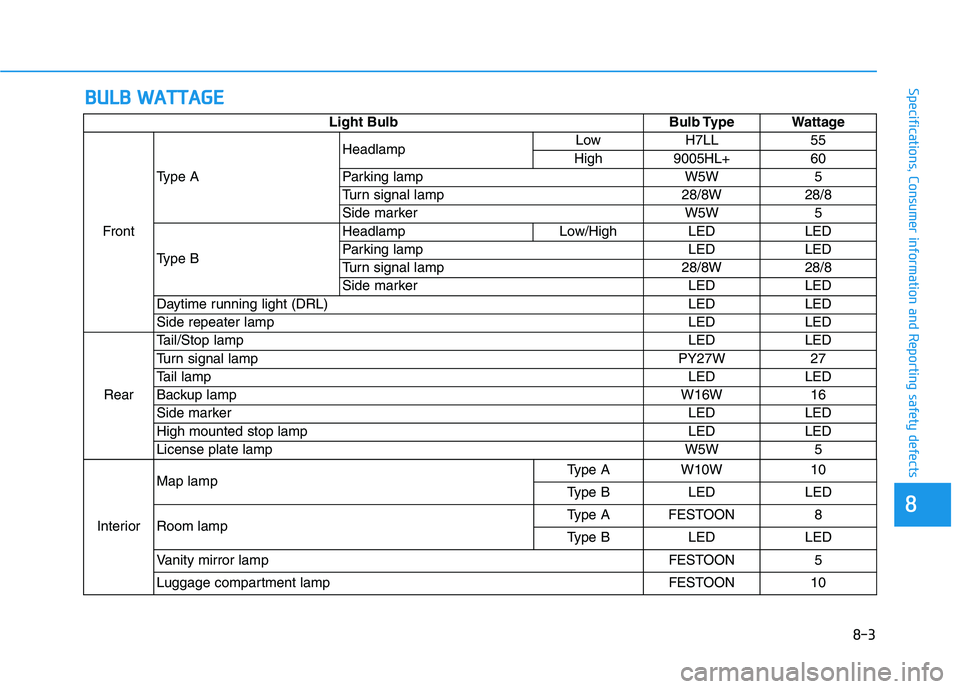
Light Bulb Bulb Type Wattage
FrontType AHeadlampLow H7LL 55
High 9005HL+ 60
Parking lamp W5W 5
Turn signal lamp 28/8W 28/8
Side marker W5W 5
Type BHeadlamp Low/High LED LED
Parking lamp LED LED
Turn signal lamp 28/8W 28/8
Side marker LED LED
Daytime running light (DRL) LED LED
Side repeater lamp LED LED
RearTail/Stop lampLED LED
Turn signal lamp PY27W 27
Tail lampLED LED
Backup lampW16W 16
Side markerLED LED
High mounted stop lamp LED LED
License plate lamp W5W 5
InteriorMap lampType A W10W 10
Type B LED LED
Room lampType A FESTOON 8
Type B LED LED
Vanity mirror lamp FESTOON 5
Luggage compartment lamp FESTOON 10