window HYUNDAI IONIQ 6 2023 Owners Manual
[x] Cancel search | Manufacturer: HYUNDAI, Model Year: 2023, Model line: IONIQ 6, Model: HYUNDAI IONIQ 6 2023Pages: 582, PDF Size: 10.77 MB
Page 62 of 582
Introduction/Getting Started with Your Electric Vehicle
1-56
Tips for enhancing the distance to empty
The distance to empty vary depending on the charge level of the high voltage battery,
weather, temperature, duration of the battery use, terrain, driving habits, etc.
You can increase the distance to empty by driving the vehicle following the instructions
below.
• The air resistance increases rapidly as the electric vehicle drives faster, so avoid speeding to increase the distance to empty and the electric energy economy.
• Rapid acceleration consumes a lot of driving energy and rapid deceleration limits the regenerative braking. Gradually depress and release the accelerator pedal when
accelerating or decelerating to maintain speed.
• If you operate the air conditioner or heater too much, the high voltage battery uses excessive electricity. This may reduce the distance to empty. Therefore, set the cabin
temperature to 72 °F (22 °C) AUTO level 2. Various assessment tests have been used to
verify that this setting maintains optimal energy consumption rates. Especially in
winter, reducing heating and using heated seats instead can significantly increase the
distance to empty. Turn off the air conditioner or heater if you do not need them.
• When using the air conditioner or heater, the energy consumption is reduced if recirculation mode is selected instead of fresh mode. Fresh mode requires a large
amount of energy consumption as the outside air has to be reheated or cooled.
• Close the windows while driving. Driving with the windows open increases air resistance and the usage of the air conditioner or heater.
• When using the air conditioner or heater while driving alone, use the DRIVER ONLY function.
• Always maintain specified tire pressures and use tires for electric vehicles.
• Do not use unnecessary electrical components while driving.
• Do not load unnecessary items in the vehicle.
• Do not mount parts that may increase air resistance.
When the distance to empty is insufficient
• When the High voltage battery level warning light is displayed, immediately charge the vehicle at a nearby charging station.
• Drive energy efficiently following the “Tips for enhancing the distance to empty.”
• When the battery level is 0 %, do not try to drive. Move to a safe place and call for help.
Hyundai_CE_en_US.book Page 56
Page 71 of 582
1
1-65
Countermeasures for Accidents or Fire
When an accident occurs while driving the electric vehicle, turn on the Hazard warning
light, move the vehicle to a safe place, and take following measures.
WARNING When a vehicle accident occurs and the high voltage battery is damaged, harmful gas
and electrolytes may leak.
• Be careful not to touch the leaked liquid.
• When you suspect leakage of inflammable gas and other harmful gases, open the windows and immediately evacuate to a safe location.
• If any leaked fluid comes in contact with your eyes or skin, immediately clean the affected area thoroughly with tap water or saline solution and have doctors inspect it
as soon as possible.
Turning Off the High Voltage Battery
In case disconnecting the high voltage cut-off switch is required in an emergency, follow
the instructions below.
WARNING • Do not intentionally disconnect the high voltage cut-off switch except in an emergency. The vehicle will not start if the high voltage battery is disconnected. Also,
when the switch is disconnected, dangerous accidents, such as electric shock, may
occur and various electric devices may be damaged.
• Do not touch any components inside the motor compartment with wet hands.
• Do not touch any components except for the components instructed to operate in this manual for a specific task.
• Do not touch wires exposed inside or outside the vehicle.
• Do not touch the high voltage electric wire (orange), connector, and all electric components and devices.
1. Open the hood and open the high voltage cut-off switch box on the right side of the motor compartment.
2. Pull the yellow label in the high voltage cut-off switch to shut down high voltage battery.
CAUTION Do not put excessive force to the switch lever while shutting down the high voltage
battery. Doing so may damage the high voltage cut-off switch.
Hyundai_CE_en_US.book Page 65
Page 76 of 582
Vehicle Information, Consumer Information, and Reporting Safety Defects
2-2
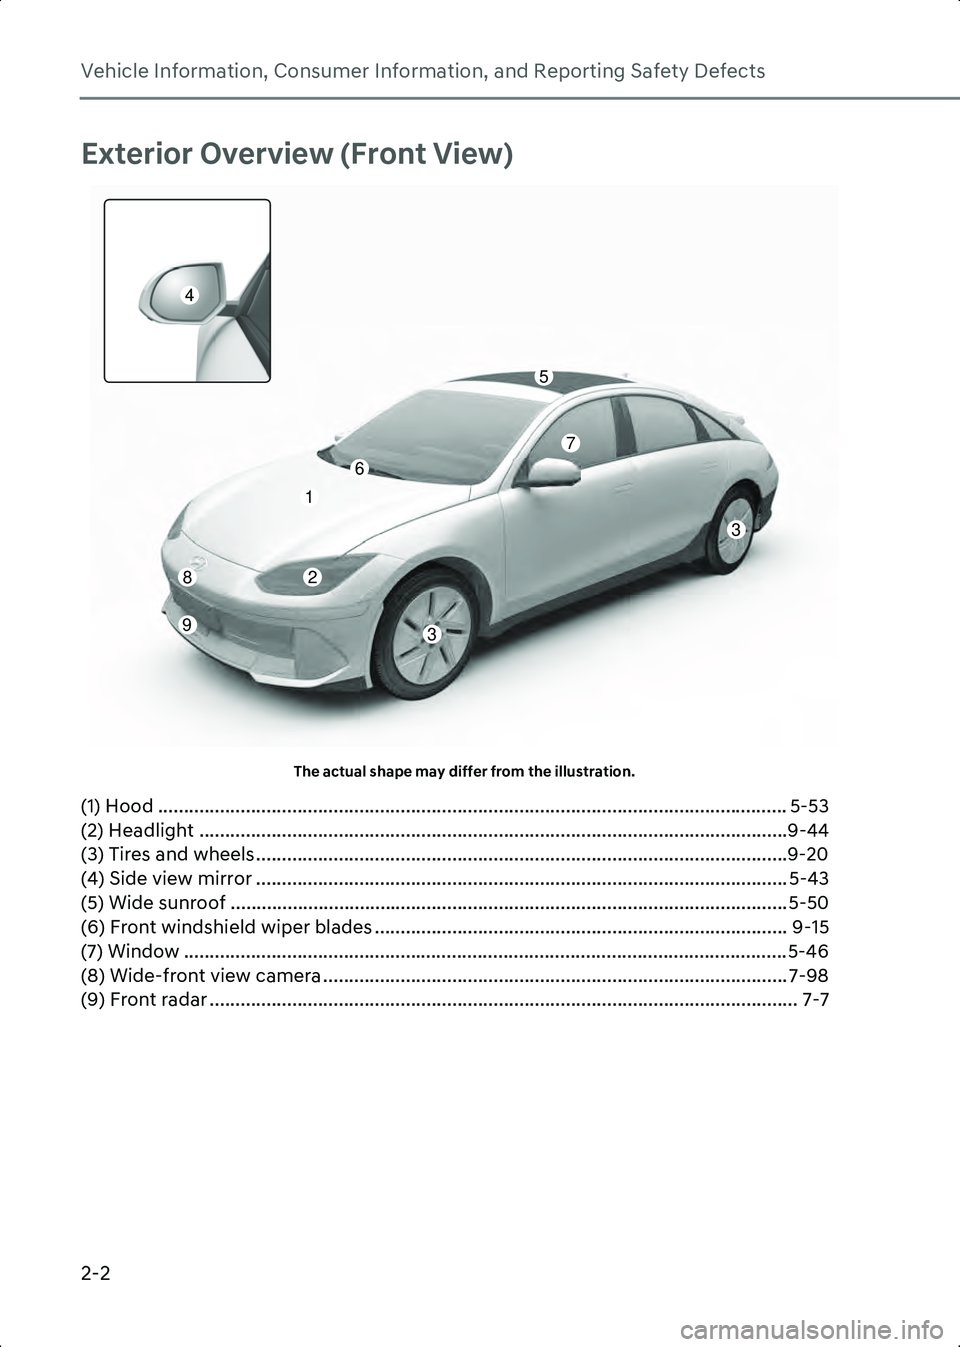
Exterior Overview (Front View)
A1000201The actual shape may differ from the illustration.
(1) Hood .......................................................................................................................... 5-53
(2) Headlight ..................................................................................................................9-44
(3) Tires and wheels .......................................................................................................9-20
(4) Side view mirror ....................................................................................................... 5-43
(5) Wide sunroof ............................................................................................................5-50
(6) Front windshield wiper blades ................................................................................ 9-15
(7) Window ..................................................................................................................... 5-46
(8) Wide-front view camera .......................................................................................... 7-98
(9) Front radar .................................................................................................................. 7-7
1
2
3
3
5
6
7
8
9
4
Hyundai_CE_en_US.book Page 2
Page 78 of 582
Vehicle Information, Consumer Information, and Reporting Safety Defects
2-4
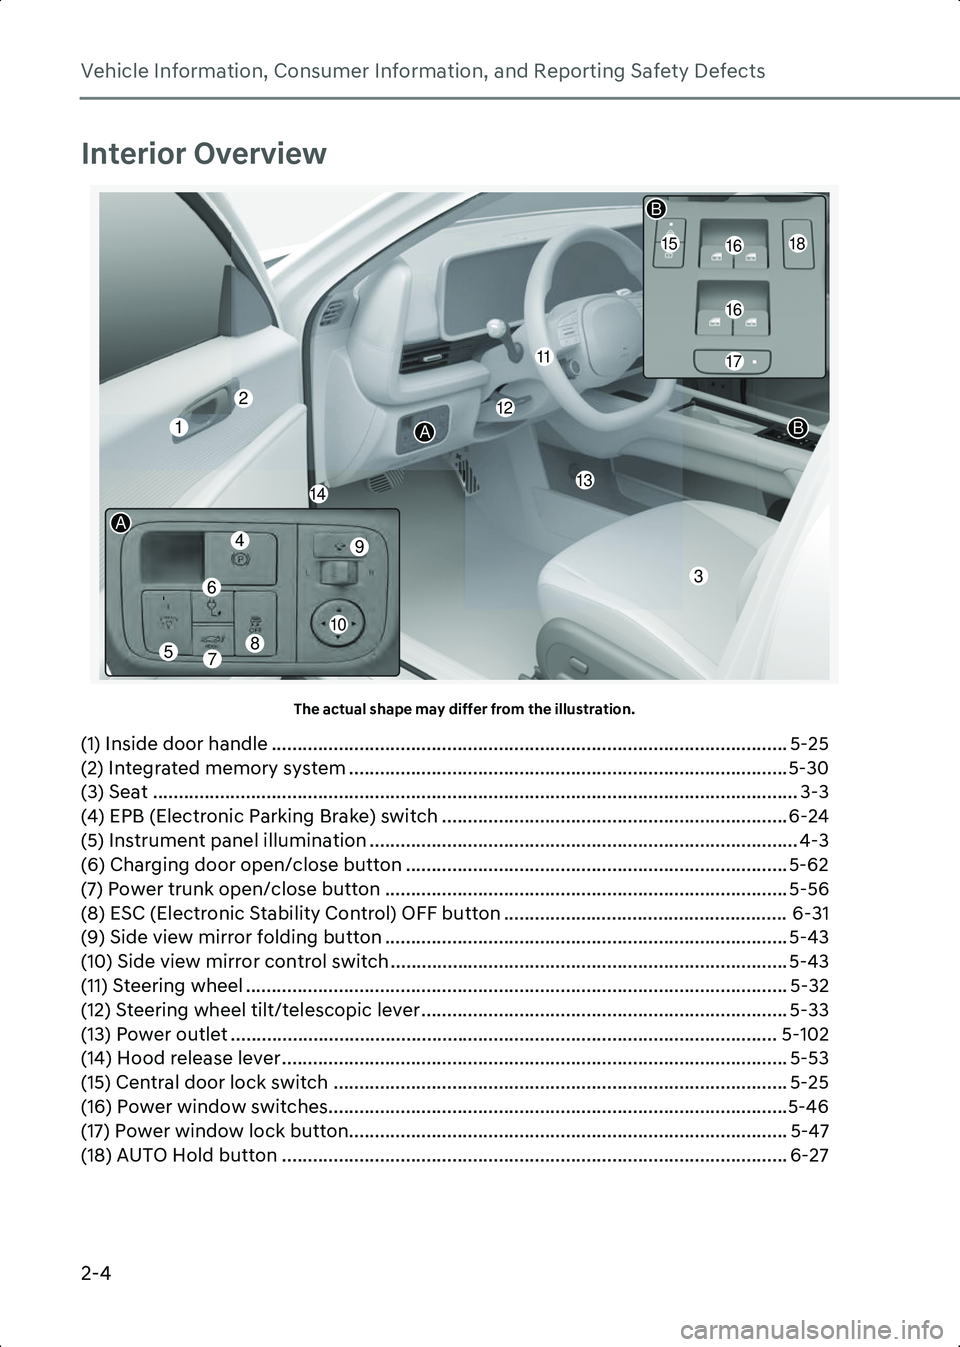
Interior Overview
A1000501The actual shape may differ from the illustration.
(1) Inside door handle .................................................................................................... 5-25
(2) Integrated memory system .....................................................................................5-30
(3) Seat ............................................................................................................................. 3-3
(4) EPB (Electronic Parking Brake) switch ................................................................... 6-24
(5) Instrument panel illumination ................................................................................... 4-3 (6) Charging door open/close button .......................................................................... 5-62
(7) Power trunk open/close button .............................................................................. 5-56
(8) ESC (Electronic Stability Control) OFF button ....................................................... 6-31
(9) Side view mirror folding button .............................................................................. 5-43
(10) Side view mirror control switch ............................................................................. 5-43
(11) Steering wheel ......................................................................................................... 5-32
(12) Steering wheel tilt/telescopic lever ....................................................................... 5-33
(13) Power outlet .......................................................................................................... 5-102 (14) Hood release lever .................................................................................................. 5-53
(15) Central door lock switch ........................................................................................ 5-25 (16) Power window switches.........................................................................................5-46
(17) Power window lock button..................................................................................... 5-47
(18) AUTO Hold button .................................................................................................. 6-27
112
1314
16
16
17
1518
11
2
3
B
B
A
10
7
6
49
8
A
5
Hyundai_CE_en_US.book Page 4
Page 133 of 582
3
3-39
pretensioners on both sides of the vehicle
may deploy if a rollover or possible
rollover is detected.
The side airbags are not designed to
deploy in all side impact or rollover
situations.
WARNING To reduce the risk of serious injury or
death from an inflating side airbag, take
the following precautions:
• Seat belts must be worn at all times to help keep occupants positioned
properly.
• Do not allow passengers to lean their heads or bodies onto doors, put their
arms on the doors, stretch their arms
out of the window, or place objects
between the doors and seats.
• Hold the steering wheel at the 9 o’clock and 3 o’clock positions, to minimize the
risk of injuries to your hands and arms.
• Do not use any accessory seat covers. This could reduce or prevent the
effectiveness of the system.
• Do not hang other objects except clothes. In an accident it may cause
vehicle damage or personal injury
especially when airbag is inflated.
• Do not place any objects over the airbag or between the airbag and
yourself. Also, do not attach any objects
around the area the airbag inflates such
as the door, side door glass, front and
rear pillar.
• Do not place any objects between the door and the seat. They may become
dangerous projectiles if the side airbag
inflates.
• Do not install any accessories on the side or near the side airbags.
• Do not impact the doors when the Start/Stop button is in the ON or START
position as this may cause the side
airbags to inflate. • If the seat or seat cover is damaged,
have the system serviced by an
authorized HYUNDAI dealer.
Curtain airbags
B3003301
B3003302
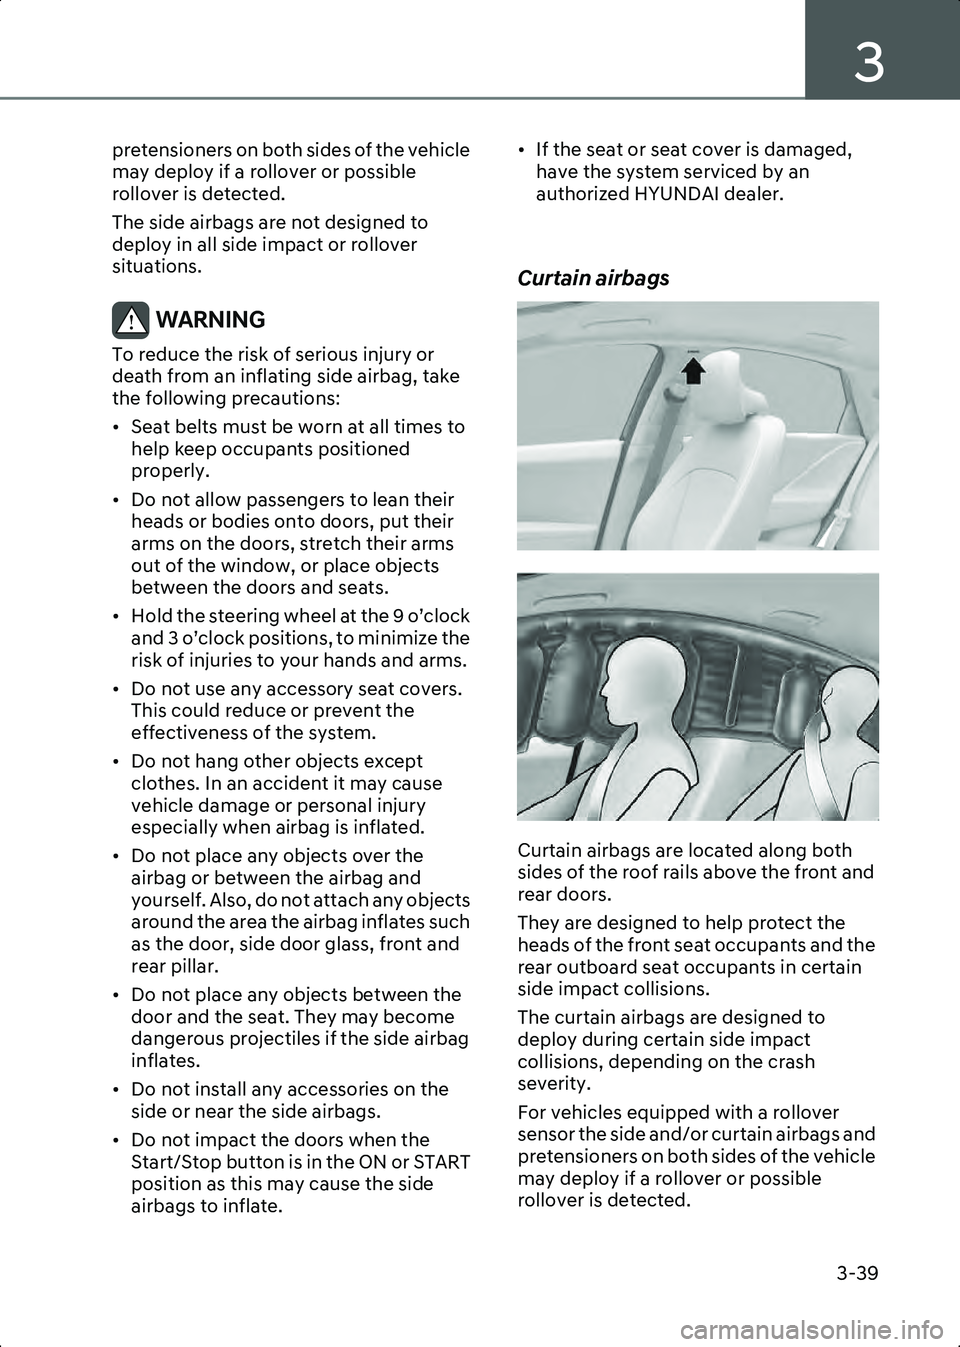
Curtain airbags are located along both
sides of the roof rails above the front and
rear doors.
They are designed to help protect the
heads of the front seat occupants and the
rear outboard seat occupants in certain
side impact collisions.
The curtain airbags are designed to
deploy during certain side impact
collisions, depending on the crash
severity.
For vehicles equipped with a rollover
sensor the side and/or curtain airbags and
pretensioners on both sides of the vehicle
may deploy if a rollover or possible
rollover is detected.
Hyundai_CE_en_US.book Page 39
Page 134 of 582
Seats & Safety System
3-40
The curtain airbags are not designed to
deploy in all side impact or rollover
situations.
WARNING To reduce the risk of serious injury or
death from an inflating curtain airbag,
take the following precautions:
• All occupants must wear seat belts at all times to help keep occupants
positioned properly.
• Properly secure Child Restraint System as far away from the door as possible.
• Do not place any objects over the airbag. Also, do not attach any objects
around the area the airbag inflates such
as the door, side door glass, front and
rear pillar, roof side rail.
• Do not hang other objects except clothes, especially hard or breakable
objects.
In an accident, it may cause vehicle
damage or personal injury.
• Do not allow passengers to lean their heads or bodies onto doors, put their
arms on the doors, stretch their arms
out of the window, or place objects
between the doors and seats.
• Do not attempt to open or repair the side curtain airbags yourself. If
necessary, have the airbag inspected
by an authorized HYUNDAI dealer.
How does the Airbags System
Operate?
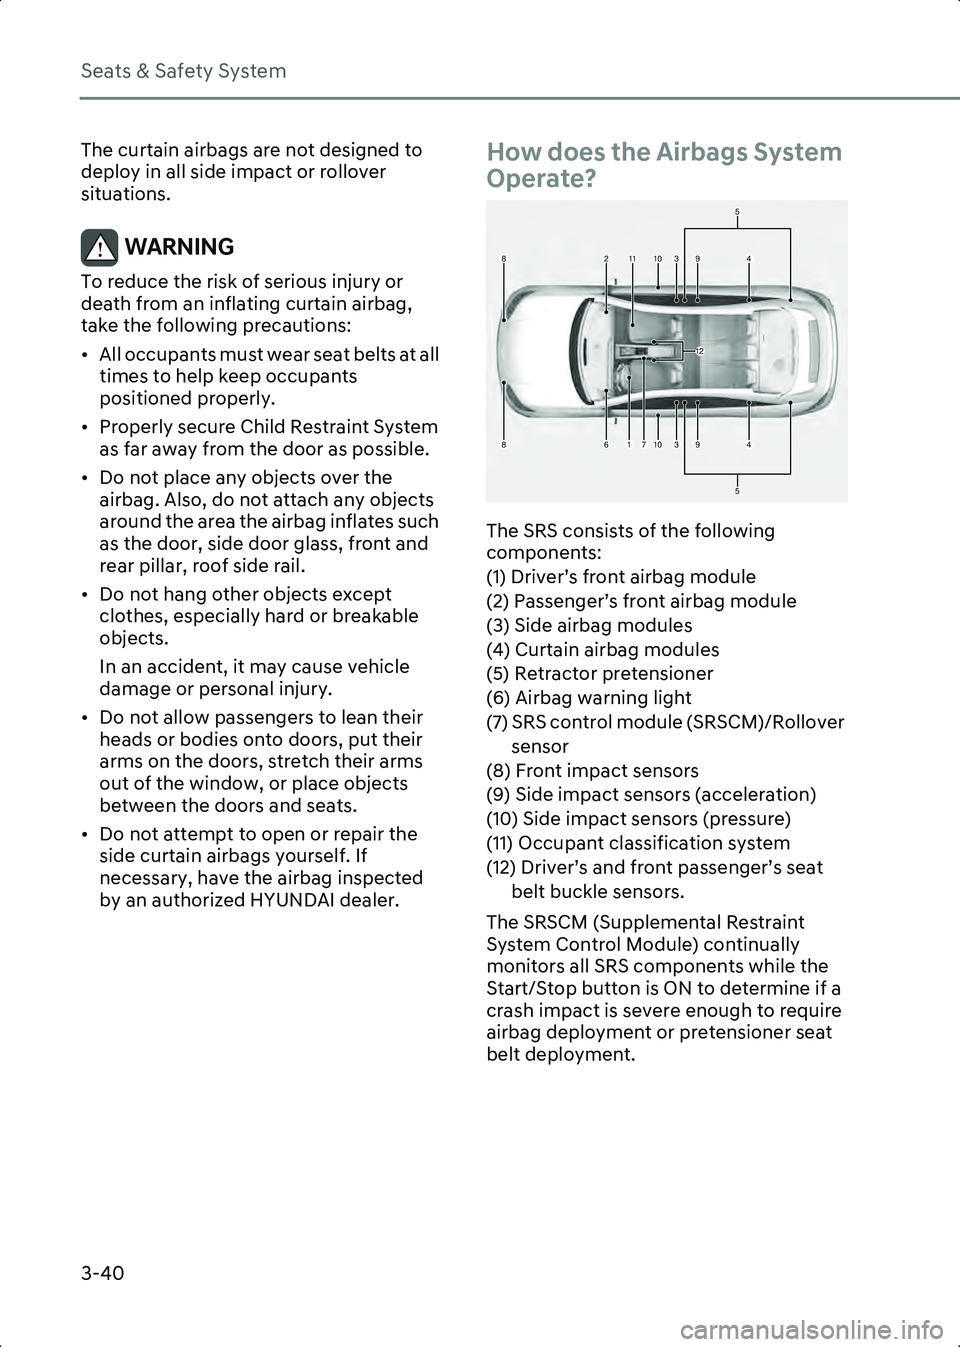
A3002401
The SRS consists of the following
components:
(1) Driver’s front airbag module
(2) Passenger’s front airbag module
(3) Side airbag modules
(4) Curtain airbag modules
(5) Retractor pretensioner
(6) Airbag warning light
(7) SRS control module (SRSCM)/Rollover sensor
(8) Front impact sensors
(9) Side impact sensors (acceleration)
(10) Side impact sensors (pressure)
(11) Occupant classification system
(12) Driver’s and front passenger’s seat belt buckle sensors.
The SRSCM (Supplemental Restraint
System Control Module) continually
monitors all SRS components while the
Start/Stop button is ON to determine if a
crash impact is severe enough to require
airbag deployment or pretensioner seat
belt deployment.
4
5
5
11
1
23
37
8
86
9
49
10
10
12
Hyundai_CE_en_US.book Page 40
Page 137 of 582
3
3-43
motion, reducing the risk of head and
chest injury.
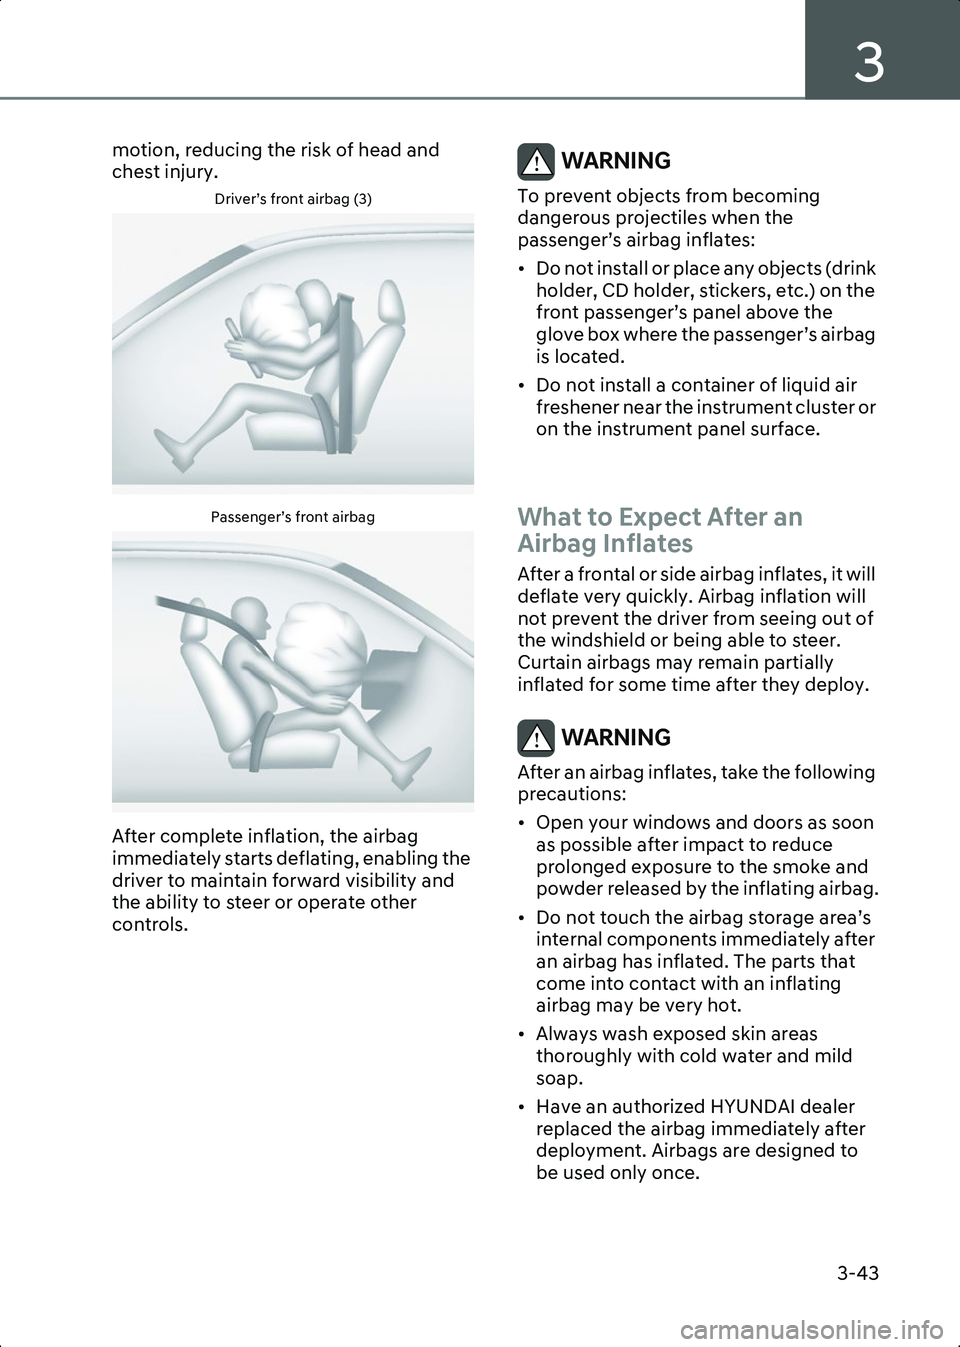
Driver’s front airbag (3)
OLMB033056Passenger’s front airbag
OLMB033057
After complete inflation, the airbag
immediately starts deflating, enabling the
driver to maintain forward visibility and
the ability to steer or operate other
controls.
WARNING To prevent objects from becoming
dangerous projectiles when the
passenger’s airbag inflates:
• Do not install or place any objects (drink holder, CD holder, stickers, etc.) on the
front passenger’s panel above the
glove box where the passenger’s airbag
is located.
• Do not install a container of liquid air freshener near the instrument cluster or
on the instrument panel surface.
What to Expect After an
Airbag Inflates
After a frontal or side airbag inflates, it will
deflate very quickly. Airbag inflation will
not prevent the driver from seeing out of
the windshield or being able to steer.
Curtain airbags may remain partially
inflated for some time after they deploy.
WARNING After an airbag inflates, take the following
precautions:
• Open your windows and doors as soon as possible after impact to reduce
prolonged exposure to the smoke and
powder released by the inflating airbag.
• Do not touch the airbag storage area’s internal components immediately after
an airbag has inflated. The parts that
come into contact with an inflating
airbag may be very hot.
• Always wash exposed skin areas thoroughly with cold water and mild
soap.
• Have an authorized HYUNDAI dealer replaced the airbag immediately after
deployment. Airbags are designed to
be used only once.
Hyundai_CE_en_US.book Page 43
Page 180 of 582
5
Inside Rearview Mirror ...............................................................................................5-35
Side View Mirrors ...................................................................................................... 5-43
Reverse Parking Aid .................................................................................................. 5-45
Windows ........................................................................................................................ 5-46 Power Windows .......................................................................................................... 5-47
Wide Sunroof................................................................................................................. 5-50
Hood ...............................................................................................................................5-53 Opening the Hood ......................................................................................................5-53
Closing the Hood ........................................................................................................5-53
Front Trunk .................................................................................................................... 5-54 Opening the Front Trunk........................................................................................... 5-54
Power Trunk ...................................................................................................................5-55 Power Trunk Operating Conditions...........................................................................5-55
Operating the Power Trunk ...................................................................................... 5-56Resetting the Power Trunk ....................................................................................... 5-58
Emergency Trunk Safety Release............................................................................. 5-58
Smart Trunk ................................................................................................................... 5-60 Using Smart Trunk ..................................................................................................... 5-60
Deactivating smart trunk ........................................................................................... 5-61
Detecting area ............................................................................................................ 5-61
Electric Charging Door ................................................................................................. 5-62
Head-up Display ........................................................................................................... 5-63 Head-up Display Settings ......................................................................................... 5-63
Head-up Display Information ................................................................................... 5-63
Precautions while Using the Head-up Display ........................................................ 5-63
Over-The-Air Software Update .................................................................................... 5-65 Downloading Software ............................................................................................. 5-65
Approving Software Update ..................................................................................... 5-65
Preparing Software Update ...................................................................................... 5-65Updating Software .................................................................................................... 5-65
Lighting ...........................................................................................................................5-67 Exterior Lights ............................................................................................................. 5-67
Welcome system ........................................................................................................5-70
Interior Lights ................................................................................................................. 5-71 Interior Light AUTO cut .............................................................................................. 5-71
Hyundai_CE_en_US.book Page 2
Page 181 of 582
5
5. Convenience Features
Front lamps.................................................................................................................. 5-71
Rear lamps ................................................................................................................... 5-71
Vanity Mirror Lamp .................................................................................................... 5-72
Glove Box Lamp ......................................................................................................... 5-72
Mood Lamp ................................................................................................................ 5-72
Front Trunk Lamp....................................................................................................... 5-73
High Beam Assist (HBA) ................................................................................................ 5-74 High Beam Assist Settings ........................................................................................ 5-74
High Beam Assist Operation ..................................................................................... 5-74
High Beam Assist Malfunction and Limitations ....................................................... 5-75
Wipers and Washers ...................................................................................................... 5-77 Front Windshield Wipers ........................................................................................... 5-77
Front Windshield Washers ........................................................................................ 5-78
Automatic Climate Control System..............................................................................5-80 Climate........................................................................................................................ 5-82
Automatic Temperature Control Mode .................................................................... 5-82
Manual Temperature Control Mode ......................................................................... 5-83
System Operation ...................................................................................................... 5-91
System Maintenance ................................................................................................. 5-92
Windshield Defrosting and Defogging.........................................................................5-94 To Defog Inside Windshield ......................................................................................5-94To Defrost Outside Windshield .................................................................................5-94
Defogging Logic......................................................................................................... 5-95
Rear Window Defroster ............................................................................................. 5-95
Climate Control Additional Features ............................................................................5-96 A/C Automatic Drying................................................................................................5-96
Auto Defogging System ............................................................................................5-96
Auto Dehumidify ........................................................................................................ 5-97
Sunroof Inside Air recirculation ................................................................................5-98
Recirculating Air When Washer Fluid Is Used..........................................................5-98
Recirculation Mode Plus............................................................................................5-98
Automatic Controls Linked to Climate Control Settings (for driver’s seat) ...........5-99
Smart Ventilation .......................................................................................................5-99
Storage Compartment ................................................................................................ 5-100 Center Console Storage .......................................................................................... 5-100
Glove Box.................................................................................................................. 5-100
Hyundai_CE_en_US.book Page 3
Page 184 of 582
Convenience Features
5-6
smart key with you locks all doors and
let the door handle to retract back.
Information • The side view mirror will fold if ‘Enable on
Door Unlock’ is selected from the Settings
menu in the infotainment system. Select
Setup > Vehicle > Lights > Welcome
Mirror/Light > Enable on Door Unlock .
• The door handle touch sensor operates when the smart key is within 28-40 in.
(0.7-1 m) from the outside door handle.
• If you lock the doors using the door handle touch sensor, the doors are not locked under
the following circumstances:
- The smart key is in the vehicle.
- The Start/Stop button is from ACC or ON position.
- Any door is open (except for the trunk).
• If this occurs, a chime sounds for about 3 seconds. Check the vehicle before
attempting to lock the vehicle again.
WARNING Do not leave the smart key in your vehicle
with children that are unattended or
unsupervised.
Children could unintentionally press the
Start/Stop button or could operate the
power windows or other vehicle controls
or even cause the vehicle to move. This
may result in serious injury or death.
Information • To fold/unfold the side view mirror simultaneously when the door is
locked/unlocked, select Setup > Vehicle >
Lights > Welcome Mirror/Light >
Enable on Door Unlock in the
infotainment system.
• The door handle button will only operate when the smart key is within 28-40 in. (0.7-1 m) from the outside door handle.
Other people can also open the doors
without the smart key in possession.
• After unlocking the doors, the doors will lock automatically after 30 seconds unless a
door is opened.
The infotainment system may change after
software updates. For more information, refer
to the user’s manual provided in the
infotainment system and the quick reference
guide.
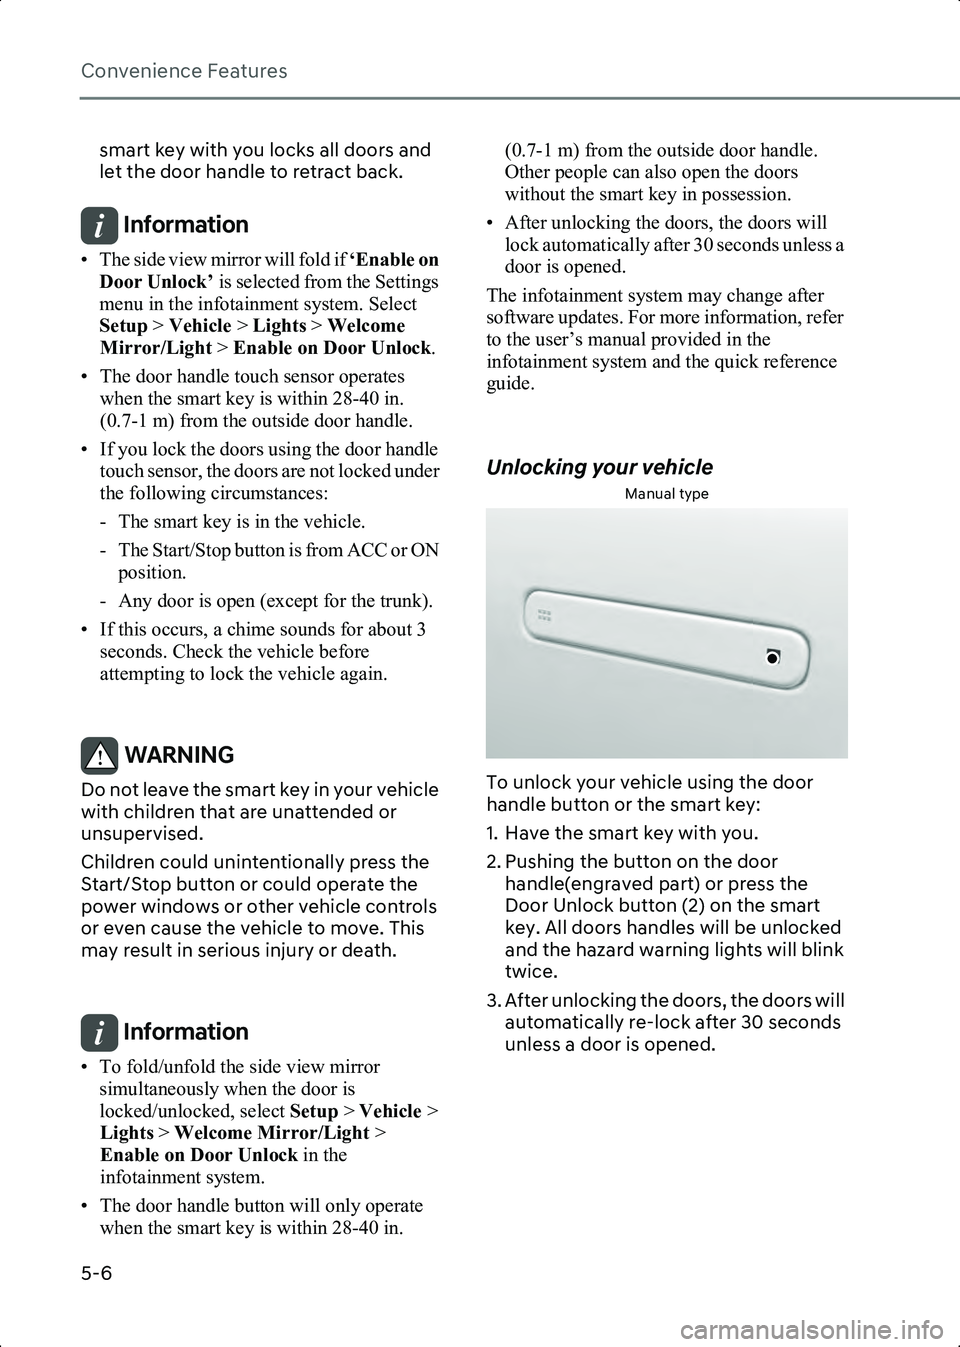
Unlocking your vehicle
Manual type
B5000204
To unlock your vehicle using the door
handle button or the smart key:
1. Have the smart key with you.
2. Pushing the button on the door handle(engraved part) or press the
Door Unlock button (2) on the smart
key. All doors handles will be unlocked
and the hazard warning lights will blink
twice.
3. After unlocking the doors, the doors will automatically re-lock after 30 seconds
unless a door is opened.
Hyundai_CE_en_US.book Page 6