ABS Hyundai Ioniq Electric 2018 User Guide
[x] Cancel search | Manufacturer: HYUNDAI, Model Year: 2018, Model line: Ioniq Electric, Model: Hyundai Ioniq Electric 2018Pages: 541, PDF Size: 19.83 MB
Page 337 of 541
5-76
Driving your vehicle
Smart Cruise Control will betemporarily cancelled when:
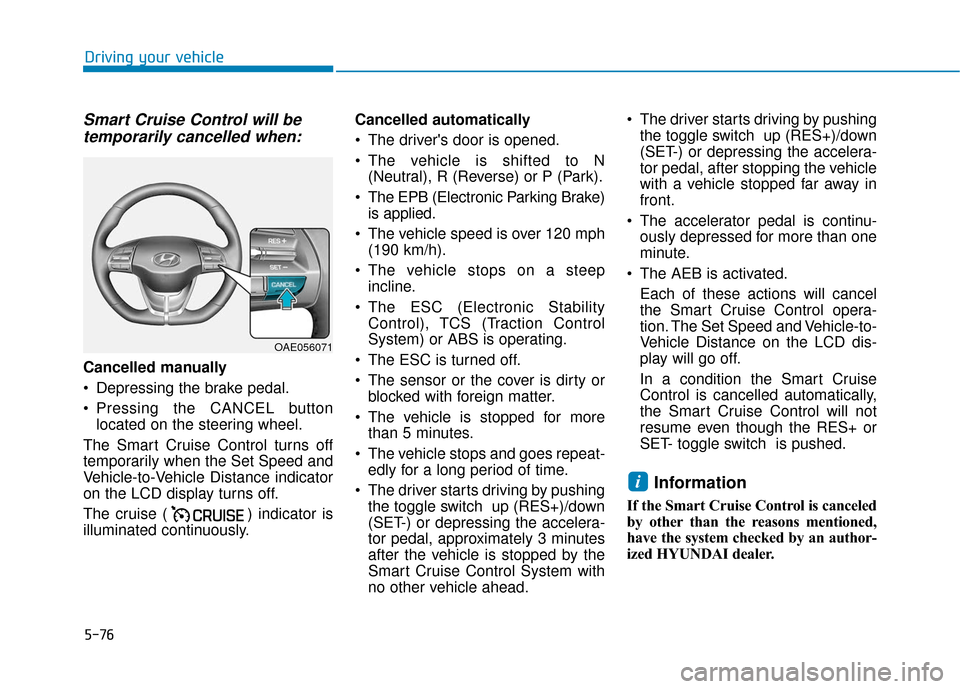
Cancelled manually
Depressing the brake pedal.
Pressing the CANCEL button
located on the steering wheel.
The Smart Cruise Control turns off
temporarily when the Set Speed and
Vehicle-to-Vehicle Distance indicator
on the LCD display turns off.
The cruise ( ) indicator is
illuminated continuously. Cancelled automatically
The driver's door is opened.
The vehicle is shifted to N
(Neutral), R (Reverse) or P (Park).
The EPB (Electronic Parking Brake) is applied.
The vehicle speed is over 120 mph (190 km/h).
The vehicle stops on a steep incline.
The ESC (Electronic Stability Control), TCS (Traction Control
System) or ABS is operating.
The ESC is turned off.
The sensor or the cover is dirty or blocked with foreign matter.
The vehicle is stopped for more than 5 minutes.
The vehicle stops and goes repeat- edly for a long period of time.
The driver starts driving by pushing the toggle switch up (RES+)/down
(SET-) or depressing the accelera-
tor pedal, approximately 3 minutes
after the vehicle is stopped by the
Smart Cruise Control System with
no other vehicle ahead. The driver starts driving by pushing
the toggle switch up (RES+)/down
(SET-) or depressing the accelera-
tor pedal, after stopping the vehicle
with a vehicle stopped far away in
front.
The accelerator pedal is continu- ously depressed for more than one
minute.
The AEB is activated. Each of these actions will cancel
the Smart Cruise Control opera-
tion. The Set Speed and Vehicle-to-
Vehicle Distance on the LCD dis-
play will go off.
In a condition the Smart Cruise
Control is cancelled automatically,
the Smart Cruise Control will not
resume even though the RES+ or
SET- toggle switch is pushed.
Information
If the Smart Cruise Control is canceled
by other than the reasons mentioned,
have the system checked by an author-
ized HYUNDAI dealer.
i
OAE056071
Page 411 of 541
7-26
Maintenance
T
TI
IR
R E
ES
S
A
A N
N D
D
W
W H
HE
EE
EL
LS
S
Tire Care
For proper maintenance, safety, and
maximum fuel economy, you must
always maintain recommended tire
inflation pressures and stay within
the load limits and weight distribution
recommended for your vehicle.
(Continued)Replace tires that are worn,
show uneven wear, or are dam-
aged. Worn tires can cause
loss of braking effectiveness,
steering) control, or traction.
ALWAYS replace tires with the
same size as each tire that
was originally supplied with
this vehicle. Using tires and
wheels other than the recom-
mended sizes could cause
unusual handling characteris-
tics, poor vehicle control, or
negatively affect your vehi-
cle's Anti-Lock Brake System
(ABS) resulting in a serious
accident.
Tire failure may cause loss of
vehicle control resulting in an
accident. To reduce risk of
SERIOUS INJURY or DEATH,
take the following precautions:
Inspect your tires monthly for
proper inflation as well as
wear and damage.
The recommended cold tire
pressure for your vehicle can
be found in this manual and on
the tire label located on the dri-
ver's side center pillar. Always
use a tire pressure gauge to
measure tire pressure. Tires
with too much or too little
pressure wear unevenly caus-
ing poor handling.
Check the pressure of the
spare every time you check
the pressure of the other tires
on your vehicle.
(Continued)
WARNING
Page 415 of 541
7-30
Maintenance
Wheel Alignment and Tire
Balance
The wheels on your vehicle were
aligned and balanced carefully at the
factory to give you the longest tire life
and best overall performance.
In most cases, you will not need to
have your wheels aligned again.
However, if you notice unusual tire
wear or your vehicle pulling one way
or the other, the alignment may need
to be reset.
If you notice your vehicle vibrating
when driving on a smooth road, your
wheels may need to be rebalanced.
Improper wheel weights can dam-
age your vehicle's aluminum
wheels. Use only approved wheel
weights.
Tire Replacement
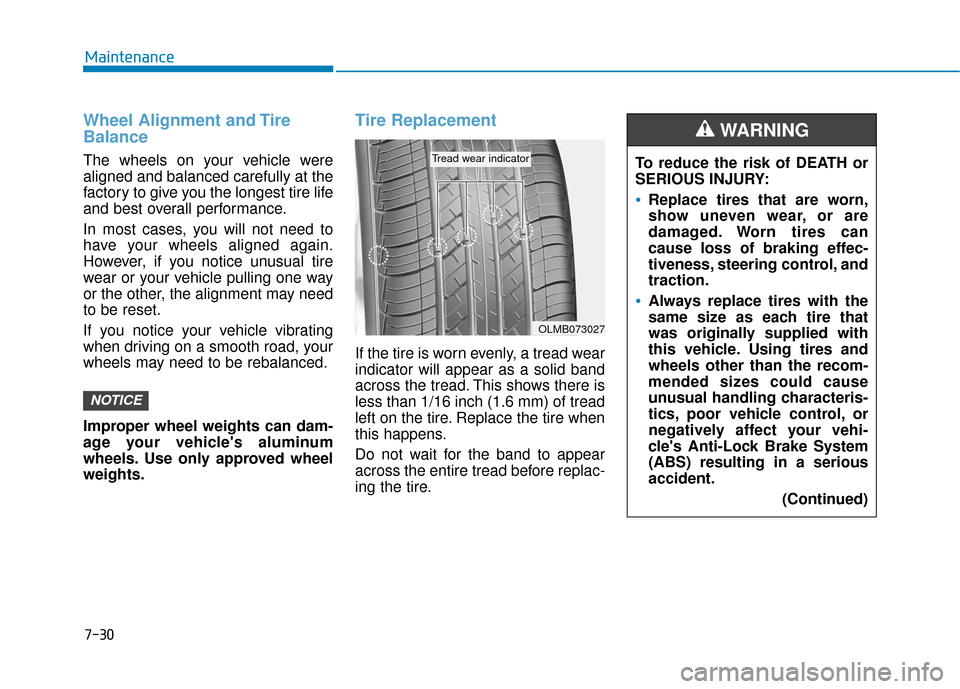
If the tire is worn evenly, a tread wear
indicator will appear as a solid band
across the tread. This shows there is
less than 1/16 inch (1.6 mm) of tread
left on the tire. Replace the tire when
this happens.
Do not wait for the band to appear
across the entire tread before replac-
ing the tire.
NOTICE
OLMB073027
Tread wear indicatorTo reduce the risk of DEATH or
SERIOUS INJURY:
Replace tires that are worn,
show uneven wear, or are
damaged. Worn tires can
cause loss of braking effec-
tiveness, steering control, and
traction.
Always replace tires with the
same size as each tire that
was originally supplied with
this vehicle. Using tires and
wheels other than the recom-
mended sizes could cause
unusual handling characteris-
tics, poor vehicle control, or
negatively affect your vehi-
cle's Anti-Lock Brake System
(ABS) resulting in a serious
accident.(Continued)
WARNING
Page 442 of 541
7-57
7
Maintenance
Headlamp and parking lamp
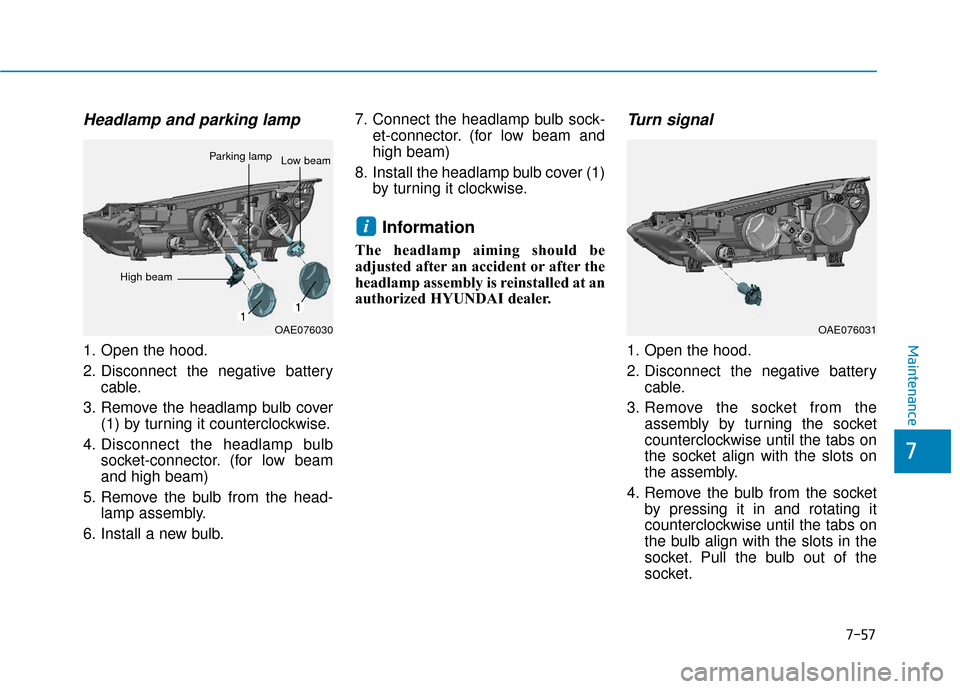
1. Open the hood.
2. Disconnect the negative batterycable.
3. Remove the headlamp bulb cover (1) by turning it counterclockwise.
4. Disconnect the headlamp bulb socket-connector. (for low beam
and high beam)
5. Remove the bulb from the head- lamp assembly.
6. Install a new bulb. 7. Connect the headlamp bulb sock-
et-connector. (for low beam and
high beam)
8. Install the headlamp bulb cover (1) by turning it clockwise.
Information
The headlamp aiming should be
adjusted after an accident or after the
headlamp assembly is reinstalled at an
authorized HYUNDAI dealer.
Turn signal
1. Open the hood.
2. Disconnect the negative batterycable.
3. Remove the socket from the assembly by turning the socket
counterclockwise until the tabs on
the socket align with the slots on
the assembly.
4. Remove the bulb from the socket by pressing it in and rotating it
counterclockwise until the tabs on
the bulb align with the slots in the
socket. Pull the bulb out of the
socket.
i
OAE076030
Parking lampLow beam
OAE076031
High beam
Page 443 of 541
7-58
Maintenance
5. Install a new bulb by inserting it into the socket and rotating it until
it locks into place.
6. Install the socket in the assembly by aligning the tabs on the socket
with the slots in the assembly.
7. Push the socket into the assembly and turn the socket clockwise.
Side marker
1. Open the hood.
2. Disconnect the negative batterycable.
3. Remove the socket from the assembly by turning the socket
counterclockwise until the tabs on
the socket align with the slots on
the assembly.
4. Remove the bulb from the socket by pulling out the bulb.
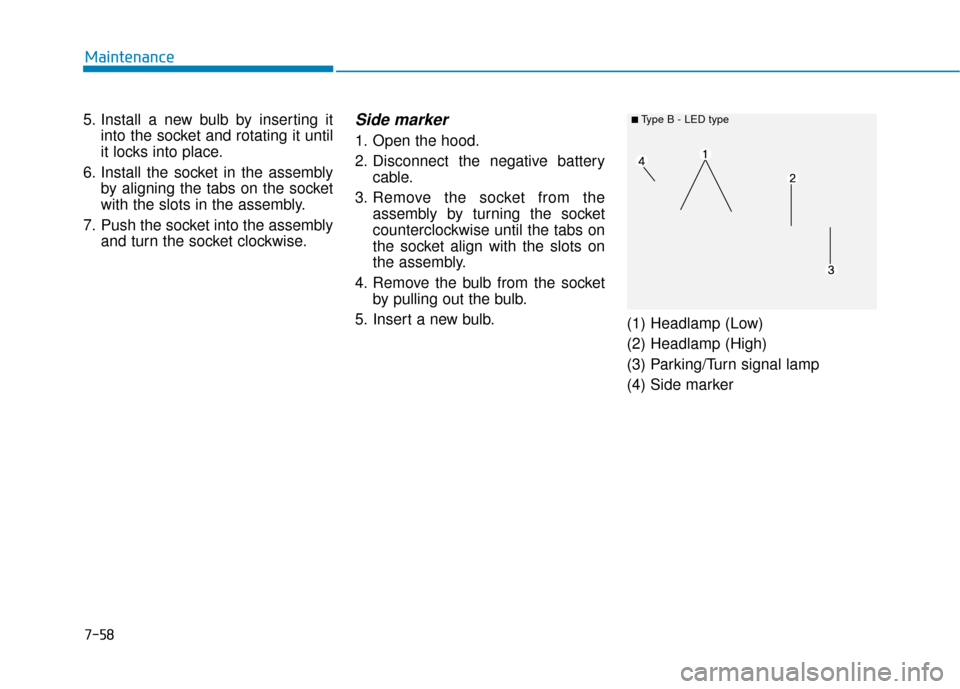
5. Insert a new bulb. (1) Headlamp (Low)
(2) Headlamp (High)
(3) Parking/Turn signal lamp
(4) Side marker
■ Type B - LED type
Page 447 of 541
7-62
Maintenance
Backup lamp
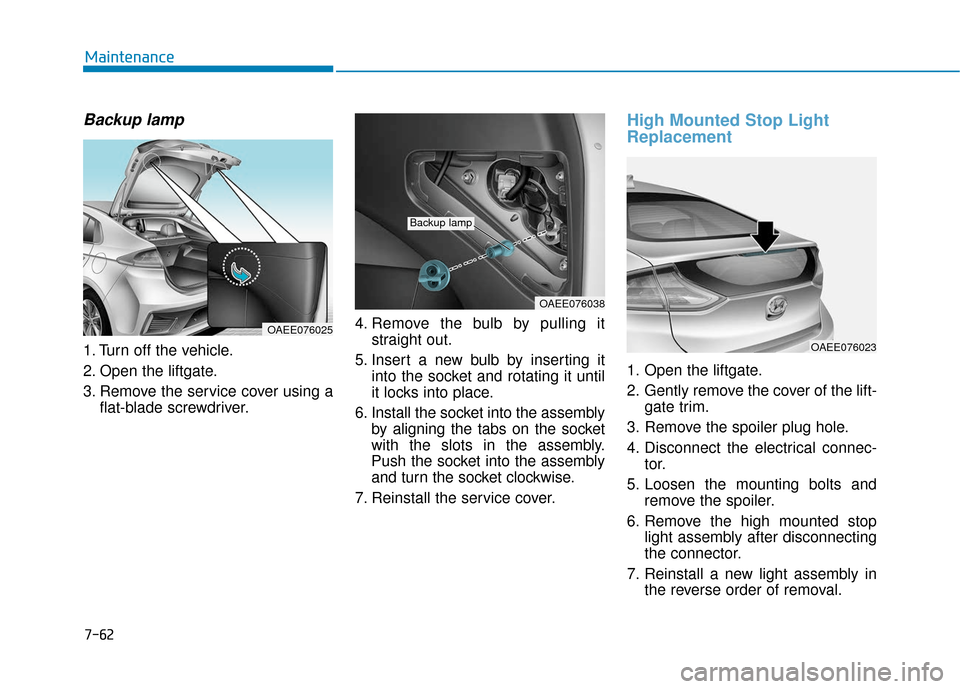
1. Turn off the vehicle.
2. Open the liftgate.
3. Remove the service cover using aflat-blade screwdriver. 4. Remove the bulb by pulling it
straight out.
5. Insert a new bulb by inserting it into the socket and rotating it until
it locks into place.
6. Install the socket into the assembly by aligning the tabs on the socket
with the slots in the assembly.
Push the socket into the assembly
and turn the socket clockwise.
7. Reinstall the service cover.
High Mounted Stop Light
Replacement
1. Open the liftgate.
2. Gently remove the cover of the lift- gate trim.
3. Remove the spoiler plug hole.
4. Disconnect the electrical connec- tor.
5. Loosen the mounting bolts and remove the spoiler.
6. Remove the high mounted stop light assembly after disconnecting
the connector.
7. Reinstall a new light assembly in the reverse order of removal.
OAEE076038
Backup lamp
OAEE076023
OAEE076025
Page 449 of 541
7-64
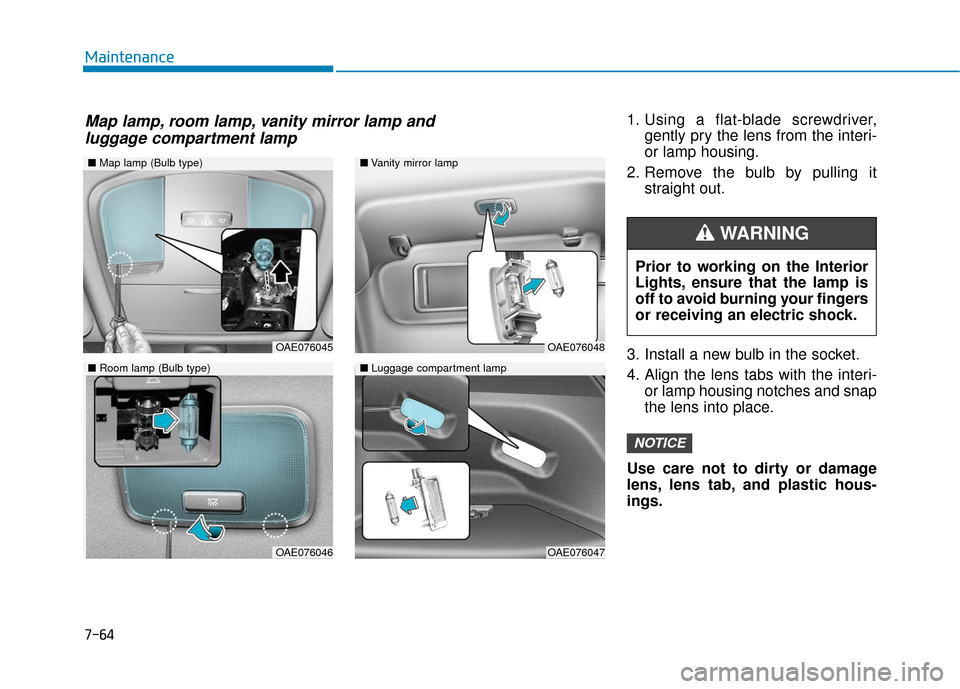
Maintenance1. Using a flat-blade screwdriver,gently pry the lens from the interi-
or lamp housing.
2. Remove the bulb by pulling it straight out.
3. Install a new bulb in the socket.
4. Align the lens tabs with the interi- or lamp housing notches and snap
the lens into place.
Use care not to dirty or damage
lens, lens tab, and plastic hous-
ings.
NOTICE
Prior to working on the Interior
Lights, ensure that the lamp is
off to avoid burning your fingers
or receiving an electric shock.
WARNING
■ Map lamp (Bulb type)
OAE076045
OAE076046
■Vanity mirror lamp
■ Luggage compartment lamp
OAE076048
OAE076047
■Room lamp (Bulb type)
Map lamp, room lamp, vanity mirror lamp and
luggage compartment lamp
Page 457 of 541
7-72
Maintenance
Caring for the leather seats - Vacuum the seat periodically toremove dust and sand on the
seat. It will prevent abrasion or
damage of the leather and main-
tain its quality.
- Wipe the natural leather seat cover often with dry or soft cloth.
- Use of proper leather protective may prevent abrasion of the
cover and helps maintain the
color. Be sure to read the instruc-
tions and consult a specialist
when using leather coating or
protective agent.
- Light colored (beige, cream beige) leather is easily contami-
nated and the stain is noticeable.
Clean the seats frequently.
- Avoid wiping with wet cloth. It may cause the surface to crack. Cleaning the leather seats
- Remove all contaminationsinstantly. Refer to instructions
below for removal of each con-
taminant.
- Cosmetic products (sunscreen, foundation, etc.)
Apply cleansing cream on a cloth
and wipe the contaminate spot.
Wipe off the cream with a wet
cloth and remove water with a dry
cloth.
- Beverages (coffee, soft drink, etc.)
Apply a small amount of neutral
detergent and wipe until contami-
nations do not smear.
- Oil Remove oil instantly with
absorbable cloth and wipe with
stain remover used only for natu-
ral leather.
- Chewing gum Harden the gum with ice and
remove gradually.
Cleaning the seat belt webbing
Clean the belt webbing with any mild
soap solution recommended for
cleaning upholstery or carpet. Follow
the instructions provided with the
soap. Do not bleach or re-dye the
webbing because this may weaken
the seat belt.
Cleaning the interior windowglass
If the interior glass surfaces of the
vehicle become fogged (that is, cov-
ered with an oily, greasy or waxy
film), they should be cleaned with
glass cleaner. Follow the directions
on the glass cleaner container.
Do not scrape or scratch the
inside of the rear window. This
may result in damage to the rear
window defroster grid.
NOTICE
Page 470 of 541
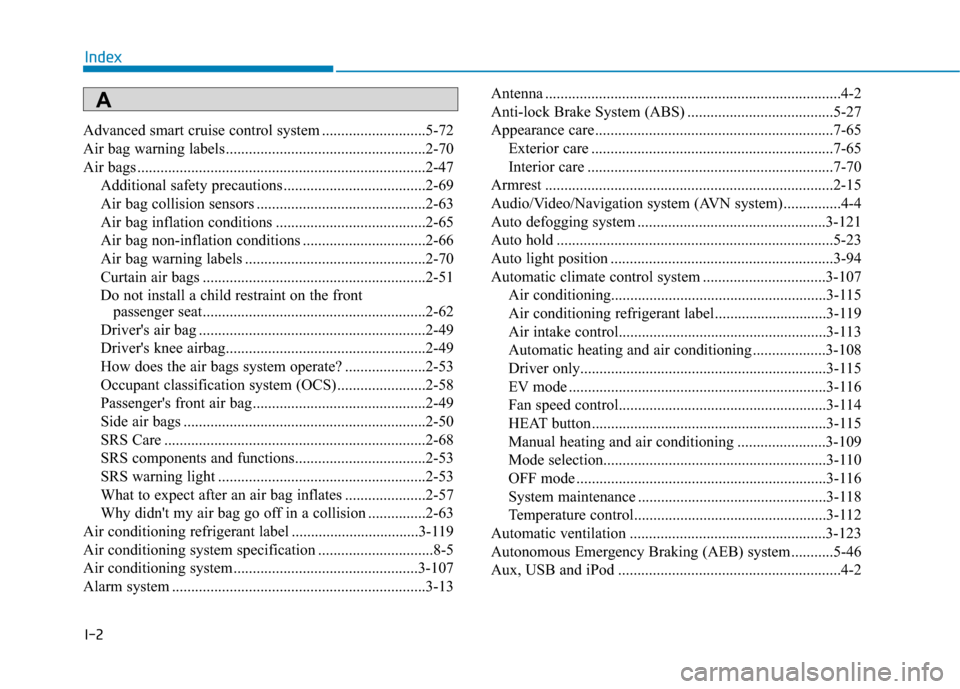
I-2
Advanced smart cruise control system ...........................5-72
Air bag warning labels ....................................................2-70
Air bags ........................................................................\
...2-47Additional safety precautions .....................................2-69
Air bag collision sensors ............................................2-63
Air bag inflation conditions .......................................2-65
Air bag non-inflation conditions ................................2-66
Air bag warning labels ...............................................2-70
Curtain air bags ..........................................................2-51
Do not install a child restraint on the front passenger seat..........................................................2-62
Driver's air bag ...........................................................2-49
Driver's knee airbag....................................................2-49
How does the air bags system operate? .....................2-53
Occupant classification system (OCS) .......................2-58
Passenger's front air bag.............................................2-49
Side air bags ...............................................................2-50
SRS Care ....................................................................2-68\
SRS components and functions..................................2-53
SRS warning light ......................................................2-53
What to expect after an air bag inflates .....................2-57
Why didn't my air bag go off in a collision ...............2-63
Air conditioning refrigerant label .................................3-119
Air conditioning system specification ..............................8-5
Air conditioning system................................................3-107
Alarm system ..................................................................3-13 Antenna ........................................................................\
.....4-2
Anti-lock Brake System (ABS) ......................................5-27
Appearance care..............................................................7-65
Exterior care ...............................................................7-65
Interior care ................................................................7-70
Armrest ........................................................................\
...2-15
Audio/Video/Navigation system (AVN system)...............4-4
Auto defogging system .................................................3-121
Auto hold ........................................................................\
5-23
Auto light position ..........................................................3-94
Automatic climate control system ................................3-107 Air conditioning........................................................\
3-115
Air conditioning refrigerant label.............................3-119
Air intake control......................................................3-113
Automatic heating and air conditioning ...................3-108
Driver only.............................................................\
...3-115
EV mode ...................................................................3-116
Fan speed control......................................................3-114
HEAT button.............................................................3-115
Manual heating and air conditioning .......................3-109
Mode selection..........................................................\
3-110
OFF mode .................................................................3-116
System maintenance .................................................3-118
Temperature control..................................................3-112
Automatic ventilation ...................................................3-123
Autonomous Emergency Braking (AEB) system...........5-46
Aux, USB and iPod ..........................................................4-2
Index
A
Page 471 of 541
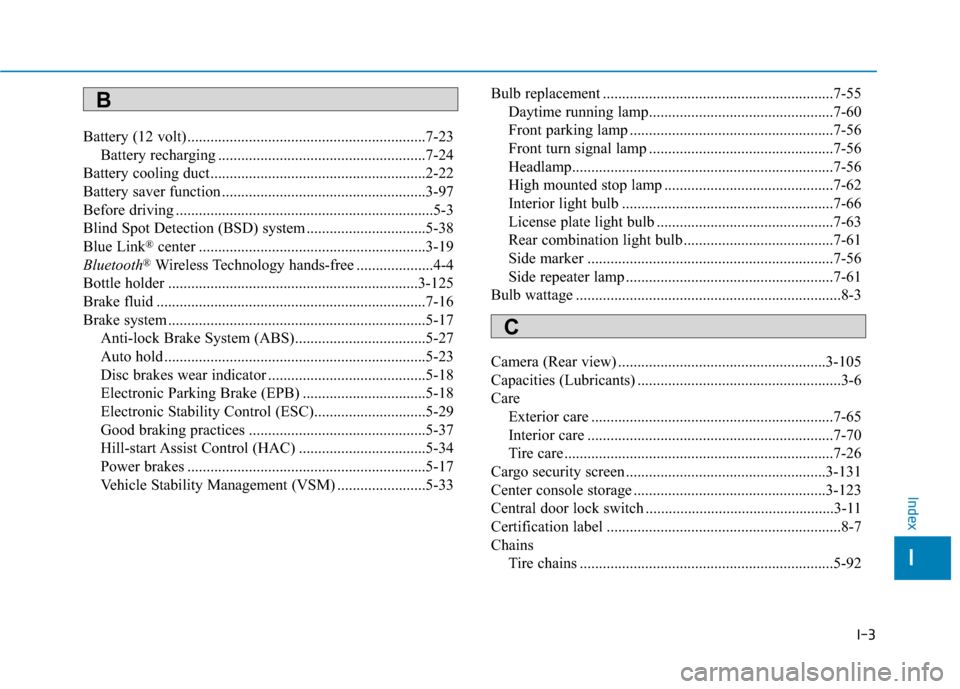
I-3
Battery (12 volt)..............................................................7-23Battery recharging ......................................................7-24
Battery cooling duct........................................................2-22
Battery saver function .....................................................3-97
Before driving ...................................................................5-3
Blind Spot Detection (BSD) system ...............................5-38
Blue Link
®center ...........................................................3-19
Bluetooth®Wireless Technology hands-free ....................4-4
Bottle holder .................................................................3-125
Brake fluid ......................................................................7-\
16
Brake system ...................................................................5-17 Anti-lock Brake System (ABS)..................................5-27
Auto hold ....................................................................5-23\
Disc brakes wear indicator .........................................5-18
Electronic Parking Brake (EPB) ................................5-18
Electronic Stability Control (ESC).............................5-29
Good braking practices ..............................................5-37
Hill-start Assist Control (HAC) .................................5-34
Power brakes ..............................................................5-17
Vehicle Stability Management (VSM) .......................5-33 Bulb replacement ............................................................7-55
Daytime running lamp................................................7-60
Front parking lamp .....................................................7-56
Front turn signal lamp ................................................7-56
Headlamp....................................................................7-56\
High mounted stop lamp ............................................7-62
Interior light bulb .......................................................7-66
License plate light bulb ..............................................7-63
Rear combination light bulb .......................................7-61
Side marker ................................................................7-56
Side repeater lamp ......................................................7-61
Bulb wattage .....................................................................8-3\
Camera (Rear view) ......................................................3-105
Capacities (Lubricants) .....................................................3-6
Care Exterior care ...............................................................7-65
Interior care ................................................................7-70
Tire care ......................................................................7-\
26
Cargo security screen ....................................................3-131
Center console storage ..................................................3-123
Central door lock switch .................................................3-11
Certification label .............................................................8-7
Chains Tire chains ..................................................................5-92
I
Index
B
C