remove seats Hyundai Ioniq Electric 2019 Owner's Manual - RHD (UK, Australia)
[x] Cancel search | Manufacturer: HYUNDAI, Model Year: 2019, Model line: Ioniq Electric, Model: Hyundai Ioniq Electric 2019Pages: 526, PDF Size: 16.63 MB
Page 93 of 526

2-15
Safety system of your vehicle
2
Armrest
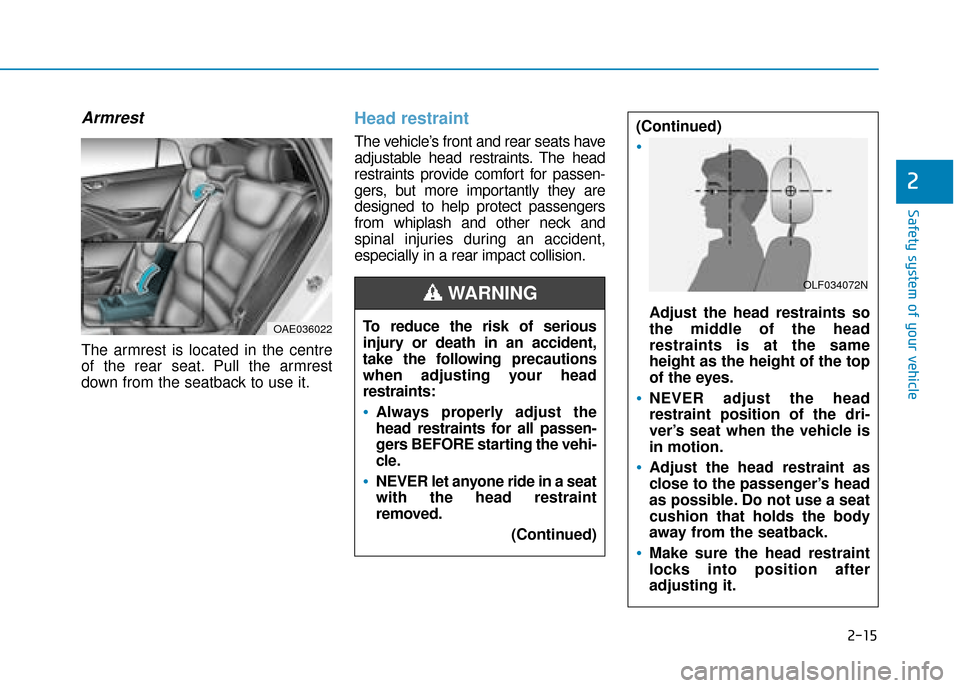
The armrest is located in the centre
of the rear seat. Pull the armrest
down from the seatback to use it.
Head restraint
The vehicle’s front and rear seats have
adjustable head restraints. The head
restraints provide comfort for passen-
gers, but more importantly they are
designed to help protect passengers
from whiplash and other neck and
spinal injuries during an accident,
especially in a rear impact collision.
OAE036022To reduce the risk of serious
injury or death in an accident,
take the following precautions
when adjusting your head
restraints:
Always properly adjust the
head restraints for all passen-
gers BEFORE starting the vehi-
cle.
NEVER let anyone ride in a seat
with the head restraint
removed.(Continued)
(Continued)
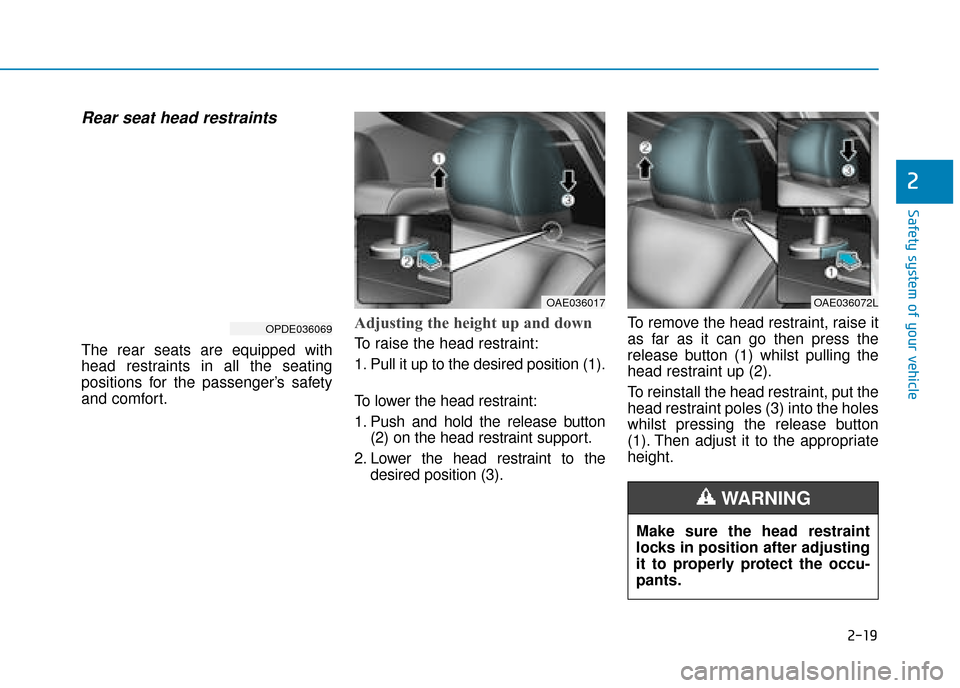
Adjust the head restraints so
the middle of the head
restraints is at the same
height as the height of the top
of the eyes.
NEVER adjust the head
restraint position of the dri-
ver’s seat when the vehicle is
in motion.
Adjust the head restraint as
close to the passenger’s head
as possible. Do not use a seat
cushion that holds the body
away from the seatback.
Make sure the head restraint
locks into position after
adjusting it.
WARNING OLF034072N
Page 97 of 526

2-19
Safety system of your vehicle
2
Rear seat head restraints
The rear seats are equipped with
head restraints in all the seating
positions for the passenger’s safety
and comfort.
Adjusting the height up and down
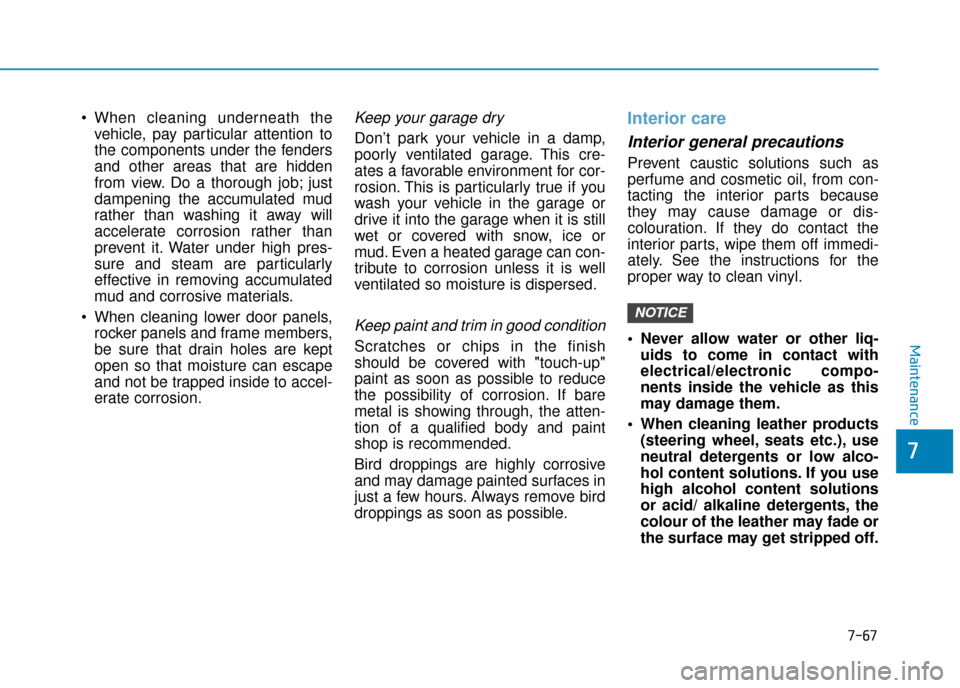
To raise the head restraint:
1. Pull it up to the desired position (1).
To lower the head restraint:
1. Push and hold the release button(2) on the head restraint support.
2. Lower the head restraint to the desired position (3). To remove the head restraint, raise it
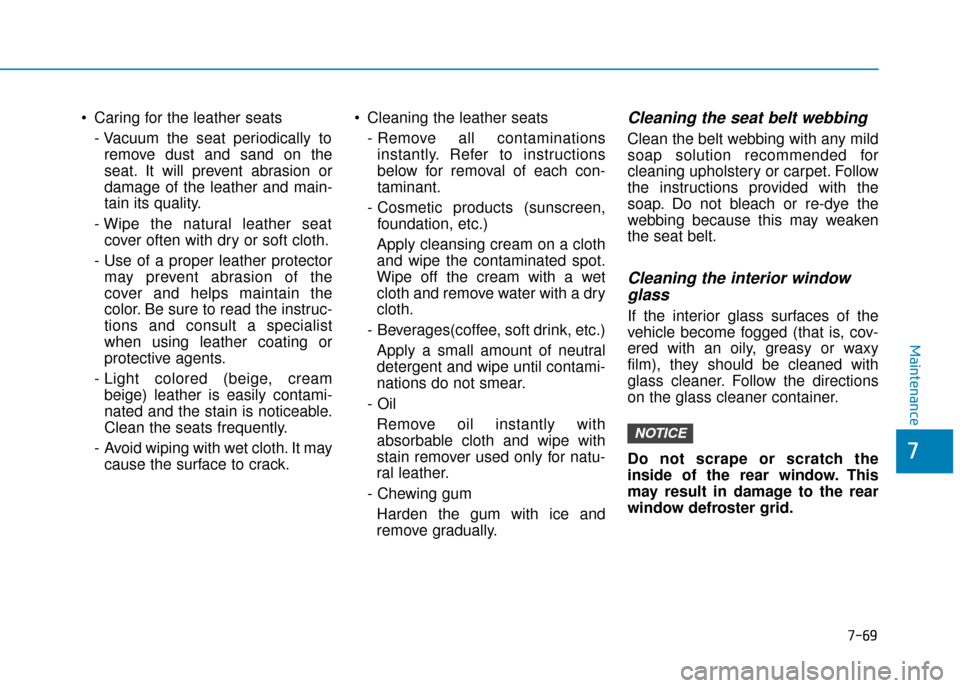
as far as it can go then press the
release button (1) whilst pulling the
head restraint up (2).
To reinstall the head restraint, put the
head restraint poles (3) into the holes
whilst pressing the release button
(1). Then adjust it to the appropriate
height.
OPDE036069
Make sure the head restraint
locks in position after adjusting
it to properly protect the occu-
pants.
WARNING
OAE036017OAE036072L
Page 515 of 526

7-67
7
Maintenance
vehicle, pay particular attention to
the components under the fenders
and other areas that are hidden
from view. Do a thorough job; just
dampening the accumulated mud
rather than washing it away will
accelerate corrosion rather than
prevent it. Water under high pres-
sure and steam are particularly
effective in removing accumulated
mud and corrosive materials.
When cleaning lower door panels, rocker panels and frame members,
be sure that drain holes are kept
open so that moisture can escape
and not be trapped inside to accel-
erate corrosion.Keep your garage dry
Don’t park your vehicle in a damp,
poorly ventilated garage. This cre-
ates a favorable environment for cor-
rosion. This is particularly true if you
wash your vehicle in the garage or
drive it into the garage when it is still
wet or covered with snow, ice or
mud. Even a heated garage can con-
tribute to corrosion unless it is well
ventilated so moisture is dispersed.
Keep paint and trim in good condition
Scratches or chips in the finish
should be covered with "touch-up"
paint as soon as possible to reduce
the possibility of corrosion. If bare
metal is showing through, the atten-
tion of a qualified body and paint
shop is recommended.
Bird droppings are highly corrosive
and may damage painted surfaces in
just a few hours. Always remove bird
droppings as soon as possible.
Interior care
Interior general precautions
Prevent caustic solutions such as
perfume and cosmetic oil, from con-
tacting the interior parts because
they may cause damage or dis-
colouration. If they do contact the
interior parts, wipe them off immedi-
ately. See the instructions for the
proper way to clean vinyl.
Never allow water or other liq-uids to come in contact with
electrical/electronic compo-
nents inside the vehicle as this
may damage them.
When cleaning leather products (steering wheel, seats etc.), use
neutral detergents or low alco-
hol content solutions. If you use
high alcohol content solutions
or acid/ alkaline detergents, the
colour of the leather may fade or
the surface may get stripped off.
NOTICE
Page 517 of 526

Caring for the leather seats- Vacuum the seat periodically toremove dust and sand on the
seat. It will prevent abrasion or
damage of the leather and main-
tain its quality.
- Wipe the natural leather seat cover often with dry or soft cloth.
- Use of a proper leather protector may prevent abrasion of the
cover and helps maintain the
color. Be sure to read the instruc-
tions and consult a specialist
when using leather coating or
protective agents.
- Light colored (beige, cream beige) leather is easily contami-
nated and the stain is noticeable.
Clean the seats frequently.
- Avoid wiping with wet cloth. It may cause the surface to crack. Cleaning the leather seats
- Remove all contaminationsinstantly. Refer to instructions
below for removal of each con-
taminant.
- Cosmetic products (sunscreen, foundation, etc.)
Apply cleansing cream on a cloth
and wipe the contaminated spot.
Wipe off the cream with a wet
cloth and remove water with a dry
cloth.
- Beverages(coffee, soft drink, etc.) Apply a small amount of neutral
detergent and wipe until contami-
nations do not smear.
- Oil Remove oil instantly with
absorbable cloth and wipe with
stain remover used only for natu-
ral leather.
- Chewing gum Harden the gum with ice and
remove gradually.Cleaning the seat belt webbing
Clean the belt webbing with any mild
soap solution recommended for
cleaning upholstery or carpet. Follow
the instructions provided with the
soap. Do not bleach or re-dye the
webbing because this may weaken
the seat belt.
Cleaning the interior windowglass
If the interior glass surfaces of the
vehicle become fogged (that is, cov-
ered with an oily, greasy or waxy
film), they should be cleaned with
glass cleaner. Follow the directions
on the glass cleaner container.
Do not scrape or scratch the
inside of the rear window. This
may result in damage to the rear
window defroster grid.
NOTICE
7-69
7
Maintenance