air condition Hyundai Ioniq Electric 2019 Owner's Manual
[x] Cancel search | Manufacturer: HYUNDAI, Model Year: 2019, Model line: Ioniq Electric, Model: Hyundai Ioniq Electric 2019Pages: 555, PDF Size: 20.1 MB
Page 8 of 555
F8
Introduction
This vehicle is equipped with an
event data recorder (EDR). The
main purpose of an EDR is to
record, in certain crash or near
crash-like situations, such as an
air bag deployment or hitting a
road obstacle, data that will assist
in understanding how a vehicle’s
systems performed. The EDR is
designed to record data related to
vehicle dynamics and safety sys-
tems for a short period of time,
typically 30 seconds or less. The
EDR in this vehicle is designed to
record such data as:
vehicle were operating;
passenger safety belts were
buckled/ fastened;
depressing the accelerator
and/or brake pedal; and,
ing. These data can help provide a bet-
ter understanding of the circum-
stances in which crashes and
injuries occur. NOTE: EDR data
are recorded by your vehicle only
if a non-trivial crash situation
occurs; no data are recorded by
the EDR under normal driving
conditions and no personal data
(e.g., name, gender, age, and
crash location) are recorded.
However, other parties, such as
law enforcement, could combine
the EDR data with the type of per-
sonally identifying data routinely
acquired during a crash investiga-
tion.
To read data recorded by an EDR,
special equipment is required, and
access to the vehicle or the EDR is
needed. In addition to the vehicle
manufacturer, other parties, such
as law enforcement, that have the
special equipment, can read the
information if they have access to
the vehicle or the EDR.
V V
E
EH
H I
IC
C L
LE
E
D
D A
A T
TA
A
C
C O
O L
LL
LE
E C
CT
T I
IO
O N
N
A
A N
N D
D
E
E V
V E
EN
N T
T
D
D A
A T
TA
A
R
R E
EC
CO
O R
RD
D E
ER
R S
S
Page 16 of 555
Safety system of your vehicle
Important Safety Precautions ..............................2-2
Always Wear Your Seat Belt ..........................................2-2
Restrain All Children .........................................................2-2
Air Bag Hazards .................................................................2-2
Driver Distraction ..............................................................2-2
Control Your Speed ...........................................................2-3
Keep Your Vehicle in Safe Condition ............................2-3
Seats ........................................................................\
2-4
Safety Precautions ...........................................................2-5
Front Seats ........................................................................\
.2-6
Rear Seats........................................................................\
.2-12
Head Restraints ...............................................................2-16
Seat warmers ...................................................................2-20
Seat Belts ..............................................................2-23
Seat Belt Safety Precautions .......................................2-23
Seat Belt Warning Light ................................................2-24
Seat Belt Restraint System...........................................2-26
Additional Seat Belt Safety Precautions ...................2-32
Care of Seat Belts...........................................................2-35
Child Restraint System (CRS) .............................2-36
Children Always in the Rear .........................................2-36
Selecting a Child Restraint System (CRS) .................2-37
Installing a Child Restraint System (CRS)..................2-39
Air Bag
- Advanced Supplemental Restraint System.....2-47
Where Are the Air Bags? ..............................................2-49
How Does the Air Bag System Operate?..................2-53
What to Expect After an Air Bag Inflates ................2-57
Occupant Classification System (OCS).......................2-58
Why Didn't My Air Bag Go Off in a Collision? ........2-63
SRS Care ........................................................................\
....2-68
Additional Safety Precautions .....................................2-69
Air Bag Warning Labels .................................................2-70
This chapter provides you with important information about how to protect yourself and your passengers.
It explains how to properly use your seats and seat belts, and how your air bags work.
Additionally, this chapter explains how to properly restrain infants and children in your vehicle.
2
Page 46 of 555
2-31
Safety system of your vehicle
2
The sensor that activates the SRS
air bag is connected with the
pre–tensioner seat belts. The SRS
air bag warning light on the instru-
ment panel will illuminate for
approximately 6 seconds after the
POWER button is in the ON posi-
tion, and then it should turn off.
If the pre-tensioner is not working
properly, the warning light will illu-
minate even if the SRS air bag is
not malfunctioning. If the warning
light does not illuminate, stays
illuminated or illuminates when
the vehicle is being driven, have
an authorized HYUNDAI dealer
inspect the pre-tensioner seat
belts and SRS air bags as soon as
possible. Both the driver's and front pas-
senger's pre-tensioner seat
belts may be activated in certain
frontal or side collisions or
rollovers.
When the pre-tensioner seat belts are activated, a loud noise
may be heard and fine dust,
which may appear to be smoke,
may be visible in the passenger
compartment. These are normal
operating conditions and are not
hazardous.
Although it is non-toxic, the fine dust may cause skin irritation
and should not be breathed for
prolonged periods. Wash all
exposed skin areas thoroughly
after an accident in which the
pre-tensioner seat belts were
activated.
NOTICENOTICE
Fasten your seat belt while
sitting properly in an upright
position to maximize the
effectiveness of the pre-ten-
sioner seat belt system.
A pre-tensioner seat belt sys-
tem is designed to activate
only once. Replace the pre-
tensioner seat belt system, if it
was activated in an accident.
WARNING
Page 59 of 555
2-44
Safety system of your vehicle
Securing a child restraint withlap/shoulder belt
When not using the LATCH system,
all child restraints must be secured to
a vehicle rear seat with the lap part
of a lap/shoulder belt.
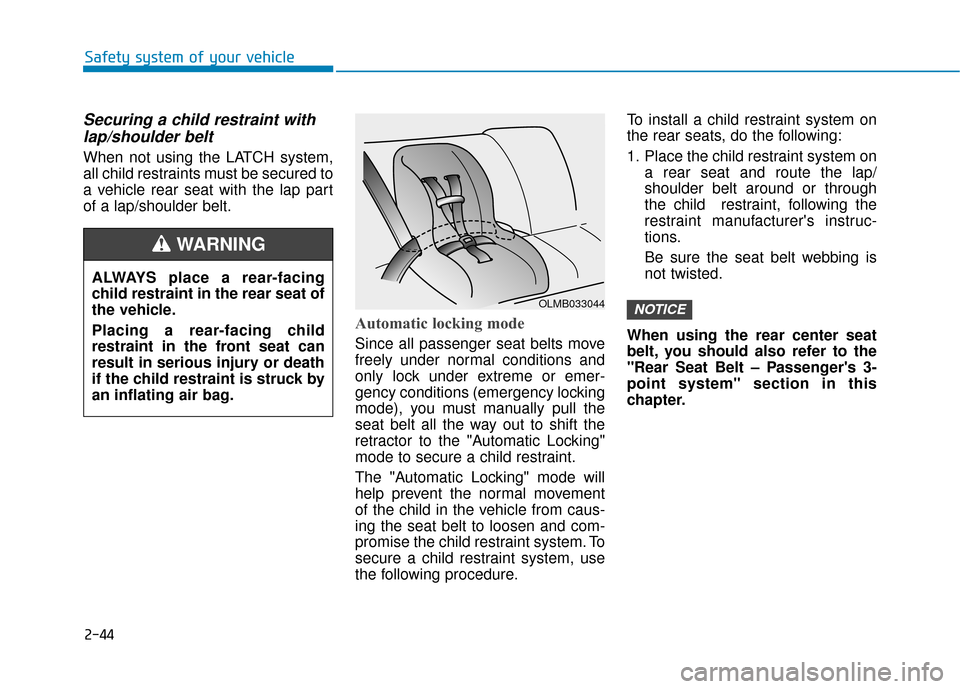
Automatic locking mode
Since all passenger seat belts move
freely under normal conditions and
only lock under extreme or emer-
gency conditions (emergency locking
mode), you must manually pull the
seat belt all the way out to shift the
retractor to the "Automatic Locking"
mode to secure a child restraint.
The "Automatic Locking" mode will
help prevent the normal movement
of the child in the vehicle from caus-
ing the seat belt to loosen and com-
promise the child restraint system. To
secure a child restraint system, use
the following procedure. To install a child restraint system on
the rear seats, do the following:
1. Place the child restraint system on
a rear seat and route the lap/
shoulder belt around or through
the child restraint, following the
restraint manufacturer's instruc-
tions.
Be sure the seat belt webbing is
not twisted.
When using the rear center seat
belt, you should also refer to the
"Rear Seat Belt – Passenger's 3-
point system" section in this
chapter.
NOTICE
ALWAYS place a rear-facing
child restraint in the rear seat of
the vehicle.
Placing a rear-facing child
restraint in the front seat can
result in serious injury or death
if the child restraint is struck by
an inflating air bag.
WARNING
OLMB033044
Page 73 of 555
2-58
Safety system of your vehicle
Occupant Classification
System (OCS)
Your vehicle is equipped with an
Occupant Classification System
(OCS) in the front passenger's seat.
Main components of theOccupant Classification System
A detection device located within
the front passenger seat cushion.
Electronic system to determine whether the passenger air bag
systems should be activated or
deactivated.
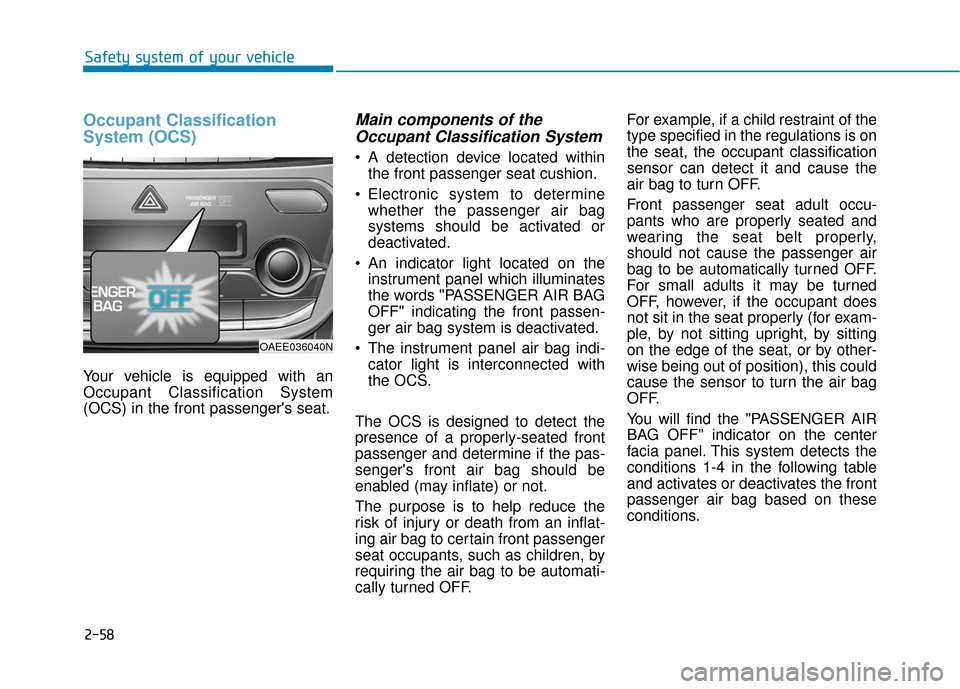
An indicator light located on the instrument panel which illuminates
the words "PASSENGER AIR BAG
OFF" indicating the front passen-
ger air bag system is deactivated.
The instrument panel air bag indi- cator light is interconnected with
the OCS.
The OCS is designed to detect the
presence of a properly-seated front
passenger and determine if the pas-
senger's front air bag should be
enabled (may inflate) or not.
The purpose is to help reduce the
risk of injury or death from an inflat-
ing air bag to certain front passenger
seat occupants, such as children, by
requiring the air bag to be automati-
cally turned OFF. For example, if a child restraint of the
type specified in the regulations is on
the seat, the occupant classification
sensor can detect it and cause the
air bag to turn OFF.
Front passenger seat adult occu-
pants who are properly seated and
wearing the seat belt properly,
should not cause the passenger air
bag to be automatically turned OFF.
For small adults it may be turned
OFF, however, if the occupant does
not sit in the seat properly (for exam-
ple, by not sitting upright, by sitting
on the edge of the seat, or by other-
wise being out of position), this could
cause the sensor to turn the air bag
OFF.
You will find the "PASSENGER AIR
BAG OFF" indicator on the center
facia panel. This system detects the
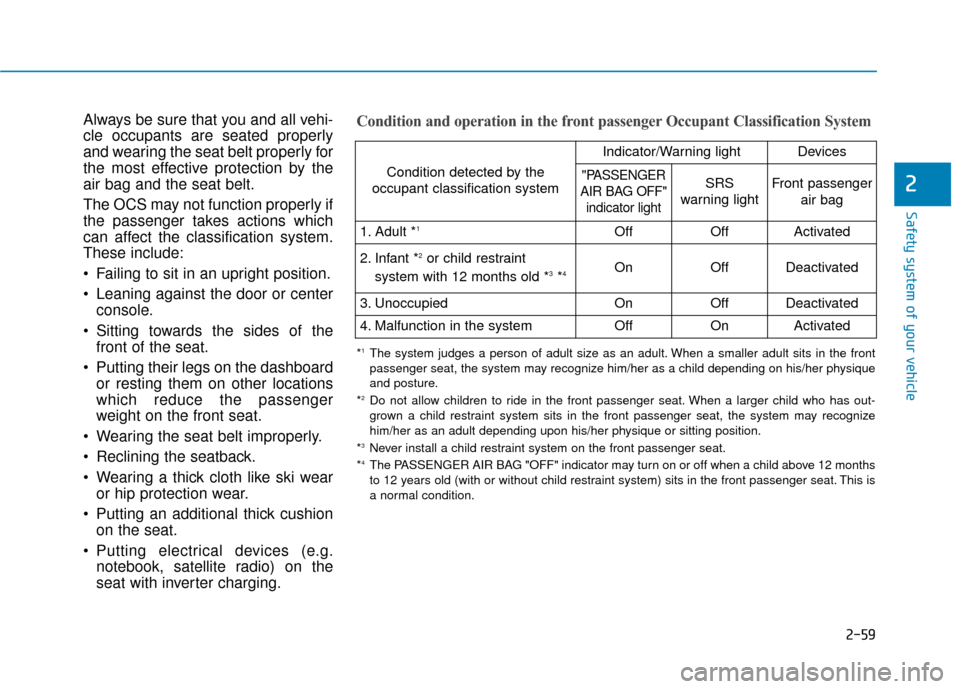
conditions 1-4 in the following table
and activates or deactivates the front
passenger air bag based on these
conditions.
OAEE036040N
Page 74 of 555
2-59
Safety system of your vehicle
2
Always be sure that you and all vehi-
cle occupants are seated properly
and wearing the seat belt properly for
the most effective protection by the
air bag and the seat belt.
The OCS may not function properly if
the passenger takes actions which
can affect the classification system.
These include:
Failing to sit in an upright position.
Leaning against the door or centerconsole.
Sitting towards the sides of the front of the seat.
Putting their legs on the dashboard or resting them on other locations
which reduce the passenger
weight on the front seat.
Wearing the seat belt improperly.
Reclining the seatback.
Wearing a thick cloth like ski wear or hip protection wear.
Putting an additional thick cushion on the seat.
Putting electrical devices (e.g. notebook, satellite radio) on the
seat with inverter charging.Condition and operation in the front passenger Occupant Classification System
Condition detected by the
occupant classification system
Indicator/Warning lightDevices
"PASSENGER
AIR BAG OFF" indicator lightSRS
warning lightFront passenger
air bag
1. Adult *1OffOffActivated
2. Infant *2or child restraint
system with 12 months old *3*4 OnOffDeactivated
3. Unoccupied OnOffDeactivated
4. Malfunction in the systemOffOnActivated
*1The system judges a person of adult size as an adult. When a smaller adult sits in the front
passenger seat, the system may recognize him/her as a child depending on his/her physique
and posture.
*
2Do not allow children to ride in the front passenger seat. When a larger child who has out- grown a child restraint system sits in the front passenger seat, the system may recognize
him/her as an adult depending upon his/her physique or sitting position.
*
3Never install a child restraint system on the front passenger seat.
*4The PASSENGER AIR BAG "OFF" indicator may turn on or off when a child above 12 months
to 12 years old (with or without child restraint system) sits in the front passenger seat. This is
a normal condition.
Page 80 of 555
2-65
Safety system of your vehicle
2
Air bag inflation conditions
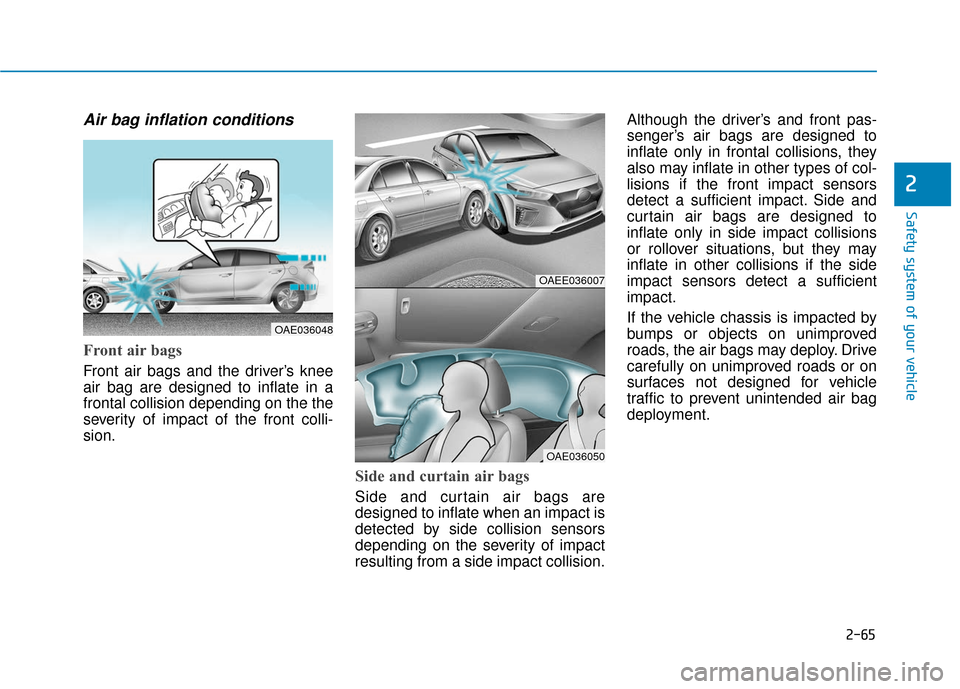
Front air bags
Front air bags and the driver’s knee
air bag are designed to inflate in a
frontal collision depending on the the
severity of impact of the front colli-
sion.
Side and curtain air bags
Side and curtain air bags are
designed to inflate when an impact is
detected by side collision sensors
depending on the severity of impact
resulting from a side impact collision.Although the driver’s and front pas-
senger’s air bags are designed to
inflate only in frontal collisions, they
also may inflate in other types of col-
lisions if the front impact sensors
detect a sufficient impact. Side and
curtain air bags are designed to
inflate only in side impact collisions
or rollover situations, but they may
inflate in other collisions if the side
impact sensors detect a sufficient
impact.
If the vehicle chassis is impacted by
bumps or objects on unimproved
roads, the air bags may deploy. Drive
carefully on unimproved roads or on
surfaces not designed for vehicle
traffic to prevent unintended air bag
deployment.
OAEE036007
OAE036050
OAE036048
Page 81 of 555
2-66
Safety system of your vehicle
Air bag non-inflation conditions
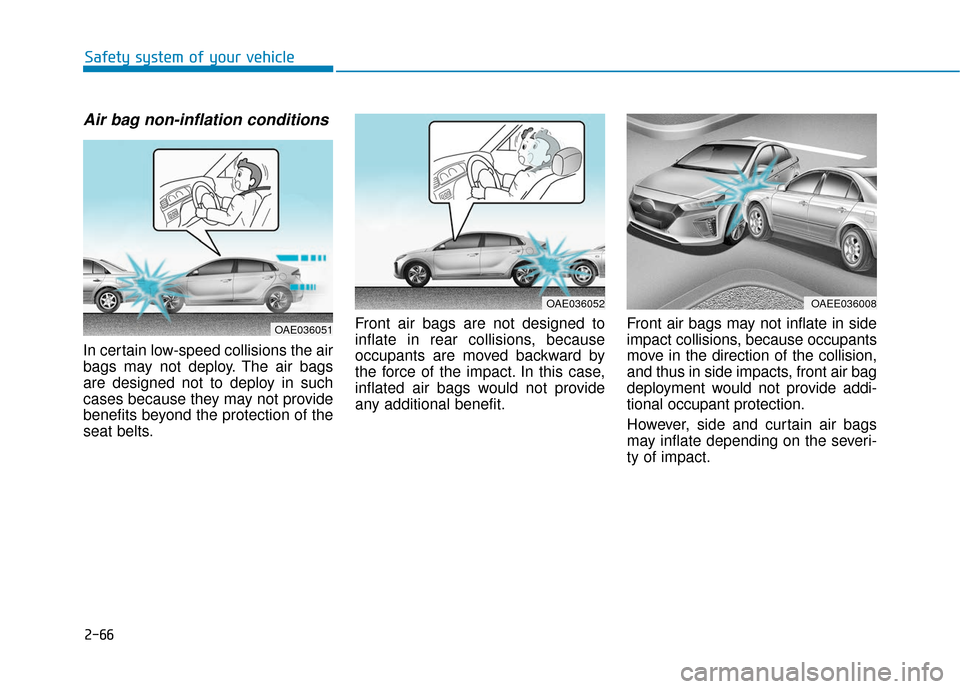
In certain low-speed collisions the air
bags may not deploy. The air bags
are designed not to deploy in such
cases because they may not provide
benefits beyond the protection of the
seat belts.Front air bags are not designed to
inflate in rear collisions, because
occupants are moved backward by
the force of the impact. In this case,
inflated air bags would not provide
any additional benefit.
Front air bags may not inflate in side
impact collisions, because occupants
move in the direction of the collision,
and thus in side impacts, front air bag
deployment would not provide addi-
tional occupant protection.
However, side and curtain air bags
may inflate depending on the severi-
ty of impact.
OAE036052
OAE036051
OAEE036008
Page 87 of 555
Wipers and Washers..........................................3-108
Windshield Wipers ........................................................3-108
Windshield Washers .....................................................3-109
Driver Assist System .........................................3-110
Rear View Monitor .......................................................3-110
Defroster .............................................................3-111
Rear Window Defroster ..............................................3-111
Automatic Climate Control System ..................3-112
Automatic Heating and Air Conditioning.................3-113
Manual Heating and Air Conditioning......................3-114
System Operation .........................................................3-122
System Maintenance....................................................3-123
Windshield Defrosting and Defogging ............3-125
To Defog Inside Windshield ........................................3-125
To Defrost Outside Windshield ..................................3-126
Defogging Logic ............................................................3-126
Auto Defogging System ..............................................3-126
Climate Control Additional Features ...............3-128
Automatic Ventilation ...................................................3-128
Storage Compartment .......................................3-128
Center Console Storage ..............................................3-128
Glove Box ........................................................................\
3-129
Sunglass Holder.............................................................3-129
Multi Box ........................................................................\
.3-130
Interior Features ................................................3-130
Cup Holder ......................................................................3-\
130
Sunvisor ........................................................................\
...3-131
Power Outlet ..................................................................3-132
Wireless Cellular Phone Charging System..............3-133
Clock ........................................................................\
.........3-135
Clothes Hanger ..............................................................3-135
Floor Mat Anchor(s).....................................................3-136
Cargo Security Screen .................................................3-137
3
Page 107 of 555
3-22
Convenient features of your vehicle
To adjust the Zone setting:
1. Determine the desired Zone Number based upon your current
location on the Zone Map.
2. Press and hold the button for 6 seconds, the current Zone
Number will appear on the display.
3. Pressing and holding the button again will cause the numbers to
increment (Note: they will repeat
…13, 14, 15, 1, 2, …). Releasing
the button when the desired Zone
Number appears on the display
will set the new Zone.
4. Within about 5 seconds the com- pass will start displaying a com-
pass heading again.
There are some conditions that can
cause changes to the vehicle mag-
nets, such as installing a ski rack or
a CB antenna. Body repair work on
the vehicle can also cause changes
to the vehicle’s magnetic field. In
these situations, the compass will
need to be re-calibrated to quickly
correct these changes. If you need to recalibrate the com-
pass:
1. Press and hold the button for
more than 9 seconds. When the
compass memory is cleared a "C"
will appear in the display.
2. Drive the vehicle in 2 complete cir- cles at less than 5 mph (8 km/h).
Integrated HomeLink®Wireless
Control System
The HomeLink®Wireless Control
System can replace up to three
hand-held radio-frequency (RF)
transmitters with a single built-in
device. This innovative feature will
learn the radio frequency codes of
most current transmitters to operate
devices such as gate operators,
garage door openers, entry door
locks, security systems, even home
lighting. Both standard and rolling
code-equipped transmitters can be
programmed by following the out-
lined procedures.
Additional HomeLink
®information
can be found at: www.homelink.com
or by calling 1-800-355-3515.
Retain the original transmitter of the
RF device you are programming for
use in other vehicles as well as for
future HomeLink
®programming. It is
also suggested that upon the sale of
the vehicle, the programmed
HomeLink
®buttons be erased for
security purposes.