navigation Hyundai Ioniq Electric 2019 Owner's Manual
[x] Cancel search | Manufacturer: HYUNDAI, Model Year: 2019, Model line: Ioniq Electric, Model: Hyundai Ioniq Electric 2019Pages: 555, PDF Size: 20.1 MB
Page 104 of 555
3-19
Convenient features of your vehicle
3
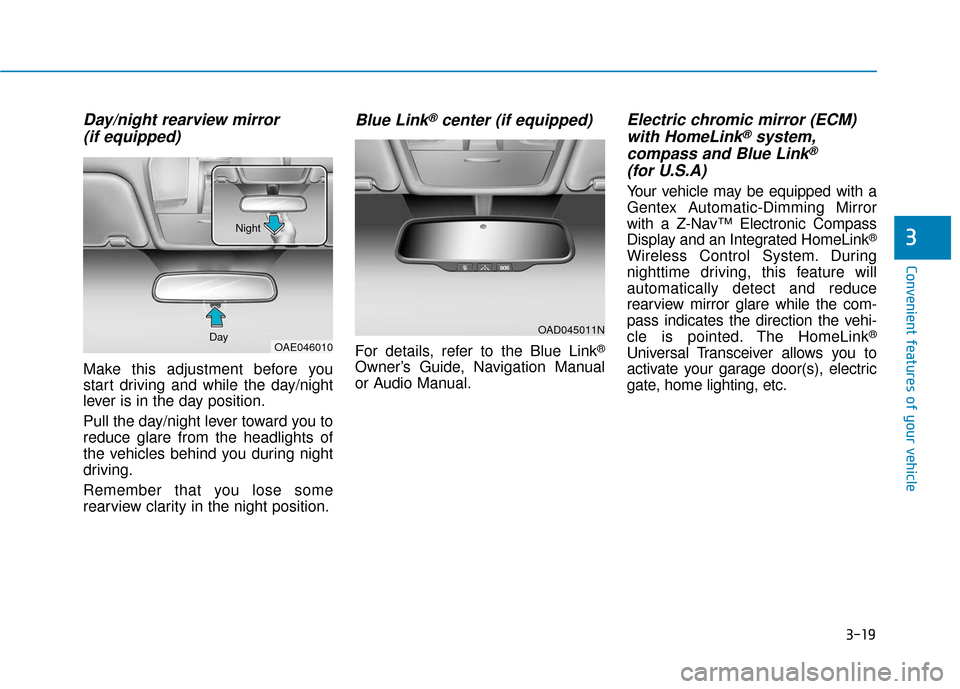
Day/night rearview mirror (if equipped)
Make this adjustment before you
start driving and while the day/night
lever is in the day position.
Pull the day/night lever toward you to
reduce glare from the headlights of
the vehicles behind you during night
driving.
Remember that you lose some
rearview clarity in the night position.
Blue Link®center (if equipped)
For details, refer to the Blue Link®
Owner’s Guide, Navigation Manual
or Audio Manual.
Electric chromic mirror (ECM)with HomeLink®system,
compass and Blue Link®
(for U.S.A)
Your vehicle may be equipped with a
Gentex Automatic-Dimming Mirror
with a Z-Nav™ Electronic Compass
Display and an Integrated HomeLink
®
Wireless Control System. During
nighttime driving, this feature will
automatically detect and reduce
rearview mirror glare while the com-
pass indicates the direction the vehi-
cle is pointed. The HomeLink
®
Universal Transceiver allows you to
activate your garage door(s), electric
gate, home lighting, etc.
OAD045011N
OAE046010
Day Night
Page 166 of 555
3-81
Convenient features of your vehicle
3
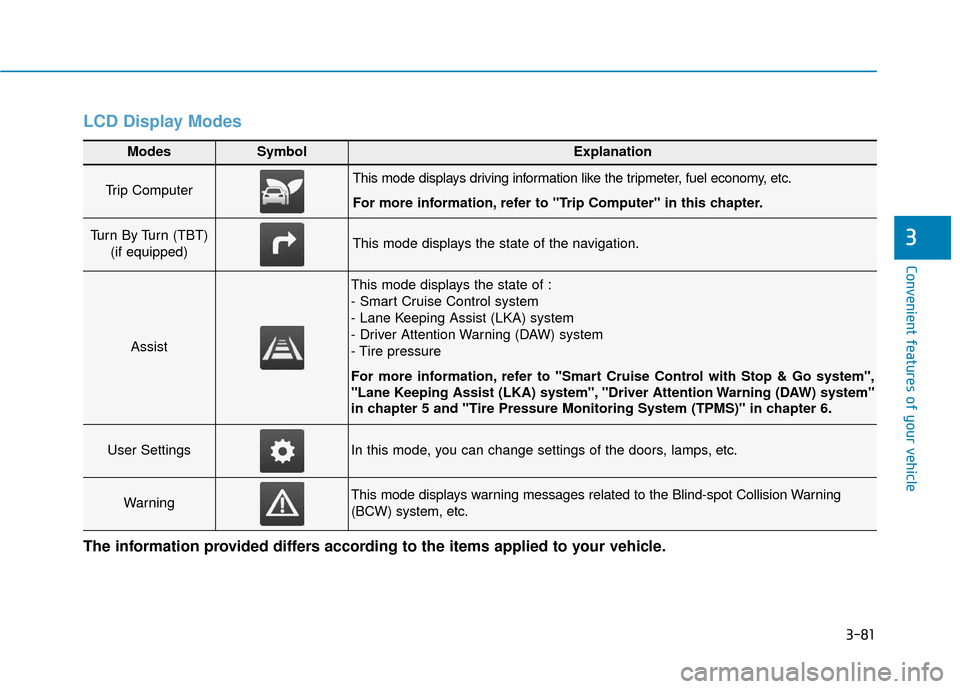
LCD Display Modes
Modes SymbolExplanation
Trip Computer This mode displays driving information like the tripmeter, fuel economy, etc.
For more information, refer to "Trip Computer" in this chapter.
Turn By Turn (TBT) (if equipped)This mode displays the state of the navigation.
Assist
This mode displays the state of :
- Smart Cruise Control system
- Lane Keeping Assist (LKA) system
- Driver Attention Warning (DAW) system
- Tire pressure
For more information, refer to "Smart Cruise Control with Stop & Go system",
"Lane Keeping Assist (LKA) system", "Driver Attention Warning (DAW) system"
in chapter 5 and "Tire Pressure Monitoring System (TPMS)" in chapter 6.
User SettingsIn this mode, you can change settings of the doors, lamps, etc.
WarningThis mode displays warning messages related to the Blind-spot Collision Warning
(BCW) system, etc.
The information provided differs according to the items applied to your vehicle.
Page 167 of 555
3-82
Convenient features of your vehicle
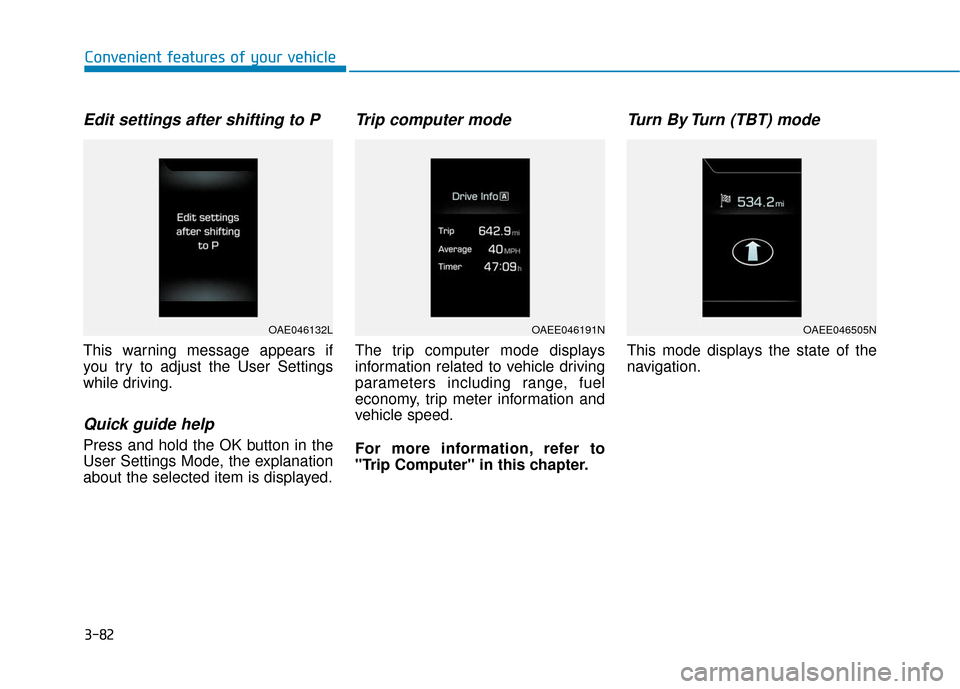
Edit settings after shifting to P
This warning message appears if
you try to adjust the User Settings
while driving.
Quick guide help
Press and hold the OK button in the
User Settings Mode, the explanation
about the selected item is displayed.
Trip computer mode
The trip computer mode displays
information related to vehicle driving
parameters including range, fuel
economy, trip meter information and
vehicle speed.
For more information, refer to
"Trip Computer" in this chapter.
Turn By Turn (TBT) mode
This mode displays the state of the
navigation.
OAE046132LOAEE046191NOAEE046505N
Page 220 of 555
![Hyundai Ioniq Electric 2019 Owners Manual 3-135
Convenient features of your vehicle
3
ClockVehicles with Audio system
Select the [SETUP]button on the
audio system ➟ Select [Date/Time].
Set time : Set the time displayed on the audio screen. Hyundai Ioniq Electric 2019 Owners Manual 3-135
Convenient features of your vehicle
3
ClockVehicles with Audio system
Select the [SETUP]button on the
audio system ➟ Select [Date/Time].
Set time : Set the time displayed on the audio screen.](/img/35/14897/w960_14897-219.png)
3-135
Convenient features of your vehicle
3
ClockVehicles with Audio system
Select the [SETUP]button on the
audio system ➟ Select [Date/Time].
Set time : Set the time displayed on the audio screen.
Time format : Choose between 12- hour and 24-hour time formats.
Vehicles with Navigation system
Select the Settings menu on the
Navigation system ➟Select
[Date/Time].
GPS time : Displays time according to the received GNSS time.
24-hour : Switches to 12 hour or 24 hour.
Clothes Hanger (if equipped)
These hangers are not designed to
hold large or heavy items.
OAEE046434
Do not adjust the clock while
driving, you may lose your
steering control and cause an
accident that results in severe
personal injury or death.
WARNING
Page 224 of 555
Multimedia System
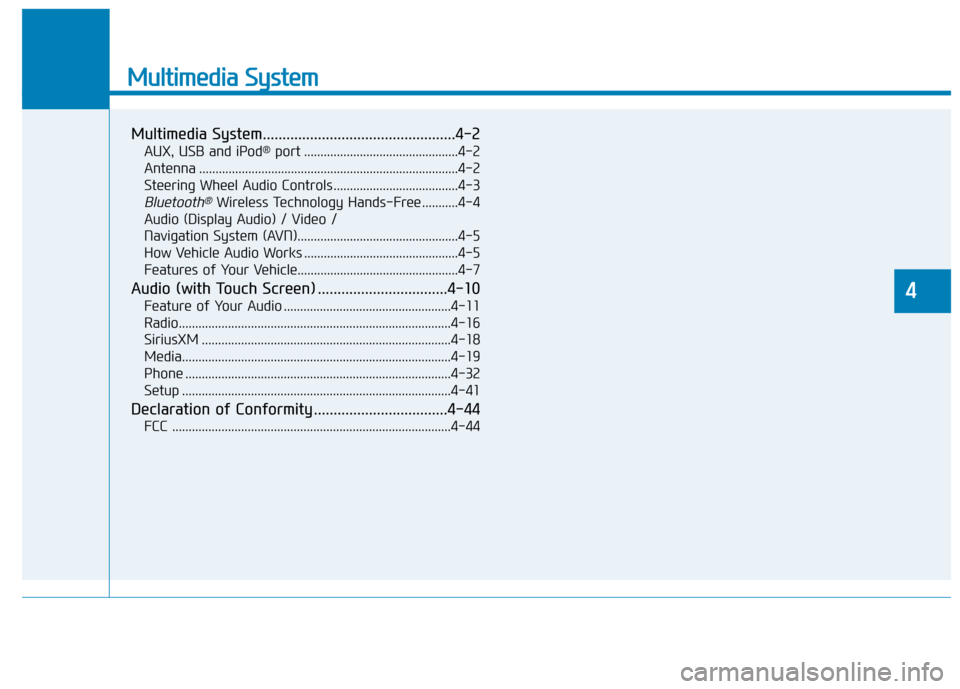
Multimedia System.................................................4-2
AUX, USB and iPod®port ...............................................4-2
Antenna ........................................................................\
.......4-2
Steering Wheel Audio Controls ......................................4-3
Bluetooth®Wireless Technology Hands-Free ...........4-4
Audio (Display Audio) / Video /
Navigation System (AVN).................................................4-5
How Vehicle Audio Works ...............................................4-5
Features of Your Vehicle.................................................4-7
Audio (with Touch Screen) .................................4-10
Feature of Your Audio ...................................................4-11
Radio........................................................................\
...........4-16
SiriusXM ........................................................................\
....4-18
Media........................................................................\
..........4-19
Phone ........................................................................\
.........4-32
Setup ........................................................................\
..........4-41
Declaration of Conformity ..................................4-44
FCC ....................................................................\
.................4-44
4
Page 228 of 555
Detailed information for the
Bluetooth®Wireless Technology
hands-free is described later in this
chapter or in the Car Multimedia
User's Manual.
Audio (Display Audio) / Video /
Navigation System (AVN)
(if equipped)
Detailed information for the AVN sys-
tem is described in the Car
Multimedia User's Manual.
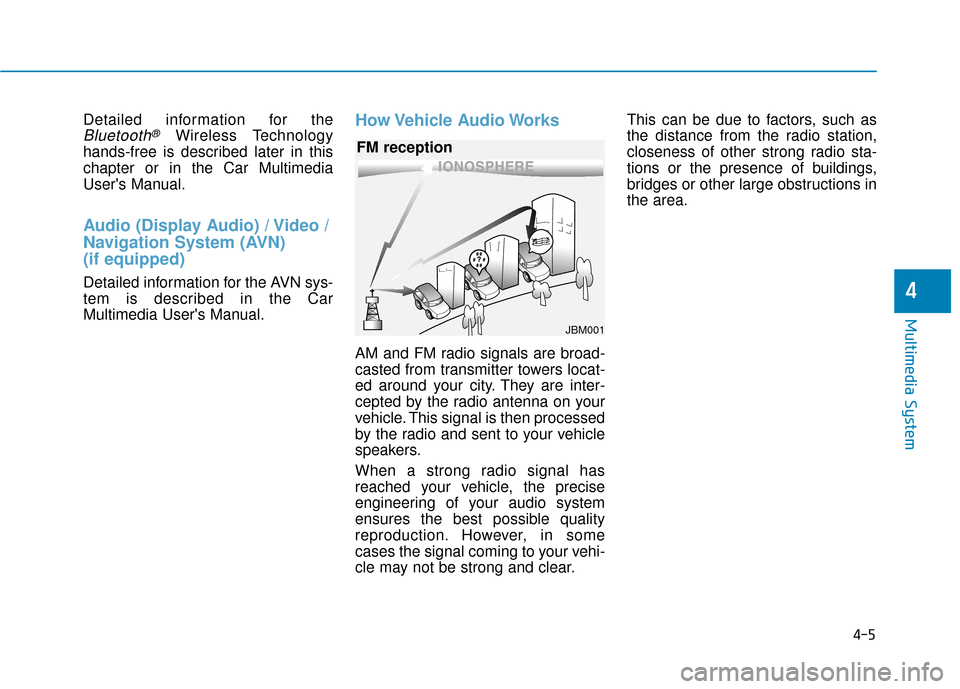
How Vehicle Audio Works
AM and FM radio signals are broad-
casted from transmitter towers locat-
ed around your city. They are inter-
cepted by the radio antenna on your
vehicle. This signal is then processed
by the radio and sent to your vehicle
speakers.
When a strong radio signal has
reached your vehicle, the precise
engineering of your audio system
ensures the best possible quality
reproduction. However, in some
cases the signal coming to your vehi-
cle may not be strong and clear. This can be due to factors, such as
the distance from the radio station,
closeness of other strong radio sta-
tions or the presence of buildings,
bridges or other large obstructions in
the area.
4-5
Multimedia System
4
JBM001
FM reception
Page 385 of 555
6-12
What to do in an emergency
The TPMS Malfunction Indicator
may illuminate after blinking for
one minute if the vehicle is near
electric power supply cables or
radio transmitters such as police
stations, government and public
offices, broadcasting stations,
military installations, airports,
transmitting towers, etc.
Additionally, the TPMS Malfunction
Indicator may illuminate if snow
chains are used or electronic
devices such as computers, charg-
ers, remote starters, navigation,
etc. This may interfere with normal
operation of the TPMS.
Changing a Tire with TPMS
If you have a flat tire, the Low Tire
Pressure and LCD position indicator
will come on. Have the flat tire
repaired by an authorized HYUNDAI
dealer as soon as possible or
replace the flat tire with the spare
tire. Once the original tire equipped with
a tire pressure monitoring sensor is
reinflated to the recommended pres-
sure and reinstalled on the vehicle,
the Low Tire Pressure LCD position
indicator and TPMS Malfunction
Indicator will go off within a few min-
utes of driving.
If the indicators do not disappear
after a few minutes, please visit an
authorized HYUNDAI dealer.
Each wheel is equipped with a tire
pressure sensor mounted inside the
tire behind the valve stem. You must
use TPMS specific wheels. It is rec-
ommended that you always have
your tires serviced by an authorized
HYUNDAI dealer.
NOTICE
Never use a puncture-repairing
agent not approved by HYUNDAI
dealer to repair and/or inflate a
low pressure tire. Tire sealant
not approved by HYUNDAI deal-
er may damage the tire pressure
sensor.
CAUTION
Page 444 of 555
7-47
7
Maintenance
Fuse NameFuse RatingProtected Component
MODULE510AElectro Chromic Mirror, Audio, Driver IMS Module, Rear Seat Warmer Module, DBL Unit, VESS Unit,
Front Seat Warmer Control Module, Head Lamp LH/RH, Front Air Ventilation Seat Control Module
MODULE410ALane Keeping Assist Unit, Crash Pad Switch, Electric Parking Brake Unit FCA Unit,
Blind-spot Collision Warning (BCW) Radar LH/RH
INTERIORLAMP10AFront Vanity Lamp LH/RH, Room Lamp, Overhead Console Lamp, Luggage Lamp, Wireless Charger Unit
A/BAG 15ASRS Control Module, Occupant Detection Sensor
E-SHIFTER110ASBW Switch, Front Console Switch
IG125APCB Block (Fuse - AHB3, EPCU2)
CLUSTER10AInstrument Cluster
MODULE310ABCM, Stop Lamp Switch, Driver Door Module, Passenger Door Module
IG3 210AIPS Control Module, Main Battery Charging Switch, Charge Lamp, PTC Heater,
A/V & Navigation Head Unit, Instrument Cluster, A/C Control Module, Audio
MEMORY27.5AActive Air Flap
A/BAG IND7.5AInstrument Cluster
START7.5AEPCU, Smart Key Control Module
Instrument panel fuse panel
Page 445 of 555
7-48
Maintenance
Fuse NameFuse RatingProtected Component
MODULE210AE/R Junction Block (Power Outlet Relay), Wireless Charger Unit, SBW Switch, BCM, USB Charging,
Smart Key Control Module, Audio, A/V & Navigation Head Unit, Power Outside Mirror Switch, AMP
PDM37.5ASmart Key Control Module
MEMORY110AAuto Light & Photo Sensor, Driver IMS Module, BCM, A/C Control Module, Instrument Cluster,
Passenger Door Module, Driver Door Module, Electro Chromic Mirror Relay Box
(Outside Mirror Folding/Unfolding Relay)
MULTIMEDIA10AA/V & Navigation Head Unit, Audio
E-SHIFTER210ASCU
IG3 310ACCM Unit
IG3 120AICM Relay Box
MDPS7.5AMDPS Unit
T/GATE10ATail Gate Relay, Main Battery Charging Switch, Quick Charging Connector Door Lock/Unlock Actuator
PDM115ASmart Key Control Module
MODULE77.5AFront Seat Warmer Control Module, Front Air Ventilation Seat Control Module, Rear Seat Warmer Module
HTD STRG15ABCM
Instrument panel fuse panel
Page 490 of 555
H10
E
EV
V
M
M O
OD
DE
E
(
( C
C O
O N
NT
T.
.)
)
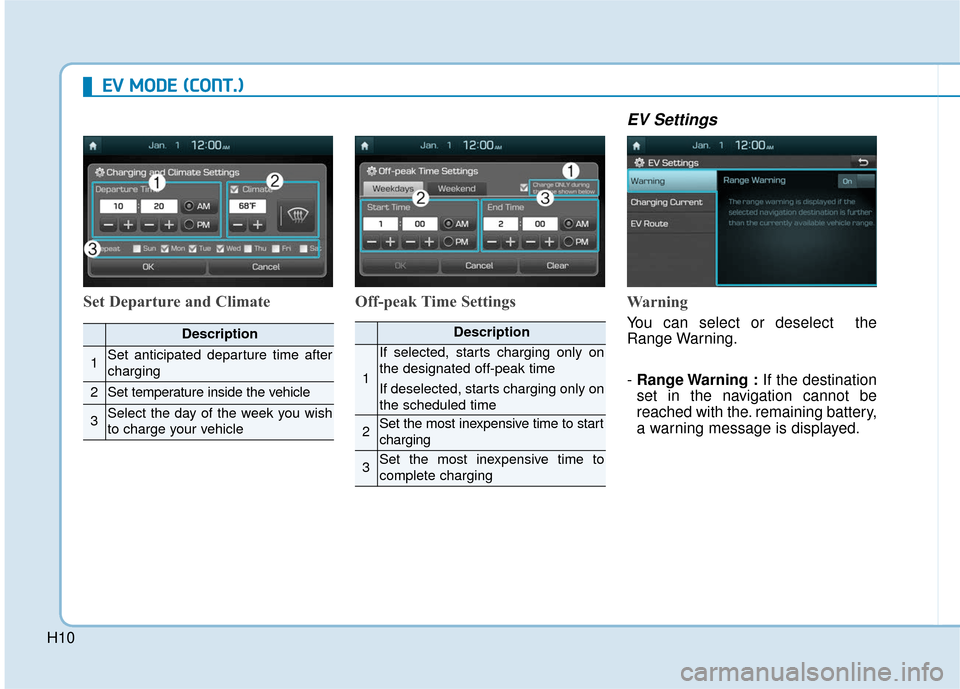
Set Departure and Climate Off-peak Time Settings
EV Settings
Warning
You can select or deselect the
Range Warning.
- Range Warning : If the destination
set in the navigation cannot be
reached with the. remaining battery,
a warning message is displayed.Description
1Set anticipated departure time after
charging
2Set temperature inside the vehicle
3Select the day of the week you wish
to charge your vehicle
Description
1
If selected, starts charging only on
the designated off-peak time
If deselected, starts charging only on
the scheduled time
2Set the most inexpensive time to start
charging
3Set the most inexpensive time to
complete charging