radio HYUNDAI IONIQ ELECTRIC 2022 Owners Manual
[x] Cancel search | Manufacturer: HYUNDAI, Model Year: 2022, Model line: IONIQ ELECTRIC, Model: HYUNDAI IONIQ ELECTRIC 2022Pages: 546, PDF Size: 34.82 MB
Page 2 of 546
F2Your HYUNDAI should not be modified in any way. Such modifications may adversely affect
the performance, safety or durability of your HYUNDAI and may, in addition, violate condi-
tions of the limited warranties covering the vehicle. Certain modifications may also be in vio-
lation of regulations established by the Department of Transportation and other government
agencies in your country.
Your vehicle is equipped with electronic fuel injection and other electronic components. It is
possible for an improperly installed/adjusted two-way radio or cellular telephone to adversely
affect electronic systems. For this reason, we recommend that you carefully follow the radio
manufacturer's instructions or consult your HYUNDAI dealer for precautionary measures or
special instructions if you choose to install one of these devices.
CAUTION: MODIFICATIONS TO YOUR HYUNDAI
TWO-WAY RADIO OR CELLULAR TELEPHONE INSTALLATION
Page 32 of 546
H23
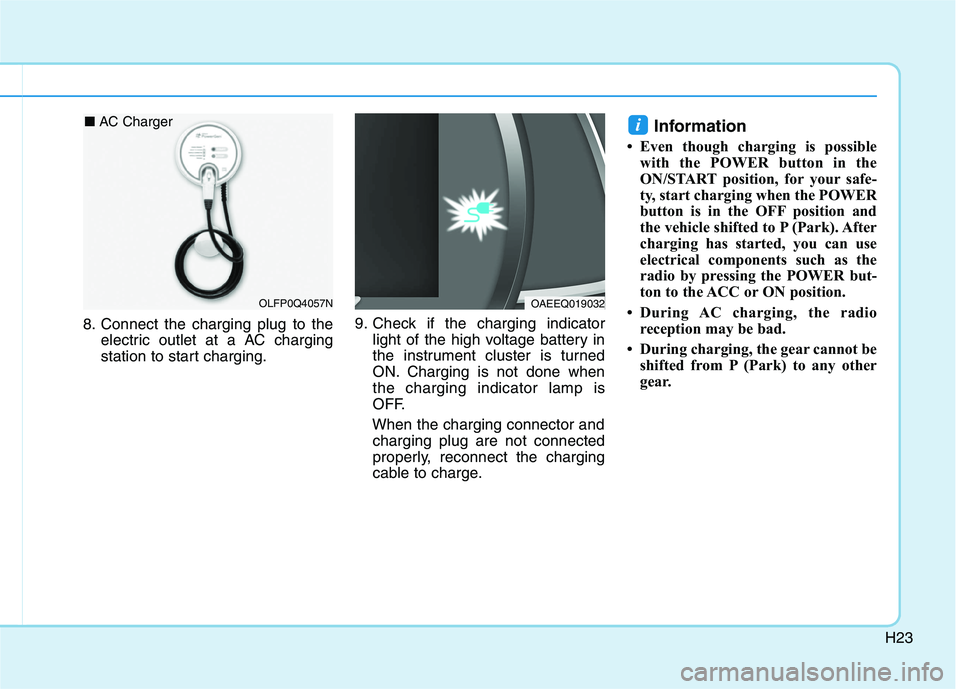
8. Connect the charging plug to theelectric outlet at a AC charging
station to start charging. 9. Check if the charging indicator
light of the high voltage battery in
the instrument cluster is turned
ON. Charging is not done whenthe charging indicator lamp is
OFF.
When the charging connector and charging plug are not connected
properly, reconnect the charging
cable to charge. Information
Even though charging is possible with the POWER button in the
ON/START position, for your safe-
ty, start charging when the POWER
button is in the OFF position and
the vehicle shifted to P (Park). After
charging has started, you can use
electrical components such as the
radio by pressing the POWER but-
ton to the ACC or ON position.
During AC charging, the radio reception may be bad.
During charging, the gear cannot be shifted from P (Park) to any other
gear.
i
OAEEQ019032OLFP0Q4057N
■
AC Charger
Page 39 of 546
H30
CCHH AARRGG IINN GG EE LLEE CCTT RR IICC VV EEHH IICC LLEE (( DD CC CC HH AARRGG EE)) (( CC OO NNTT..))
Information
Even though charging is possible with the POWER button in the
ON/START position, for your safe-
ty, start charging when the POWER
button is in the OFF position and
the vehicle shifted to P (Park).
After charging has started, you can
use electrical components such as
the radio by pressing the POWER
button to ACC or ON position.
During charging, the gear cannot be shifted from P (Park) to any other
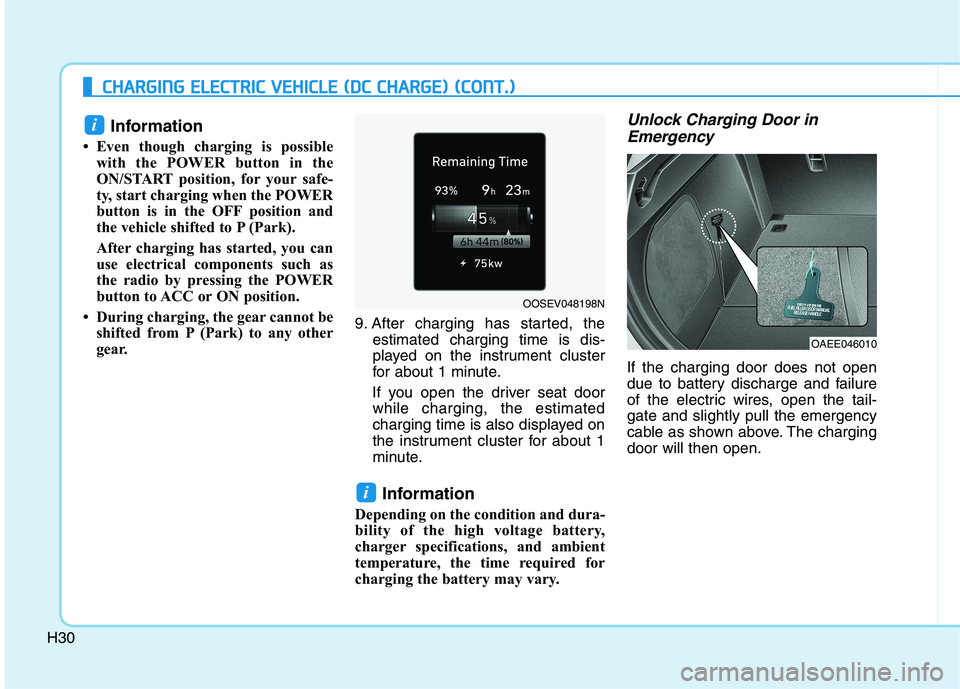
gear. 9. After charging has started, the
estimated charging time is dis-
played on the instrument cluster
for about 1 minute.
If you open the driver seat door while charging, the estimated
charging time is also displayed on
the instrument cluster for about 1
minute.
Information
Depending on the condition and dura-
bility of the high voltage battery,
charger specifications, and ambient
temperature, the time required for
charging the battery may vary. Unlock Charging Door in Emergency
If the charging door does not open
due to battery discharge and failure
of the electric wires, open the tail-gate and slightly pull the emergency
cable as shown above. The chargingdoor will then open.
i
i
OOSEV048198N
OAEE046010
Page 46 of 546
H37
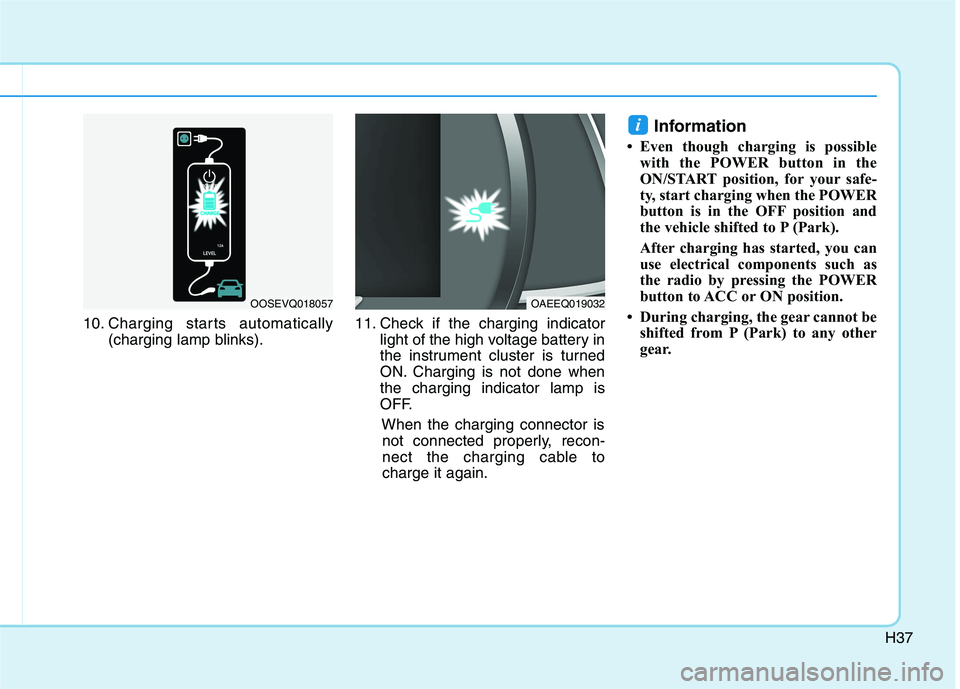
10. Charging starts automatically(charging lamp blinks). 11. Check if the charging indicator
light of the high voltage battery in
the instrument cluster is turned
ON. Charging is not done whenthe charging indicator lamp is
OFF.
When the charging connector isnot connected properly, recon-
nect the charging cable tocharge it again. Information
Even though charging is possible with the POWER button in the
ON/START position, for your safe-
ty, start charging when the POWER
button is in the OFF position and
the vehicle shifted to P (Park).
After charging has started, you can
use electrical components such as
the radio by pressing the POWER
button to ACC or ON position.
During charging, the gear cannot be shifted from P (Park) to any other
gear.
i
OOSEVQ018057OAEEQ019032
Page 139 of 546
2-59
Safety system of your vehicle
2
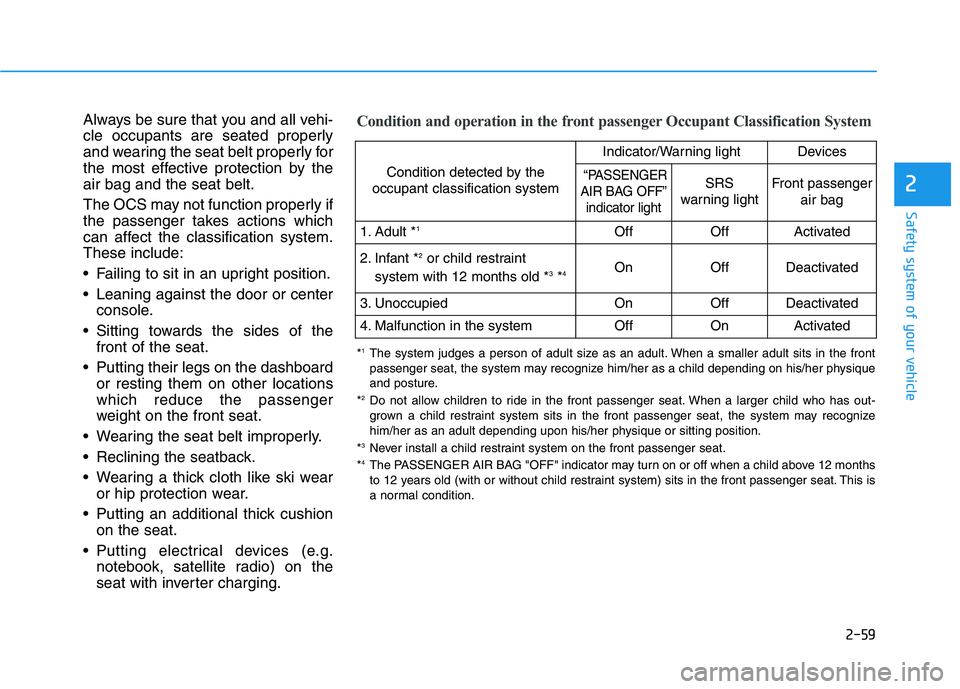
Always be sure that you and all vehi-
cle occupants are seated properly
and wearing the seat belt properly for
the most effective protection by theair bag and the seat belt.
The OCS may not function properly if
the passenger takes actions which
can affect the classification system.These include:
Failing to sit in an upright position.
Leaning against the door or centerconsole.
Sitting towards the sides of the front of the seat.
Putting their legs on the dashboard or resting them on other locations which reduce the passenger
weight on the front seat.
Wearing the seat belt improperly.
Reclining the seatback.
Wearing a thick cloth like ski wear or hip protection wear.
Putting an additional thick cushion on the seat.
Putting electrical devices (e.g. notebook, satellite radio) on the
seat with inverter charging.Condition and operation in the front passenger Occupant Classification System
Condition detected by the
occupant classification system
Indicator/Warning lightDevices
“PASSENGER
AIR BAG OFF” indicator lightSRS
warning lightFront passenger
air bag
1. Adult * 1OffOffActivated
2. Infant * 2
or child restraint
system with 12 months old * 3
*4 OnOffDeactivated
3. Unoccupied OnOffDeactivated
4. Malfunction in the systemOffOnActivated
*
1
The system judges a person of adult size as an adult. When a smaller adult sits in the front
passenger seat, the system may recognize him/her as a child depending on his/her physique
and posture.
* 2
Do not allow children to ride in the front passenger seat. When a larger child who has out-
grown a child restraint system sits in the front passenger seat, the system may recognize
him/her as an adult depending upon his/her physique or sitting position.
* 3
Never install a child restraint system on the front passenger seat.
* 4
The PASSENGER AIR BAG "OFF" indicator may turn on or off when a child above 12 months
to 12 years old (with or without child restraint system) sits in the front passenger seat. This is
a normal condition.
Page 141 of 546
2-61
Safety system of your vehicle
2
ODH035900K
ODH035901K
ODH035902K
ODH035903K
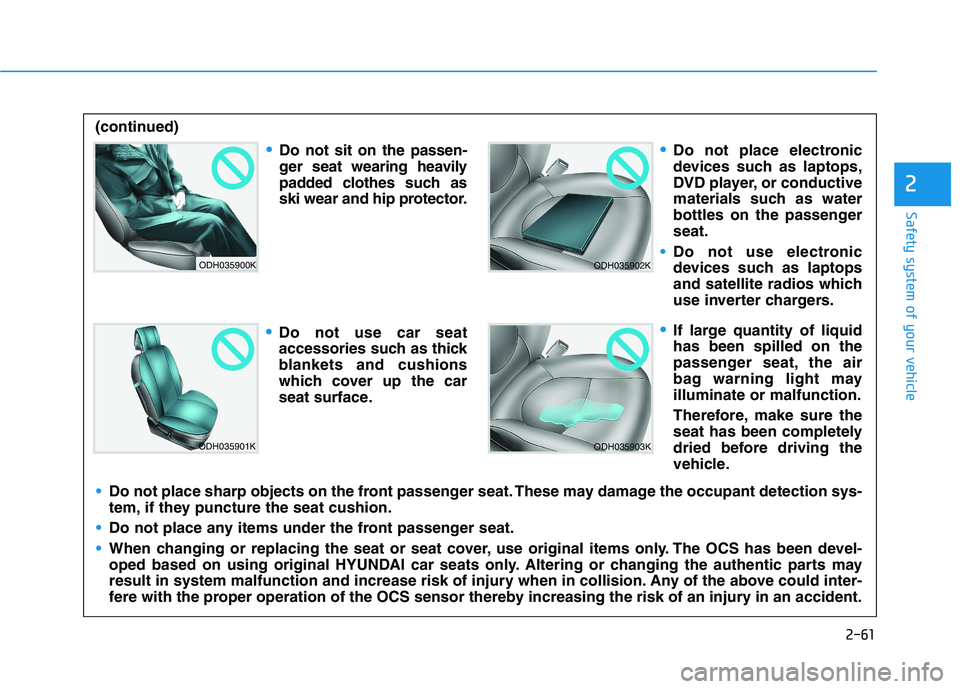
Do not sit on the passen-
ger seat wearing heavily
padded clothes such as
ski wear and hip protector.
Do not use car seat
accessories such as thick
blankets and cushions
which cover up the car
seat surface.
Do not place electronic
devices such as laptops,
DVD player, or conductive
materials such as water
bottles on the passengerseat.
Do not use electronic
devices such as laptops
and satellite radios which
use inverter chargers.
If large quantity of liquid has been spilled on the
passenger seat, the air
bag warning light mayilluminate or malfunction.
Therefore, make sure the
seat has been completely
dried before driving the
vehicle.
Do not place sharp objects on the front passenger seat. These may damage the occupant detection sys-
tem, if they puncture the seat cushion.
Do not place any items under the front passenger seat.
When changing or replacing the seat or seat cover, use original items only. The OCS has been devel-
oped based on using original HYUNDAI car seats only. Altering or changing the authentic parts may
result in system malfunction and increase risk of injury when in collision. Any of the above could inter-
fere with the proper operation of the OCS sensor thereby increasing the risk of an injury in an accident.
(continued)
Page 156 of 546
3-6
Mechanical key
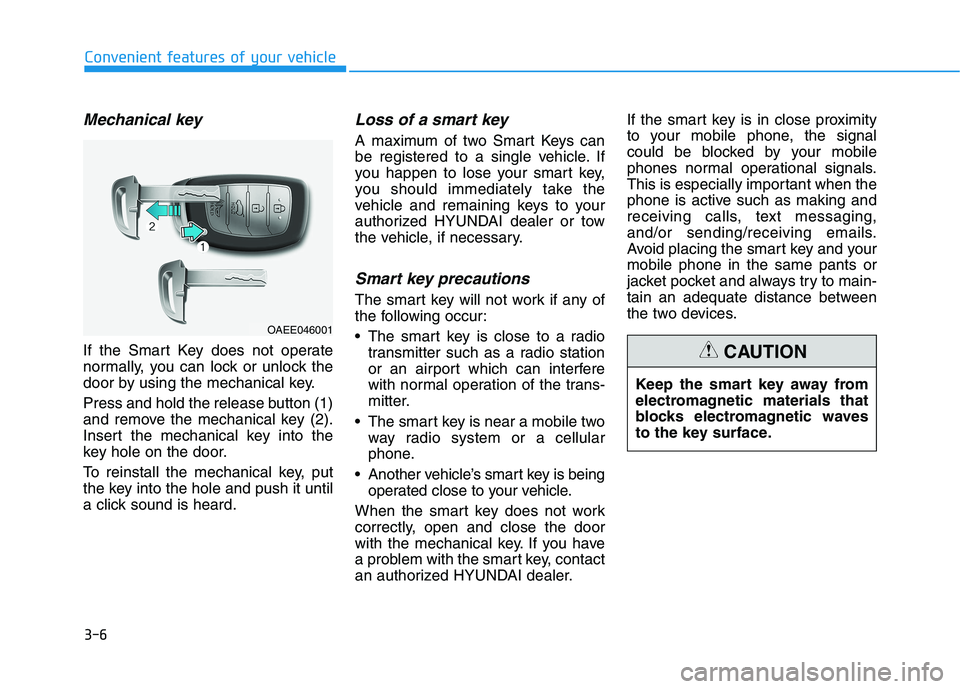
If the Smart Key does not operate
normally, you can lock or unlock the
door by using the mechanical key.
Press and hold the release button (1)
and remove the mechanical key (2).
Insert the mechanical key into the
key hole on the door.
To reinstall the mechanical key, put
the key into the hole and push it until
a click sound is heard.
Loss of a smart key
A maximum of two Smart Keys can
be registered to a single vehicle. If
you happen to lose your smart key,
you should immediately take the
vehicle and remaining keys to your
authorized HYUNDAI dealer or tow
the vehicle, if necessary.
Smart key precautions
The smart key will not work if any of
the following occur:
The smart key is close to a radiotransmitter such as a radio station
or an airport which can interfere
with normal operation of the trans-
mitter.
The smart key is near a mobile two way radio system or a cellular
phone.
Another vehicle’s smart key is being operated close to your vehicle.
When the smart key does not work
correctly, open and close the door
with the mechanical key. If you have
a problem with the smart key, contact
an authorized HYUNDAI dealer. If the smart key is in close proximity
to your mobile phone, the signal
could be blocked by your mobile
phones normal operational signals.
This is especially important when the
phone is active such as making and
receiving calls, text messaging,
and/or sending/receiving emails.
Avoid placing the smart key and yourmobile phone in the same pants or
jacket pocket and always try to main-
tain an adequate distance between
the two devices.
Convenient features of your vehicle
Keep the smart key away from
electromagnetic materials that
blocks electromagnetic waves
to the key surface.
CAUTION
OAEE046001
Page 173 of 546
3-23
Convenient features of your vehicle
3
There are some conditions that can
cause changes to the vehicle mag-
nets, such as installing a ski rack or
a CB antenna. Body repair work on
the vehicle can also cause changes
to the vehicle’s magnetic field. In
these situations, the compass will
need to be re-calibrated to quickly
correct these changes.
If you need to recalibrate the com- pass:
1. Press and hold the button formore than 6 seconds. When the
compass memory is cleared a "C"
will appear in the display.
2. Drive the vehicle in 2 complete cir- cles at less than 8 km/h (5 mph).Integrated HomeLink ®
Wireless
Control System
The HomeLink ®
Wireless Control
System can replace up to three hand-
held radio-frequency (RF) transmit-
ters with a single built-in device. This
innovative feature will learn the radiofrequency codes of most current
transmitters to operate devices such
as gate operators, garage door open-
ers, entry door locks, security sys-
tems, even home lighting. Both stan-
dard and rolling code-equipped trans-
mitters can be programmed by fol-
lowing the outlined procedures. Additional HomeLink ®
information
can be found at: www.homelink.com
or by calling 1-800-355-3515.
Retain the original transmitter of the
RF device you are programming for
use in other vehicles as well as forfuture HomeLink ®
programming. It is
also suggested that upon the sale of
the vehicle, the programmedHomeLink ®
buttons be erased for
security purposes.Before programming HomeLink ®
to a garage door
opener or gate operator, makesure people and objects are out
of the way of the device to pre-
vent potential harm or damage.Do not use the HomeLink ®
with
any garage door opener that
lacks the safety stop and
reverse features required by
federal safety standards (this
includes any garage door open-
er model manufactured before
April 1, 1982). A garage doorthat cannot detect an object -signaling the door to stop and
reverse - does not meet current
federal safety standards. Using
a garage door opener without
these features increases the
risk of serious injury or death.
WARNING
Page 174 of 546
3-24
Convenient features of your vehicle
Programming HomeLink®
Please note the following:
When programming a garage door
opener, it is advised to park the
vehicle outside of the garage.
It is recommended that a new bat- tery be placed in the hand-held
transmitter of the device being pro-
grammed to HomeLink ®
for quicker
training and accurate transmission
of the radio-frequency signal.
Some vehicles may require the POWER button to be placed in the
ACC (or "Accessories") position for
programming and/or operation ofHomeLink ®
.
In the event that there are still pro- gramming difficulties or questions
after following the programming
steps listed below, contactHomeLink ®
at: www.homelink.com
or by calling 1-800-355-3515.
Rolling code programming
Rolling code devices which are
"code-protected" and manufactured
after 1996 may be determined by the
following:
Reference the device owner’s manual for verification.
The handheld transmitter appears to program the HomeLink ®
Universal
Transceiver but does not activate the
device.
Press and hold the trained HomeLink button. The device has
the rolling code feature if the indi-
cator light flashes rapidly and then
turns solid after 2 seconds. To train rolling code devices, follow
these instructions:
1. At the garage door opener receiv-
er (motor-head unit) in the garage,
locate the "learn" or "smart" but-
ton. This can usually be foundwhere the hanging antenna wire isattached to the motor-head unit.
Exact location and color of the but-
ton may vary by garage door
opener brand. If there is difficulty
locating the training button, refer-
ence the device owner’s manual or
please visit our Web site at
www.homelink.com.
2. Firmly press and release the "learn" or "smart" button (which
activates the "training light"). You
will have 30 seconds to initiatestep 3.
3. Return to the vehicle and firmly press, hold for two seconds andthen release the desiredHomeLink ®
button. Repeat the
"press/hold/release" sequence asecond time to complete the pro-
gramming. (Some devices may
require you to repeat thissequence a third time to complete
the programming.)
Page 289 of 546
4-3
Infotainment system
4
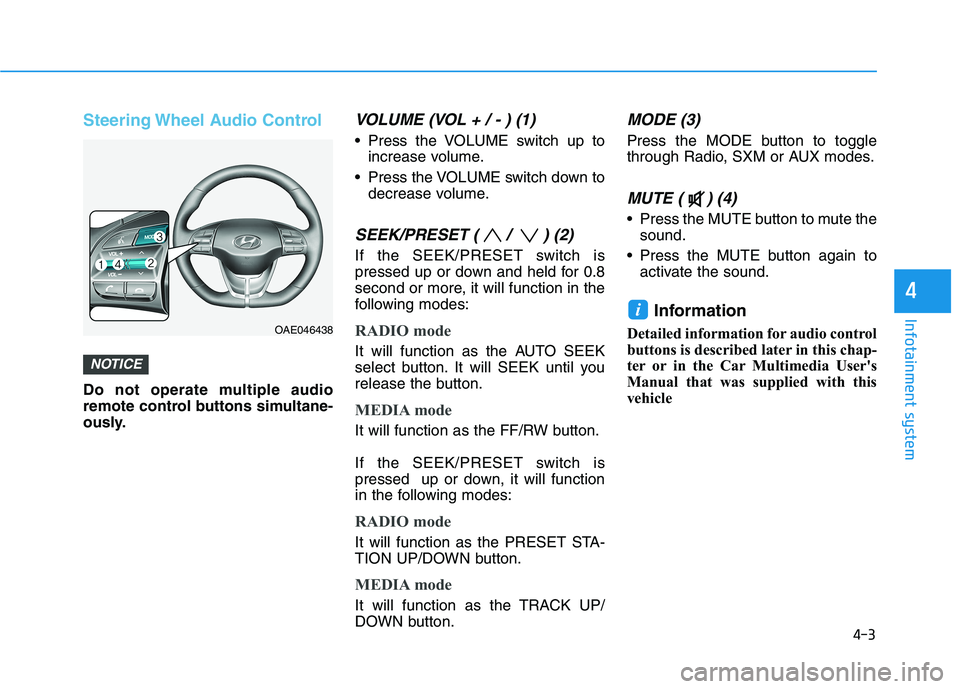
Steering Wheel Audio Control
Do not operate multiple audio
remote control buttons simultane-
ously.
VOLUME (VOL + / - ) (1)
Press the VOLUME switch up toincrease volume.
Press the VOLUME switch down to decrease volume.
SEEK/PRESET ( / ) (2)
If the SEEK/PRESET switch is
pressed up or down and held for 0.8
second or more, it will function in the
following modes:
RADIO mode
It will function as the AUTO SEEK
select button. It will SEEK until you
release the button.
MEDIA mode
It will function as the FF/RW button.
If the SEEK/PRESET switch is
pressed up or down, it will function
in the following modes:
RADIO mode
It will function as the PRESET STA-
TION UP/DOWN button.
MEDIA mode
It will function as the TRACK UP/
DOWN button.
MODE (3)
Press the MODE button to toggle
through Radio, SXM or AUX modes.
MUTE ( ) (4)
Press the MUTE button to mute thesound.
Press the MUTE button again to activate the sound.
Information
Detailed information for audio control
buttons is described later in this chap-
ter or in the Car Multimedia User's
Manual that was supplied with this
vehicle
i
NOTICE
OAE046438