ABS Hyundai Ioniq Plug-in Hybrid 2018 User Guide
[x] Cancel search | Manufacturer: HYUNDAI, Model Year: 2018, Model line: Ioniq Plug-in Hybrid, Model: Hyundai Ioniq Plug-in Hybrid 2018Pages: 589, PDF Size: 21.53 MB
Page 319 of 589
5-28
Driving your vehicle
Information
When you jump start your vehicle
because of a drained battery, the ABS
warning light ( ) may turn on at the
same time. This happens because of
the low battery voltage. It does not
mean your ABS is malfunctioning.
Have the battery recharged before
driving the vehicle.
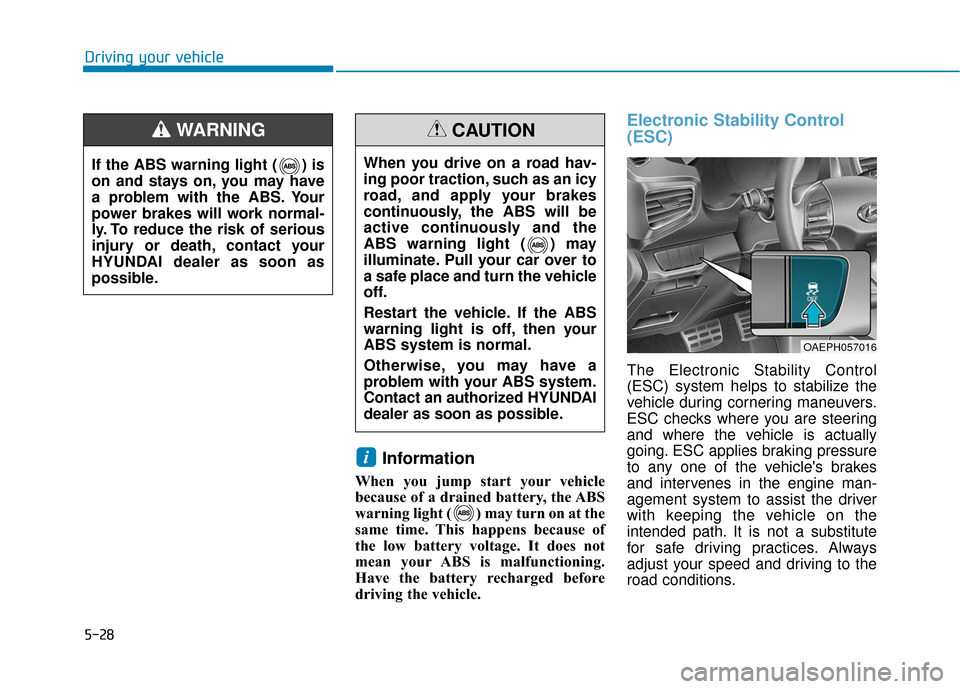
Electronic Stability Control
(ESC)
The Electronic Stability Control
(ESC) system helps to stabilize the
vehicle during cornering maneuvers.
ESC checks where you are steering
and where the vehicle is actually
going. ESC applies braking pressure
to any one of the vehicle's brakes
and intervenes in the engine man-
agement system to assist the driver
with keeping the vehicle on the
intended path. It is not a substitute
for safe driving practices. Always
adjust your speed and driving to the
road conditions.
i
When you drive on a road hav-
ing poor traction, such as an icy
road, and apply your brakes
continuously, the ABS will be
active continuously and the
ABS warning light ( ) may
illuminate. Pull your car over to
a safe place and turn the vehicle
off.
Restart the vehicle. If the ABS
warning light is off, then your
ABS system is normal.
Otherwise, you may have a
problem with your ABS system.
Contact an authorized HYUNDAI
dealer as soon as possible.
CAUTION
If the ABS warning light ( ) is
on and stays on, you may have
a problem with the ABS. Your
power brakes will work normal-
ly. To reduce the risk of serious
injury or death, contact your
HYUNDAI dealer as soon as
possible.
WARNING
OAEPH057016
Page 322 of 589
5-31
Driving your vehicle
5
ESC OFF usage
When Driving
The ESC OFF mode should only be
used briefly to help free the vehicle if
stuck in snow or mud by temporarily
stopping operation of the ESC to
maintain wheel torque.
To turn ESC off while driving, press
the ESC OFF button while driving on
a flat road surface.To prevent damage to the trans-
mission:
Do not allow wheel(s) of one
axle to spin excessively while
the ESC, ABS, and parking brake
warning lights are displayed.
The repairs would not be cov-
ered by the vehicle warranty.
Reduce engine power and do
not spin the wheel(s) excessive-
ly while these lights are dis-
played.
When operating the vehicle on a dynamometer, make sure the
ESC is turned off (ESC OFF light
illuminated).
Information
Turning the ESC off does not affect
ABS or standard brake system opera-
tion.
Vehicle Stability Management
(VSM)
The Vehicle Stability Management
(VSM) is a function of the Electronic
Stability Control (ESC) system. It
helps ensure the vehicle stays stable
when accelerating or braking sud-
denly on wet, slippery and rough
roads where traction over the four
tires can suddenly become uneven.
i
NOTICE
Take the following precautions
when using the Vehicle Stability
Management (VSM):
ALWAYS check the speed and
the distance to the vehicle
ahead. The VSM is not a sub-
stitute for safe driving prac-
tices.
Never drive too fast for the
road conditions. The VSM sys-
tem will not prevent acci-
dents. Excessive speed in bad
weather, slippery and uneven
roads can result in severe
accidents.
WARNING
Page 364 of 589
5-73
Driving your vehicle
5
The Smart Cruise Control turns off
temporarily when the Set Speed and
Vehicle-to-Vehicle Distance indicator
on the LCD display turns off.
The cruise ( ) indicator is
illuminated continuously.Canceled automatically
The driver's door is opened.
The vehicle is shifted to N
(Neutral), R (Reverse) or P (Park).
The vehicle speed is over 120 mph (190 km/h).
The ESC (Electronic Stability Control), TCS (Traction Control
System) or ABS is operating.
The ESC is turned off.
The sensor or the cover is dirty or blocked with foreign matter.
The accelerator pedal is continu- ously depressed for more than one
minute.
The SCC system has malfunc- tioned.
The engine RPM enters the red zone.
The AEB is activated. Each of these actions will cancel
the Smart Cruise Control opera-
tion. The Set Speed and Vehicle-to-
Vehicle Distance on the LCD dis-
play will go off.
In a condition the Smart Cruise
Control is canceled automatically,
the Smart Cruise Control will not
resume even though the RES+ or
SET- toggle switch is pushed.
Information
If the Smart Cruise Control is canceled
by other than the reasons mentioned,
have the system checked by an author-
ized HYUNDAI dealer.
i
Page 467 of 589
7-34
Maintenance
T
TI
IR
R E
ES
S
A
A N
N D
D
W
W H
HE
EE
EL
LS
S
Tire Care
For proper maintenance, safety, and
maximum fuel economy, you must
always maintain recommended tire
inflation pressures and stay within
the load limits and weight distribution
recommended for your vehicle.
(Continued)Replace tires that are worn,
show uneven wear, or are dam-
aged. Worn tires can cause
loss of braking effectiveness,
steering control, or traction.
ALWAYS replace tires with the
same size as each tire that
was originally supplied with
this vehicle. Using tires and
wheels other than the recom-
mended sizes could cause
unusual handling characteris-
tics, poor vehicle control, or
negatively affect your vehi-
cle's Anti-Lock Brake System
(ABS) resulting in a serious
accident.
Tire failure may cause loss of
vehicle control resulting in an
accident. To reduce risk of
SERIOUS INJURY or DEATH,
take the following precautions:
Inspect your tires monthly for
proper inflation as well as
wear and damage.
The recommended cold tire
pressure for your vehicle can
be found in this manual and on
the tire label located on the dri-
ver’s side center pillar. Always
use a tire pressure gauge to
measure tire pressure. Tires
with too much or too little
pressure wear unevenly caus-
ing poor handling.
Check the pressure of the
spare every time you check
the pressure of the other tires
on your vehicle.
(Continued)
WARNING
Page 471 of 589
7-38
Maintenance
Wheel Alignment and Tire
Balance
The wheels on your vehicle were
aligned and balanced carefully at the
factory to give you the longest tire life
and best overall performance.
In most cases, you will not need to
have your wheels aligned again.
However, if you notice unusual tire
wear or your vehicle pulling one way
or the other, the alignment may need
to be reset.
If you notice your vehicle vibrating
when driving on a smooth road, your
wheels may need to be rebalanced.
Improper wheel weights can dam-
age your vehicle's aluminum
wheels. Use only approved wheel
weights.
Tire Replacement
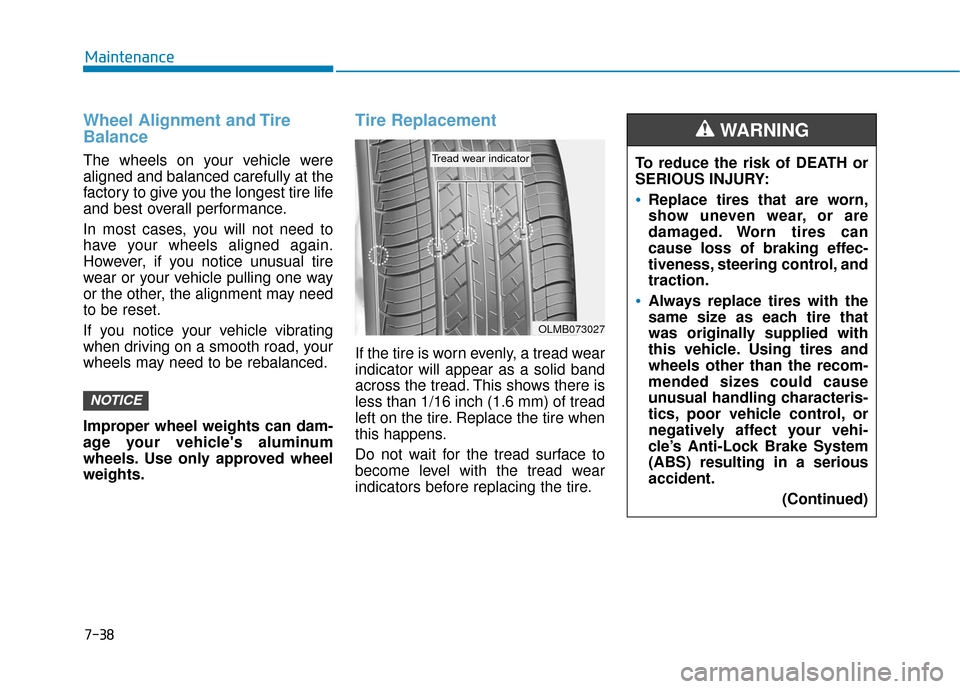
If the tire is worn evenly, a tread wear
indicator will appear as a solid band
across the tread. This shows there is
less than 1/16 inch (1.6 mm) of tread
left on the tire. Replace the tire when
this happens.
Do not wait for the tread surface to
become level with the tread wear
indicators before replacing the tire.
NOTICE
OLMB073027
Tread wear indicatorTo reduce the risk of DEATH or
SERIOUS INJURY:
Replace tires that are worn,
show uneven wear, or are
damaged. Worn tires can
cause loss of braking effec-
tiveness, steering control, and
traction.
Always replace tires with the
same size as each tire that
was originally supplied with
this vehicle. Using tires and
wheels other than the recom-
mended sizes could cause
unusual handling characteris-
tics, poor vehicle control, or
negatively affect your vehi-
cle’s Anti-Lock Brake System
(ABS) resulting in a serious
accident.(Continued)
WARNING
Page 490 of 589
7-57
7
Maintenance
7. Connect the headlamp bulb sock-et-connector. (for low beam and
high beam)
8. Install the hbulb cover (1) by turn- ing it clockwise.
Information
The headlamp aiming should be
adjusted after an accident or after the
headlamp assembly is reinstalled at an
authorized HYUNDAI dealer.
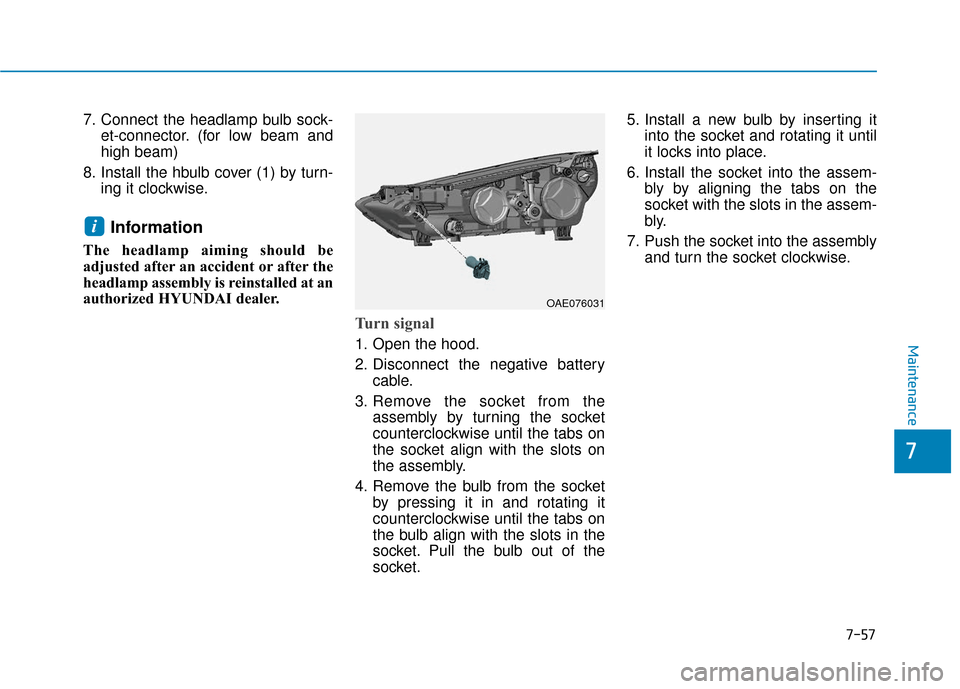
Turn signal
1. Open the hood.
2. Disconnect the negative batterycable.
3. Remove the socket from the assembly by turning the socket
counterclockwise until the tabs on
the socket align with the slots on
the assembly.
4. Remove the bulb from the socket by pressing it in and rotating it
counterclockwise until the tabs on
the bulb align with the slots in the
socket. Pull the bulb out of the
socket. 5. Install a new bulb by inserting it
into the socket and rotating it until
it locks into place.
6. Install the socket into the assem- bly by aligning the tabs on the
socket with the slots in the assem-
bly.
7. Push the socket into the assembly and turn the socket clockwise.
i
OAE076031
Page 491 of 589
7-58
Maintenance
Side marker
1. Open the hood.
2. Disconnect the negative batterycable.
3. Remove the socket from the assembly by turning the socket
counterclockwise until the tabs on
the socket align with the slots on
the assembly.
4. Remove the bulb from the socket by pulling out the bulb.
5. Insert a new bulb.
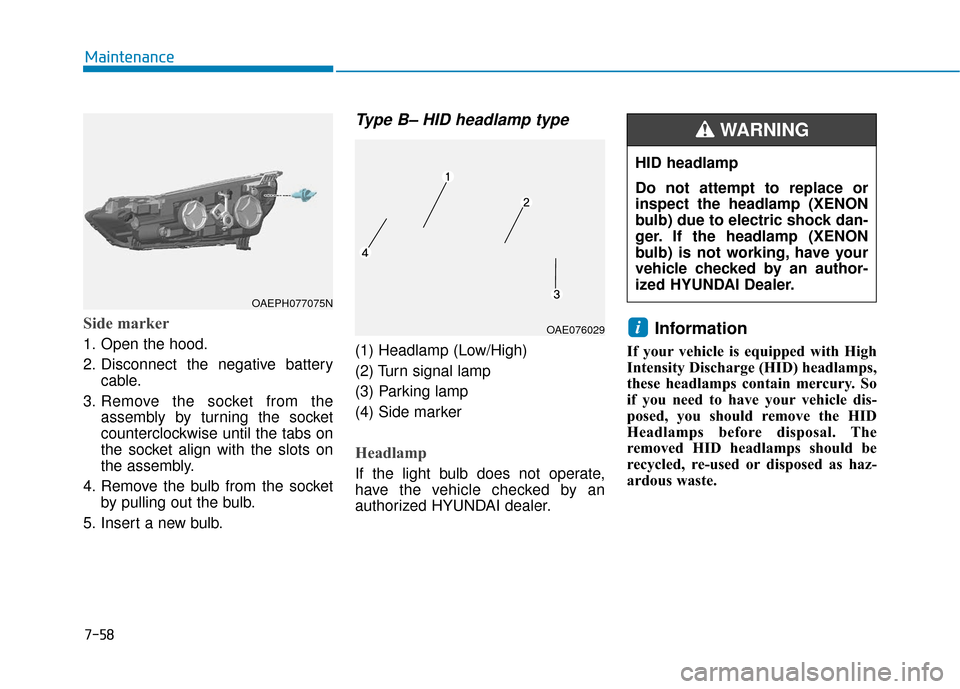
Type B– HID headlamp type
(1) Headlamp (Low/High)
(2) Turn signal lamp
(3) Parking lamp
(4) Side marker
Headlamp
If the light bulb does not operate,
have the vehicle checked by an
authorized HYUNDAI dealer.
Information
If your vehicle is equipped with High
Intensity Discharge (HID) headlamps,
these headlamps contain mercury. So
if you need to have your vehicle dis-
posed, you should remove the HID
Headlamps before disposal. The
removed HID headlamps should be
recycled, re-used or disposed as haz-
ardous waste.
iOAE076029
HID headlamp
Do not attempt to replace or
inspect the headlamp (XENON
bulb) due to electric shock dan-
ger. If the headlamp (XENON
bulb) is not working, have your
vehicle checked by an author-
ized HYUNDAI Dealer.
WARNING
OAEPH077075N
Page 492 of 589
7-59
7
Maintenance
Information
HID lamps have superior perform-
ance vs. halogen bulbs.
HID lamps are estimated by the man-
ufacturer to last twice as long or
longer than halogen bulbs depending
on their frequency of use. They will
probably require replacement at some
point in the life of the vehicle. Cycling
the headlamps on and off more than
typical use will shorten HID lamps
life. HID lamps do not fail in the same
manner as halogen incandescent
lamps. If a headlamp goes out after a
period of operation but will immedi-
ately relight when the headlamp
switch is cycled it is likely the HID
lamp needs to be replaced. HID light-
ing components are more complex
than conventional halogen bulbs thus
have higher replacement cost.
Information
The headlamp aiming should be
adjusted after an accident or after the
headlamp assembly is reinstalled at an
authorized HYUNDAI dealer.
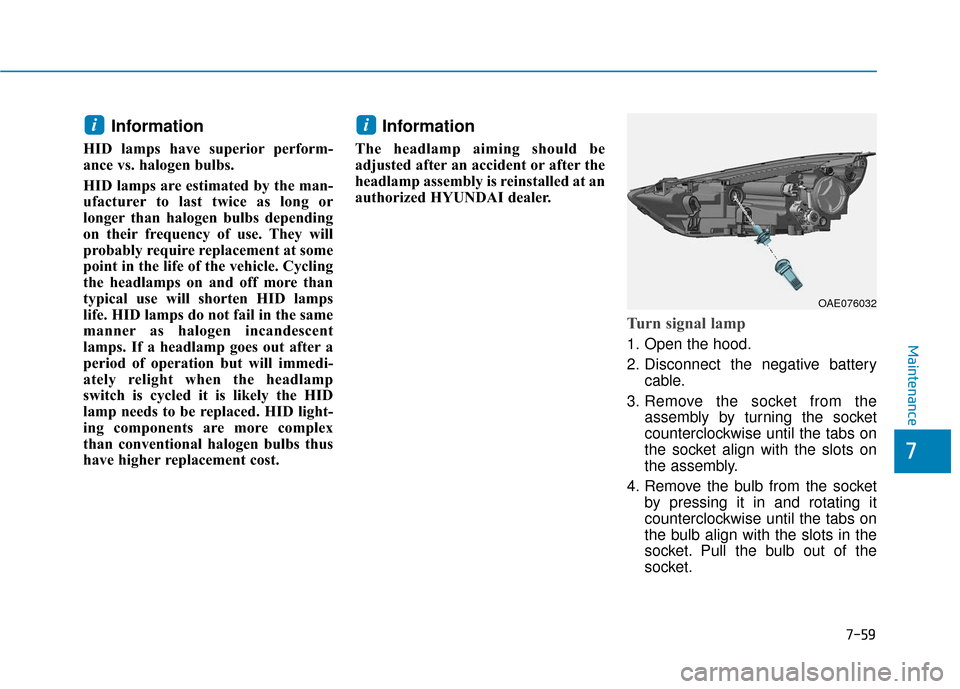
Turn signal lamp
1. Open the hood.
2. Disconnect the negative batterycable.
3. Remove the socket from the assembly by turning the socket
counterclockwise until the tabs on
the socket align with the slots on
the assembly.
4. Remove the bulb from the socket by pressing it in and rotating it
counterclockwise until the tabs on
the bulb align with the slots in the
socket. Pull the bulb out of the
socket.
ii
OAE076032
Page 493 of 589
7-60
Maintenance
5. Install a new bulb by inserting it into the socket and rotating it until
it locks into place.
6. Install the socket into the assem- bly by aligning the tabs on the
socket with the slots in the assem-
bly.
7. Push the socket into the assembly and turn the socket clockwise.
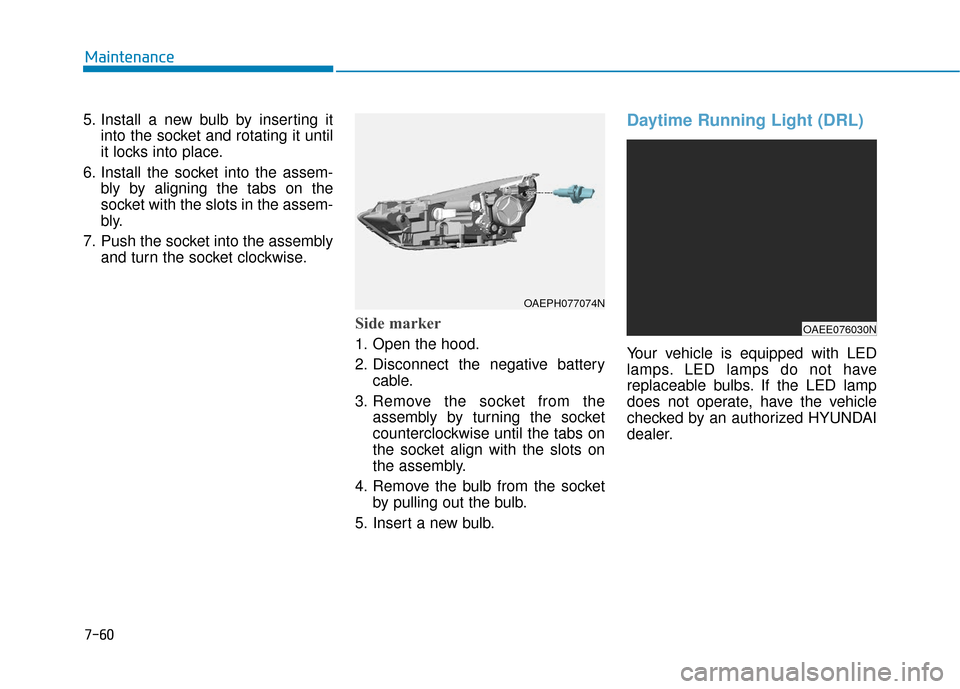
Side marker
1. Open the hood.
2. Disconnect the negative batterycable.
3. Remove the socket from the assembly by turning the socket
counterclockwise until the tabs on
the socket align with the slots on
the assembly.
4. Remove the bulb from the socket by pulling out the bulb.
5. Insert a new bulb.
Daytime Running Light (DRL)
Your vehicle is equipped with LED
lamps. LED lamps do not have
replaceable bulbs. If the LED lamp
does not operate, have the vehicle
checked by an authorized HYUNDAI
dealer.
OAEE076030N
OAEPH077074N
Page 495 of 589
7-62
Maintenance
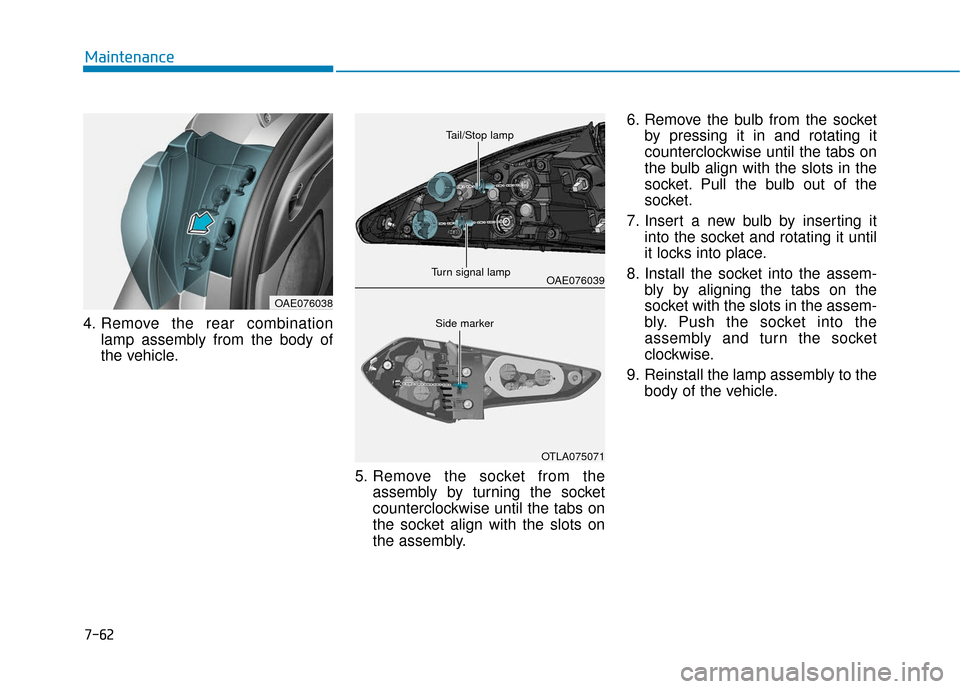
4. Remove the rear combination lamp assembly from the body of
the vehicle.
5. Remove the socket from theassembly by turning the socket
counterclockwise until the tabs on
the socket align with the slots on
the assembly. 6. Remove the bulb from the socket
by pressing it in and rotating it
counterclockwise until the tabs on
the bulb align with the slots in the
socket. Pull the bulb out of the
socket.
7. Insert a new bulb by inserting it into the socket and rotating it until
it locks into place.
8. Install the socket into the assem- bly by aligning the tabs on the
socket with the slots in the assem-
bly. Push the socket into the
assembly and turn the socket
clockwise.
9. Reinstall the lamp assembly to the body of the vehicle.
OAE076039
OTLA075071
Turn signal lamp
Tail/Stop lamp
Side marker
OAE076038