stop start Hyundai Ioniq Plug-in Hybrid 2020 Owners Manual
[x] Cancel search | Manufacturer: HYUNDAI, Model Year: 2020, Model line: Ioniq Plug-in Hybrid, Model: Hyundai Ioniq Plug-in Hybrid 2020Pages: 635, PDF Size: 52.13 MB
Page 388 of 635
5-122
Driving your vehicle
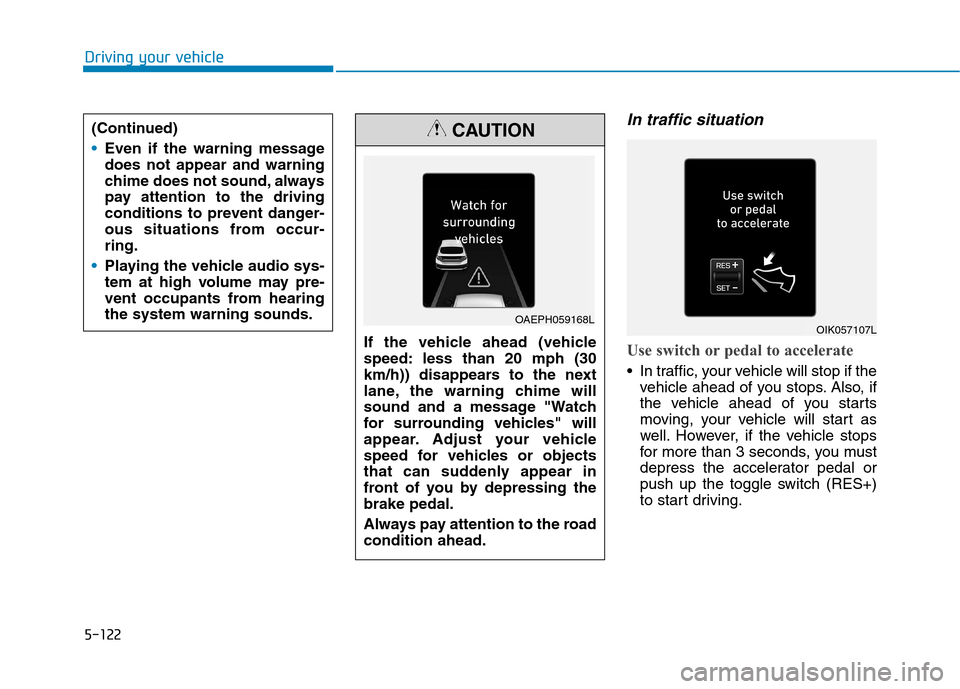
In traffic situation
Use switch or pedal to accelerate
In traffic, your vehicle will stop if the
vehicle ahead of you stops. Also, if
the vehicle ahead of you starts
moving, your vehicle will start as
well. However, if the vehicle stops
for more than 3 seconds, you must
depress the accelerator pedal or
push up the toggle switch (RES+)
to start driving. If the vehicle ahead (vehicle
speed: less than 20 mph (30
km/h)) disappears to the next
lane, the warning chime will
sound and a message "Watch
for surrounding vehicles" will
appear. Adjust your vehicle
speed for vehicles or objects
that can suddenly appear in
front of you by depressing the
brake pedal.
Always pay attention to the road
condition ahead.
CAUTION
OAEPH059168LOIK057107L
(Continued)
Even if the warning message
does not appear and warning
chime does not sound, always
pay attention to the driving
conditions to prevent danger-
ous situations from occur-
ring.
Playing the vehicle audio sys-
tem at high volume may pre-
vent occupants from hearing
the system warning sounds.
Page 389 of 635
5-123
Driving your vehicle
5
If you push the smart cruise control
toggle switch (RES+ or SET-) while
Auto Hold and smart cruise control
is operating the Auto Hold will be
released regardless of accelerator
pedal operation and the vehicle will
start to move. The AUTO HOLD
indicator changes from green to
white.Sensor to detect distance to
the vehicle ahead
Smart Cruise Control uses a sensor
to detect distance to the vehicle
ahead.
If the sensor is covered with dirt or
other foreign matter, the vehicle to
vehicle distance control may not
operate correctly. Always keep the
sensor clean.
Warning message
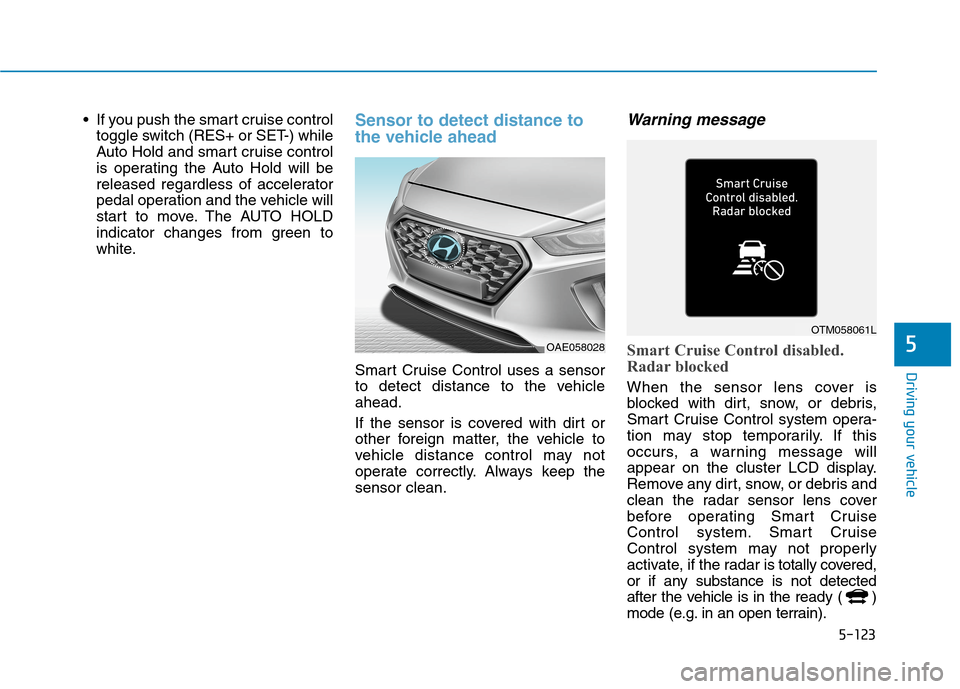
Smart Cruise Control disabled.
Radar blocked
When the sensor lens cover is
blocked with dirt, snow, or debris,
Smart Cruise Control system opera-
tion may stop temporarily. If this
occurs, a warning message will
appear on the cluster LCD display.
Remove any dirt, snow, or debris and
clean the radar sensor lens cover
before operating Smart Cruise
Control system. Smart Cruise
Control system may not properly
activate, if the radar is totally covered,
or if any substance is not detected
after the vehicle is in the ready ( )
mode (e.g. in an open terrain).
OAE058028
OTM058061L
Page 398 of 635
5-132
Driving your vehicle
System Setting and Operation
System setting
With the Engine Start/Stop button in
the ON or START position, the
Navigation-based Smart Cruise
Control can be activated by select-
ing 'User setting →Driver
Assistance →Driver Assist →
Highway Auto Curve Slowdown'
from the Settings menu in the info-
tainment system screen. Deselect
the setting to turn off the system.
If the engine is turned off then on
again, the system maintains the
last setting.
Operating conditions
Select 'Highway Auto Curve
Slowdown' from the Settings menu in
the infotainment system screen and
satisfy the following conditions for
the system to operate.
Driving on the highway main line
Smart Cruise Control is operating
If all the mentioned conditions are
satisfied, the system is ENABLED
and the 'AUTO' symbol on the cluster
will illuminate white.
System operation
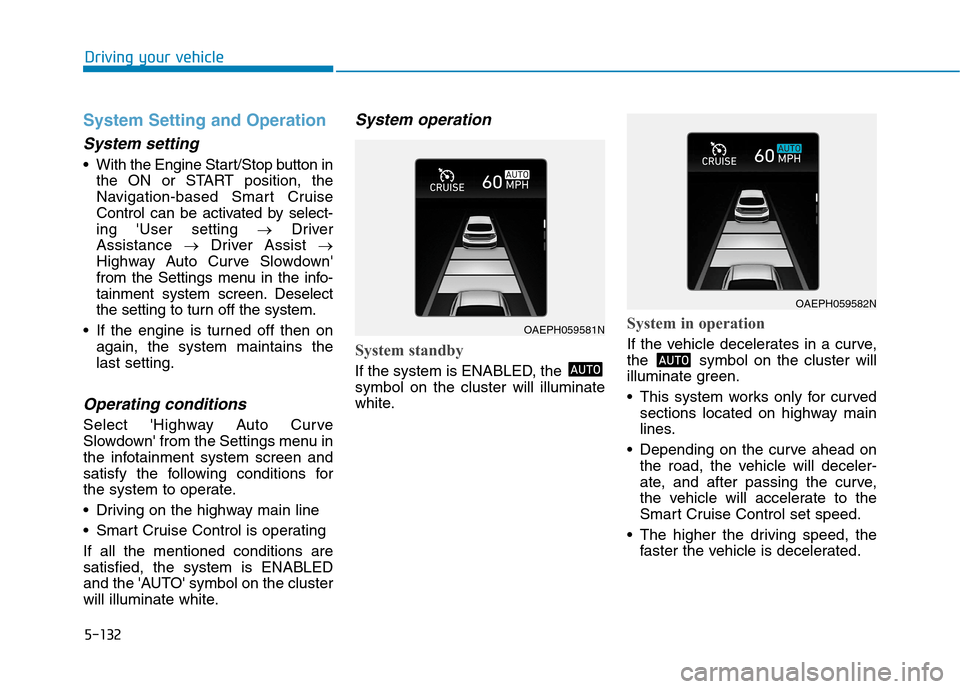
System standby
If the system is ENABLED, the
symbol on the cluster will illuminate
white.
System in operation
If the vehicle decelerates in a curve,
the symbol on the cluster will
illuminate green.
This system works only for curved
sections located on highway main
lines.
Depending on the curve ahead on
the road, the vehicle will deceler-
ate, and after passing the curve,
the vehicle will accelerate to the
Smart Cruise Control set speed.
The higher the driving speed, the
faster the vehicle is decelerated.
OAEPH059581N
OAEPH059582N
Page 407 of 635
5-141
Driving your vehicle
5
Highway Driving Assist system helps
keep the vehicle between lanes,
maintain a distance with the vehicle
ahead, and automatically adjusts the
vehicle speed to the speed limit while
driving on the highway.Information
• Highway Driving Assist system is
available only on controlled access
road of certain highways.
❈ ❈
Controlled access road indicates
roads with limited entrances and
exits that allow uninterrupted
high speed traffic flow. Only pas-
senger cars and motorcycles are
allowed on controlled access
roads.
• Additional highways may be
expanded by navigation updates.
System Setting and Operation
System setting
With the Engine Start/Stop button
in the ON or START position, the
Highway Driving Assist can be acti-
vated by selecting 'User setting →
Driver Assistance →Driver Assist
→Highway Driving Assist' from the
Settings menu in the infotainment
system screen. Deselect the set-
ting to turn off the system.
If the engine is turned off then on
again, the system maintains the
last setting.
i
H HI
IG
GH
HW
WA
AY
Y
D
DR
RI
IV
VI
IN
NG
G
A
AS
SS
SI
IS
ST
T
(
(H
HD
DA
A)
)
(
(I
IF
F
E
EQ
QU
UI
IP
PP
PE
ED
D)
)
Highway Driving Assist system
is not a substitute for safe driv-
ing practices, but a conven-
ience function. It is the respon-
sibility of the driver to always
be aware of the surroundings
and drive safely.
Highway Driving Assist sys-
tem relies entirely on the road
information provided by the
navigation system. It is the
responsibility of the driver to
follow traffic laws and avoid
accidents.
Turn off the Highway driving
assist system when the vehi-
cle is being towed.
For your safety, please read
the owner's manual before
using the system.
WARNING
Available highway
(Controlled access road)
USA
Select Interstate Highway
and U.S. (Federal) and State
Highways
CanadaSelect Provincial and
Territorial Highways
Page 438 of 635
6-2
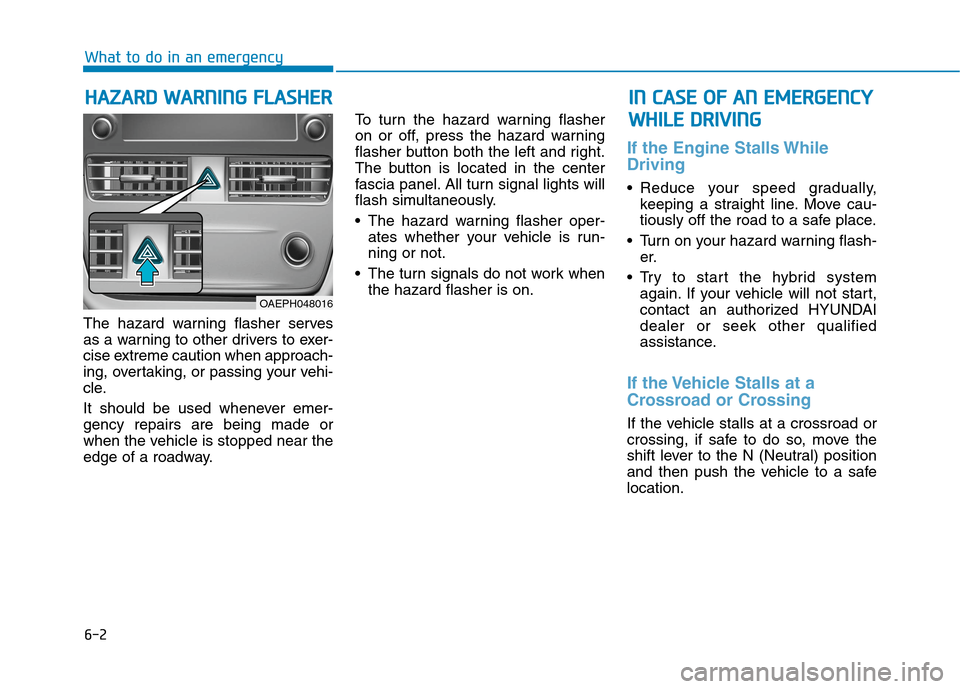
The hazard warning flasher serves
as a warning to other drivers to exer-
cise extreme caution when approach-
ing, overtaking, or passing your vehi-
cle.
It should be used whenever emer-
gency repairs are being made or
when the vehicle is stopped near the
edge of a roadway.To turn the hazard warning flasher
on or off, press the hazard warning
flasher button both the left and right.
The button is located in the center
fascia panel. All turn signal lights will
flash simultaneously.
• The hazard warning flasher oper-
ates whether your vehicle is run-
ning or not.
The turn signals do not work when
the hazard flasher is on.
If the Engine Stalls While
Driving
Reduce your speed gradually,
keeping a straight line. Move cau-
tiously off the road to a safe place.
Turn on your hazard warning flash-
er.
Try to start the hybrid system
again. If your vehicle will not start,
contact an authorized HYUNDAI
dealer or seek other qualified
assistance.
If the Vehicle Stalls at a
Crossroad or Crossing
If the vehicle stalls at a crossroad or
crossing, if safe to do so, move the
shift lever to the N (Neutral) position
and then push the vehicle to a safe
location.
H HA
AZ
ZA
AR
RD
D
W
WA
AR
RN
NI
IN
NG
G
F
FL
LA
AS
SH
HE
ER
R
What to do in an emergency
I
IN
N
C
CA
AS
SE
E
O
OF
F
A
AN
N
E
EM
ME
ER
RG
GE
EN
NC
CY
Y
W WH
HI
IL
LE
E
D
DR
RI
IV
VI
IN
NG
G
OAEPH048016
Page 439 of 635
6-3
What to do in an emergency
If You Have a Flat Tire While
Driving
If a tire goes flat while you are driving:
Take your foot off the accelerator
pedal and let the vehicle slow
down while driving straight ahead.
Do not apply the brakes immedi-
ately or attempt to pull off the road
as this may cause loss of vehicle
control resulting in an accident.
When the vehicle has slowed to
such a speed that it is safe to do
so, brake carefully and pull off the
road. Drive off the road as far as
possible and park on firm, level
ground. If you are on a divided
highway, do not park in the median
area between the two traffic lanes.
When the vehicle is stopped, press
the hazard warning flasher button,
move the shift lever into P (Park),
and apply the parking brake, and
place the Engine Start/Stop button
in the OFF position.
Have all passengers get out of the
vehicle. Be sure they all get out on
the side of the vehicle that is away
from traffic.
When changing a flat tire, follow
the instructions provided later in
this chapter.
Hybrid vehicle
Be sure the shift lever is in P
(Park). The vehicle starts only
when the shift lever is in P (Park).
This vehicle does not have a regu-
lar 12V battery that needs periodic
replacement. It is lithium ion poly-
mer type integrated into the HEV
high voltage battery. The vehicle
has a 12V battery protection sys-
tem that cuts 12V battery from
vehicle draw to prevent full dis-
charge. If vehicle will not start, first
try pressing the 12V Battery Reset
switch (left side of the steering
wheel near the fuel door open
switch) to reconnect the 12V bat-
tery, but you must start vehicle
within 15 seconds of pressing the
12V Battery Reset switch. After
starting vehicle, operate the vehi-
cle safely outdoors in ready mode
stopped and/or drive it for 30 min-
utes total to charge the 12V battery
fully.Push or pull starting the vehicle
may cause the catalytic converter
to overload which can lead to
damage to the emission control
system.
Check the fuel level and add fuel if
necessary.
If the vehicle still does not start, have
your vehicle checked by an author-
ized HYUNDAI dealer.
NOTICE
6
I IF
F
T
TH
HE
E
V
VE
EH
HI
IC
CL
LE
E
W
WI
IL
LL
L
N
NO
OT
T
S
ST
TA
AR
RT
T
Page 441 of 635
6-5
What to do in an emergency
6
Before Jump Starting
This vehicle does not have a regular
12V battery that needs periodic
replacement. It is lithium ion polymer
type integrated into the HEV high
voltage battery. The vehicle has a
12V battery protection system that
cuts 12V battery from vehicle draw to
prevent full discharge.
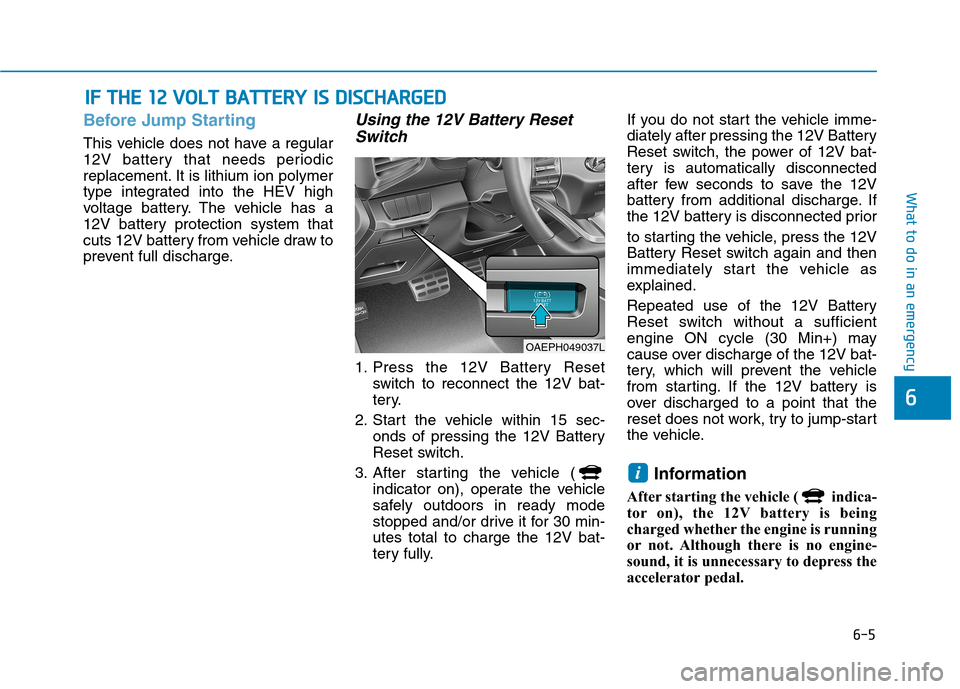
Using the 12V Battery Reset
Switch
1. Press the 12V Battery Reset
switch to reconnect the 12V bat-
tery.
2. Start the vehicle within 15 sec-
onds of pressing the 12V Battery
Reset switch.
3. After starting the vehicle (
indicator on), operate the vehicle
safely outdoors in ready mode
stopped and/or drive it for 30 min-
utes total to charge the 12V bat-
tery fully.If you do not start the vehicle imme-
diately after pressing the 12V Battery
Reset switch, the power of 12V bat-
tery is automatically disconnected
after few seconds to save the 12V
battery from additional discharge. If
the 12V battery is disconnected prior
to starting the vehicle, press the 12V
Battery Reset switch again and then
immediately start the vehicle as
explained.
Repeated use of the 12V Battery
Reset switch without a sufficient
engine ON cycle (30 Min+) may
cause over discharge of the 12V bat-
tery, which will prevent the vehicle
from starting. If the 12V battery is
over discharged to a point that the
reset does not work, try to jump-start
the vehicle.
Information
After starting the vehicle ( indica-
tor on), the 12V battery is being
charged whether the engine is running
or not. Although there is no engine-
sound, it is unnecessary to depress the
accelerator pedal.
i
I IF
F
T
TH
HE
E
1
12
2
V
VO
OL
LT
T
B
BA
AT
TT
TE
ER
RY
Y
I
IS
S
D
DI
IS
SC
CH
HA
AR
RG
GE
ED
D
OAEPH049037L
Page 443 of 635
6-7
What to do in an emergency
6
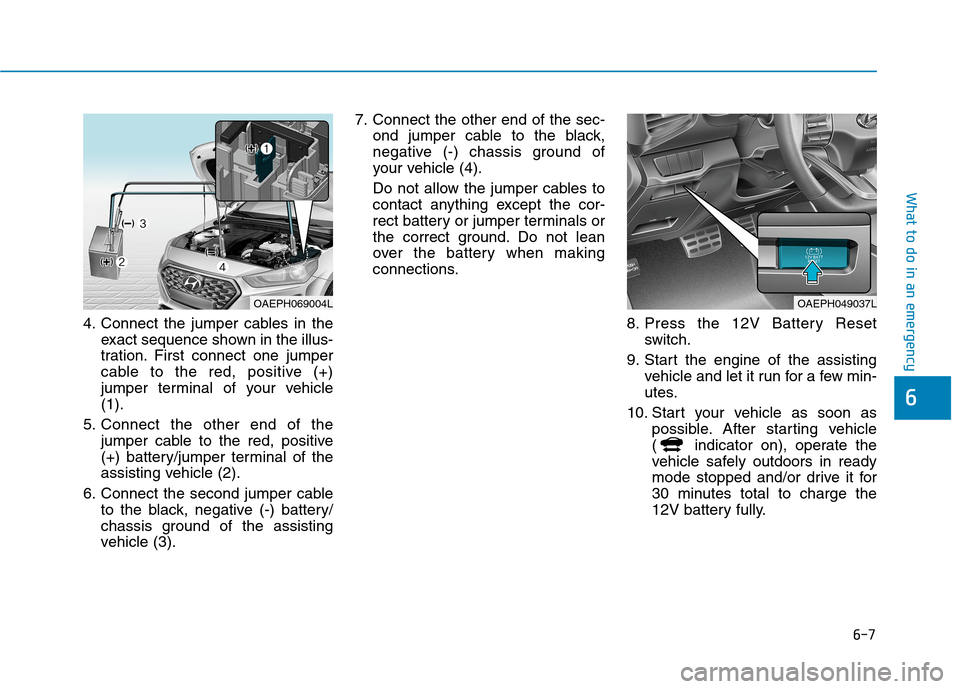
4. Connect the jumper cables in the
exact sequence shown in the illus-
tration. First connect one jumper
cable to the red, positive (+)
jumper terminal of your vehicle
(1).
5. Connect the other end of the
jumper cable to the red, positive
(+) battery/jumper terminal of the
assisting vehicle (2).
6. Connect the second jumper cable
to the black, negative (-) battery/
chassis ground of the assisting
vehicle (3).7. Connect the other end of the sec-
ond jumper cable to the black,
negative (-) chassis ground of
your vehicle (4).
Do not allow the jumper cables to
contact anything except the cor-
rect battery or jumper terminals or
the correct ground. Do not lean
over the battery when making
connections.
8. Press the 12V Battery Reset
switch.
9. Start the engine of the assisting
vehicle and let it run for a few min-
utes.
10. Start your vehicle as soon as
possible. After starting vehicle
( indicator on), operate the
vehicle safely outdoors in ready
mode stopped and/or drive it for
30 minutes total to charge the
12V battery fully.
OAEPH069004LOAEPH049037L
Page 444 of 635
6-8
What to do in an emergency
If your vehicle will not start after a
few attempts, it probably requires
servicing. In this event please seek
qualified assistance. If the cause of
your battery discharging is not
apparent, have your vehicle checked
by an authorized HYUNDAI dealer.
Disconnect the jumper cables in the
exact reverse order you connected
them:
1. Disconnect the jumper cable from
the black, negative (-) chassis
ground of your vehicle (4).
2. Disconnect the other end of the
jumper cable from the black, neg-
ative (-) battery/chassis ground of
the assisting vehicle (3).
3. Disconnect the second jumper
cable from the red, positive (+)
battery/jumper terminal of the
assisting vehicle (2).
4. Disconnect the other end of the
jumper cable from the red, positive
(+) jumper terminal of your vehicle
(1).
Information
The voltage range of the charger
should be 13.3~14V and its current
range should be less than 60A. (13.8V
is recommended).
Information
An inappropriately disposed
battery can be harmful to the
environment and human
health. Dispose of the battery
according to your local law(s)
or regulations.
To prevent damage to your vehi-
cle:
• Only use a 12-volt power supply
(battery or jumper system) to
jump start your vehicle.
Do not attempt to jump start
your vehicle by push-starting.
NOTICE
ii
Pb
The use of an improper charg-
er with a voltage and current
range higher than specified
may cause overheating and
damage to the 12V battery.
The use of an incorrect charg-
er will lead to a power shut-off
to save the 12V battery. Stop
using the incorrect charger
once the power of the vehicle
is shut off.
CAUTION
Page 446 of 635
6-10
Information
An inappropriately disposed
battery can be harmful to the
environment and human
health. Dispose of the battery
according to your local law(s)
or regulations.
To prevent damage to your vehicle:
Only use a 12-volt power supply
(battery or jumper system) to
jump start your vehicle.
Do not attempt to jump start
your vehicle by push-starting.
Jump starting procedure
1. Position the vehicles close enough
that the jumper cables will reach,
but do not allow the vehicles to
touch.
2. Avoid fans or any moving parts in
the engine compartment at all
times, even when the vehicles are
turned off.
3. Turn off all electrical devices such
as radios, lights, air conditioning,
etc. Put the vehicles in P (Park)
and set the parking brake. Turn
both vehicles OFF.
Information
Your vehicle has a battery in the lug-
gage compartment, but when you
jump start your vehicle, use the
jumper terminal in the engine com-
partment.
i
NOTICE
i
What to do in an emergency
(Continued)
NEVER attempt to recharge
the battery when the vehicle's
battery cables are connected
to the battery.
The electrical ignition system
works with high voltage.
NEVER touch these compo-
nents with the engine running
or when the Engine Start/Stop
button is in the ON position.