engine HYUNDAI IX20 2016 Workshop Manual
[x] Cancel search | Manufacturer: HYUNDAI, Model Year: 2016, Model line: IX20, Model: HYUNDAI IX20 2016Pages: 385, PDF Size: 13.67 MB
Page 147 of 385

When the light switch is in the AUTO light
position, the taillights and headlights will
be turned ON or OFF automatically
depending on th")
471
Features of your vehicle
Auto light position (if equipped)
When the light switch is in the AUTO light
position, the taillights and headlights will
be turned ON or OFF automatically
depending on the amount of light outside
the vehicle.
High beam operation
To turn on the high beam headlights, push
the lever away from you. Pull it back for
low beams.
The high beam indicator will light when
the headlight high beams are switched on.
To prevent the battery from being dis-
charged, do not leave the lights on for a
prolonged time whilst the engine is not
running.
OED040801
CAUTION
• Never place anything over sensor
(1) located on the instrument
panel, this will ensure better auto-
light system control.
• Don’t clean the sensor using a
window cleaner, the cleanser may
leave a light film which could
interfere with sensor operation.
• If your vehicle has window tint or
other types of metallic coating on
the front windscreen, the Auto
light system may not work prop-
erly.
OYN049201
procarmanuals.com
Page 149 of 385

Fog lights are used to provide improved
visibility when visibility is poor due to fog,
rain or snow, etc. The fog lights will turn
on when")
473
Features of your vehicle
Front fog light (if equipped)
Fog lights are used to provide improved
visibility when visibility is poor due to fog,
rain or snow, etc. The fog lights will turn
on when the fog light switch (1) is turned
on after the parklight is turned on.
To turn off the fog lights, turn the fog light
switch (1) to the O (Off) position.
Rear fog light
To turn the rear fog lights on, turn the
rear fog light switch (1) to the on position
when the headlight is turned on.
Also, the rear fog lights turn on when the
rear fog light switch is turned on after the
front fog light switch (if equipped) is
turned on and the headlight switch is in
the parklight position.
To turn the rear fog lights off, turn the rear
fog light switch to the on position again.
Daytime running light
(if equipped)
The Daytime Running Lights (DRL) can
make it easier for others to see the front
of your vehicle during the day. DRL can
be helpful in many different driving condi-
tions, and it is especially helpful after
dawn and before sunset.
The DRL system will make the head-
lights turn OFF when:
1. The parklight switch is ON.
2. The engine is OFF.
OED040806
OAM049046L
■Type A
■Type B
OYN049200
CAUTION
When in operation, the fog lights
consume large amounts of vehicle
electrical power. Only use the fog
lights when visibility is poor.
procarmanuals.com
Page 153 of 385

In the O (Off) position, pull the lever gen-
tly toward you to spray washer fluid on
the windscreen and to run the wipers 1-3
cycles.
Use this")
477
Features of your vehicle
Windscreen washers (front)
In the O (Off) position, pull the lever gen-
tly toward you to spray washer fluid on
the windscreen and to run the wipers 1-3
cycles.
Use this function when the windscreen is
dirty.
The spray and wiper operation will con-
tinue until you release the lever.
If the washer does not work, check the
washer fluid level. If the fluid level is not
sufficient, you will need to add appropri-
ate non-abrasive windscreen washer
fluid to the washer reservoir.
The reservoir filler neck is located in the
front of the engine compartment on the
driver side.
OXM049048E
WARNING
Do not use the washer in freezing
temperatures without first warming
the windscreen with the defrosters;
the washer solution could freeze on
the windscreen and obscure your
vision.
CAUTION
• To prevent possible damage to
the wipers or windscreen, do not
operate the wipers when the
windscreen is dry.
• To prevent damage to the wiper
blades, do not use petrol,
kerosene, paint thinner, or other
solvents on or near them.
• To prevent damage to the wiper
arms and other components, do
not attempt to move the wipers
manually.
CAUTION
To prevent possible damage to the
washer pump, do not operate the
washer when the fluid reservoir is
empty.
procarmanuals.com
Page 155 of 385
 Map lamp (if equipped)
Push the lamp lens to turn the light on or
off. This light produces a spot beam for
convenient use as a map lamp at night or
as a pers")
479
Features of your vehicle
Room lamp
(1) Map lamp (if equipped)
Push the lamp lens to turn the light on or
off. This light produces a spot beam for
convenient use as a map lamp at night or
as a personal lamp for the driver and the
front passenger.
(2)
The light comes on when any door is
opened regardless of the ignition switch
position. When doors are unlocked by the
transmitter or smart key, or the key is
removed from the ignition switch, the
light comes on for approximately 30 sec-
onds as long as any door is not opened.
The light goes out gradually after approx-
imately 30 seconds if the door is closed.
However, if the ignition switch is ON or all
doors are locked, the light will turn off
immediately.
If a door is opened with the ignition
switch in the ACC or LOCK position, the
light stays on for about 20 minutes.
However, if a door is opened with the
ignition switch in the ON position, the
light stays on continuously.
(3)
In the on position, the light stays on at all
times.
(4) O
In the off position, the light stays off at all
times, even when a door is open.
INTERIOR LIGHT
CAUTION
Do not use the interior lights for
extended periods when engine is
not running.
It may cause battery discharge.OYN049048
OYN049049
OYN049095
■ ■T T
ype A ype A
■ ■T T
ype B ype B
■ ■T T
ype C ype C
procarmanuals.com
Page 156 of 385

Features of your vehicle
80 4
✽NOTICE
If you want to defrost and defog the
front windscreen, refer to “Windscreen
defrosting and defogging” in this sec-
tion.
Rear window defroster
The defroster heats the window to
remove frost, fog and thin ice from the
interior and exterior of the rear window,
whilst engine is running.
To activate the rear window defroster,
press the rear window defroster button
located in the centre facia switch panel.The indicator on the rear window
defroster button illuminates when the
defroster is ON.
If there is heavy accumulation of snow on
the rear window, brush it off before oper-
ating the rear defroster.
The rear window defroster automatically
turns off after approximately 20 minutes
or when the ignition switch is turned off.
To turn off the defroster, press the rear
window defroster button again.
Outside mirror defroster
(if equipped)
If your vehicle is equipped with outside
mirror defrosters, they will operate at the
same time when you turn on the rear
window defroster.
Front windscreen deicer
(if equipped)
If your vehicle is equipped with front
windscreen deicer, they will operate at
the same time when you turn on the rear
window defroster.
DEFROSTER
CAUTION
To prevent damage to the conduc-
tors bonded to the inside surface of
the rear window, never use sharp
instruments or window cleaners
containing abrasives to clean the
window.
OJC040056
OJC040055
■Man Man
ual c ual c
limate contr limate contr
ol ol
■A A
utomatic c utomatic c
limate contr limate contr
ol ol- Type A- Type B
procarmanuals.com
Page 158 of 385

Features of your vehicle
82 4
Heating and air conditioning
1. Start the engine.
2. Set the mode to the desired position.
To improve the effectiveness of heat-
ing and cooling :
- Heating:
- Cooling:
3. Set the temperature control to the
desired position.
4. Set the air intake control to the outside
(fresh) air position.
5. Set the fan speed control to the
desired speed.
6. If air conditioning is desired, turn the
air conditioning system (if equipped)
on.
OJC040096R
procarmanuals.com
Page 163 of 385

487
Features of your vehicle
Operation Tips
• To keep dust or unpleasant fumes from
entering the car through the ventilation
system, temporarily set the air intake
control to the recirculated air position.
Be sure to return the control to the
fresh air position when the irritation
has passed to keep fresh air in the
vehicle. This will help keep the driver
alert and comfortable.
• Air for the heating/cooling system is
drawn in through the grilles just ahead
of the windscreen. Care should be
taken that these are not blocked by
leaves, snow, ice or other obstructions.
• To prevent interior fog on the wind-
screen, set the air intake control to the
fresh air position and fan speed to the
desired position, turn on the air condi-
tioning system, and adjust the temper-
ature control to desired temperature.Air conditioning (if equipped)
All HYUNDAI Air Conditioning Systems
are filled with environmentally friendly
R-134a refrigerant which does not dam-
age the ozone layer.
1. Start the engine. Push the air condi-
tioning button.
2. Set the mode to the position.
3. Set the air intake control to the outside
air or recirculated air position.
4. Adjust the fan speed control and tem-
perature control to maintain maximum
comfort.✽NOTICE
• When using the air conditioning sys-
tem, monitor the temperature gauge
closely whilst driving up hills or in
heavy traffic when outside tempera-
tures are high. Air conditioning sys-
tem operation may cause engine over-
heating. Continue to use the blower
fan but turn the air conditioning sys-
tem off if the temperature gauge indi-
cates engine overheating.
• When opening the windows in humid
weather air conditioning may create
water droplets inside the vehicle.
Since excessive water droplets may
cause damage to electrical equipment,
air conditioning should only be used
with the windows closed.
Air conditioning system operation tips
• If the vehicle has been parked in direct
sunlight during hot weather, open the
windows for a short time to let the hot
air inside the vehicle escape.
• To help reduce moisture inside of the
windows on rainy or humid days,
decrease the humidity inside the vehi-
cle by operating the air conditioning
system.
procarmanuals.com
Page 164 of 385

Features of your vehicle
88 4
• During air conditioning system opera-
tion, you may occasionally notice a
slight change in engine speed as the
air conditioning compressor cycles.
This is a normal system operation
characteristic.
• Use the air conditioning system every
month only for a few minutes to ensure
maximum system performance.
• When using the air conditioning sys-
tem, you may notice clear water drip-
ping (or even puddling) on the ground
under the passenger side of the vehi-
cle. This is a normal system operation
characteristic.
• Operating the air conditioning system
in the recirculated air position provides
maximum cooling, however, continual
operation in this mode may cause the
air inside the vehicle to become stale.
• During cooling operation, you may
occasionally notice a misty air flow
because of rapid cooling and humid air
intake. This is a normal system opera-
tion characteristics.
Climate control air filter
(if equipped)
The climate control air filter installed
behind the glove box filters the dust or
other pollutants that come into the vehi-
cle from the outside through the heating
and air conditioning system. If dust or
other pollutants accumulate in the filter
over a period of time, the air flow from the
air vents may decrease, resulting in
moisture accumulation on the inside of
the windscreen even when the outside
(fresh) air position is selected. If this hap-
pens, have the climate control air filter
replaced by a HYUNDAI authorised
repairer.
✽NOTICE
• Replace the filter according to the
Maintenance Schedule.
If the vehicle is being driven in severe
conditions such as dusty, rough roads,
more frequent climate control air fil-
ter inspections and changes are
required.
• When the air flow rate suddenly
decreases, the system should be
checked at a HYUNDAI authorised
repairer.
1LDA5047
Outside air
Recirculated
air
Climate control
air filterBlower
Evaporator
coreHeater core
procarmanuals.com
Page 168 of 385

Features of your vehicle
92 4
Manual heating and air condition-
ing
The heating and cooling system can be
controlled manually by pressing buttons
other than the AUTO button. In this case,
the system works sequentially according
to the order of buttons selected.
When pressing any button (or turning
any knob) except AUTO button whilst
automatic operation, the functions not
selected will be controlled automatically.
1. Start the engine.
2. Set the mode to the desired position.
3. Set the temperature control to the
desired position.
4. Set the air intake control to the outside
(fresh) air position.
5. Set the fan speed control to the
desired speed.
6. If air conditioning is desired, turn the
air conditioning system on.
Press the AUTO button in order to con-
vert to full automatic control of the sys-
tem.
Mode selection
The mode selection button controls the
direction of the air flow through the venti-
lation system.
Refer to the illustration in the “Manual cli-
mate control system”.
If you press the button once, the corre-
sponding switch will turn on, and if you
press the button again, the switch will
turn off.Defrost-Level (A, D)
Most of the air flow is directed to the
windscreen.
Face-Level (B, D)
Air flow is directed toward the upper body
and face. Additionally, each outlet can be
controlled to direct the air discharged
from the outlet.
Floor-Level (C, E, A, D)
Most of the air flow is directed to the
floor.
Also you may select 2~3 modes at the
same time for desired air flow.
- face ( ) + floor ( ) mode
- face ( ) + defrost ( ) mode
- floor ( ) + defrost ( ) mode
- face ( ) + floor ( ) + defrost ( )
mode
OJC040068 ■Type A
■Type B
procarmanuals.com
Page 182 of 385
Features of your vehicle
106 4
✽NOTICE
Close the vanity mirror cover securely
and return the sunvisor to its original
position after use.
❈To learn how to use the vanity mirror
lamp, refer to "Interior light" in this sec-
tion.
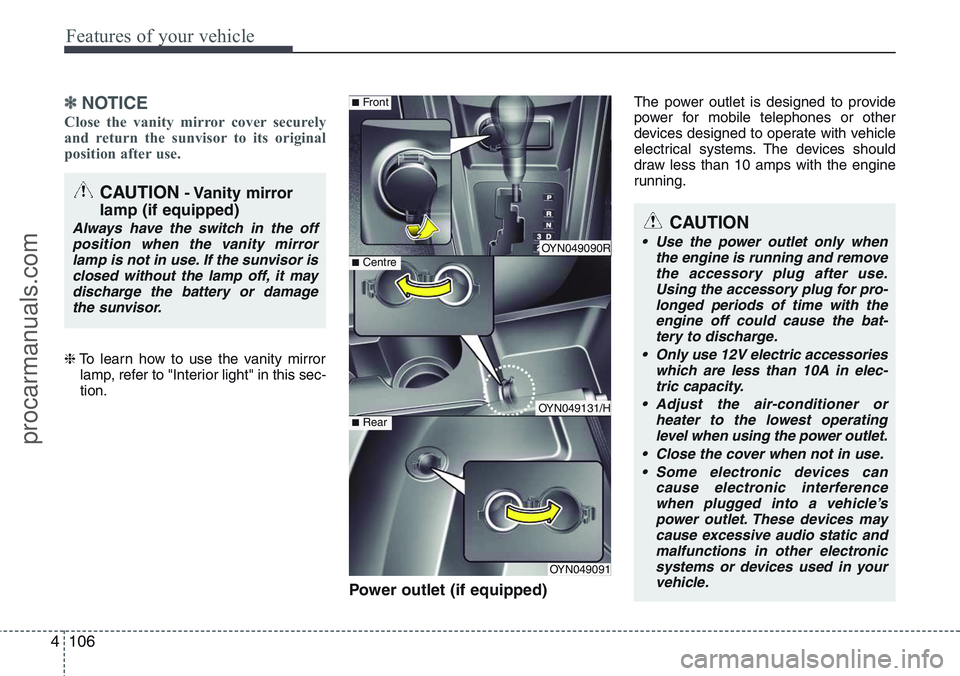
Power outlet (if equipped)
The power outlet is designed to provide
power for mobile telephones or other
devices designed to operate with vehicle
electrical systems. The devices should
draw less than 10 amps with the engine
running.
CAUTION- Vanity mirror
lamp (if equipped)
Always have the switch in the off
position when the vanity mirror
lamp is not in use. If the sunvisor is
closed without the lamp off, it may
discharge the battery or damage
the sunvisor.
OYN049090R
OYN049131/H
OYN049091
■Centre
■Front
■Rear
CAUTION
• Use the power outlet only when
the engine is running and remove
the accessory plug after use.
Using the accessory plug for pro-
longed periods of time with the
engine off could cause the bat-
tery to discharge.
• Only use 12V electric accessories
which are less than 10A in elec-
tric capacity.
• Adjust the air-conditioner or
heater to the lowest operating
level when using the power outlet.
• Close the cover when not in use.
• Some electronic devices can
cause electronic interference
when plugged into a vehicle’s
power outlet. These devices may
cause excessive audio static and
malfunctions in other electronic
systems or devices used in your
vehicle.
procarmanuals.com