change wheel HYUNDAI IX35 2010 User Guide
[x] Cancel search | Manufacturer: HYUNDAI, Model Year: 2010, Model line: IX35, Model: HYUNDAI IX35 2010Pages: 560, PDF Size: 28.31 MB
Page 281 of 560
Driving your vehicle
56
5
Use high quality ethylene glycol coolant
Your vehicle is delivered with high quality
ethylene glycol coolant in the cooling
system. It is the only type of coolant that
should be used because it helps prevent
corrosion in the cooling system, lubri-
cates the water pump and prevents
freezing. Be sure to replace or replenish
your coolant in accordance with the
maintenance schedule. Before winter,
have your coolant tested to assure that
its freezing point is sufficient for the tem-
peratures anticipated during the winter.
Check battery and cables
Winter puts additional burdens on the
battery system. Visually inspect the bat-
tery and cables as described in section
7. The level of charge in your battery can
be checked by a HYUNDAI authorised
repairer or a service station. Change to "winter weight" oil if
necessary In some climates it is recommended that
a lower viscosity "winter weight" oil be
used during cold weather. See section 8
for recommendations. If you aren't sure
what weight oil you should use, consult a
HYUNDAI authorised repairer.
Check spark plugs and ignition system
Inspect your spark plugs and replace
them if necessary. Also check all ignition
wiring and components to be sure they
are not cracked, worn or damaged in any
way.
CAUTION
Chains that are the wrong size or
improperly installed can damage
your vehicle's brake lines, sus-pension, body and wheels.
Stop driving and retighten the chains any time you hear them
hitting the vehicle.
WARNING - Tyre chains
The use of chains may adversely affect vehicle handling.
Do not exceed 20 mph (30 km/h) or the chain manufacturer’s rec-
ommended speed limit, whichev-
er is lower.
Drive carefully and avoid bumps, holes, sharp turns, and other
road hazards, which may cause
the vehicle to bounce.
Avoid sharp turns or locked- wheel braking.
EL UK 5.QXP 1/25/2010 9:57 AM Page 56
Page 286 of 560
561
Driving your vehicle
Following distance
Stay at least twice as far behind the vehi-
cle ahead as you would when driving
your vehicle without a trailer. This can
help you avoid situations that require
heavy braking and sudden turns.
Passing
You’ll need more passing distance up
ahead when you’re towing a trailer. And,
because of the increased vehicle length,
you’ll need to go much farther beyond the
passed vehicle before you can return to
your lane.
Backing up
Hold the bottom of the steering wheel
with one hand. Then, to move the trailer
to the left, just move your hand to the left.
To move the trailer to the right, move your
hand to the right. Always back up slowly
and, if possible, have someone guide
you.
Making turns
When you’re turning with a trailer, make
wider turns than normal. Do this so your
trailer won’t strike soft shoulders, kerbs,
road signs, trees, or other objects. Avoid
jerky or sudden manoeuvres. Signal well
in advance.
Turn signals when towing a trailer
When you tow a trailer, your vehicle has
to have a different turn signal flasher and
extra wiring. The green arrows on your
instrument panel will flash whenever you
signal a turn or lane change. Properly
connected, the trailer lights will also flash
to alert other drivers you’re about to turn,
change lanes, or stop.
When towing a trailer, the green arrows
on your instrument panel will flash for
turns even if the bulbs on the trailer are
burned out. Thus, you may think drivers
behind you are seeing your signals
when, in fact, they are not. It’s important
to check occasionally to be sure the trail-
er bulbs are still working. You must also
check the lights every time you discon-
nect and then reconnect the wires.
Do not connect a trailer lighting system
directly to your vehicle’s lighting system.
Use only an approved trailer wiring har-
ness.
A HYUNDAI authorised repairer can
assist you in installing the wiring harness.
EL UK 5.QXP 1/25/2010 9:57 AM Page 61
Page 295 of 560
63
What to do in an emergency
IN CASE OF AN EMERGENCY WHILST DRIVING
If the engine stalls at a crossroad
or crossing
If the engine stalls at a crossroad orcrossing, set the shift lever in the N
(Neutral) position and then push the
vehicle to a safe place.
If your vehicle has a manual transaxle not equipped with a ignition lock
switch, the vehicle can move forward
by shifting to the 2(second) or 3(third)
gear and then turning the starter with-out depressing the clutch pedal. If a puncture occurs whilst driv-
ing the vehicle
1. Bring the car to rest as soon as it is
safe to do so and with the minimum
amount of braking required which will
assist in maintaining the maximum
amount of control. The vehicle should
be parked wherever possible upon firm
level ground to facilitate wheel chang-ing.
2. If the vehicle is creating a hazard and the road conditions do not permit the
wheel to be changed safely, assis-tance should be sought.
3. Passengers must not be allowed to remain inside the vehicle during wheel
changing. If a puncture occurs whilst
the vehicle is on a motorway, the pas-
sengers should take refuge on the
motorway embankment to avoid the
possibility of injury occurring should
the vehicle be struck by other motor-
way traffic.
4. Wheel changing should be performed according to the following instructions. If engine stalls whilst driving
1. Reduce your speed gradually, keeping
a straight line. Move cautiously off the
road to a safe place.
2. Turn on your emergency flashers.
3. Try to start the engine again. If your vehicle will not start, contact a
HYUNDAI authorised repairer or seek
other qualified assistance.
EL UK 6.QXP 1/25/2010 9:58 AM Page 3
Page 305 of 560
613
What to do in an emergency
IF YOU HAVE A FLAT TYRE
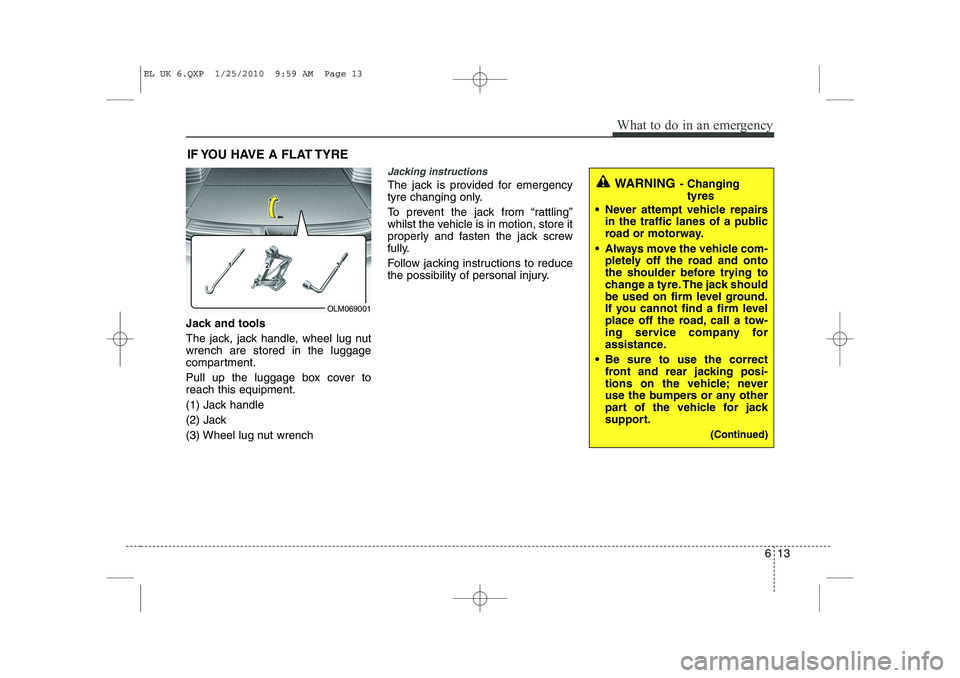
Jack and tools
The jack, jack handle, wheel lug nut wrench are stored in the luggage
compartment.
Pull up the luggage box cover to reach this equipment.
(1) Jack handle
(2) Jack
(3) Wheel lug nut wrench
Jacking instructions
The jack is provided for emergency
tyre changing only.
To prevent the jack from “rattling”
whilst the vehicle is in motion, store it
properly and fasten the jack screw
fully.
Follow jacking instructions to reduce
the possibility of personal injury.
OLM069001
WARNING - Changing
tyres
Never attempt vehicle repairs in the traffic lanes of a public
road or motorway.
Always move the vehicle com- pletely off the road and onto
the shoulder before trying to
change a tyre. The jack should
be used on firm level ground.
If you cannot find a firm level
place off the road, call a tow-
ing service company for
assistance.
Be sure to use the correct front and rear jacking posi-
tions on the vehicle; never
use the bumpers or any other
part of the vehicle for jack
support.
(Continued)
EL UK 6.QXP 1/25/2010 9:59 AM Page 13
Page 307 of 560
615
What to do in an emergency
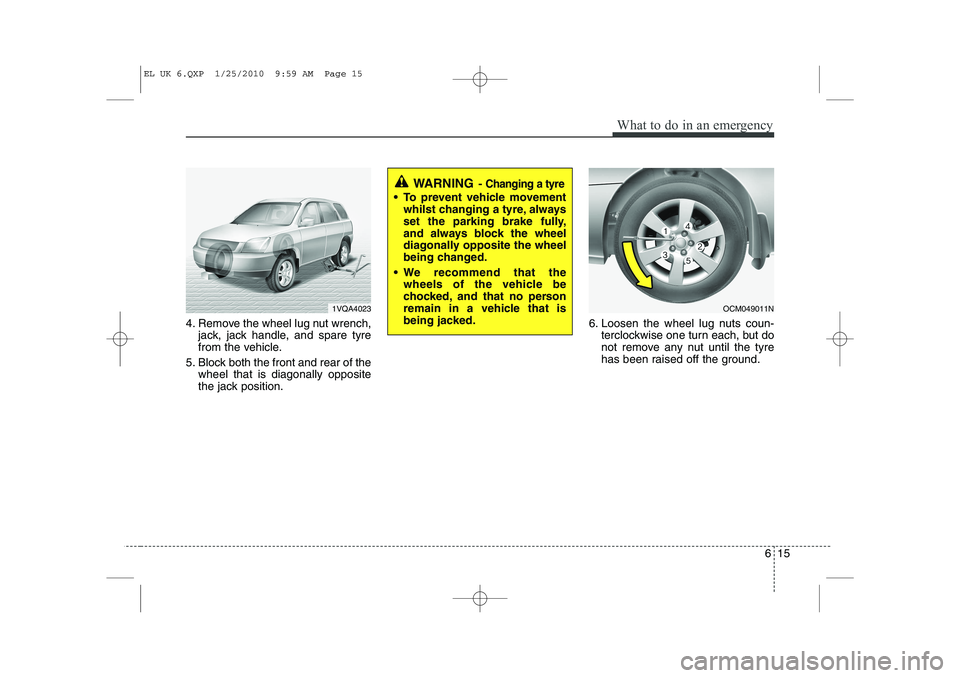
4. Remove the wheel lug nut wrench,jack, jack handle, and spare tyre
from the vehicle.
5. Block both the front and rear of the wheel that is diagonally opposite
the jack position. 6. Loosen the wheel lug nuts coun-
terclockwise one turn each, but do
not remove any nut until the tyre
has been raised off the ground.
WARNING - Changing a tyre
To prevent vehicle movement
whilst changing a tyre, always
set the parking brake fully,
and always block the wheel
diagonally opposite the wheel
being changed.
We recommend that the wheels of the vehicle be
chocked, and that no person
remain in a vehicle that is
being jacked.
1VQA4023OCM049011N
EL UK 6.QXP 1/25/2010 9:59 AM Page 15
Page 310 of 560
What to do in an emergency
18
6
If you have a tyre gauge, remove the
valve cap and check the air pressure.
If the pressure is lower than recom-
mended, drive slowly to the nearest
service station and inflate to the cor-
rect pressure. If it is too high, adjust
it until it is correct. Always reinstall
the valve cap after checking or
adjusting tyre pressure. If the cap is
not replaced, air may leak from the
tyre. If you lose a valve cap, buyanother and install it as soon as pos-
sible.
After you have changed wheels,
always secure the flat tyre in its place
and return the jack and tools to their
proper storage locations. To prevent the jack, jack handle,
wheel lug nut wrench and spare tyre
from rattling whilst the vehicle is in
motion, store them properly.CAUTION
Your vehicle has metric threads
on the wheel studs and nuts.Make certain during wheel removal that the same nuts thatwere removed are reinstalled -or, if replaced, that nuts with metric threads and the samechamfer configuration are used.Installation of a non-metric thread nut on a metric stud orvice-versa will not secure thewheel to the hub properly andwill damage the stud so that it must be replaced.
Note that most lug nuts do nothave metric threads. Be sure touse extreme care in checking for thread style before installingaftermarket lug nuts or wheels.If in doubt, consult a HYUNDAIauthorised repairer.
WARNING - Wheel studs
If the studs are damaged, they
may lose their ability to retain
the wheel. This could lead to theloss of the wheel and a collisionresulting in serious injuries.
WARNING - Inadequate
spare tyre pressure
Check the inflation pressures as
soon as possible after installing
the spare tyre. Adjust it to the
specified pressure, if necessary.
Refer to “Tyres and wheels” insection 8.
EL UK 6.QXP 1/25/2010 9:59 AM Page 18
Page 326 of 560
Maintenance
6
7
OWNER MAINTENANCE
The following lists are vehicle checks and
inspections that should be performed by
the owner or a HYUNDAI authorisedrepairer at the frequencies indicated to
help ensure safe, dependable operation
of your vehicle.
Any adverse conditions should be
brought to the attention of your dealer as
soon as possible.
These Owner Maintenance Checks are
generally not covered by warranties and
you may be charged for labour, parts and
lubricants used. Owner maintenance schedule
When you stop for fuel:
Check the engine oil level.
Check coolant level in coolant reser-
voir.
Check the windscreen washer fluid level.
Look for low or under-inflated tyres.
Whilst operating your vehicle:
Note any changes in the sound of the exhaust or any smell of exhaust fumes
in the vehicle.
Check for vibrations in the steering wheel. Notice any increased steering
effort or looseness in the steering
wheel, or change in its straight-aheadposition.
Notice if your vehicle constantly turns slightly or “pulls” to one side when trav-
elling on smooth, level road.
When stopping, listen and check for unusual sounds, pulling to one side,
increased brake pedal travel or “hard-
to-push” brake pedal.
If any slipping or changes in the oper- ation of your transaxle occurs, check
the transaxle fluid level.
Check manual transaxle operation, including clutch operation.
Check automatic transaxle P (Park) function.
Check parking brake.
Check for fluid leaks under your vehicle (water dripping from the air condition-
ing system during or after use is nor-mal).
WARNING
Be careful when checking your
engine coolant level when the
engine is hot. Scalding hot coolant
and steam may blow out under
pressure. This could cause burns
or other serious injury.
EL UK 7.QXP 1/25/2010 10:01 AM Page 6
Page 411 of 560
Index
10
I
Tachometer ····································································4-43 Tailgate ··········································································4-17
Emergency tailgate safety release ····························4-18
Tether anchor system ·····················································3-33
Theft-alarm system ························································4-11
Tilt steering ····································································4-34Towing ···········································································6-24 Emergency towing ···················································6-26
Removable towing hook ··········································6-25
Trailer towing ·································································5-58Transaxle Automatic transaxle ·················································5-17
Manual transaxle ······················································5-14
Tripmeter ·······································································4-47
Trip computer ································································4-46
Turn signals and lane change signals ·····························4-75
Turn signal light bulb replacement ································7-51
TyreMobilityKit ······························································6-19
Tyre Pressure Monitoring System (TPMS) ······················6-8
Tyre specification and pressure label ······························8-8
Tyres and wheels ····················································7-29, 8-3 Checking tyre inflation pressure ······························7-31
Recommended cold tyre inflation pressures ············7-29
Tyre care ··································································7-29
Tyre maintenance ·····················································7-35
Tyre replacement ······················································7-33 Tyre rotation ·····························································7-32
Tyre sidewall labeling ··············································7-35
Tyre traction ·····························································7-35
Wheel alignment and tyre balance ···························7-33
Wheel replacement ···················································7-34
Vanity mirror lamp ·························································4-83
Vehicle certification label ················································8-7
Vehicle handling instructions ···········································1-5
Vehicle identification number (VIN) ······························8-7
Vehicle run-in process ·····················································1-5
Vehicle weight ·······························································5-67 GAW (Gross axle weight) ·······································5-67
GAWR (Gross axle weight rating) ··························5-67
GVW (Gross vehicle weight) ··································5-67
GVWR (Gross vehicle weight rating) ·····················5-67
Payload ······································································5-67
Vehicle kerb weight ·················································5-67
V
T
EL UK INDEX.QXP 1/12/2010 3:27 PM Page 10
Page 445 of 560
433
Features of your vehicle
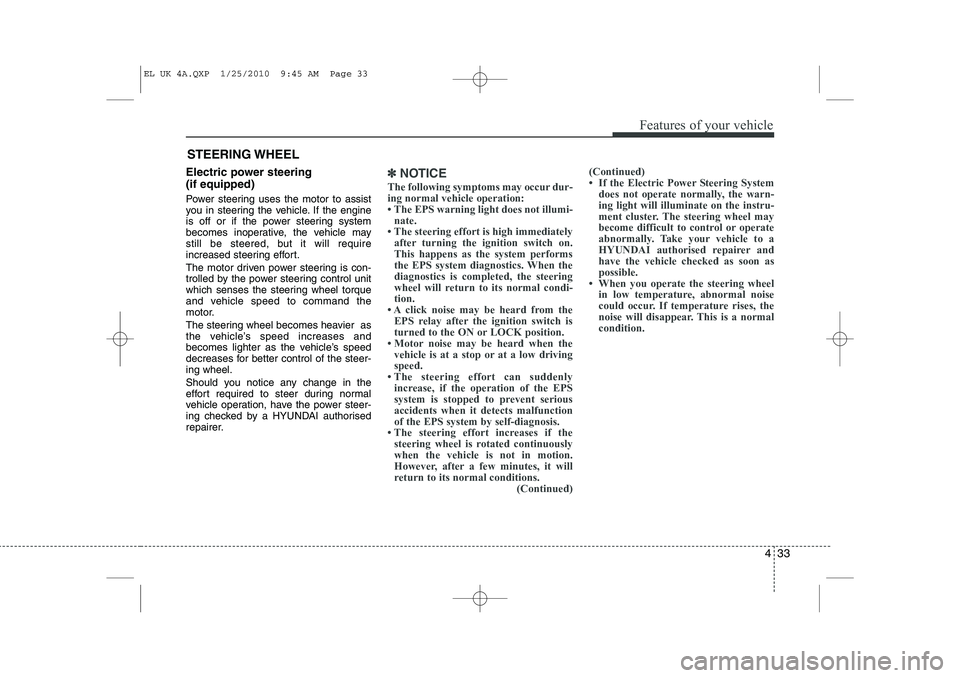
Electric power steering (if equipped)
Power steering uses the motor to assist
you in steering the vehicle. If the engine
is off or if the power steering system
becomes inoperative, the vehicle may
still be steered, but it will require
increased steering effort.
The motor driven power steering is con-
trolled by the power steering control unit
which senses the steering wheel torque
and vehicle speed to command the
motor.
The steering wheel becomes heavier as
the vehicle’s speed increases and
becomes lighter as the vehicle’s speed
decreases for better control of the steer-ing wheel.
Should you notice any change in the
effort required to steer during normal
vehicle operation, have the power steer-
ing checked by a HYUNDAI authorised
repairer.✽✽NOTICE
The following symptoms may occur dur- ing normal vehicle operation:
Page 446 of 560
Features of your vehicle
34
4
CAUTION
Do not strike the horn severely to
operate it, or hit it with your fist. Donot press on the horn with a sharp-
pointed object.
Tilt steering
A tilt steering wheel allows you to adjust
the steering wheel before you drive. You
can also raise it to give your legs more
room when you exit and enter the vehicle(if equipped).
The steering wheel should be positioned
so that it is comfortable for you to drive,
whilst permitting you to see the instru-
ment panel warning lights and gauges.
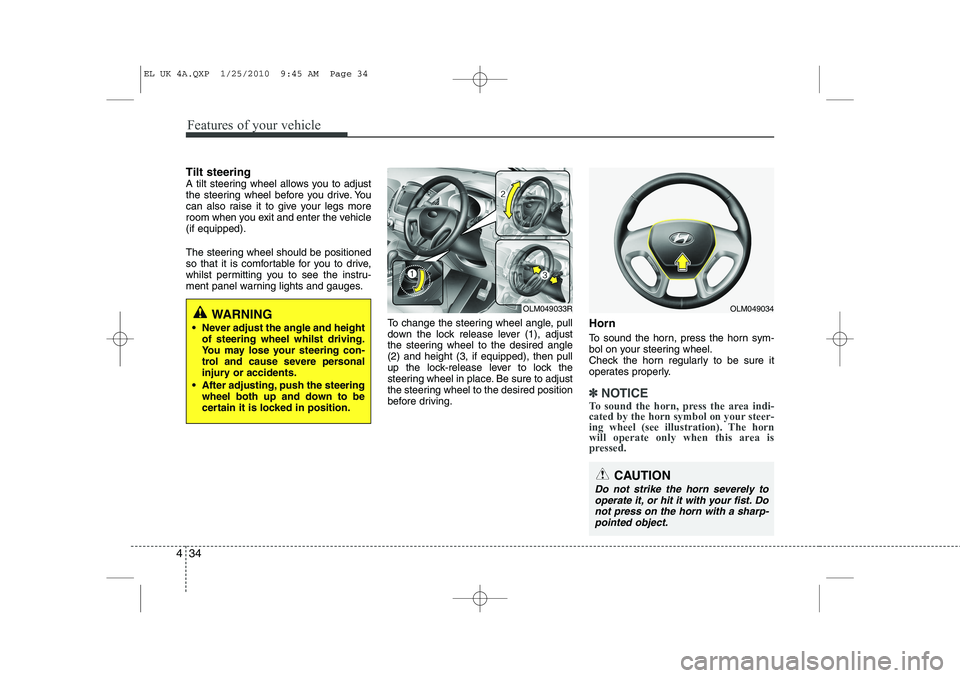
To change the steering wheel angle, pull
down the lock release lever (1), adjust
the steering wheel to the desired angle(2) and height (3, if equipped), then pull
up the lock-release lever to lock the
steering wheel in place. Be sure to adjust
the steering wheel to the desired position
before driving.Horn
To sound the horn, press the horn sym-
bol on your steering wheel.
Check the horn regularly to be sure it
operates properly.
✽✽
NOTICE
To sound the horn, press the area indi-
cated by the horn symbol on your steer-
ing wheel (see illustration). The horn
will operate only when this area is
pressed.
WARNING
Never adjust the angle and height of steering wheel whilst driving.
You may lose your steering con-
trol and cause severe personal
injury or accidents.
After adjusting, push the steering wheel both up and down to be
certain it is locked in position.OLM049034OLM049033R
EL UK 4A.QXP 1/25/2010 9:45 AM Page 34