HYUNDAI IX35 2011 Owners Manual
Manufacturer: HYUNDAI, Model Year: 2011, Model line: IX35, Model: HYUNDAI IX35 2011Pages: 560, PDF Size: 28.31 MB
Page 521 of 560
4 109
Features of your vehicle
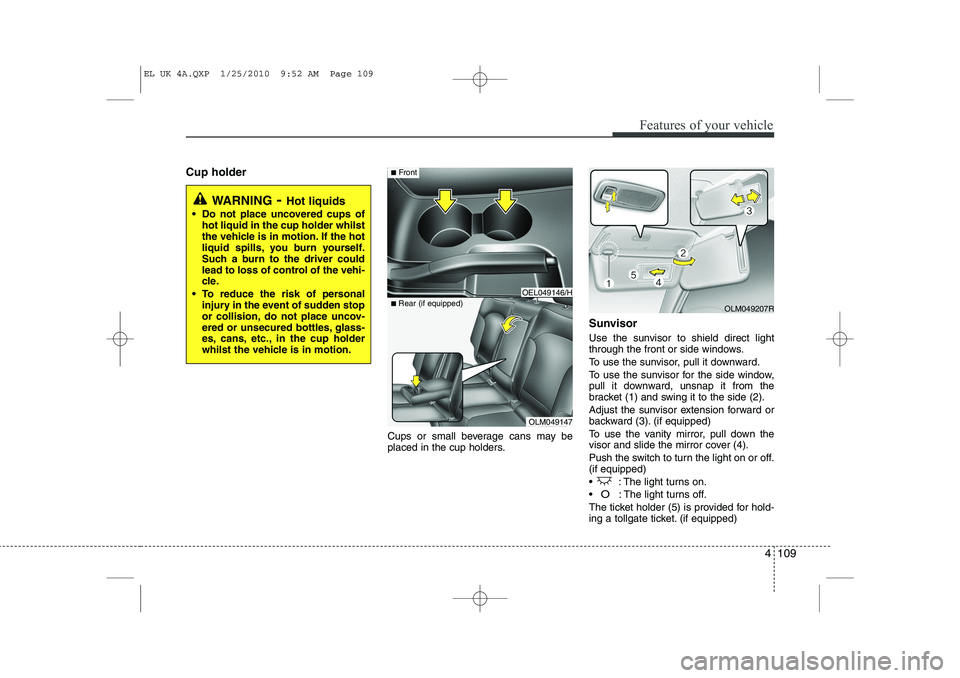
Cup holderCups or small beverage cans may be
placed in the cup holders.Sunvisor
Use the sunvisor to shield direct light
through the front or side windows.
To use the sunvisor, pull it downward.
To use the sunvisor for the side window,
pull it downward, unsnap it from the
bracket (1) and swing it to the side (2).
Adjust the sunvisor extension forward or
backward (3). (if equipped)
To use the vanity mirror, pull down the
visor and slide the mirror cover (4).
Push the switch to turn the light on or off. (if equipped)
: The light turns on.
O: The light turns off.
The ticket holder (5) is provided for hold-
ing a tollgate ticket. (if equipped)
WARNING - Hot liquids
Do not place uncovered cups of hot liquid in the cup holder whilst
the vehicle is in motion. If the hot
liquid spills, you burn yourself.
Such a burn to the driver could
lead to loss of control of the vehi-
cle.
To reduce the risk of personal injury in the event of sudden stop
or collision, do not place uncov-
ered or unsecured bottles, glass-
es, cans, etc., in the cup holder
whilst the vehicle is in motion.
OLM049147
■
Rear (if equipped)
OEL049146/H
■Front
OLM049207R
EL UK 4A.QXP 1/25/2010 9:52 AM Page 109
Page 522 of 560
Features of your vehicle
110
4
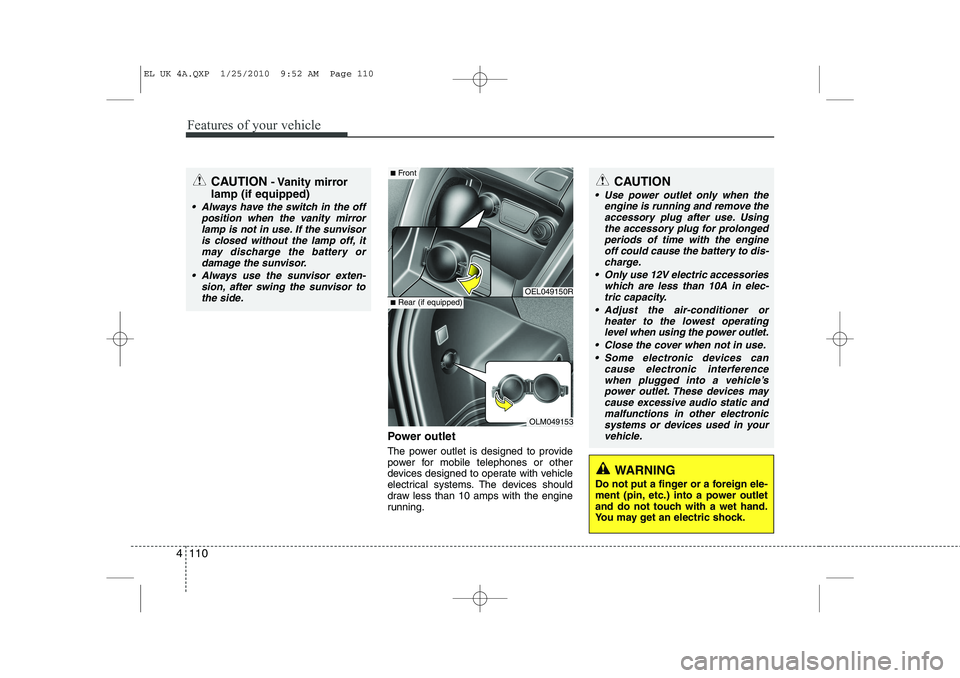
Power outlet
The power outlet is designed to provide
power for mobile telephones or other
devices designed to operate with vehicle
electrical systems. The devices should
draw less than 10 amps with the engine
running.
CAUTION - Vanity mirror
lamp (if equipped)
Always have the switch in the off position when the vanity mirror
lamp is not in use. If the sunvisoris closed without the lamp off, itmay discharge the battery or damage the sunvisor.
Always use the sunvisor exten- sion, after swing the sunvisor tothe side.
OEL049150R
OLM049153
■ Front
■Rear (if equipped)
CAUTION
Use power outlet only when the
engine is running and remove the
accessory plug after use. Using the accessory plug for prolongedperiods of time with the engineoff could cause the battery to dis-
charge.
Only use 12V electric accessories which are less than 10A in elec-tric capacity.
Adjust the air-conditioner or heater to the lowest operatinglevel when using the power outlet.
Close the cover when not in use. Some electronic devices can cause electronic interference
when plugged into a vehicle’s power outlet. These devices maycause excessive audio static and malfunctions in other electronic
systems or devices used in yourvehicle.
WARNING
Do not put a finger or a foreign ele-
ment (pin, etc.) into a power outlet
and do not touch with a wet hand.
You may get an electric shock.
EL UK 4A.QXP 1/25/2010 9:52 AM Page 110
Page 523 of 560
4 111
Features of your vehicle
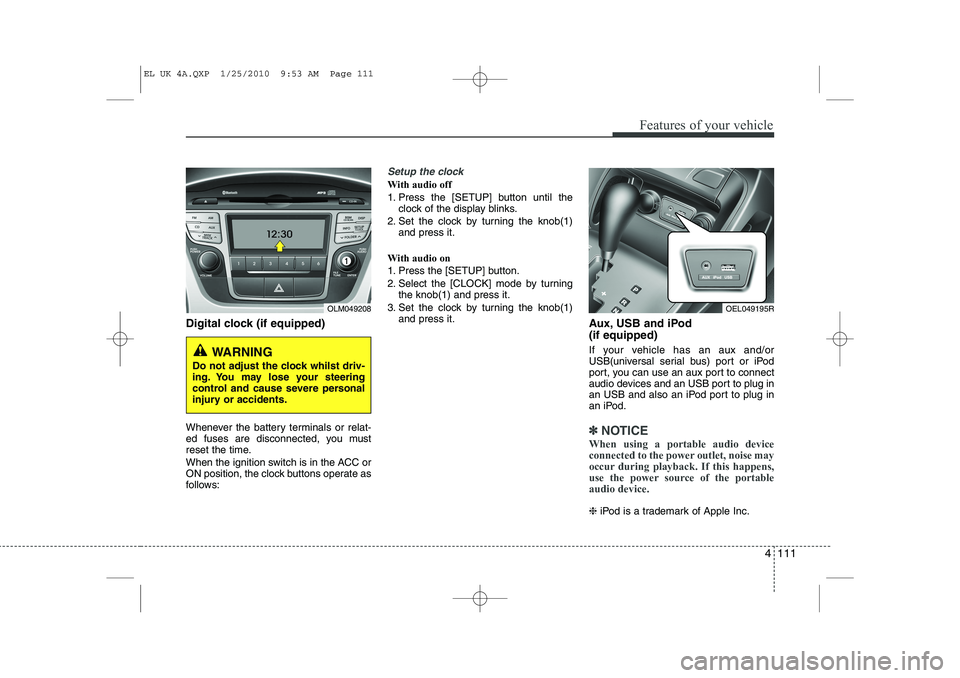
Digital clock (if equipped)
Whenever the battery terminals or relat-
ed fuses are disconnected, you must
reset the time.
When the ignition switch is in the ACC or
ON position, the clock buttons operate as
follows:
Setup the clock
With audio off
1. Press the [SETUP] button until theclock of the display blinks.
2. Set the clock by turning the knob(1) and press it.
With audio on
1. Press the [SETUP] button.
2. Select the [CLOCK] mode by turning the knob(1) and press it.
3. Set the clock by turning the knob(1) and press it. Aux, USB and iPod (if equipped)
If your vehicle has an aux and/or
USB(universal serial bus) port or iPod
port, you can use an aux port to connect
audio devices and an USB port to plug in
an USB and also an iPod port to plug in
an iPod.
✽✽NOTICE
When using a portable audio device
connected to the power outlet, noise may
occur during playback. If this happens,
use the power source of the portableaudio device.
❈ iPod is a trademark of Apple Inc.
OLM049208
WARNING
Do not adjust the clock whilst driv-
ing. You may lose your steering
control and cause severe personal
injury or accidents.
OEL049195R
EL UK 4A.QXP 1/25/2010 9:53 AM Page 111
Page 524 of 560
Features of your vehicle
112
4
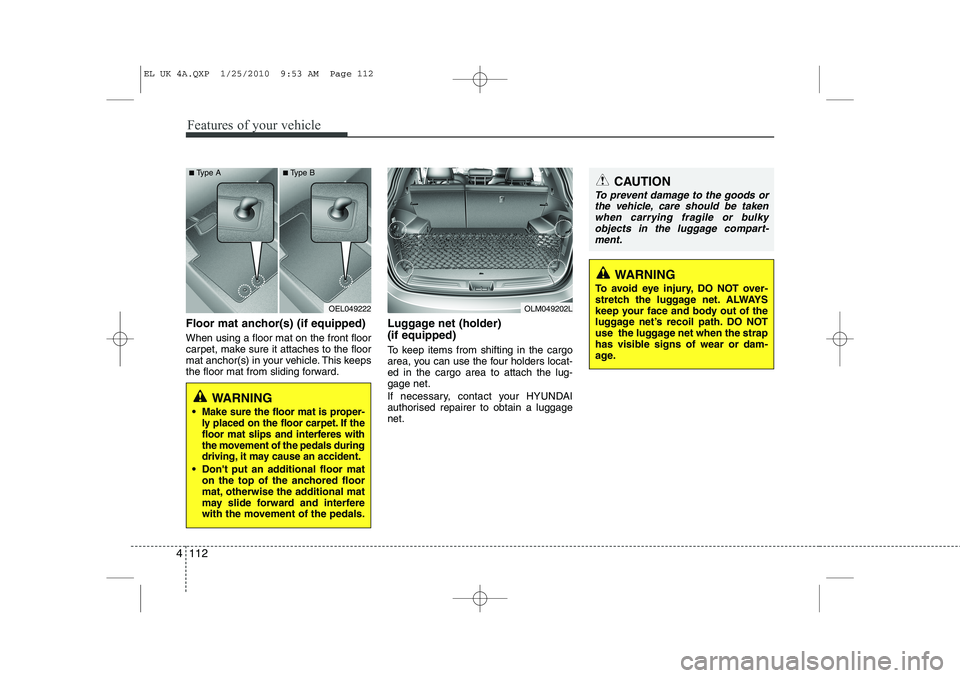
Floor mat anchor(s) (if equipped) When using a floor mat on the front floor
carpet, make sure it attaches to the floor
mat anchor(s) in your vehicle. This keeps
the floor mat from sliding forward. Luggage net (holder) (if equipped)
To keep items from shifting in the cargo
area, you can use the four holders locat-ed in the cargo area to attach the lug-gage net.
If necessary, contact your HYUNDAI
authorised repairer to obtain a luggagenet.
OEL049222
WARNING
Make sure the floor mat is proper-
ly placed on the floor carpet. If the
floor mat slips and interferes with
the movement of the pedals during
driving, it may cause an accident.
Don't put an additional floor mat on the top of the anchored floor
mat, otherwise the additional mat
may slide forward and interfere
with the movement of the pedals.
OLM049202L
CAUTION
To prevent damage to the goods or
the vehicle, care should be taken
when carrying fragile or bulkyobjects in the luggage compart-ment.
WARNING
To avoid eye injury, DO NOT over-
stretch the luggage net. ALWAYS
keep your face and body out of the
luggage net’s recoil path. DO NOT
use the luggage net when the strap
has visible signs of wear or dam-
age.
■ Type A ■Type B
EL UK 4A.QXP 1/25/2010 9:53 AM Page 112
Page 525 of 560
4 113
Features of your vehicle
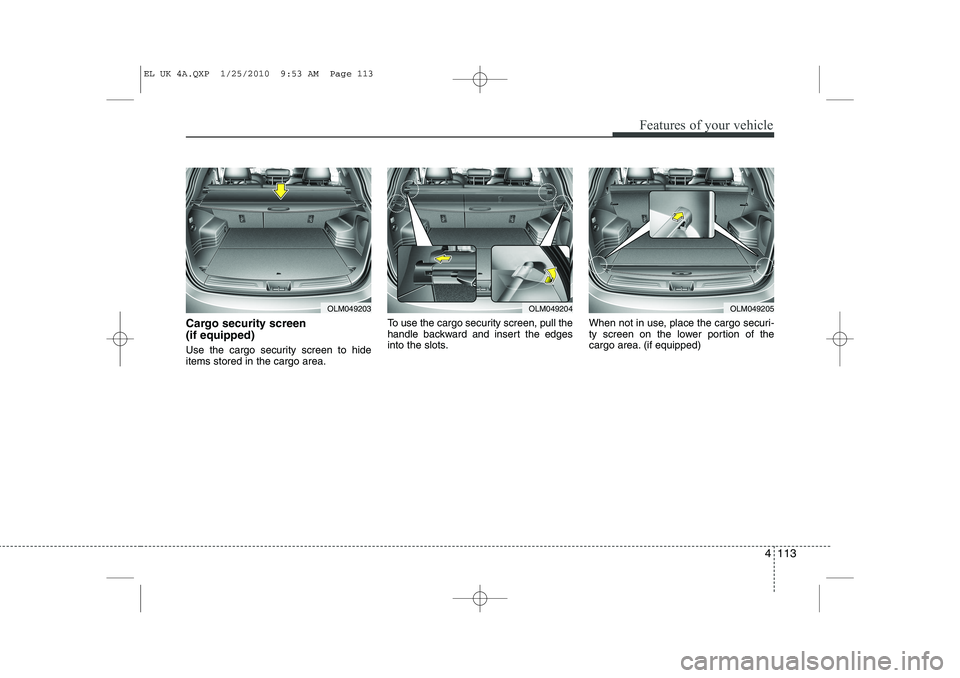
Cargo security screen (if equipped)
Use the cargo security screen to hide items stored in the cargo area.To use the cargo security screen, pull the
handle backward and insert the edges
into the slots.
When not in use, place the cargo securi-
ty screen on the lower portion of the
cargo area. (if equipped)
OLM049203OLM049204OLM049205
EL UK 4A.QXP 1/25/2010 9:53 AM Page 113
Page 526 of 560
Features of your vehicle
114
4
WARNING
Do not place objects on the cargo security screen. Such objects
may be thrown about inside the
vehicle and possibly injure vehi-
cle occupants during an accidentor when braking.
Never allow anyone to ride in the luggage compartment. It is
designed for luggage only.
Maintain the balance of the vehi- cle and locate the weight as far
forward as possible.
CAUTION
Since the cargo security screen
may be damaged or malformed, donot put the luggage on it when it is
used.
EL UK 4A.QXP 1/25/2010 9:53 AM Page 114
Page 527 of 560
4 115
Features of your vehicle
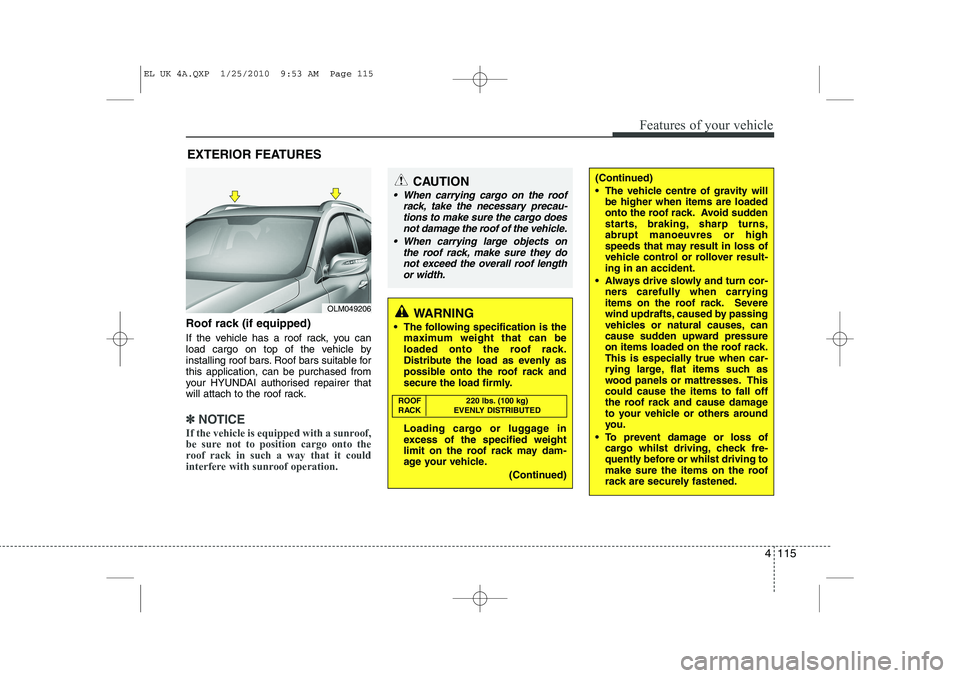
Roof rack (if equipped)
If the vehicle has a roof rack, you can
load cargo on top of the vehicle by
installing roof bars. Roof bars suitable forthis application, can be purchased from
your HYUNDAI authorised repairer that
will attach to the roof rack.
✽✽NOTICE
If the vehicle is equipped with a sunroof,
be sure not to position cargo onto the
roof rack in such a way that it could
interfere with sunroof operation.
EXTERIOR FEATURES
(Continued)
The vehicle centre of gravity will be higher when items are loaded
onto the roof rack. Avoid sudden
starts, braking, sharp turns,abrupt manoeuvres or high
speeds that may result in loss of
vehicle control or rollover result-ing in an accident.
Always drive slowly and turn cor- ners carefully when carrying
items on the roof rack. Severe
wind updrafts, caused by passing
vehicles or natural causes, can
cause sudden upward pressure
on items loaded on the roof rack.
This is especially true when car-
rying large, flat items such as
wood panels or mattresses. Thiscould cause the items to fall off
the roof rack and cause damage
to your vehicle or others around
you.
To prevent damage or loss of cargo whilst driving, check fre-
quently before or whilst driving to
make sure the items on the roof
rack are securely fastened.CAUTION
When carrying cargo on the roof
rack, take the necessary precau-
tions to make sure the cargo does not damage the roof of the vehicle.
When carrying large objects on the roof rack, make sure they do
not exceed the overall roof lengthor width.
WARNING
The following specification is the maximum weight that can be
loaded onto the roof rack.
Distribute the load as evenly as
possible onto the roof rack and
secure the load firmly.
Loading cargo or luggage in
excess of the specified weight
limit on the roof rack may dam-
age your vehicle.
(Continued)
ROOF 220 lbs. (100 kg)
RACK EVENLY DISTRIBUTED
OLM049206
EL UK 4A.QXP 1/25/2010 9:53 AM Page 115
Page 528 of 560
Features of your vehicle
116
4
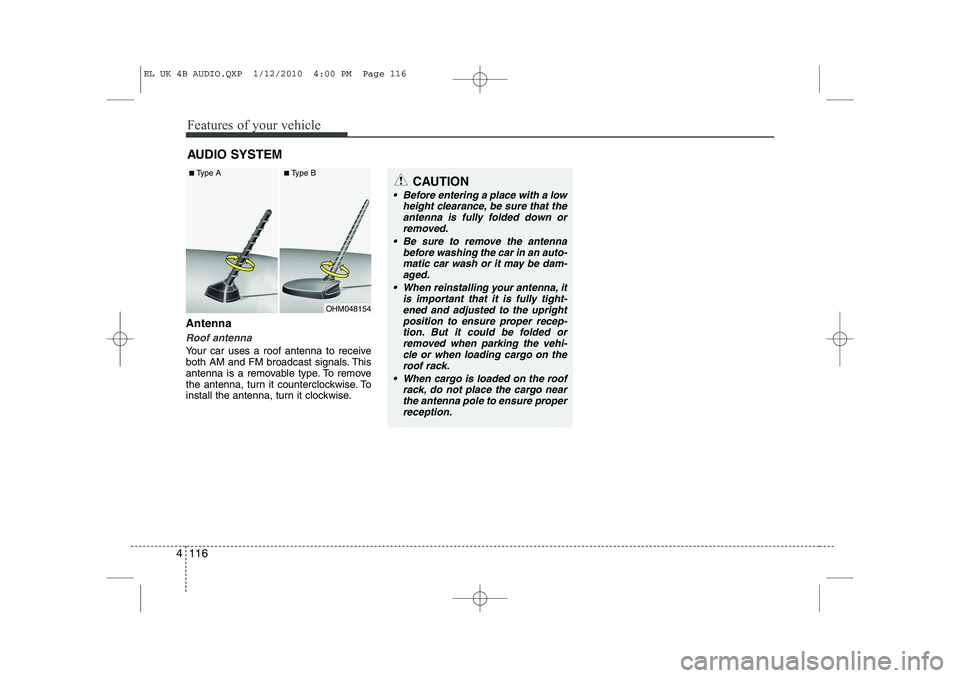
Antenna
Roof antenna
Your car uses a roof antenna to receive
both AM and FM broadcast signals. This
antenna is a removable type. To remove
the antenna, turn it counterclockwise. To
install the antenna, turn it clockwise. AUDIO SYSTEM
CAUTION
• Before entering a place with a low
height clearance, be sure that the
antenna is fully folded down or removed.
Be sure to remove the antenna before washing the car in an auto-
matic car wash or it may be dam- aged.
When reinstalling your antenna, it is important that it is fully tight-ened and adjusted to the upright
position to ensure proper recep- tion. But it could be folded orremoved when parking the vehi-
cle or when loading cargo on theroof rack.
When cargo is loaded on the roof rack, do not place the cargo nearthe antenna pole to ensure proper
reception.
OHM048154
■
Type A ■Type B
EL UK 4B AUDIO.QXP 1/12/2010 4:00 PM Page 116
Page 529 of 560
4 117
Features of your vehicle
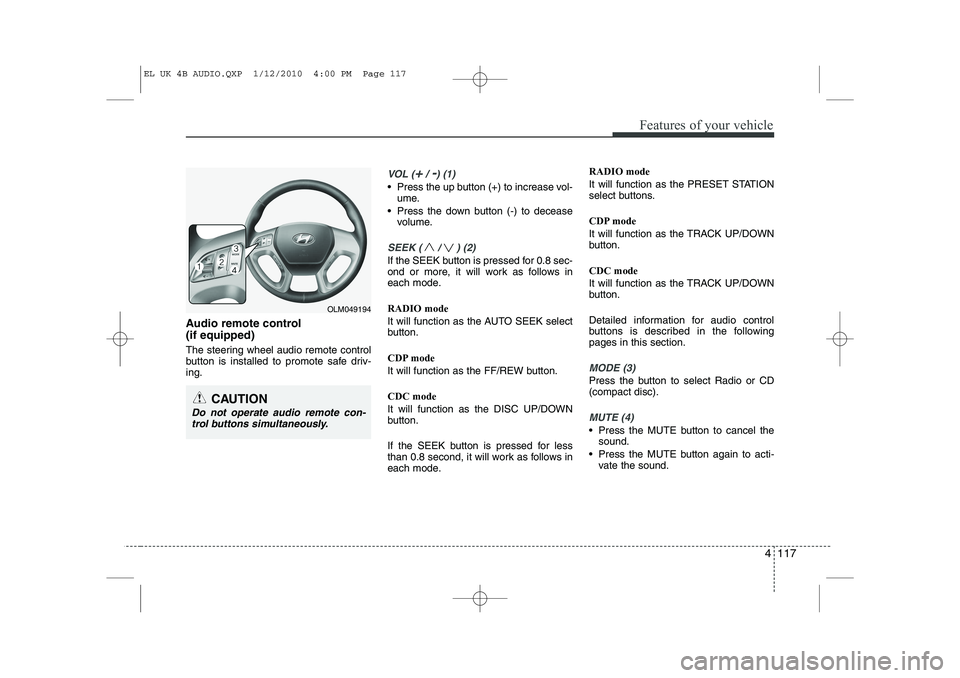
Audio remote control (if equipped)
The steering wheel audio remote control
button is installed to promote safe driv-ing.
VOL (+/ -) (1)
• Press the up button (+) to increase vol-ume.
Press the down button (-) to decease volume.
SEEK ( / ) (2)
If the SEEK button is pressed for 0.8 sec-
ond or more, it will work as follows in
each mode. RADIO mode
It will function as the AUTO SEEK select
button.
CDP mode
It will function as the FF/REW button. CDC mode
It will function as the DISC UP/DOWN
button.
If the SEEK button is pressed for less
than 0.8 second, it will work as follows in
each mode. RADIO mode
It will function as the PRESET STATION
select buttons.
CDP mode
It will function as the TRACK UP/DOWN
button. CDC mode
It will function as the TRACK UP/DOWN
button.
Detailed information for audio control
buttons is described in the followingpages in this section.
MODE (3)
Press the button to select Radio or CD (compact disc).
MUTE (4)
Press the MUTE button to cancel the
sound.
Press the MUTE button again to acti- vate the sound.
CAUTION
Do not operate audio remote con-
trol buttons simultaneously.
OLM049194
EL UK 4B AUDIO.QXP 1/12/2010 4:00 PM Page 117
Page 530 of 560
Features of your vehicle
118
4
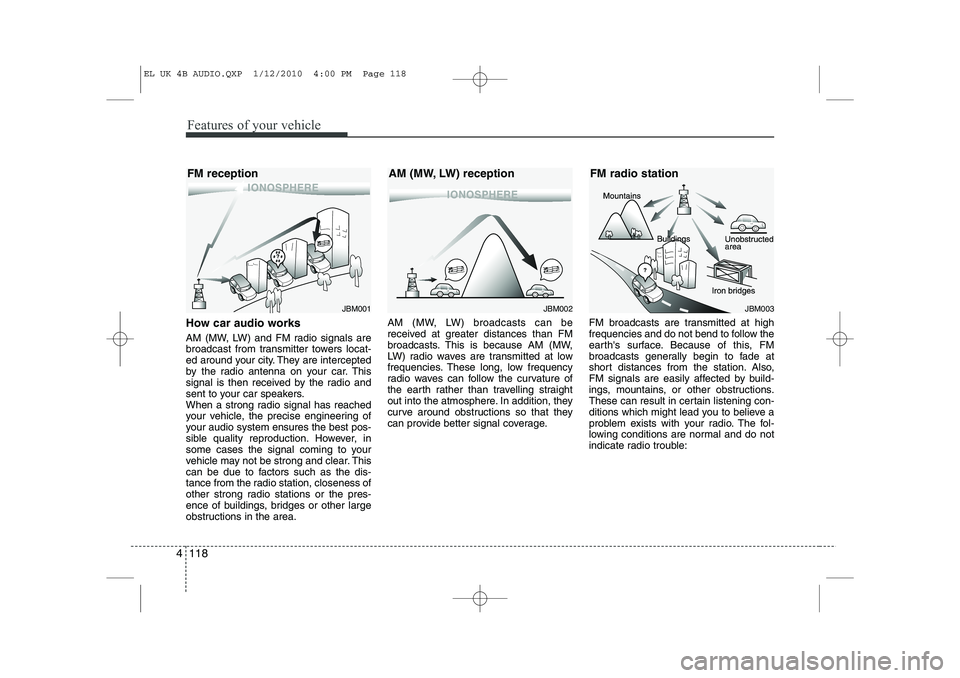
How car audio works
AM (MW, LW) and FM radio signals are
broadcast from transmitter towers locat-
ed around your city. They are intercepted
by the radio antenna on your car. This
signal is then received by the radio and
sent to your car speakers.
When a strong radio signal has reached
your vehicle, the precise engineering of
your audio system ensures the best pos-
sible quality reproduction. However, in
some cases the signal coming to your
vehicle may not be strong and clear. This
can be due to factors such as the dis-
tance from the radio station, closeness of
other strong radio stations or the pres-
ence of buildings, bridges or other large
obstructions in the area. AM (MW, LW) broadcasts can be
received at greater distances than FM
broadcasts. This is because AM (MW,
LW) radio waves are transmitted at low
frequencies. These long, low frequency
radio waves can follow the curvature of
the earth rather than travelling straight
out into the atmosphere. In addition, they
curve around obstructions so that they
can provide better signal coverage.
FM broadcasts are transmitted at high
frequencies and do not bend to follow the
earth's surface. Because of this, FM
broadcasts generally begin to fade at
short distances from the station. Also,
FM signals are easily affected by build-
ings, mountains, or other obstructions.
These can result in certain listening con-
ditions which might lead you to believe a
problem exists with your radio. The fol-
lowing conditions are normal and do not
indicate radio trouble:
JBM001JBM002
FM reception AM (MW, LW) receptionJBM003
FM radio station
EL UK 4B AUDIO.QXP 1/12/2010 4:00 PM Page 118