high beam HYUNDAI IX35 2011 Owners Manual
[x] Cancel search | Manufacturer: HYUNDAI, Model Year: 2011, Model line: IX35, Model: HYUNDAI IX35 2011Pages: 560, PDF Size: 28.31 MB
Page 6 of 560
Introduction
6
1
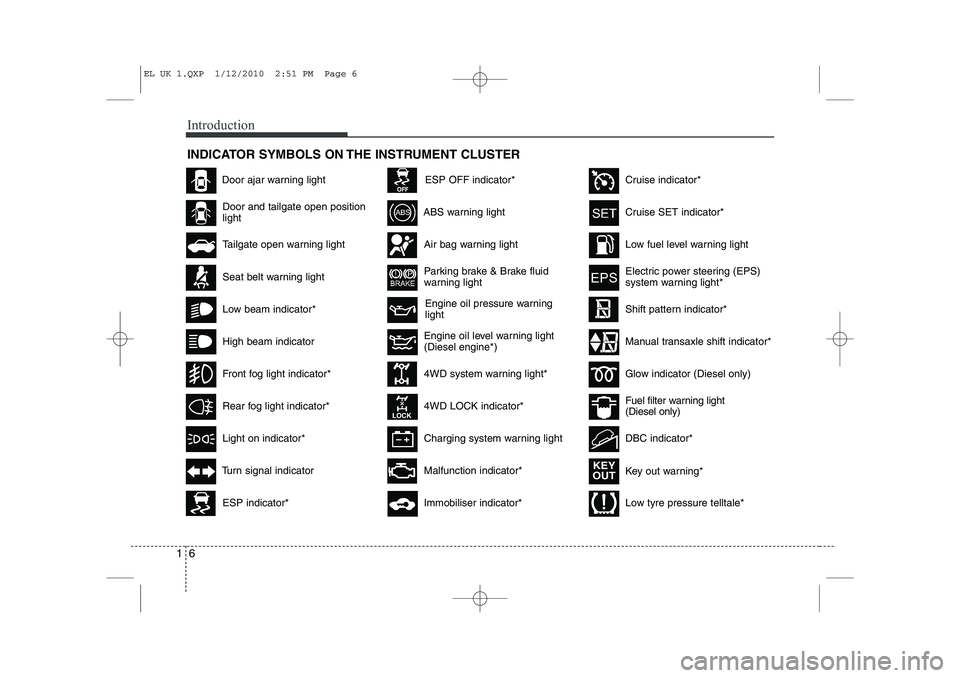
INDICATOR SYMBOLS ON THE INSTRUMENT CLUSTER
Engine oil pressure warning light
Seat belt warning light
Door and tailgate open position light
High beam indicator
Light on indicator*
Turn signal indicator
ABS warning light
Parking brake & Brake fluid
warning light
4WD system warning light* 4WD LOCK indicator*
Malfunction indicator*
Air bag warning light
Cruise SET indicator*
Low fuel level warning light
Charging system warning light
Door ajar warning light
Glow indicator (Diesel only)
Fuel filter warning light (Diesel only)
Cruise indicator*
ESP indicator*
ESP OFF indicator*
Immobiliser indicator*
Shift pattern indicator*
Front fog light indicator*
Rear fog light indicator*
Low beam indicator*
Electric power steering (EPS)
system warning light*
Key out warning*
KEY
OUT
DBC indicator*
Tailgate open warning light
Engine oil level warning light (Diesel engine*)
Low tyre pressure telltale*
Manual transaxle shift indicator*
EL UK 1.QXP 1/12/2010 2:51 PM Page 6
Page 127 of 560
Features of your vehicle
52
4
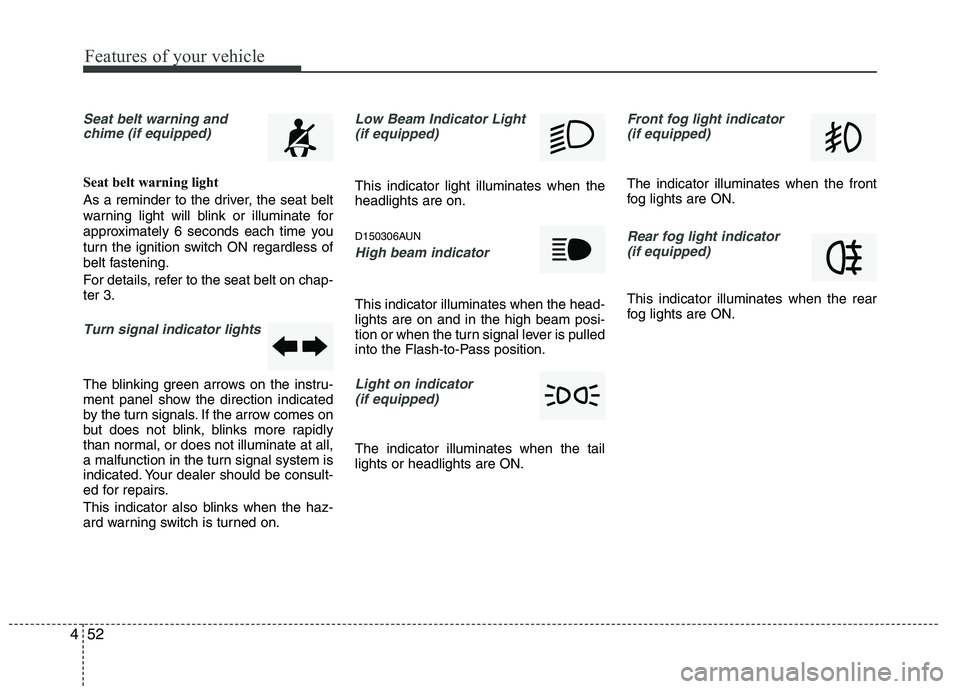
Seat belt warning and
chime (if equipped)
Seat belt warning light
As a reminder to the driver, the seat belt
warning light will blink or illuminate for
approximately 6 seconds each time you
turn the ignition switch ON regardless of
belt fastening.
For details, refer to the seat belt on chap- ter 3.
Turn signal indicator lights
The blinking green arrows on the instru-
ment panel show the direction indicated
by the turn signals. If the arrow comes on
but does not blink, blinks more rapidly
than normal, or does not illuminate at all,
a malfunction in the turn signal system is
indicated. Your dealer should be consult-
ed for repairs.
This indicator also blinks when the haz-
ard warning switch is turned on.
Low Beam Indicator Light
(if equipped)
This indicator light illuminates when the headlights are on.
D150306AUN
High beam indicator
This indicator illuminates when the head- lights are on and in the high beam posi-
tion or when the turn signal lever is pulled
into the Flash-to-Pass position.
Light on indicator (if equipped)
The indicator illuminates when the tail lights or headlights are ON.
Front fog light indicator (if equipped)
The indicator illuminates when the front
fog lights are ON.
Rear fog light indicator
(if equipped)
This indicator illuminates when the rear
fog lights are ON.
Page 149 of 560
Features of your vehicle
74
4
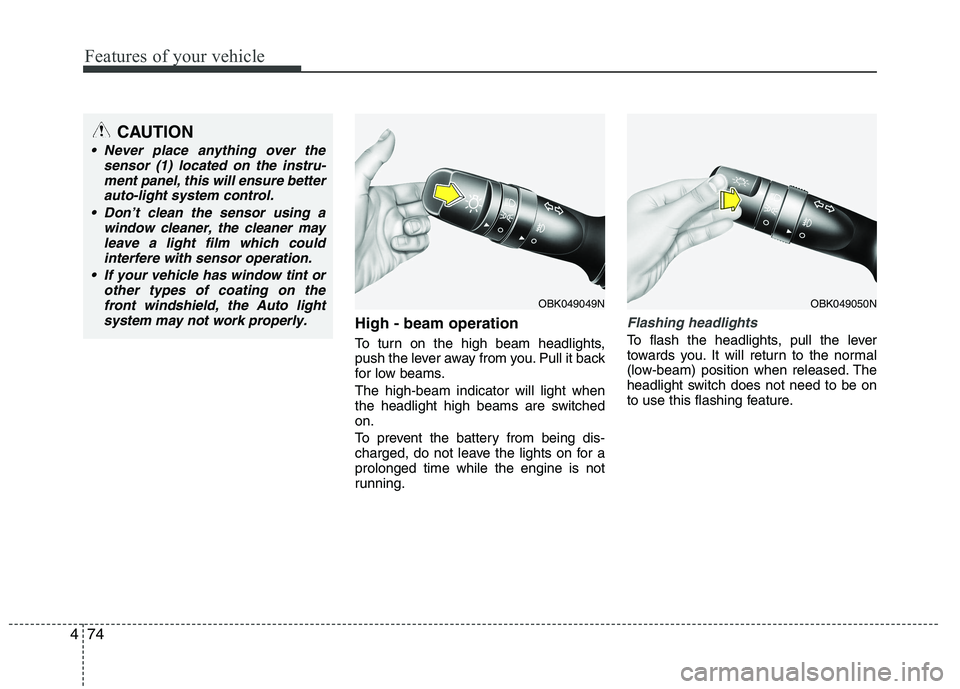
High - beam operation
To turn on the high beam headlights,
push the lever away from you. Pull it back
for low beams. The high-beam indicator will light when
the headlight high beams are switchedon.
To prevent the battery from being dis-
charged, do not leave the lights on for aprolonged time while the engine is not
running.Flashing headlights
To flash the headlights, pull the lever
towards you. It will return to the normal
(low-beam) position when released. The
headlight switch does not need to be on
to use this flashing feature.
OBK049049NOBK049050N
CAUTION
Never place anything over the
sensor (1) located on the instru-
ment panel, this will ensure betterauto-light system control.
Don’t clean the sensor using a window cleaner, the cleaner may
leave a light film which could interfere with sensor operation.
If your vehicle has window tint or other types of coating on thefront windshield, the Auto light
system may not work properly.
Page 152 of 560
477
Features of your vehicle
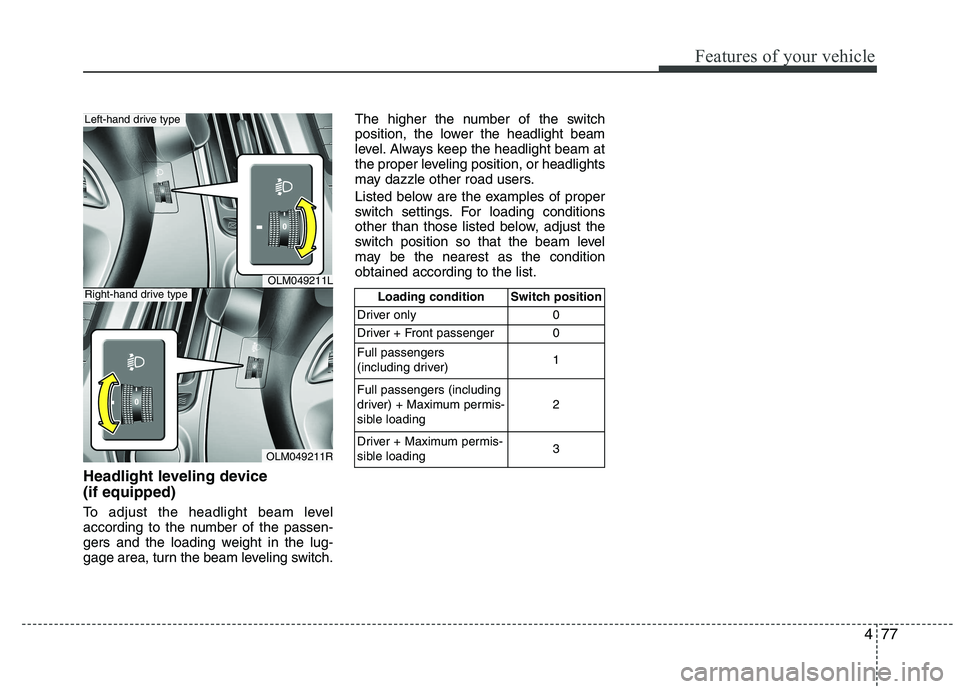
Headlight leveling device (if equipped)
To adjust the headlight beam level
according to the number of the passen-
gers and the loading weight in the lug-
gage area, turn the beam leveling switch.The higher the number of the switch
position, the lower the headlight beam
level. Always keep the headlight beam at
the proper leveling position, or headlights
may dazzle other road users.
Listed below are the examples of proper
switch settings. For loading conditions
other than those listed below, adjust the
switch position so that the beam level
may be the nearest as the conditionobtained according to the list.
OLM049211L
OLM049211R
Left-hand drive type
Right-hand drive typeLoading condition Switch position
Driver only 0
Driver + Front passenger 0 Full passengers
(including driver) 1
Full passengers (including
driver) + Maximum permis-
sible loading 2
Driver + Maximum permis-
sible loading 3
Page 464 of 560
Features of your vehicle
52
4
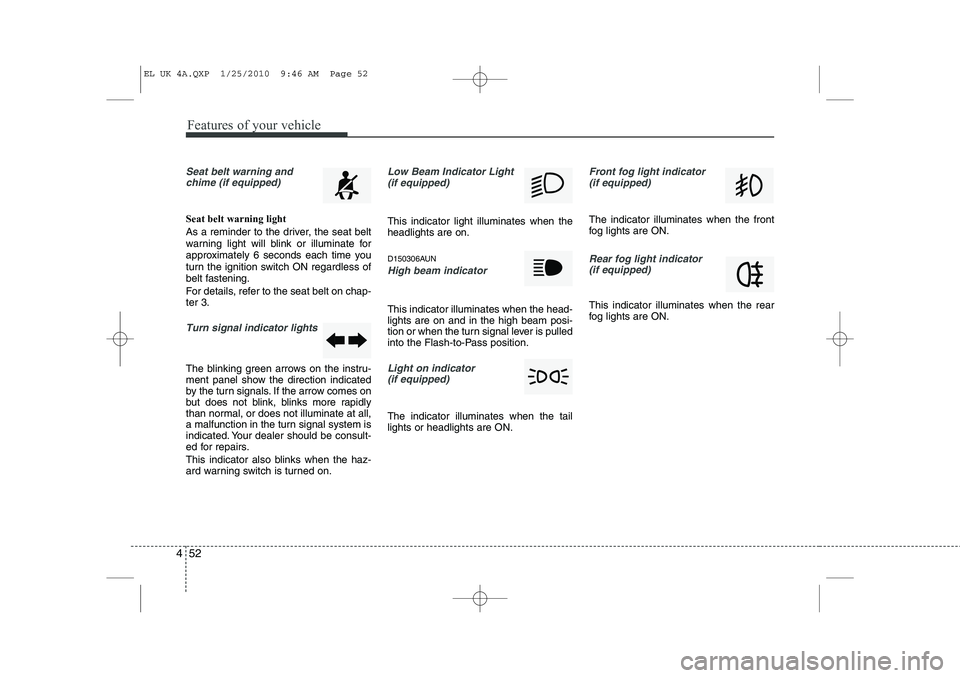
Seat belt warning and
chime (if equipped)
Seat belt warning light
As a reminder to the driver, the seat belt
warning light will blink or illuminate for
approximately 6 seconds each time you
turn the ignition switch ON regardless of
belt fastening.
For details, refer to the seat belt on chap- ter 3.
Turn signal indicator lights
The blinking green arrows on the instru-
ment panel show the direction indicated
by the turn signals. If the arrow comes on
but does not blink, blinks more rapidly
than normal, or does not illuminate at all,
a malfunction in the turn signal system is
indicated. Your dealer should be consult-
ed for repairs.
This indicator also blinks when the haz-
ard warning switch is turned on.
Low Beam Indicator Light
(if equipped)
This indicator light illuminates when the headlights are on.
D150306AUN
High beam indicator
This indicator illuminates when the head- lights are on and in the high beam posi-
tion or when the turn signal lever is pulled
into the Flash-to-Pass position.
Light on indicator (if equipped)
The indicator illuminates when the tail lights or headlights are ON.
Front fog light indicator (if equipped)
The indicator illuminates when the front
fog lights are ON.
Rear fog light indicator
(if equipped)
This indicator illuminates when the rear
fog lights are ON.
EL UK 4A.QXP 1/25/2010 9:46 AM Page 52
Page 486 of 560
Features of your vehicle
74
4
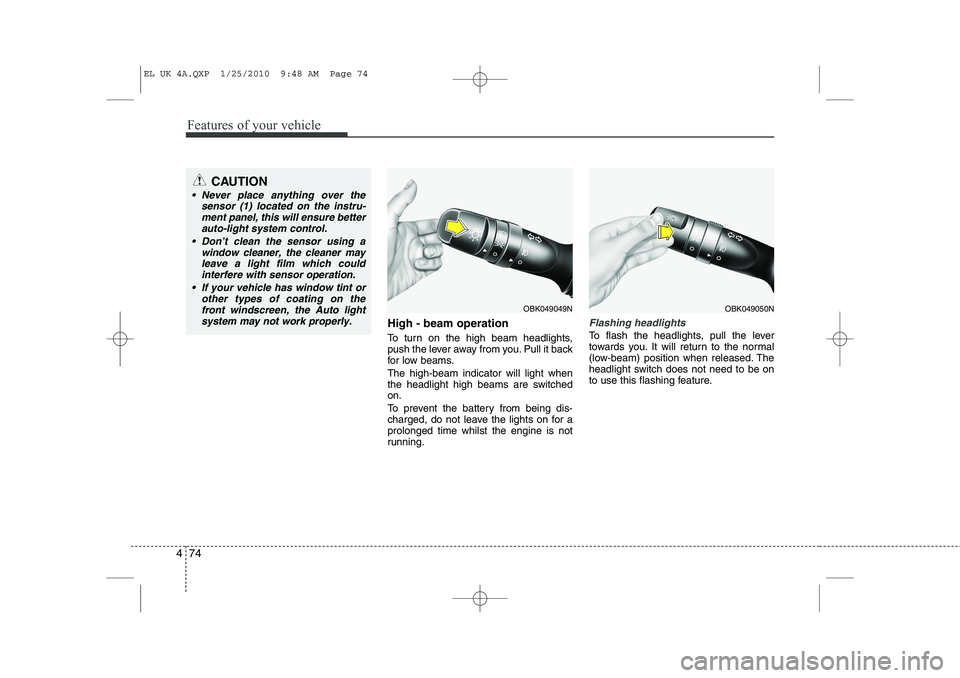
High - beam operation
To turn on the high beam headlights,
push the lever away from you. Pull it back
for low beams. The high-beam indicator will light when
the headlight high beams are switchedon.
To prevent the battery from being dis-
charged, do not leave the lights on for aprolonged time whilst the engine is not
running.Flashing headlights
To flash the headlights, pull the lever
towards you. It will return to the normal
(low-beam) position when released. The
headlight switch does not need to be on
to use this flashing feature.
OBK049049NOBK049050N
CAUTION
Never place anything over the
sensor (1) located on the instru-
ment panel, this will ensure betterauto-light system control.
Don’t clean the sensor using a window cleaner, the cleaner may
leave a light film which could interfere with sensor operation.
If your vehicle has window tint or other types of coating on thefront windscreen, the Auto light
system may not work properly.
EL UK 4A.QXP 1/25/2010 9:48 AM Page 74
Page 489 of 560
477
Features of your vehicle
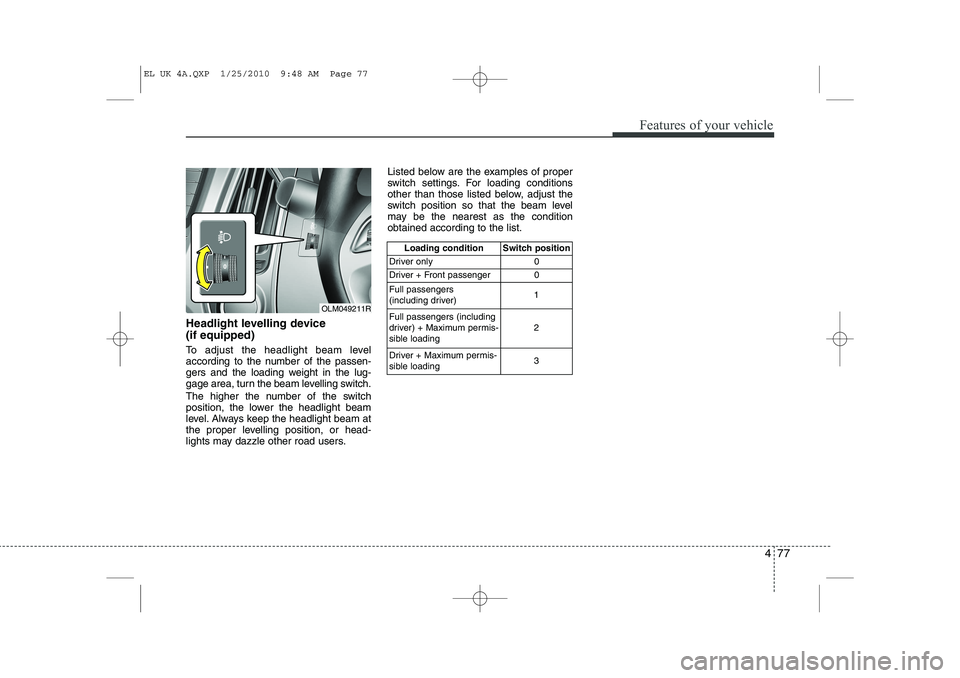
Headlight levelling device (if equipped)
To adjust the headlight beam level
according to the number of the passen-
gers and the loading weight in the lug-
gage area, turn the beam levelling switch.
The higher the number of the switch
position, the lower the headlight beam
level. Always keep the headlight beam at
the proper levelling position, or head-
lights may dazzle other road users.Listed below are the examples of proper
switch settings. For loading conditions
other than those listed below, adjust the
switch position so that the beam level
may be the nearest as the conditionobtained according to the list.
Loading condition Switch position
Driver only 0
Driver + Front passenger 0 Full passengers
(including driver) 1
Full passengers (including
driver) + Maximum permis-
sible loading 2
Driver + Maximum permis-
sible loading 3
OLM049211R
EL UK 4A.QXP 1/25/2010 9:48 AM Page 77