remove seats HYUNDAI IX35 2011 Owners Manual
[x] Cancel search | Manufacturer: HYUNDAI, Model Year: 2011, Model line: IX35, Model: HYUNDAI IX35 2011Pages: 560, PDF Size: 28.31 MB
Page 18 of 560

Safety system of your vehicle
6
3
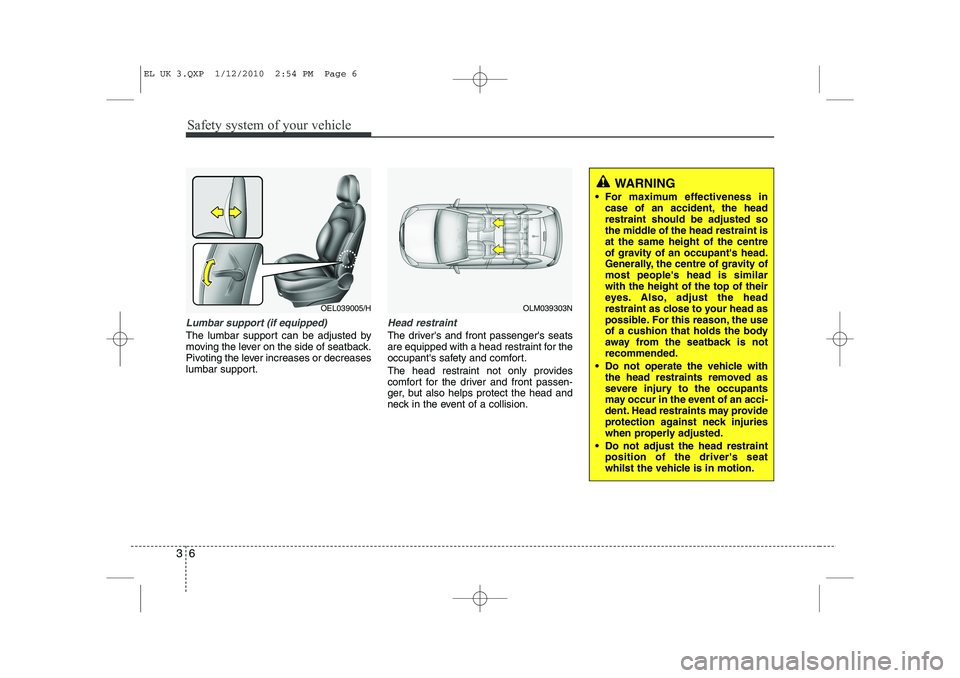
Lumbar support (if equipped)
The lumbar support can be adjusted by
moving the lever on the side of seatback.
Pivoting the lever increases or decreases
lumbar support.
Head restraint
The driver's and front passenger's seats
are equipped with a head restraint for the
occupant's safety and comfort.
The head restraint not only provides
comfort for the driver and front passen-
ger, but also helps protect the head and
neck in the event of a collision.
OLM039303N
WARNING
For maximum effectiveness in case of an accident, the head restraint should be adjusted so
the middle of the head restraint isat the same height of the centre
of gravity of an occupant's head.
Generally, the centre of gravity ofmost people's head is similarwith the height of the top of their
eyes. Also, adjust the head
restraint as close to your head as
possible. For this reason, the use
of a cushion that holds the body
away from the seatback is notrecommended.
Do not operate the vehicle with the head restraints removed as
severe injury to the occupants
may occur in the event of an acci-
dent. Head restraints may provide
protection against neck injuries
when properly adjusted.
Do not adjust the head restraint position of the driver's seat
whilst the vehicle is in motion.
OEL039005/H
EL UK 3.QXP 1/12/2010 2:54 PM Page 6
Page 20 of 560

Safety system of your vehicle
8
3
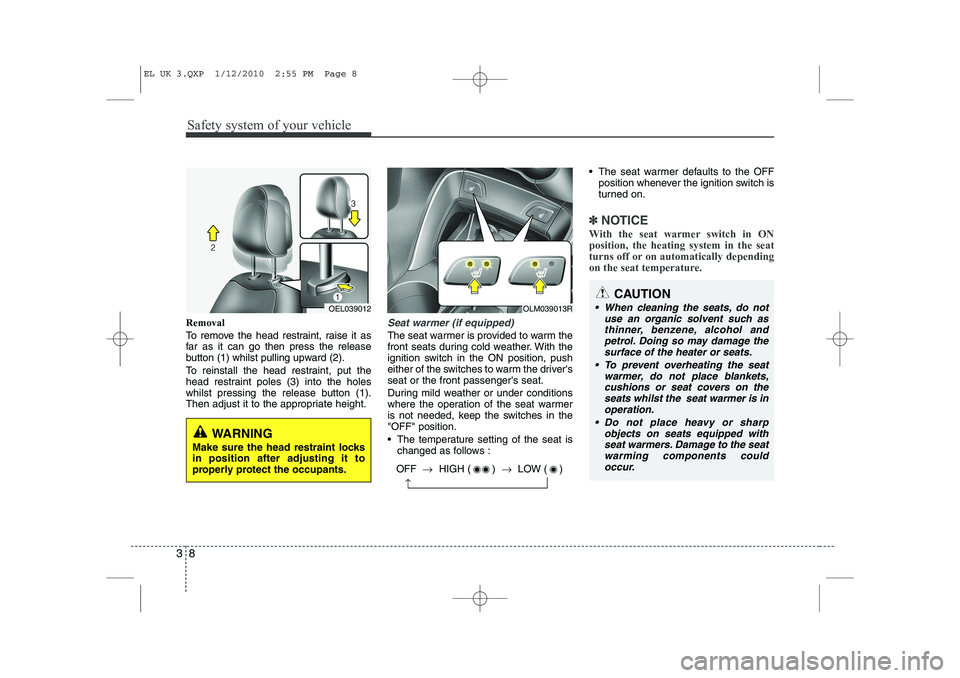
Removal
To remove the head restraint, raise it as
far as it can go then press the release
button (1) whilst pulling upward (2).
To reinstall the head restraint, put the
head restraint poles (3) into the holes
whilst pressing the release button (1).
Then adjust it to the appropriate height.Seat warmer (if equipped)
The seat warmer is provided to warm the
front seats during cold weather. With the
ignition switch in the ON position, push
either of the switches to warm the driver'sseat or the front passenger's seat.
During mild weather or under conditions
where the operation of the seat warmer
is not needed, keep the switches in the"OFF" position.
The temperature setting of the seat is
changed as follows : The seat warmer defaults to the OFF
position whenever the ignition switch is
turned on.
✽✽ NOTICE
With the seat warmer switch in ON position, the heating system in the seat
turns off or on automatically depending
on the seat temperature.
OEL039012
WARNING
Make sure the head restraint locks in position after adjusting it to
properly protect the occupants.
OLM039013R
OFF →HIGH ( ) →LOW ( )
→
CAUTION
When cleaning the seats, do not
use an organic solvent such as
thinner, benzene, alcohol andpetrol. Doing so may damage the surface of the heater or seats.
To prevent overheating the seat warmer, do not place blankets,
cushions or seat covers on the seats whilst the seat warmer is inoperation.
Do not place heavy or sharp objects on seats equipped with
seat warmers. Damage to the seat warming components couldoccur.
EL UK 3.QXP 1/12/2010 2:55 PM Page 8
Page 23 of 560

311
Safety system of your vehicle
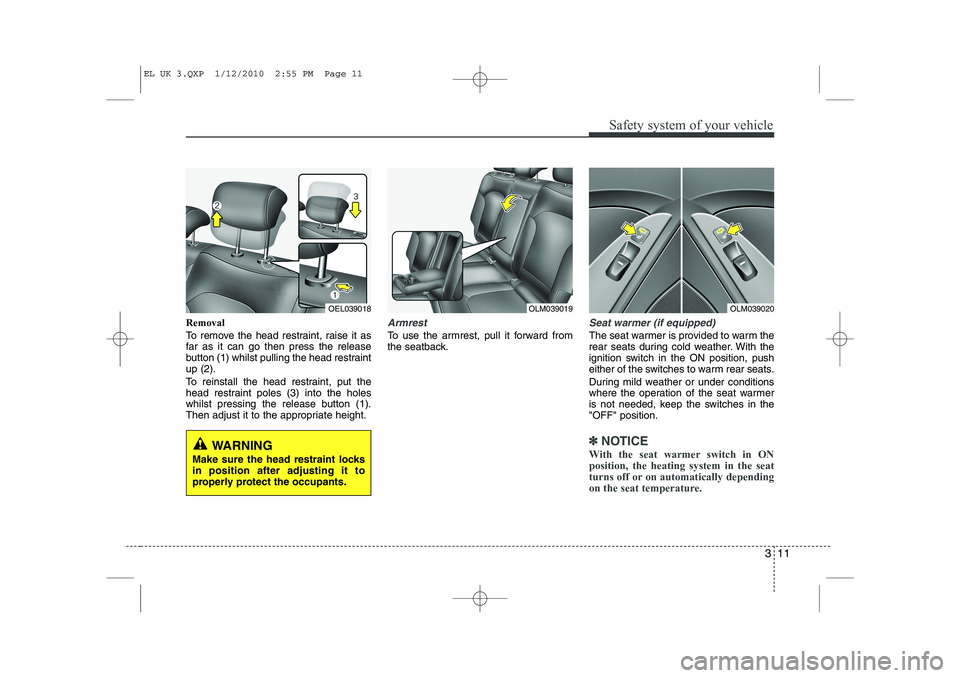
Removal
To remove the head restraint, raise it as
far as it can go then press the release
button (1) whilst pulling the head restraintup (2).
To reinstall the head restraint, put the
head restraint poles (3) into the holes
whilst pressing the release button (1).
Then adjust it to the appropriate height.Armrest
To use the armrest, pull it forward from
the seatback.
Seat warmer (if equipped)
The seat warmer is provided to warm the
rear seats during cold weather. With the
ignition switch in the ON position, push
either of the switches to warm rear seats.
During mild weather or under conditions
where the operation of the seat warmer
is not needed, keep the switches in the"OFF" position.
✽✽NOTICE
With the seat warmer switch in ON position, the heating system in the seat
turns off or on automatically depending
on the seat temperature.
OEL039018
WARNING
Make sure the head restraint locks in position after adjusting it to
properly protect the occupants.
OLM039019OLM039020
EL UK 3.QXP 1/12/2010 2:55 PM Page 11
Page 382 of 560

Maintenance
62
7
Interior care
Interior general precautions
Prevent caustic solutions such as per- fume and cosmetic oil from contacting
the dashboard because they may cause
damage or discoloration. If they do con-tact the dashboard, wipe them off imme-
diately. See the instructions that follow for
the proper way to clean vinyl.
Cleaning the upholstery and interior
trim
Vinyl
Remove dust and loose dirt from vinyl
with a whisk broom or vacuum cleaner.
Clean vinyl surfaces with a vinyl cleaner. Fabric
Remove dust and loose dirt from fabric
with a whisk broom or vacuum cleaner.Clean with a mild soap solution recom-
mended for upholstery or carpets.
Remove fresh spots immediately with a
fabric spot cleaner. If fresh spots do not
receive immediate attention, the fabriccan be stained and its colour can be
affected. Also, its fire-resistant properties
can be reduced if the material is not
properly maintained.
Cleaning the lap/shoulder belt web- bing
Clean the belt webbing with any mild
soap solution recommended for cleaning
upholstery or carpet. Follow the instruc-
tions provided with the soap. Do not
bleach or re-dye the webbing because
this may weaken it.
Cleaning the interior window glass
If the interior glass surfaces of the vehi-
cle become fogged (that is, covered with
an oily, greasy or waxy film), they should
be cleaned with glass cleaner. Follow the
directions on the glass cleaner container.CAUTION
Never allow water or other liquidsto come in contact with
electrical/electronic componentsinside the vehicle as this may dam-age them.
CAUTION
Using anything but recommended
cleaners and procedures may affect the fabric’s appearance and fire-resistant properties.
CAUTION
When cleaning leather products (steering wheel, seats etc.), use neutral detergents or low alcoholcontent solutions. If you use high
alcohol content solutions oracid/alkaline detergents, the colour of the leather may fade or the sur-face may get stripped off.
CAUTION
Do not scrape or scratch the insideof the rear window. This may result
in damage to the rear windowdefroster grid.
EL UK 7.QXP 1/25/2010 10:06 AM Page 62