Room lp HYUNDAI IX35 2014 Owner's Guide
[x] Cancel search | Manufacturer: HYUNDAI, Model Year: 2014, Model line: IX35, Model: HYUNDAI IX35 2014Pages: 1534, PDF Size: 39.76 MB
Page 916 of 1534
751
Maintenance
ENGINE OIL
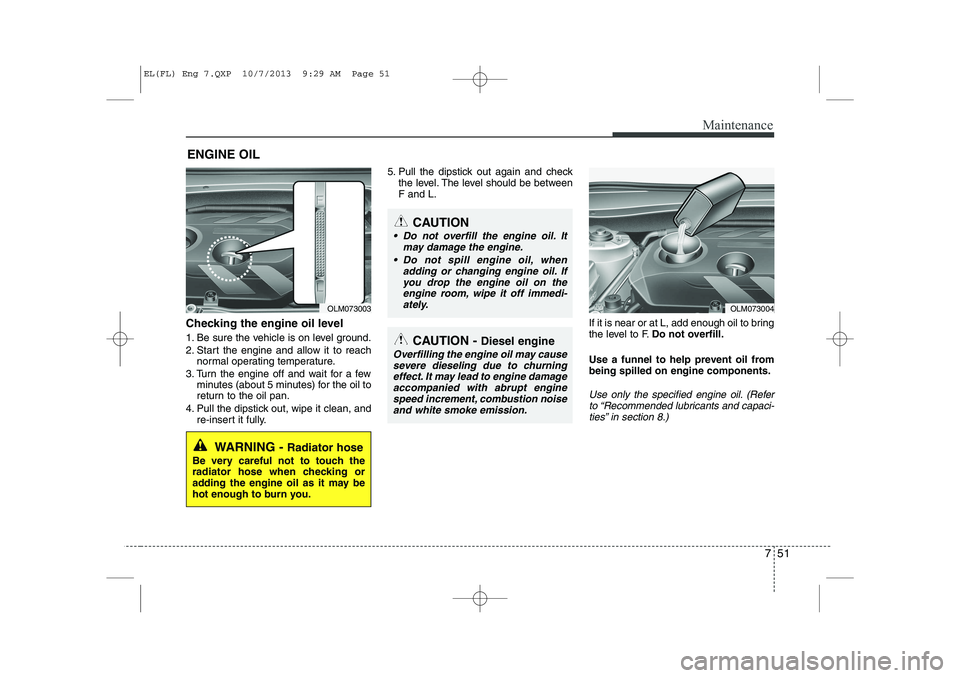
Checking the engine oil level
1. Be sure the vehicle is on level ground.
2. Start the engine and allow it to reach normal operating temperature.
3. Turn the engine off and wait for a few minutes (about 5 minutes) for the oil to
return to the oil pan.
4. Pull the dipstick out, wipe it clean, and re-insert it fully. 5. Pull the dipstick out again and check
the level. The level should be between F and L.
If it is near or at L, add enough oil to bring
the level to F.Do not overfill.
Use a funnel to help prevent oil frombeing spilled on engine components.
Use only the specified engine oil. (Refer to “Recommended lubricants and capaci-ties” in section 8.)
WARNING - Radiator hose
Be very careful not to touch the
radiator hose when checking or
adding the engine oil as it may be
hot enough to burn you.
OLM073003OLM073004
CAUTION - Diesel engine
Overfilling the engine oil may cause
severe dieseling due to churning effect. It may lead to engine damageaccompanied with abrupt engine speed increment, combustion noise
and white smoke emission.
CAUTION
Do not overfill the engine oil. It may damage the engine.
Do not spill engine oil, when adding or changing engine oil. If
you drop the engine oil on theengine room, wipe it off immedi- ately.
EL(FL) Eng 7.QXP 10/7/2013 9:29 AM Page 51
Page 951 of 1534
Maintenance
86
7
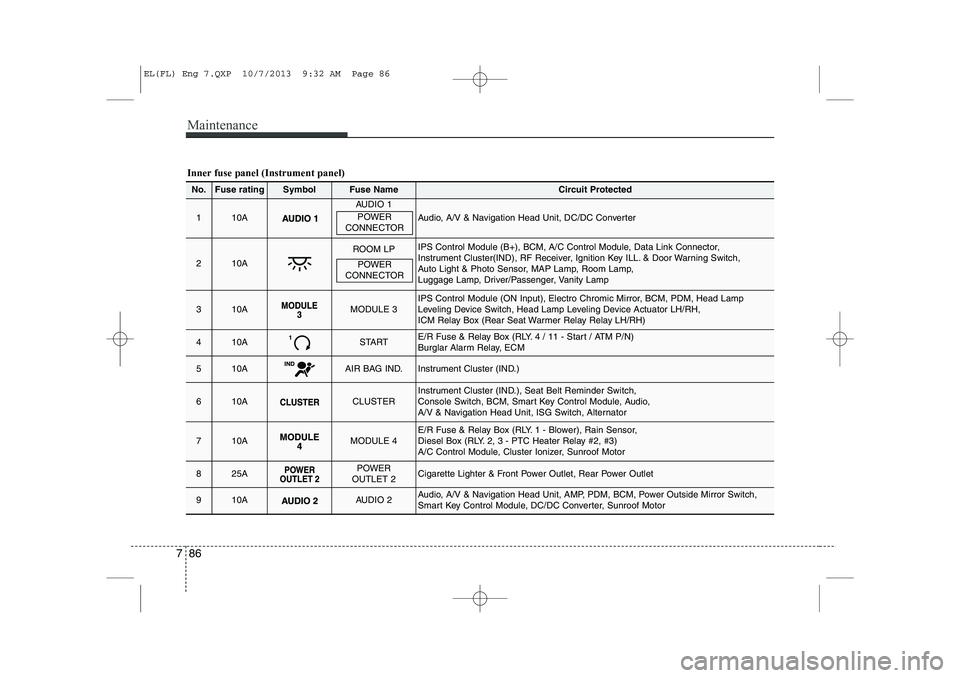
Inner fuse panel (Instrument panel)
No.Fuse ratingSymbolFuse NameCircuit Protected
110A
AUDIO 1
Audio, A/V & Navigation Head Unit, DC/DC Converter
210A
ROOM LPIPS Control Module (B+), BCM, A/C Control Module, Data Link Connector,
Instrument Cluster(IND), RF Receiver, Ignition Key ILL. & Door Warning Switch,
Auto Light & Photo Sensor, MAP Lamp, Room Lamp,
Luggage Lamp, Driver/Passenger, Vanity Lamp
310AMODULE 3IPS Control Module (ON Input), Electro Chromic Mirror, BCM, PDM, Head Lamp
Leveling Device Switch, Head Lamp Leveling Device Actuator LH/RH,
ICM Relay Box (Rear Seat Warmer Relay Relay LH/RH)
410ASTARTE/R Fuse & Relay Box (RLY. 4 / 11 - Start / ATM P/N)
Burglar Alarm Relay, ECM
510AAIR BAG IND.Instrument Cluster (IND.)
610ACLUSTERInstrument Cluster (IND.), Seat Belt Reminder Switch,
Console Switch, BCM, Smart Key Control Module, Audio,
A/V & Navigation Head Unit, ISG Switch, Alternator
710AMODULE 4E/R Fuse & Relay Box (RLY. 1 - Blower), Rain Sensor,
Diesel Box (RLY. 2, 3 - PTC Heater Relay #2, #3)
A/C Control Module, Cluster Ionizer, Sunroof Motor
825APOWER
OUTLET 2Cigarette Lighter & Front Power Outlet, Rear Power Outlet
910AAUDIO 2Audio, A/V & Navigation Head Unit, AMP, PDM, BCM, Power Outside Mirror Switch,
Smart Key Control Module, DC/DC Converter, Sunroof Motor
POWER
CONNECTOR
POWER
CONNECTOR
EL(FL) Eng 7.QXP 10/7/2013 9:32 AM Page 86
Page 971 of 1534
Maintenance
106
7
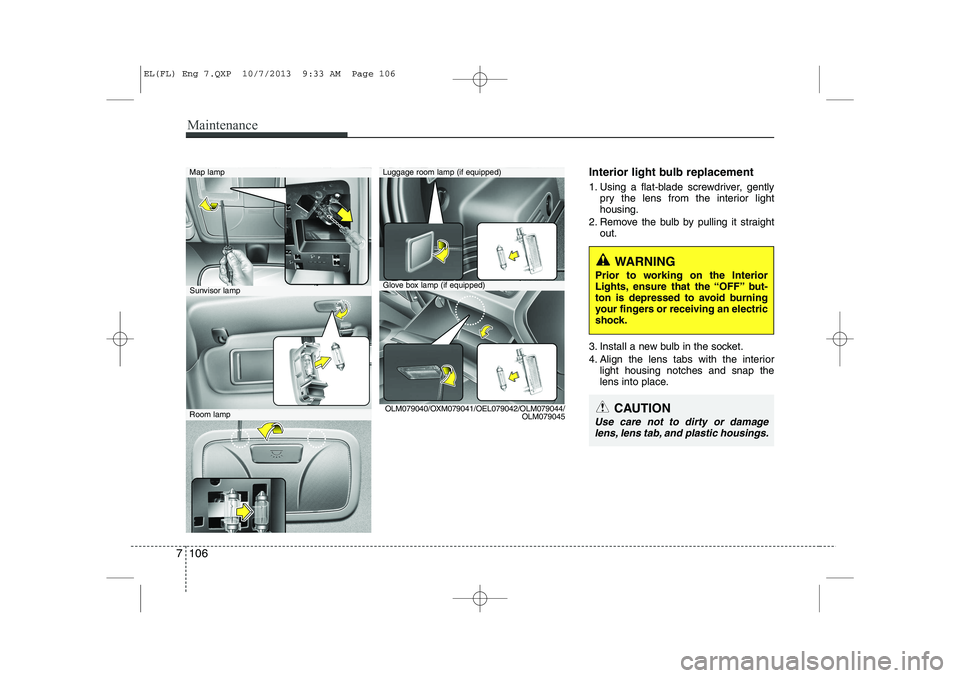
Interior light bulb replacement
1. Using a flat-blade screwdriver, gently
pry the lens from the interior light housing.
2. Remove the bulb by pulling it straight out.
3. Install a new bulb in the socket.
4. Align the lens tabs with the interior light housing notches and snap the
lens into place.Map lamp
Glove box lamp (if equipped)
Luggage room lamp (if equipped)
Sunvisor lamp
Room lamp OLM079040/OXM079041/OEL079042/OLM079044/
OLM079045
WARNING
Prior to working on the Interior
Lights, ensure that the “OFF” but-
ton is depressed to avoid burning
your fingers or receiving an electric
shock.
CAUTION
Use care not to dirty or damage lens, lens tab, and plastic housings.
EL(FL) Eng 7.QXP 10/7/2013 9:33 AM Page 106
Page 977 of 1534
Maintenance
112
7
Interior care
Interior general precautions
Prevent chemicals such as perfume, cos-
metic oil, sun cream, hand cleaner, and
air freshener from contacting the interior
parts because they may cause damage
or discoloration. If they do contact the
interior parts, wipe them off immediately.
See the instructions that follow for the
proper way to clean vinyl.
Cleaning the upholstery and interior
trim
Vinyl
Remove dust and loose dirt from vinyl
with a whisk broom or vacuum cleaner.
Clean vinyl surfaces with a vinyl cleaner. Fabric
Remove dust and loose dirt from fabric
with a whisk broom or vacuum cleaner.Clean with a mild soap solution recom-
mended for upholstery or carpets.
Remove fresh spots immediately with a
fabric spot cleaner. If fresh spots do not
receive immediate attention, the fabriccan be stained and its color can be
affected. Also, its fire-resistant properties
can be reduced if the material is not
properly maintained.
Cleaning the lap/shoulder belt web- bing
Clean the belt webbing with any mild
soap solution recommended for cleaning
upholstery or carpet. Follow the instruc-
tions provided with the soap. Do not
bleach or re-dye the webbing because
this may weaken it.
Cleaning the interior window glass
If the interior glass surfaces of the vehi-
cle become fogged (that is, covered with
an oily, greasy or waxy film), they should
be cleaned with glass cleaner. Follow the
directions on the glass cleaner container.
CAUTION
Never allow water or other liquidsto come in contact with
electrical/electronic componentsinside the vehicle as this may dam- age them.
CAUTION
Using anything but recommended
cleaners and procedures may affectthe fabric’s appearance and fire- resistant properties.
CAUTION
When cleaning leather products(steering wheel, seats etc.), useneutral detergents or low alcoholcontent solutions. If you use high
alcohol content solutions oracid/alkaline detergents, the colorof the leather may fade or the sur- face may get stripped off.
CAUTION
Do not scrape or scratch the insideof the rear window. This may result
in damage to the rear windowdefroster grid.
EL(FL) Eng 7.QXP 10/7/2013 9:33 AM Page 112
Page 984 of 1534
83
Specifications & Consumer information
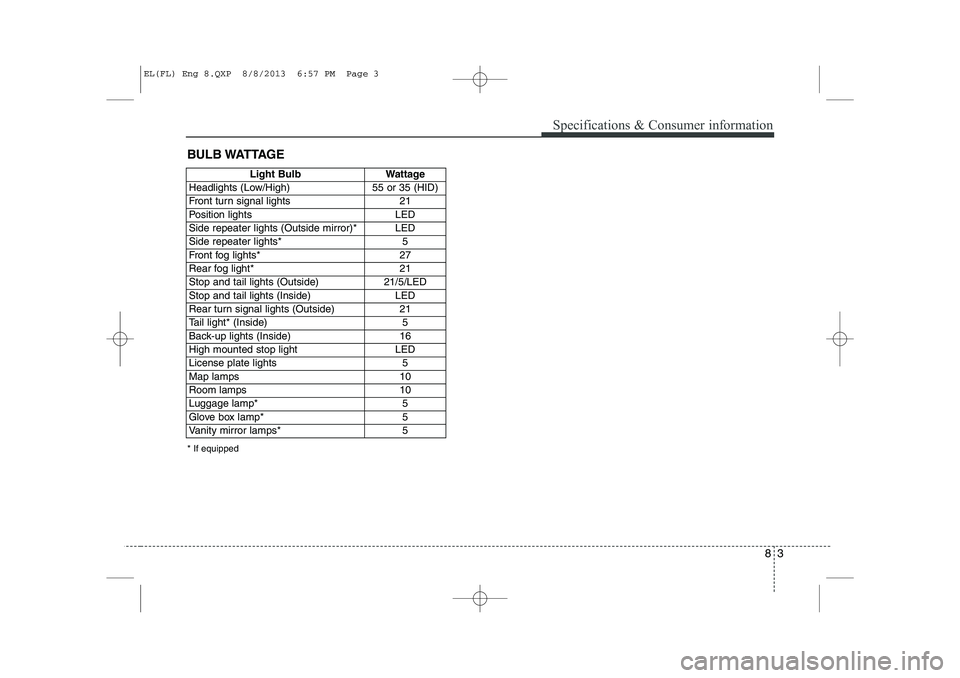
BULB WATTAGE
* If equipped
Light BulbWattage
Headlights (Low/High)55 or 35 (HID)
Front turn signal lights21
Position lightsLED
Side repeater lights (Outside mirror)*LED
Side repeater lights* 5
Front fog lights* 27
Rear fog light*21
Stop and tail lights (Outside)21/5/LED
Stop and tail lights (Inside)LED
Rear turn signal lights (Outside)21
Tail light* (Inside)5
Back-up lights (Inside)16
High mounted stop lightLED
License plate lights5
Map lamps10
Room lamps10
Luggage lamp*5
Glove box lamp*5
Vanity mirror lamps*5
EL(FL) Eng 8.QXP 8/8/2013 6:57 PM Page 3
Page 1003 of 1534
Your vehicle at a glance
4
2
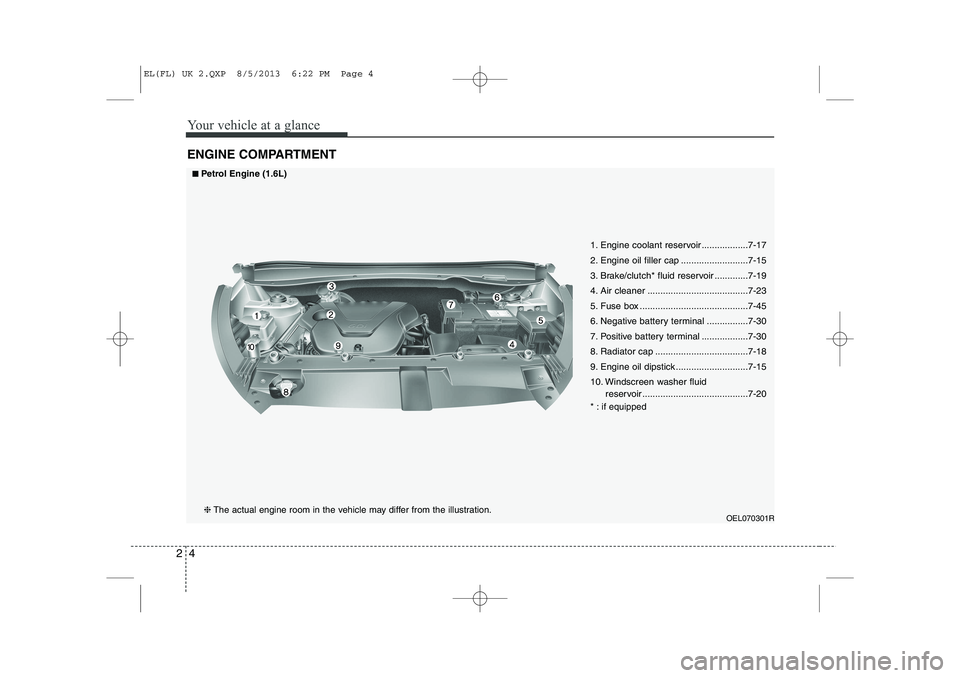
ENGINE COMPARTMENT
OEL070301R
1. Engine coolant reservoir ..................7-17
2. Engine oil filler cap ..........................7-15
3. Brake/clutch* fluid reservoir .............7-19
4. Air cleaner .......................................7-23
5. Fuse box ..........................................7-45
6. Negative battery terminal ................7-30
7. Positive battery terminal ..................7-30
8. Radiator cap ....................................7-18
9. Engine oil dipstick ............................7-15
10. Windscreen washer fluid
reservoir .........................................7-20
* : if equipped
■■Petrol Engine (1.6L)
❈ The actual engine room in the vehicle may differ from the illustration.
EL(FL) UK 2.QXP 8/5/2013 6:22 PM Page 4
Page 1004 of 1534
25
Your vehicle at a glance
OEL073300R
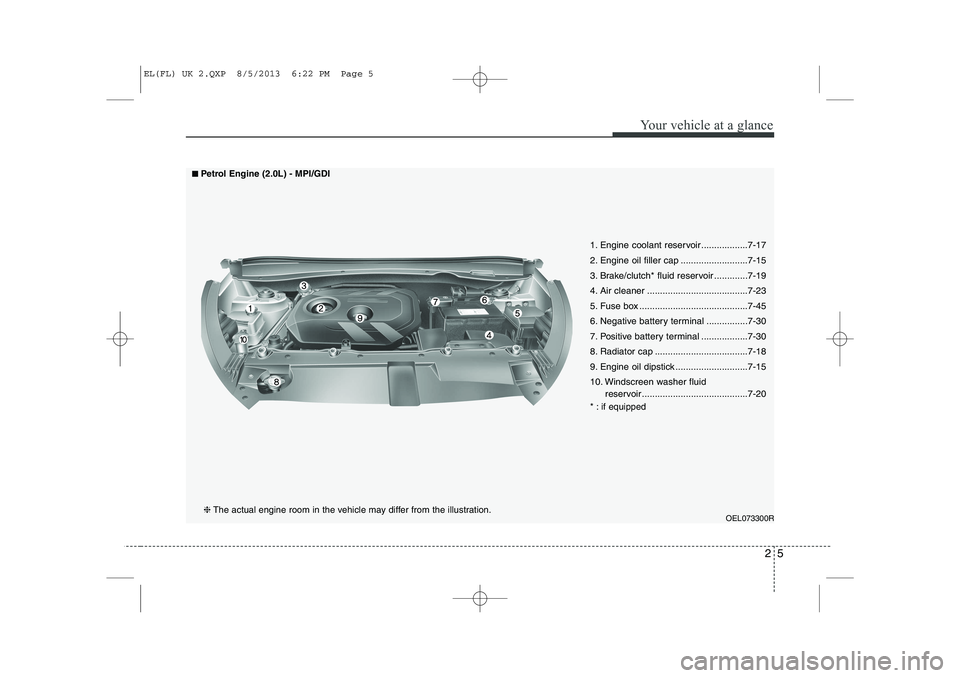
1. Engine coolant reservoir ..................7-17
2. Engine oil filler cap ..........................7-15
3. Brake/clutch* fluid reservoir .............7-19
4. Air cleaner .......................................7-23
5. Fuse box ..........................................7-45
6. Negative battery terminal ................7-30
7. Positive battery terminal ..................7-30
8. Radiator cap ....................................7-18
9. Engine oil dipstick ............................7-15
10. Windscreen washer fluidreservoir .........................................7-20
* : if equipped
■■Petrol Engine (2.0L) - MPI/GDI
❈ The actual engine room in the vehicle may differ from the illustration.
EL(FL) UK 2.QXP 8/5/2013 6:22 PM Page 5
Page 1005 of 1534
26
Your vehicle at a glance
OEL070302R
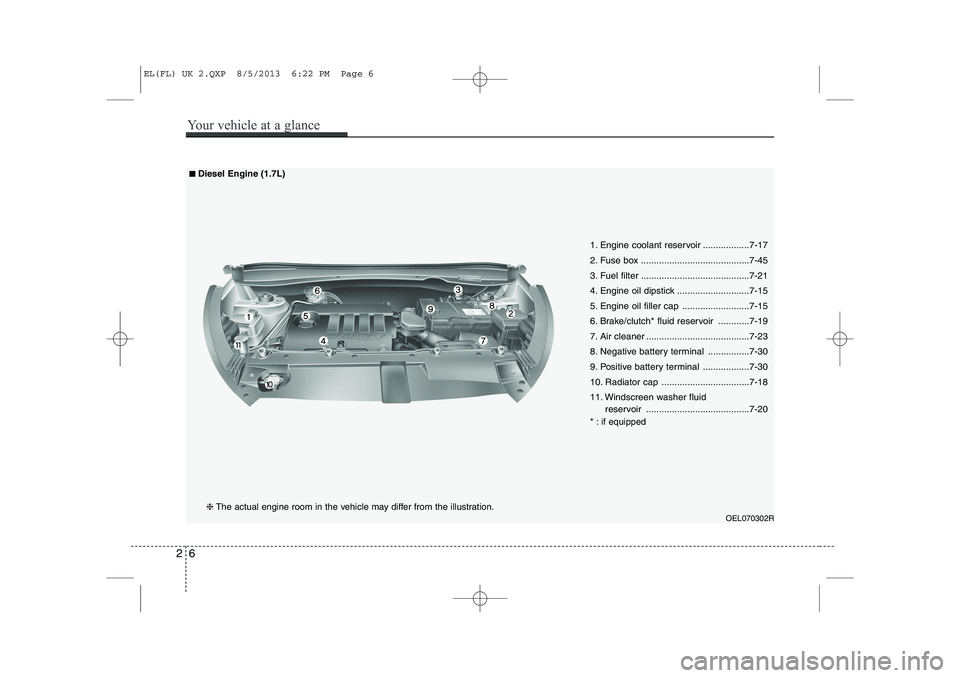
1. Engine coolant reservoir ..................7-17
2. Fuse box ..........................................7-45
3. Fuel filter ..........................................7-21
4. Engine oil dipstick ............................7-15
5. Engine oil filler cap ..........................7-15
6. Brake/clutch* fluid reservoir ............7-19
7. Air cleaner ........................................7-23
8. Negative battery terminal ................7-30
9. Positive battery terminal ..................7-30
10. Radiator cap ..................................7-18
11. Windscreen washer fluidreservoir ........................................7-20
* : if equipped
■■Diesel Engine (1.7L)
❈ The actual engine room in the vehicle may differ from the illustration.
EL(FL) UK 2.QXP 8/5/2013 6:22 PM Page 6
Page 1006 of 1534

27
Your vehicle at a glance
OLM079002R
1. Engine coolant reservoir ..................7-17
2. Fuse box ..........................................7-45
3. Fuel filter ..........................................7-21
4. Engine oil dipstick ............................7-15
5. Engine oil filler cap ..........................7-15
6. Brake/clutch* fluid reservoir ............7-19
7. Air cleaner ........................................7-23
8. Negative battery terminal ................7-30
9. Positive battery terminal ..................7-30
10. Radiator cap ..................................7-18
11. Windscreen washer fluidreservoir ........................................7-20
* : if equipped
■■Diesel Engine (2.0L)
❈ The actual engine room in the vehicle may differ from the illustration.
EL(FL) UK 2.QXP 8/5/2013 6:22 PM Page 7
Page 1106 of 1534
435
Features of your vehicle
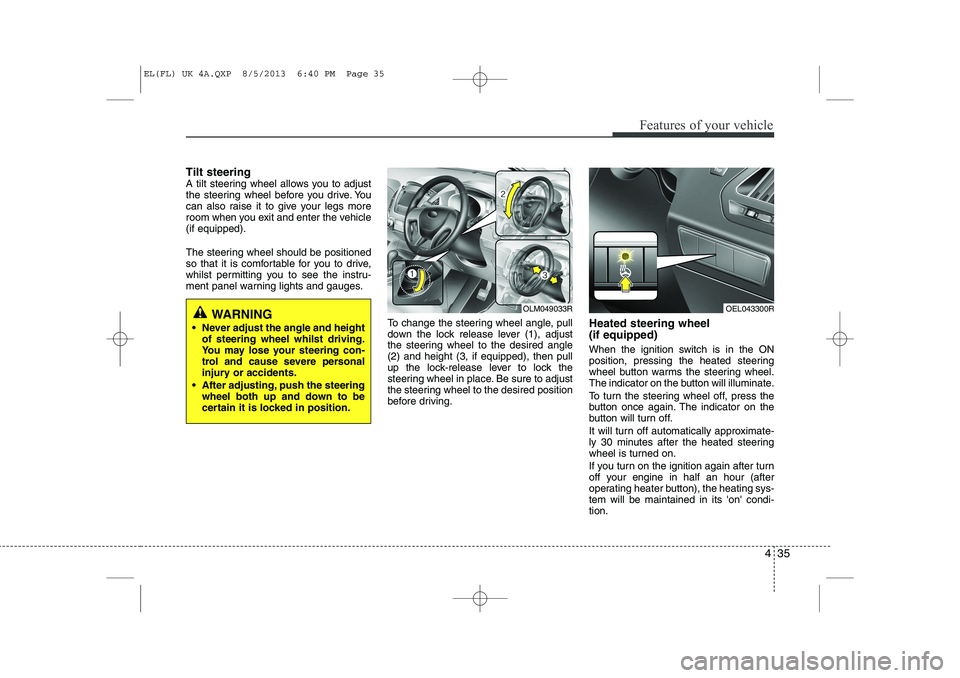
Tilt steering
A tilt steering wheel allows you to adjust
the steering wheel before you drive. You
can also raise it to give your legs more
room when you exit and enter the vehicle(if equipped).
The steering wheel should be positioned
so that it is comfortable for you to drive,
whilst permitting you to see the instru-
ment panel warning lights and gauges.To change the steering wheel angle, pull
down the lock release lever (1), adjust
the steering wheel to the desired angle(2) and height (3, if equipped), then pull
up the lock-release lever to lock the
steering wheel in place. Be sure to adjust
the steering wheel to the desired position
before driving.Heated steering wheel (if equipped)
When the ignition switch is in the ON
position, pressing the heated steering
wheel button warms the steering wheel.
The indicator on the button will illuminate.
To turn the steering wheel off, press the
button once again. The indicator on the
button will turn off.
It will turn off automatically approximate-
ly 30 minutes after the heated steering
wheel is turned on.
If you turn on the ignition again after turn
off your engine in half an hour (after
operating heater button), the heating sys-tem will be maintained in its 'on' condi-tion.
WARNING
Never adjust the angle and height of steering wheel whilst driving.
You may lose your steering con-
trol and cause severe personal
injury or accidents.
After adjusting, push the steering wheel both up and down to be
certain it is locked in position.OLM049033ROEL043300R
EL(FL) UK 4A.QXP 8/5/2013 6:40 PM Page 35