driver seat adjustment HYUNDAI IX35 2014 Owners Manual
[x] Cancel search | Manufacturer: HYUNDAI, Model Year: 2014, Model line: IX35, Model: HYUNDAI IX35 2014Pages: 1534, PDF Size: 39.76 MB
Page 18 of 1534
35
Safety features of your vehicle
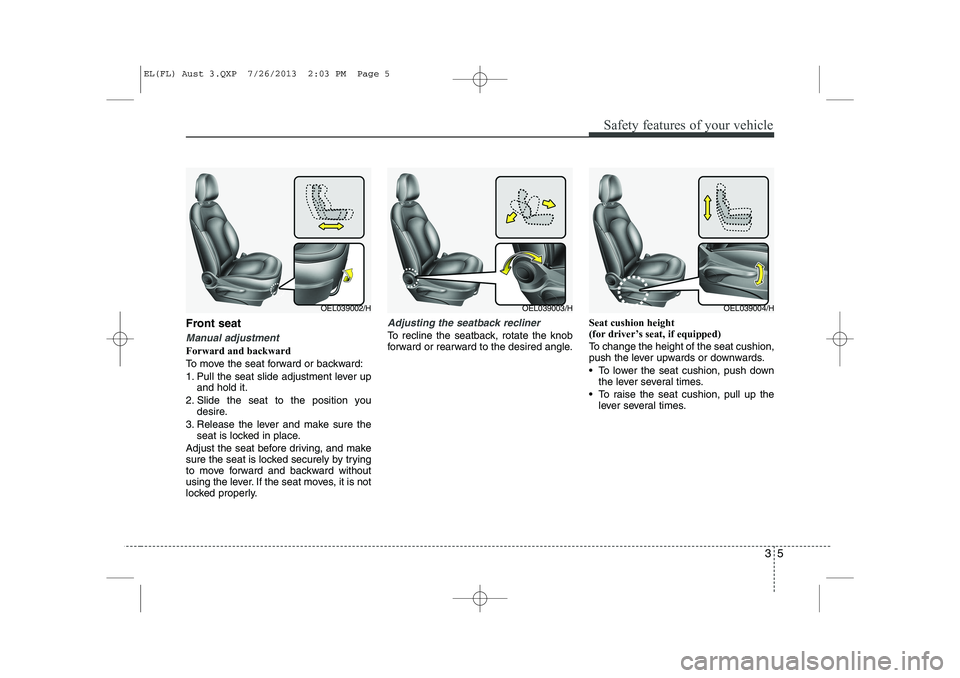
Front seat
Manual adjustment
Forward and backward
To move the seat forward or backward:
1. Pull the seat slide adjustment lever upand hold it.
2. Slide the seat to the position you desire.
3. Release the lever and make sure the seat is locked in place.
Adjust the seat before driving, and make
sure the seat is locked securely by trying
to move forward and backward without
using the lever. If the seat moves, it is not
locked properly.
Adjusting the seatback recliner
To recline the seatback, rotate the knob
forward or rearward to the desired angle. Seat cushion height
(for driver’s seat, if equipped)
To change the height of the seat cushion,
push the lever upwards or downwards.
To lower the seat cushion, push down
the lever several times.
To raise the seat cushion, pull up the lever several times.
OEL039002/HOEL039003/HOEL039004/H
EL(FL) Aust 3.QXP 7/26/2013 2:03 PM Page 5
Page 111 of 1534
439
Features of your vehicle
Inside rearview mirror
Adjust the rearview mirror to centre on
the view through the rear window. Make
this adjustment before you start driving.
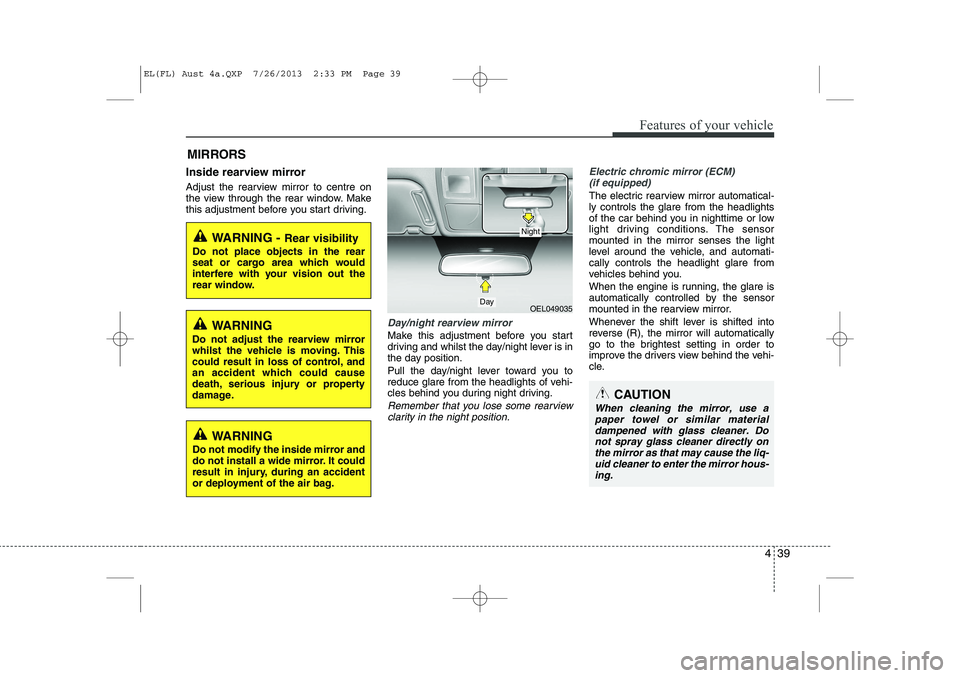
Day/night rearview mirror
Make this adjustment before you start
driving and whilst the day/night lever is in
the day position.
Pull the day/night lever toward you to
reduce glare from the headlights of vehi-
cles behind you during night driving.
Remember that you lose some rearviewclarity in the night position.
Electric chromic mirror (ECM) (if equipped)
The electric rearview mirror automatical- ly controls the glare from the headlights
of the car behind you in nighttime or low
light driving conditions. The sensormounted in the mirror senses the light
level around the vehicle, and automati-cally controls the headlight glare from
vehicles behind you.
When the engine is running, the glare is
automatically controlled by the sensor
mounted in the rearview mirror.
Whenever the shift lever is shifted into
reverse (R), the mirror will automatically
go to the brightest setting in order to
improve the drivers view behind the vehi-
cle.
MIRRORS
WARNING -
Rear visibility
Do not place objects in the rear
seat or cargo area which would
interfere with your vision out the
rear window.
OEL049035
CAUTION
When cleaning the mirror, use a paper towel or similar materialdampened with glass cleaner. Do not spray glass cleaner directly on
the mirror as that may cause the liq- uid cleaner to enter the mirror hous-ing.
Day
Night
WARNING
Do not adjust the rearview mirror
whilst the vehicle is moving. This
could result in loss of control, and
an accident which could cause
death, serious injury or property
damage.
WARNING
Do not modify the inside mirror and
do not install a wide mirror. It could
result in injury, during an accident
or deployment of the air bag.
EL(FL) Aust 4a.QXP 7/26/2013 2:33 PM Page 39
Page 114 of 1534
Features of your vehicle
42
4
3. Setting the compass zone
1. Find your current location and vari-
ance zone number on the zone map.
2. Press and hold the button for more than 6 but less than 9 seconds. The
current zone number will appear in the
display.
3. Press the button until the new zone number appears in the display. After
you stop pressing the button in, the
display will show a compass direction
within a few seconds. 4. Changing Mirror Angle setting
(if equipped):
Due to mirror positions being angled
towards the driver, the compass mirror
can also compensate for drivers seated
on the Left Hand side of the vehicle
(steering wheel on the LH side of the
vehicle) or Right Hand side of the vehicle
(steering wheel on the RH side of the
vehicle).
To adjust the Left Hand, “L” or Right
Hand, “R”, setting:
1. Press and hold the button for more than 12 seconds.
2. Release then press the button to tog- gle between “L” and “R”.
✽✽ NOTICE
This procedure also causes the compass to be de-calibrated.
3. To re-calibrate the compass, drive the vehicle in 2 complete circles at less than 8km/h (5mph).
CAUTION
1. Do not install the ski rack, anten-
na, etc. which are attached to thevehicle by means of a magnet.They affect the operation of thecompass.
2. If the compass deviates from the correct indication soon after
repeated adjustment, we recom-mend that the system be checked by an authorised HYUNDAI dealer.
3. The compass may not indicate the correct compass point in tun-nels or whilst driving up or down a steep hill.
(The compass returns to the cor-rect compass point when thevehicle moves to an area wherethe geomagnetism is stabilized.)
4. When cleaning the mirror, use a paper towel or similar material
dampened with glass cleaner. Do not spray glass cleaner directlyon the mirror as that may causethe liquid cleaner to enter the mir-
ror housing.
EL(FL) Aust 4a.QXP 7/26/2013 2:33 PM Page 42
Page 430 of 1534
35
Safety features of your vehicle
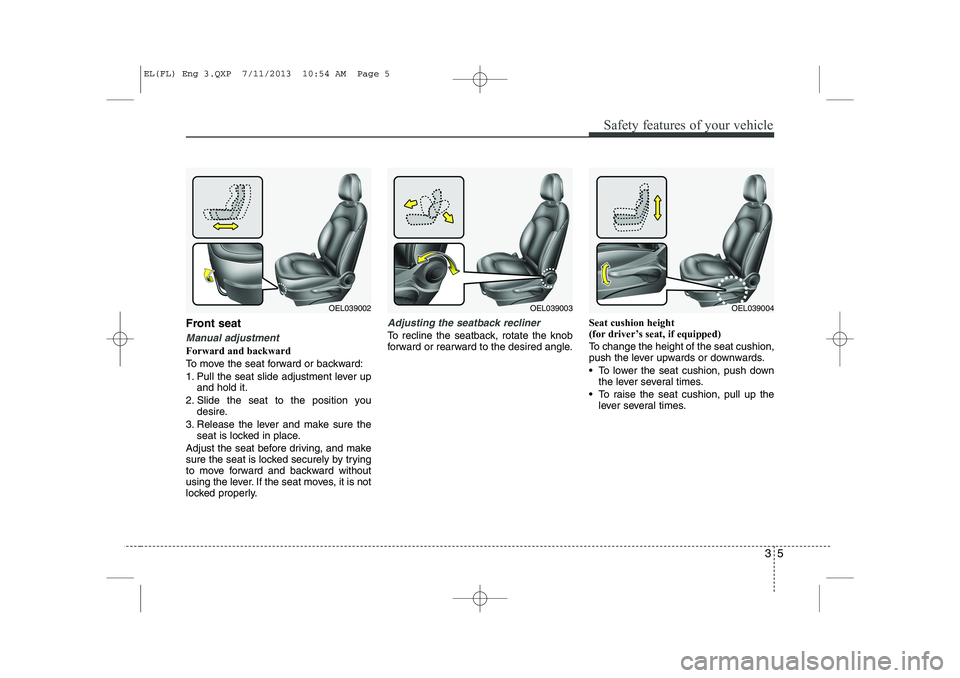
Front seat
Manual adjustment
Forward and backward
To move the seat forward or backward:
1. Pull the seat slide adjustment lever upand hold it.
2. Slide the seat to the position you desire.
3. Release the lever and make sure the seat is locked in place.
Adjust the seat before driving, and make
sure the seat is locked securely by trying
to move forward and backward without
using the lever. If the seat moves, it is not
locked properly.
Adjusting the seatback recliner
To recline the seatback, rotate the knob
forward or rearward to the desired angle. Seat cushion height
(for driver’s seat, if equipped)
To change the height of the seat cushion,
push the lever upwards or downwards.
To lower the seat cushion, push down
the lever several times.
To raise the seat cushion, pull up the lever several times.
OEL039002OEL039003OEL039004
EL(FL) Eng 3.QXP 7/11/2013 10:54 AM Page 5
Page 529 of 1534
439
Features of your vehicle
Inside rearview mirror
Adjust the rearview mirror to center on
the view through the rear window. Make
this adjustment before you start driving.
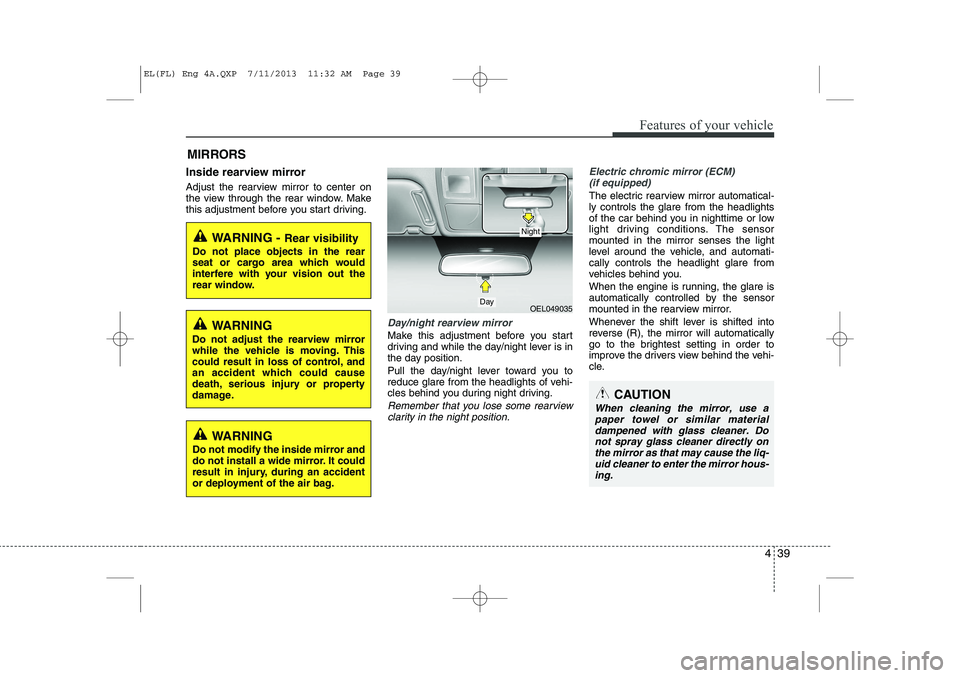
Day/night rearview mirror
Make this adjustment before you start
driving and while the day/night lever is in
the day position.
Pull the day/night lever toward you to
reduce glare from the headlights of vehi-
cles behind you during night driving.
Remember that you lose some rearviewclarity in the night position.
Electric chromic mirror (ECM) (if equipped)
The electric rearview mirror automatical- ly controls the glare from the headlights
of the car behind you in nighttime or low
light driving conditions. The sensormounted in the mirror senses the light
level around the vehicle, and automati-cally controls the headlight glare from
vehicles behind you.
When the engine is running, the glare is
automatically controlled by the sensor
mounted in the rearview mirror.
Whenever the shift lever is shifted into
reverse (R), the mirror will automatically
go to the brightest setting in order to
improve the drivers view behind the vehi-
cle.
MIRRORS
WARNING -
Rear visibility
Do not place objects in the rear
seat or cargo area which would
interfere with your vision out the
rear window.
OEL049035
CAUTION
When cleaning the mirror, use a paper towel or similar materialdampened with glass cleaner. Do not spray glass cleaner directly on
the mirror as that may cause the liq- uid cleaner to enter the mirror hous-ing.
Day
Night
WARNING
Do not adjust the rearview mirror
while the vehicle is moving. This
could result in loss of control, and
an accident which could cause
death, serious injury or property
damage.
WARNING
Do not modify the inside mirror and
do not install a wide mirror. It could
result in injury, during an accident
or deployment of the air bag.
EL(FL) Eng 4A.QXP 7/11/2013 11:32 AM Page 39
Page 532 of 1534
Features of your vehicle
42
4
3. Setting the compass zone
1. Find your current location and vari-
ance zone number on the zone map.
2. Press and hold the button for more than 6 but less than 9 seconds. The
current zone number will appear in the
display.
3. Press the button until the new zone number appears in the display. After
you stop pressing the button in, the
display will show a compass direction
within a few seconds. 4. Changing Mirror Angle setting
(if equipped):
Due to mirror positions being angled
towards the driver, the compass mirror
can also compensate for drivers seated
on the Left Hand side of the vehicle
(steering wheel on the LH side of the
vehicle) or Right Hand side of the vehicle
(steering wheel on the RH side of the
vehicle).
To adjust the Left Hand, “L” or Right
Hand, “R”, setting:
1. Press and hold the button for more than 12 seconds.
2. Release then press the button to tog- gle between “L” and “R”.
✽✽ NOTICE
This procedure also causes the compass to be de-calibrated.
3. To re-calibrate the compass, drive the vehicle in 2 complete circles at less than 8km/h (5mph).
CAUTION
1. Do not install the ski rack, anten-
na, etc. which are attached to thevehicle by means of a magnet.They affect the operation of thecompass.
2. If the compass deviates from the correct indication soon after
repeated adjustment, we recom-mend that the system be checked by an authorized HYUNDAI dealer.
3. The compass may not indicate the correct compass point in tun-nels or while driving up or down a steep hill.
(The compass returns to the cor-rect compass point when thevehicle moves to an area wherethe geomagnetism is stabilized.)
4. When cleaning the mirror, use a paper towel or similar material
dampened with glass cleaner. Do not spray glass cleaner directlyon the mirror as that may causethe liquid cleaner to enter the mir-
ror housing.
EL(FL) Eng 4A.QXP 7/11/2013 11:32 AM Page 42
Page 1011 of 1534
35
Safety features of your vehicle
Front seat
Manual adjustment
Forward and backward
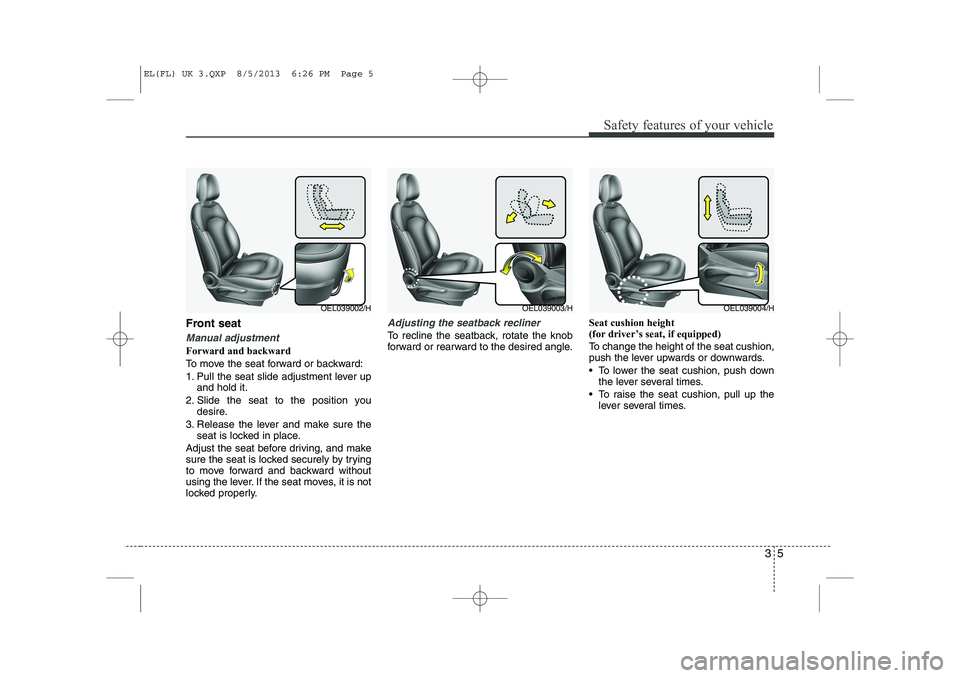
To move the seat forward or backward:
1. Pull the seat slide adjustment lever upand hold it.
2. Slide the seat to the position you desire.
3. Release the lever and make sure the seat is locked in place.
Adjust the seat before driving, and make
sure the seat is locked securely by trying
to move forward and backward without
using the lever. If the seat moves, it is not
locked properly.
Adjusting the seatback recliner
To recline the seatback, rotate the knob
forward or rearward to the desired angle. Seat cushion height
(for driver’s seat, if equipped)
To change the height of the seat cushion,
push the lever upwards or downwards.
To lower the seat cushion, push down
the lever several times.
To raise the seat cushion, pull up the lever several times.
OEL039002/HOEL039003/HOEL039004/H
EL(FL) UK 3.QXP 8/5/2013 6:26 PM Page 5
Page 1110 of 1534
439
Features of your vehicle
Inside rearview mirror
Adjust the rearview mirror to centre on
the view through the rear window. Make
this adjustment before you start driving.
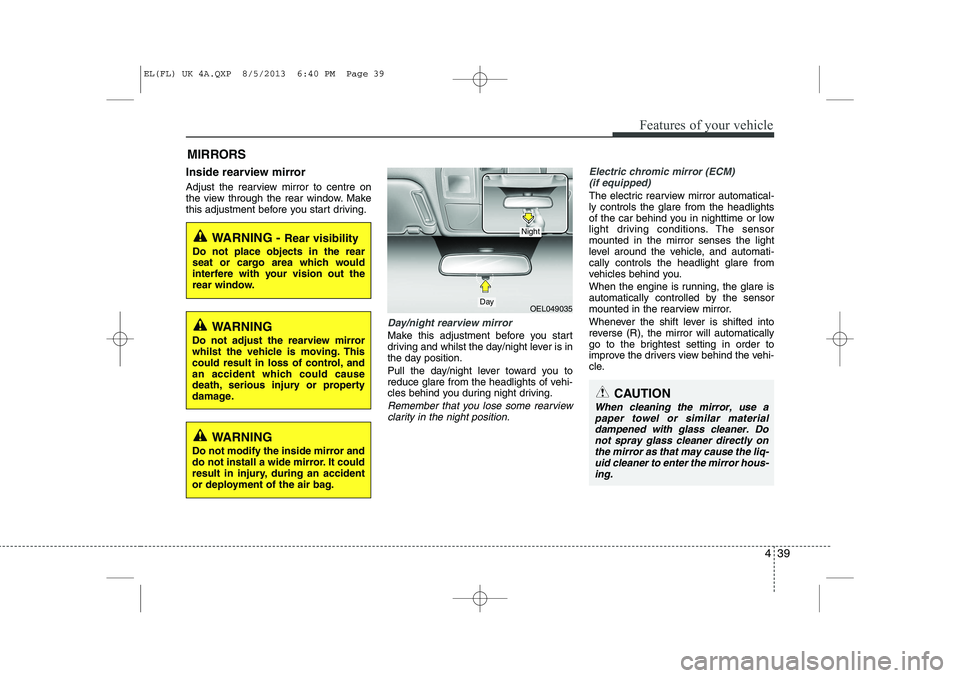
Day/night rearview mirror
Make this adjustment before you start
driving and whilst the day/night lever is in
the day position.
Pull the day/night lever toward you to
reduce glare from the headlights of vehi-
cles behind you during night driving.
Remember that you lose some rearviewclarity in the night position.
Electric chromic mirror (ECM) (if equipped)
The electric rearview mirror automatical- ly controls the glare from the headlights
of the car behind you in nighttime or low
light driving conditions. The sensormounted in the mirror senses the light
level around the vehicle, and automati-cally controls the headlight glare from
vehicles behind you.
When the engine is running, the glare is
automatically controlled by the sensor
mounted in the rearview mirror.
Whenever the shift lever is shifted into
reverse (R), the mirror will automatically
go to the brightest setting in order to
improve the drivers view behind the vehi-
cle.
MIRRORS
WARNING -
Rear visibility
Do not place objects in the rear
seat or cargo area which would
interfere with your vision out the
rear window.
OEL049035
CAUTION
When cleaning the mirror, use a paper towel or similar materialdampened with glass cleaner. Do not spray glass cleaner directly on
the mirror as that may cause the liq- uid cleaner to enter the mirror hous-ing.
Day
Night
WARNING
Do not adjust the rearview mirror
whilst the vehicle is moving. This
could result in loss of control, and
an accident which could cause
death, serious injury or property
damage.
WARNING
Do not modify the inside mirror and
do not install a wide mirror. It could
result in injury, during an accident
or deployment of the air bag.
EL(FL) UK 4A.QXP 8/5/2013 6:40 PM Page 39
Page 1113 of 1534
Features of your vehicle
42
4
3. Setting the compass zone
1. Find your current location and vari-
ance zone number on the zone map.
2. Press and hold the button for more than 6 but less than 9 seconds. The
current zone number will appear in the
display.
3. Press the button until the new zone number appears in the display. After
you stop pressing the button in, the
display will show a compass direction
within a few seconds. 4. Changing Mirror Angle setting
(if equipped):
Due to mirror positions being angled
towards the driver, the compass mirror
can also compensate for drivers seated
on the Left Hand side of the vehicle
(steering wheel on the LH side of the
vehicle) or Right Hand side of the vehicle
(steering wheel on the RH side of the
vehicle).
To adjust the Left Hand, “L” or Right
Hand, “R”, setting:
1. Press and hold the button for more than 12 seconds.
2. Release then press the button to tog- gle between “L” and “R”.
✽✽ NOTICE
This procedure also causes the compass to be de-calibrated.
3. To re-calibrate the compass, drive the vehicle in 2 complete circles at less than 5mph (8km/h).
CAUTION
1. Do not install the ski rack, anten-
na, etc. which are attached to thevehicle by means of a magnet. They affect the operation of thecompass.
2. If the compass deviates from the correct indication soon afterrepeated adjustment, we recom- mend that the system be checked
by an authorized HYUNDAI delaer.
3. The compass may not indicate the correct compass point in tun-nels or whilst driving up or down
a steep hill.
(The compass returns to the cor-rect compass point when thevehicle moves to an area where the geomagnetism is stabilized.)
4. When cleaning the mirror, use a paper towel or similar materialdampened with glass cleaner. Donot spray glass cleaner directly on the mirror as that may cause
the liquid cleaner to enter the mir- ror housing.
EL(FL) UK 4A.QXP 8/5/2013 6:40 PM Page 42