radiator cap HYUNDAI IX35 2014 Owners Manual
[x] Cancel search | Manufacturer: HYUNDAI, Model Year: 2014, Model line: IX35, Model: HYUNDAI IX35 2014Pages: 1534, PDF Size: 39.76 MB
Page 12 of 1534
Your vehicle at a glance
4
2
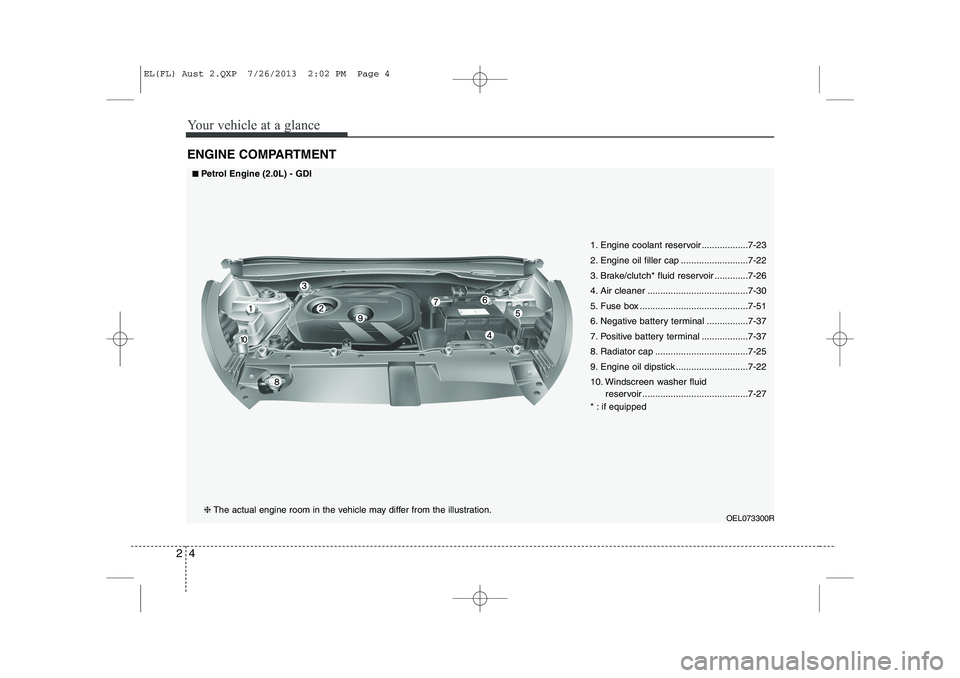
ENGINE COMPARTMENT
OEL073300R
1. Engine coolant reservoir ..................7-23
2. Engine oil filler cap ..........................7-22
3. Brake/clutch* fluid reservoir .............7-26
4. Air cleaner .......................................7-30
5. Fuse box ..........................................7-51
6. Negative battery terminal ................7-37
7. Positive battery terminal ..................7-37
8. Radiator cap ....................................7-25
9. Engine oil dipstick ............................7-22
10. Windscreen washer fluid
reservoir .........................................7-27
* : if equipped
■■Petrol Engine (2.0L) - GDI
❈ The actual engine room in the vehicle may differ from the illustration.
EL(FL) Aust 2.QXP 7/26/2013 2:02 PM Page 4
Page 13 of 1534
25
Your vehicle at a glance
OEL079002R
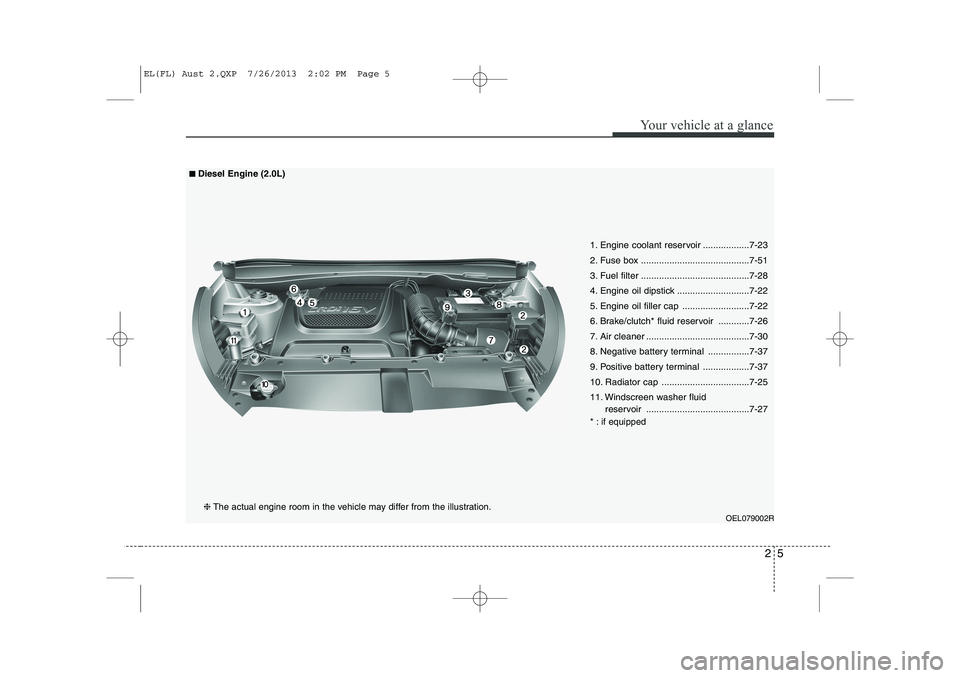
1. Engine coolant reservoir ..................7-23
2. Fuse box ..........................................7-51
3. Fuel filter ..........................................7-28
4. Engine oil dipstick ............................7-22
5. Engine oil filler cap ..........................7-22
6. Brake/clutch* fluid reservoir ............7-26
7. Air cleaner ........................................7-30
8. Negative battery terminal ................7-37
9. Positive battery terminal ..................7-37
10. Radiator cap ..................................7-25
11. Windscreen washer fluid reservoir ........................................7-27
* : if equipped
■■Diesel Engine (2.0L)
❈ The actual engine room in the vehicle may differ from the illustration.
EL(FL) Aust 2.QXP 7/26/2013 2:02 PM Page 5
Page 99 of 1534
427
Features of your vehicle
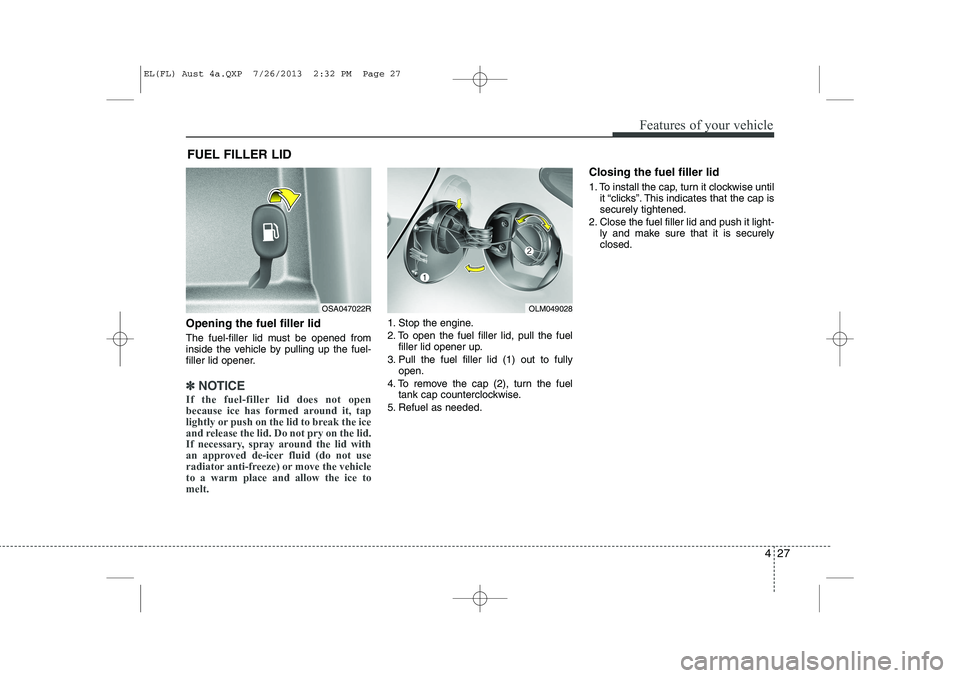
Opening the fuel filler lid
The fuel-filler lid must be opened from
inside the vehicle by pulling up the fuel-
filler lid opener.
✽✽NOTICE
If the fuel-filler lid does not open
because ice has formed around it, tap
lightly or push on the lid to break the ice
and release the lid. Do not pry on the lid.
If necessary, spray around the lid with
an approved de-icer fluid (do not use
radiator anti-freeze) or move the vehicleto a warm place and allow the ice tomelt.
1. Stop the engine.
2. To open the fuel filler lid, pull the fuel filler lid opener up.
3. Pull the fuel filler lid (1) out to fully open.
4. To remove the cap (2), turn the fuel tank cap counterclockwise.
5. Refuel as needed. Closing the fuel filler lid
1. To install the cap, turn it clockwise until
it “clicks”. This indicates that the cap is securely tightened.
2. Close the fuel filler lid and push it light- ly and make sure that it is securelyclosed.
FUEL FILLER LID
OLM049028OSA047022R
EL(FL) Aust 4a.QXP 7/26/2013 2:32 PM Page 27
Page 121 of 1534
449
Features of your vehicle
The tachometer pointer may move slight-
ly when the ignition switch is in ACC or
ON position with the engine OFF. This
movement is normal and will not affect
the accuracy of the tachometer once the
engine is running.
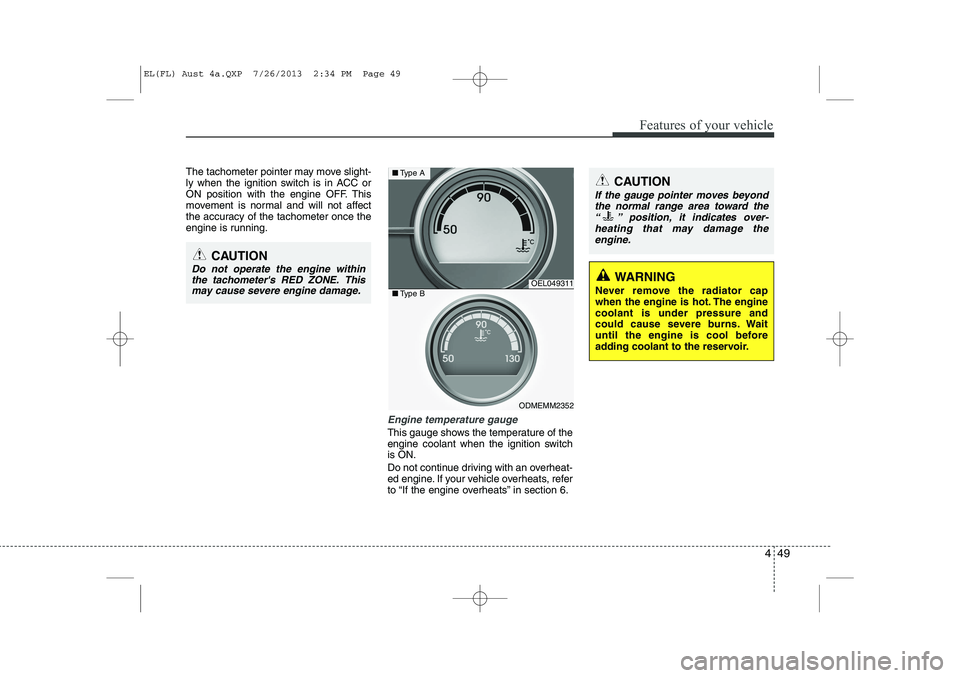
Engine temperature gauge
This gauge shows the temperature of the
engine coolant when the ignition switchis ON.
Do not continue driving with an overheat-
ed engine. If your vehicle overheats, refer
to “If the engine overheats” in section 6.
CAUTION
Do not operate the engine withinthe tachometer's RED ZONE. This may cause severe engine damage.
OEL049311
ODMEMM2352
■ Type A
■Type B
CAUTION
If the gauge pointer moves beyond
the normal range area toward the
“ ” position, it indicates over- heating that may damage theengine.
WARNING
Never remove the radiator cap
when the engine is hot. The enginecoolant is under pressure and
could cause severe burns. Wait
until the engine is cool before
adding coolant to the reservoir.
EL(FL) Aust 4a.QXP 7/26/2013 2:34 PM Page 49
Page 283 of 1534
67
What to do in an emergency
IF THE ENGINE OVERHEATS
If your temperature gauge indicates over-
heating, you experience a loss of power,
or hear loud pinging or knocking, the
engine is probably too hot. If this hap-
pens, you should:
1. Pull off the road and stop as soon as it is safe to do so.
2. Place the shift lever in P (automatic transaxle) or neutral (manual
transaxle) and set the parking brake. If
the air conditioning is on, turn it off.
3. If engine coolant is running out under the vehicle or steam is coming out
from the bonnet, stop the engine. Donot open the bonnet until the coolant
has stopped running or the steaming
has stopped. If there is no visible loss
of engine coolant and no steam, leave
the engine running and check to be
sure the engine cooling fan is operat-
ing. If the fan is not running, turn the
engine off.
4. Check to see if the water pump drive belt is missing. If it is not missing,
check to see that it is tight. If the drive
belt seems to be satisfactory, check
for coolant leaking from the radiator,
hoses or under the vehicle. (If the air
conditioning had been in use, it is nor-
mal for cold water to be draining from
it when you stop). 5. If the water pump drive belt is broken
or engine coolant is leaking out, stop
the engine immediately and we recom-
mend that you call an authorised
HYUNDAI dealer. 6. If you cannot find the cause of the
overheating, wait until the engine tem-
perature has returned to normal. Then,if coolant has been lost, carefully add
coolant to the reservoir to bring the
fluid level in the reservoir up to the
halfway mark.
7. Proceed with caution, keeping alert for further signs of overheating. If over-
heating happens again, we recom-
mend that you call an authorised
HYUNDAI dealer.
CAUTION
Serious loss of coolant indicates
there is a leak in the cooling system
and we recommend that the system be checked by an authorisedHYUNDAI dealer.
WARNING
Whilst the engine is running, keep
hair, hands and clothing away from
moving parts such as the fan and
drive belts to prevent injury.
WARNING
Do not remove the radiator cap
when the engine is hot. This can
allow coolant to be blown out of the
opening and cause serious burns.
EL(FL) Aust 6.QXP 7/26/2013 2:11 PM Page 7
Page 297 of 1534
73
Maintenance
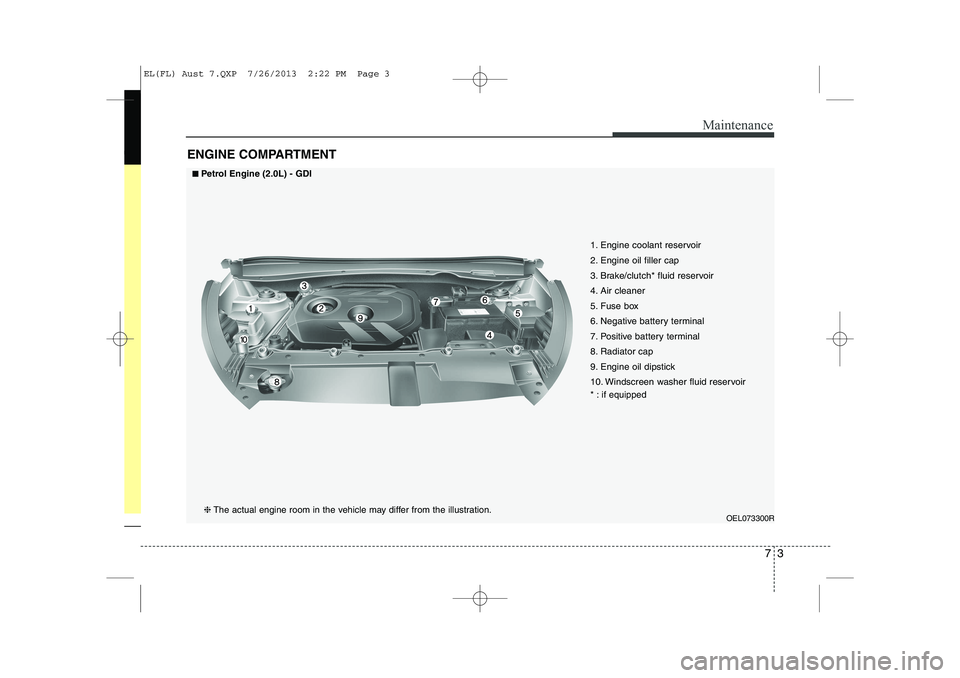
ENGINE COMPARTMENT
OEL073300R
1. Engine coolant reservoir
2. Engine oil filler cap
3. Brake/clutch* fluid reservoir
4. Air cleaner
5. Fuse box
6. Negative battery terminal
7. Positive battery terminal
8. Radiator cap
9. Engine oil dipstick
10. Windscreen washer fluid reservoir
* : if equipped
■■Petrol Engine (2.0L) - GDI
❈ The actual engine room in the vehicle may differ from the illustration.
EL(FL) Aust 7.QXP 7/26/2013 2:22 PM Page 3
Page 298 of 1534
Maintenance
4
7
OEL079002R
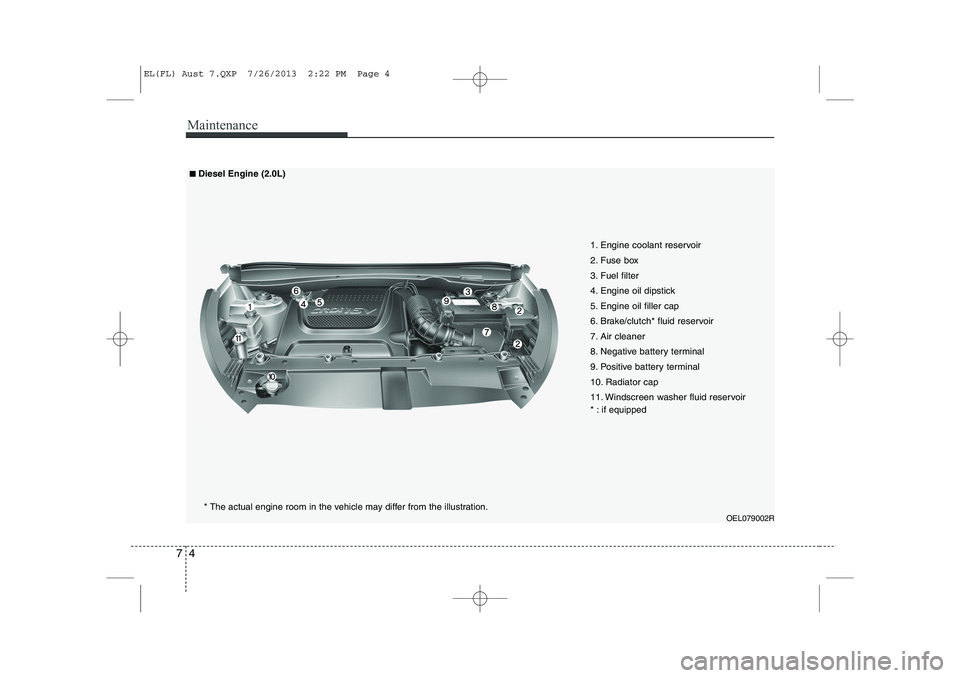
1. Engine coolant reservoir
2. Fuse box
3. Fuel filter
4. Engine oil dipstick
5. Engine oil filler cap
6. Brake/clutch* fluid reservoir
7. Air cleaner
8. Negative battery terminal
9. Positive battery terminal
10. Radiator cap
11. Windscreen washer fluid reservoir
* : if equipped
■■
Diesel Engine (2.0L)
* The actual engine room in the vehicle may differ from the illustration.
EL(FL) Aust 7.QXP 7/26/2013 2:22 PM Page 4
Page 314 of 1534
Maintenance
20
7
Vapour hose and fuel filler cap
The vapour hose and fuel filler cap
should be inspected at those intervals
specified in the maintenance schedule.
Make sure that a new vapour hose or fuelfiller cap is correctly replaced.
Vacuum crankcase ventilation hoses (if equipped)
Inspect the surface of hoses for evidence
of heat and/or mechanical damage. Hard
and brittle rubber, cracking, tears, cuts,
abrasions, and excessive swelling indi-
cate deterioration. Particular attention
should be paid to examine those hose
surfaces nearest to high heat sources,
such as the exhaust manifold. Inspect the hose routing to assure that the hoses do not come in contact with
any heat source, sharp edges or movingcomponent which might cause heat dam-
age or mechanical wear. Inspect all hose
connections, such as clamps and cou-
plings, to make sure they are secure, and
that no leaks are present. Hoses should
be replaced immediately if there is any
evidence of deterioration or damage. Air cleaner filter
We recommend that you use air cleaner
filter for replacement from an authorised
HYUNDAI dealer.
Spark plugs (for petrol engine)
Make sure to install new spark plugs of
the correct heat range. Cooling system
Check the cooling system parts, such as
radiator, coolant reservoir, hoses and
connections for leakage and damage.
Replace any damaged parts. Coolant The coolant should be changed at the
intervals specified in the maintenance
schedule.
Manual transaxle fluid (if equipped)
Inspect the manual transaxle fluid
according to the maintenance schedule.
Automatic transaxle fluid (if equipped)
Automatic transaxle fluid should not be
checked under normal usage conditions.
But in severe conditions, we recommend
that the fluid be changed by an autho-
rised HYUNDAI dealer in accordance tothe scheduled maintenance at the begin-
ning of this chapter.
✽✽
NOTICE
Automatic transaxle fluid colour is basi-
cally red. As the vehicle is driven, the automatic
transaxle fluid will begin to look darker.It is normal condition and you should
not judge the need to replace the fluid
based upon the changed colour.
EL(FL) Aust 7.QXP 7/26/2013 2:22 PM Page 20
Page 316 of 1534
Maintenance
22
7
ENGINE OIL
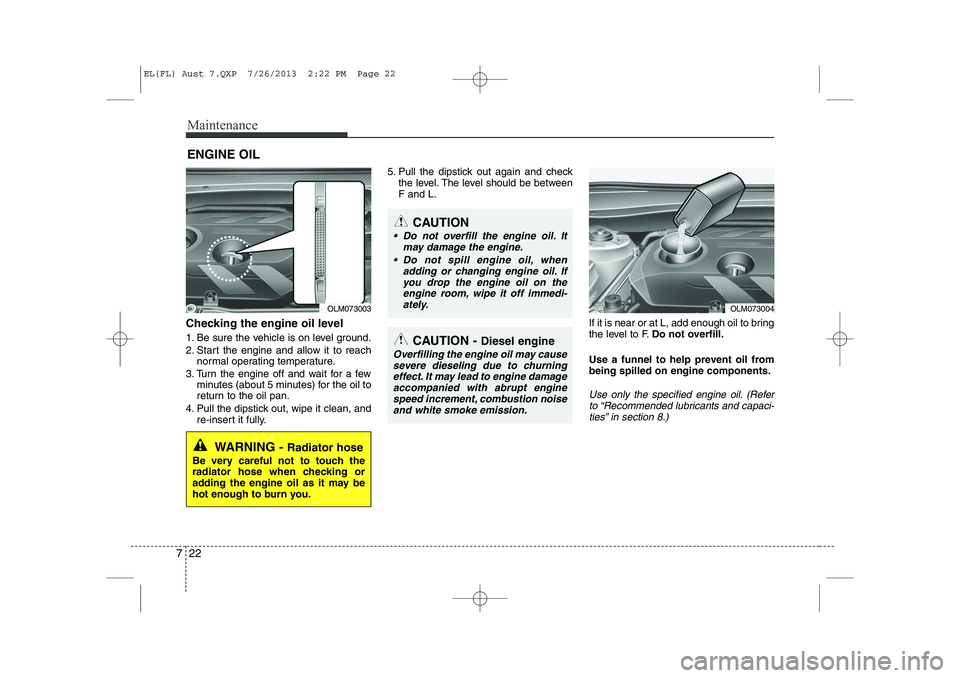
Checking the engine oil level
1. Be sure the vehicle is on level ground.
2. Start the engine and allow it to reach normal operating temperature.
3. Turn the engine off and wait for a few minutes (about 5 minutes) for the oil to
return to the oil pan.
4. Pull the dipstick out, wipe it clean, and re-insert it fully. 5. Pull the dipstick out again and check
the level. The level should be between F and L.
If it is near or at L, add enough oil to bring
the level to F.Do not overfill.
Use a funnel to help prevent oil frombeing spilled on engine components.
Use only the specified engine oil. (Refer to “Recommended lubricants and capaci-ties” in section 8.)
WARNING - Radiator hose
Be very careful not to touch the
radiator hose when checking or
adding the engine oil as it may be
hot enough to burn you.
OLM073003OLM073004
CAUTION - Diesel engine
Overfilling the engine oil may cause
severe dieseling due to churning effect. It may lead to engine damageaccompanied with abrupt engine speed increment, combustion noise
and white smoke emission.
CAUTION
Do not overfill the engine oil. It may damage the engine.
Do not spill engine oil, when adding or changing engine oil. If
you drop the engine oil on theengine room, wipe it off immedi- ately.
EL(FL) Aust 7.QXP 7/26/2013 2:22 PM Page 22
Page 317 of 1534
723
Maintenance
ENGINE COOLANT
Changing the engine oil and filter
We recommend that the engine oil and
filter be replaced by an authorised
HYUNDAI dealer. The high-pressure cooling system has a
reservoir filled with year-round antifreeze
coolant. The reservoir is filled at the fac-
tory.
Check the antifreeze protection and
coolant concentration level at least once
a year, at the beginning of the winter sea-
son, and before travelling to a colder cli-
mate.
Checking the coolant level
WARNING
Removing radiatorcap
Never attempt to remove the radi- ator cap whilst the engine is
operating or hot. Doing so mightlead to cooling system and
engine damage and could result
in serious personal injury fromescaping hot coolant or steam.
Turn the engine off and wait until it cools down. Use extreme care
when removing the radiator cap.
Wrap a thick towel around it, and
turn it counterclockwise slowly to
the first stop.
(Continued)
(Continued)Step back whilst the pressure is
released from the cooling sys-
tem. When you are sure all thepressure has been released,
press down on the cap, using a
thick towel, and continue turning
counterclockwise to remove it.
Even if the engine is not operat- ing, do not remove the radiatorcap or the drain plug whilst the
engine and radiator are hot. Hot
coolant and steam may still blow
out under pressure, causing seri-
ous injury.
WARNING
Used engine oil may cause irrita- tion or cancer of the skin if left in
contact with the skin for prolonged
periods of time. Used engine oil
contains chemicals that have
caused cancer in laboratory ani-
mals. Always protect your skin by
washing your hands thoroughlywith soap and warm water as soon
as possible after handling used oil.
EL(FL) Aust 7.QXP 7/26/2013 2:22 PM Page 23